The applications of computer vision continue to amaze. From detecting objects in a video, to counting the number of people in a crowd, there is no challenge that computer vision seemingly cannot overcome.
One of the more intriguing applications of computer vision is identifying pixels in a scene and using them for diverse and remarkably useful purposes. We will be taking up one such application in this article, and trying to understand how it works using Python!
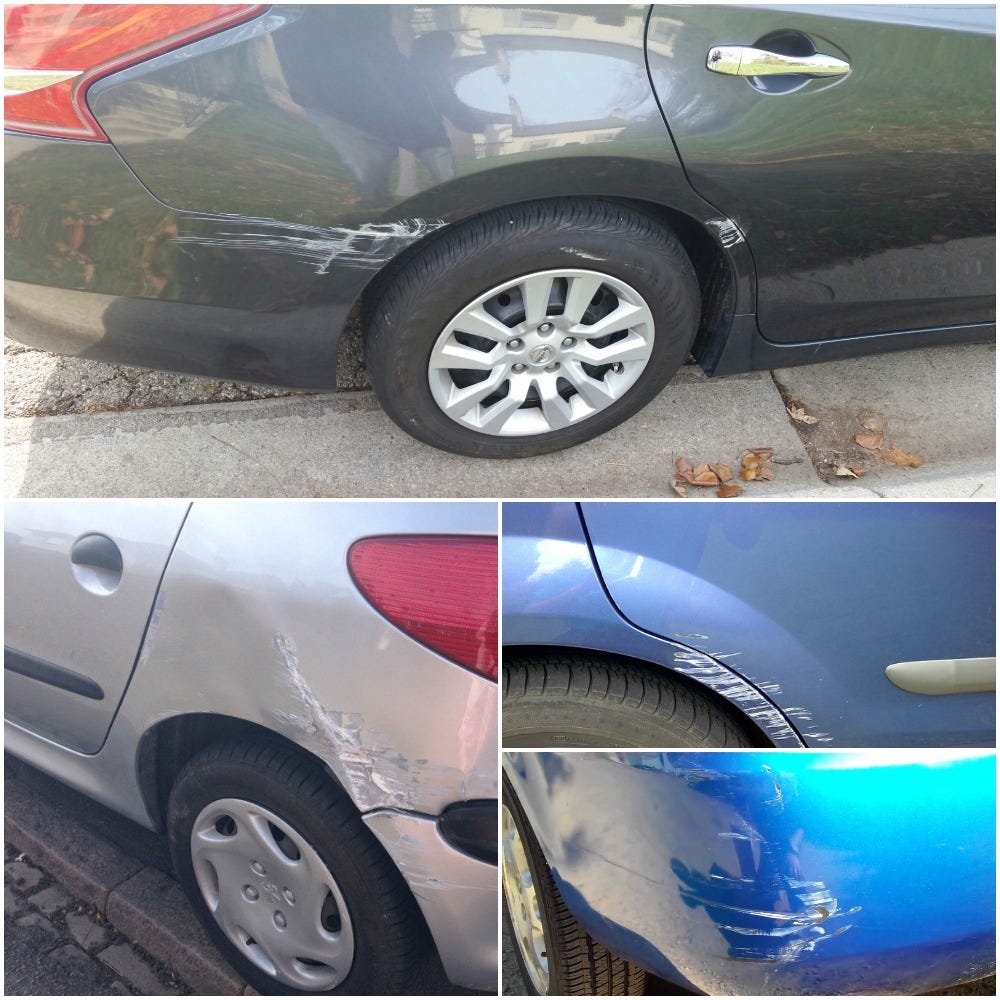
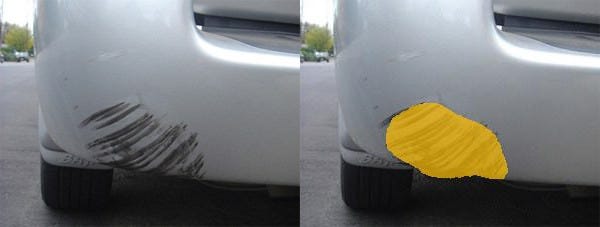
The aim of this post is to build a custom Mask R-CNN model that can detect the area of damage on a car (see the image example above). The rationale for such a model is that it can be used by insurance companies for faster processing of claims if users can upload pics and they can assess damage from them. This model can also be used by lenders if they are underwriting a car loan especially for a used car.
You can read an in-depth explanation of Mask R-CNN and how it works in more detail here.
How to build a Mask R-CNN for Car Damage Detection
Collecting Data
Annotating the Data
Training a Model
Validating the Model
Run the Model of Images and Make Predictions
What is Mask R-CNN?
Mask R-CNN is an instance segmentation model that allows us to identify pixel wise location for our class. “Instance segmentation” means segmenting individual objects within a scene, regardless of whether they are of the same type — i.e, identifying individual cars, persons, etc. Check out the below GIF of a Mask-RCNN model trained on the COCO dataset. As you can see, we can identify pixel locations for cars, persons, fruits, etc.
Mask R-CNN is different from classical object detection models like Faster R-CNN where, in addition to identifying the class and its bounding box location, it can also color pixels in the bounding box that correspond to that class. When do you think we would be need this additional detail? Some examples I can think of are:
Self-Driving Cars need to know the exact pixel location of the road; potentially of other cars as well to avoid collisions
Robots may need pixel location of objects that they want to pick up (Amazon’s drones comes to mind here)
The easiest way to try a Mask R-CNN model built on COCO classes is to use the Tensorflow Object Detection API. You can refer to this article (written by me) that has information on how to use the API and run the model on YouTube videos.
How Mask R-CNN works
Before we build a Mask R-CNN model, let’s first understand how it actually works.
A good way to think about Mask R-CNN is that it is a combination of a Faster R-CNN that does object detection (class + bounding box) and FCN (Fully Convolutional Network) that does pixel wise boundary. See figure below:
Mask RCNN is a combination of Faster RCNN and FCN
Mask R-CNN is conceptually simple: Faster R-CNN has two outputs for each candidate object, a class label and a bounding-box offset; to this we add a third branch that outputs the object mask — which is a binary mask that indicates the pixels where the object is in the bounding box. But the additional mask output is distinct from the class and box outputs, requiring extraction of much finer spatial layout of an object. To do this Mask R-CNN uses the Fully Convolution Network (FCN) described below.
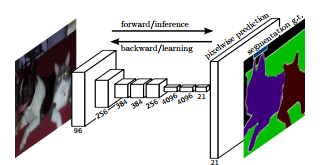
FCN is a popular algorithm for doing semantic segmentation. This model uses various blocks of convolution and max pool layers to first decompress an image to 1/32th of its original size. It then makes a class prediction at this level of granularity. Finally it uses up sampling and deconvolution layers to resize the image to its original dimensions.
So, in short, we can say that Mask R-CNN combines the two networks — Faster R-CNN and FCN in one mega architecture. The loss function for the model is the total loss in doing classification, generating bounding box and generating the mask.
Mask RCNN has a couple of additional improvements that make it much more accurate than FCN. You can read more about them in their paper.
How to build a Mask R-CNN Model for Car Damage Detection
For building a custom Mask R-CNN, we will leverage the Matterport Github repository. The latest TensorFlow Object Detection repository also provides the option to build Mask R-CNN. However I would only recommend this for the strong-hearted! The versions of TensorFlow, object detection, format for mask, etc. can demand debugging of errors. I was able to successfully train a Mask R-CNN using it.
But I have seen many people struggle with all kinds of errors. So I now highly recommend the Matterport Mask R-CNN repository to anyone venturing into this domain.
Collecting Data
For this exercise, I collected 66 images (50 train and 16 validation) of damaged cars from Google. Check out some examples below.
Annotating the Data
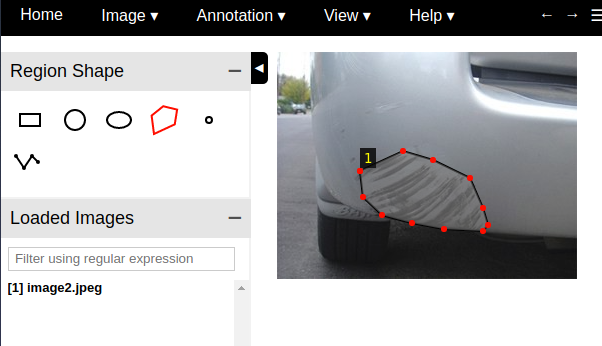
A Mask R-CNN model requires the user to annotate the images and identify the region of damage. The annotation tool I used is the VGG Image Annotator — v 1.0.6. You can use the html version available at this link. Using this tool you can create a polygon mask as shown below:
Once you have created all the annotations, you can download the annotation and save it in a json format. You can look at my images and annotations on my repository here.
Training a model
Now we start the interesting work of actually training the model! Start by cloning the ‘Matterport Mask R-CNN’ repository— https://github.com/matterport/Mask_RCNN.
Next we will load our images and annotations.
class CustomDataset(utils.Dataset):

def load_custom(self, dataset_dir, subset):
"""Load a subset of the Balloon dataset.
dataset_dir: Root directory of the dataset.
subset: Subset to load: train or val
"""
# Add classes. We have only one class to add.
self.add_class("damage", 1, "damage")

# Train or validation dataset?
assert subset in ["train", "val"]
dataset_dir = os.path.join(dataset_dir, subset)

# We mostly care about the x and y coordinates of each region
annotations1 = json.load(open(os.path.join(dataset_dir, "via_region_data.json")))
annotations = list(annotations1.values()) # don't need the dict keys

# The VIA tool saves images in the JSON even if they don't have any
# annotations. Skip unannotated images.
annotations = [a for a in annotations if a['regions']]

# Add images
for a in annotations:
# Get the x, y coordinaets of points of the polygons that make up
# the outline of each object instance. There are stores in the
# shape_attributes (see json format above)
polygons = [r['shape_attributes'] for r in a['regions'].values()]

# load_mask() needs the image size to convert polygons to masks.
image_path = os.path.join(dataset_dir, a['filename'])
image = skimage.io.imread(image_path)
height, width = image.shape[:2]

self.add_image(
"damage", ## for a single class just add the name here
image_id=a['filename'], # use file name as a unique image id
path=image_path,
width=width, height=height,
polygons=polygons)
I have used the balloon.py file shared by Matterport and modified it to create a custom code that loads images and annotations and adds them to a CustomDataset class. Check out the entire code here. Follow the same code block and update it for any specifics for your class. Please note that this code only works for one class.
Further, you can use this notebook to visualize the mask on the given images. See an example of this below:
To train the model, we use the COCO trained model as the checkpoint to perform transfer learning. You can download this model from the Matterport repository as well.
To train the model, run the below code block:
## Train a new model starting from pre-trained COCO weights
python3 custom.py train --dataset=/path/to/datasetfolder --weights=coco

## Resume training a model that you had trained earlier
python3 custom.py train --dataset=/path/to/datasetfolder --weights=last
I am using a GPU and trained the model for 10 epochs in 20–30 minutes.
Validate your model
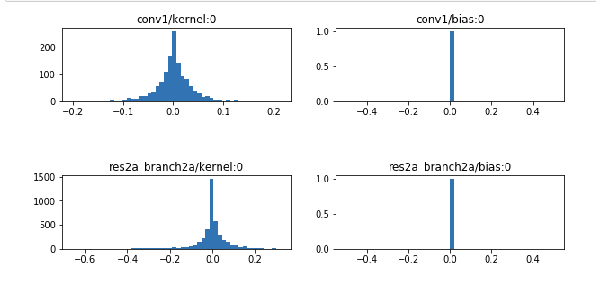
You can inspect the model weights using the notebook — Inspect Custom Weights. Please link your last checkpoint in this notebook. This notebook can help you perform a sanity check if your weights and biases are properly distributed. See a sample output below:
Run model on images and make predictions
Use the notebook inspect_custom_model to run model on images from test/val set and see model predictions. See a sample result below:
And there you have it! You just built a Mask R-CNN model to detect damage on a car. What an awesome way to learn deep learning.
End Notes
Mask-RCNN is the next evolution of object detection models which allow detection with better precision. A big thanks to Matterport for making their repository public and allowing us to leverage it to build custom models. This is just a small example of what we can accomplish with this wonderful model.
If you have any questions, or feedback for me on this article, please share it using the comments section below.
Priya Dwivedi – President, Deep Learning Analytical Solutions
Priya Dwivedi is a graduate of IIT Delhi. She has 10+ years experience working as a data scientist. She currently runs her own deep learning analytics consultancy (http://www.deeplearninganalytics.org/) that works with businesses to build and implement deep learning models for them. Please reach out to her at [email protected] if you would like to collaborate with her on a project.
that's a cool application Priya.
Thanks for sharing that, I'll need some time to digest all of that.
Srikanth
19 Jul, 2018
Helllo Priya,
The post is really cool. I am trying to just draw a bounding box over the damaged area and possibly try to crop it out from the image and also name the part of the car it is. Is this possible ? I am actually trying to build a system that can quantitatively tell out how much a car is damaged from the provided image and also the parts that are damaged. Please do suggest me a good way to do it. Possibly any reference links available too.
Thank you
Karan Purohit
23 Jul, 2018
Thanks for the nice blog!
I ran your model. so after training when I run inspect_custom_model notebook it gives error:
OSError: Unable to open file (unable to open file: name = 'mask_rcnn_damage_0010.h5', errno = 2, error message = 'No such file or directory', flags = 0, o_flags = 0)
I cant find saved weights file.
sset
04 Aug, 2018
Thanks for article.
Execution of detection or prediction on unseen dataset yields no bounding mask. However if I take sample from train/validation set for some images bounds are detected. What could be reason - is it overfitting or lack of training samples or anchors needs to be adjusted?
Pitter
05 Aug, 2018
Helllo Priya,
The post is really cool.
Thanks for the nice blog
What is the difference between cnn and rcnn and mask rcnn for given problem
Sruti Bhattacharjee
13 Aug, 2018
Hey ,
can you help me personally with this project? actually i am dealing with same with my own dataset for 4 months. It will be really helpful for me if you can tell me through email. thanks.
cc
18 Oct, 2018
hello
nice results..
do you know how to run evaluation in balloon.py like coco.py?
thanks
Dinesh 92x
16 Jan, 2019
Very helpful and nice article..
..
But one question..
Why validation data have JSON file. It is for the testing not for training.? right..
Ram
21 Jan, 2019
Perhaps you can understand easily if you start from CNN, R-CNN, Fast R-CNN, Faster R-CNN as Mask R-CNN is Faster R-CNN+FCN
Pls go through below blog post covering them
https://www.analyticsvidhya.com/blog/2018/10/a-step-by-step-introduction-to-the-basic-object-detection-algorithms-part-1/
Somesh Sunariwal
02 Feb, 2019
please make a video of this full article so understandability of concepts is easy...
And please provide a YouTube link
This article is very Helpfull for me.
Thank you
PK
02 Mar, 2019
Hi, This is a great example and thanks for working and sharing this. Can I run the model against a streaming video (of damaged car images stitched into an .mp4, for example) so that the damages get marked (ie. boxed) instantly - something similar to the 2nd video image you have shown above in this article. I'm thinking there should be a way to store/convert the model into a .pb and label.pbtxt and use that to do this live detection ? Any help on this would be greatly appreciated. Thanks again !
saisriteja
10 Mar, 2019
Hello Priya,
The post is really good.
I tried to train with my custom data.
I dont have a GPU to train this...
I dont know how to work with collabs and kaggle.....can anyone help me with this....
rama subba reddy
19 Oct, 2022
can we have different classes like dent ,scracth and other classes to classify accordingly..
A verification link has been sent to your email id
If you have not recieved the link please goto
Sign Up page again
Loading...
Please enter the OTP that is sent to your registered email id
Loading...
Please enter the OTP that is sent to your email id
Loading...
Please enter your registered email id
This email id is not registered with us. Please enter your registered email id.
Don't have an account yet?Register here
Loading...
Please enter the OTP that is sent your registered email id
Loading...
Please create the new password here
We use cookies on Analytics Vidhya websites to deliver our services, analyze web traffic, and improve your experience on the site. By using Analytics Vidhya, you agree to our Privacy Policy and Terms of Use.Accept
Privacy & Cookies Policy
Privacy Overview
This website uses cookies to improve your experience while you navigate through the website. Out of these, the cookies that are categorized as necessary are stored on your browser as they are essential for the working of basic functionalities of the website. We also use third-party cookies that help us analyze and understand how you use this website. These cookies will be stored in your browser only with your consent. You also have the option to opt-out of these cookies. But opting out of some of these cookies may affect your browsing experience.
Necessary cookies are absolutely essential for the website to function properly. This category only includes cookies that ensures basic functionalities and security features of the website. These cookies do not store any personal information.
Any cookies that may not be particularly necessary for the website to function and is used specifically to collect user personal data via analytics, ads, other embedded contents are termed as non-necessary cookies. It is mandatory to procure user consent prior to running these cookies on your website.


 Priya Dwivedi – President, Deep Learning Analytical Solutions


that's a cool application Priya. Thanks for sharing that, I'll need some time to digest all of that.
Helllo Priya, The post is really cool. I am trying to just draw a bounding box over the damaged area and possibly try to crop it out from the image and also name the part of the car it is. Is this possible ? I am actually trying to build a system that can quantitatively tell out how much a car is damaged from the provided image and also the parts that are damaged. Please do suggest me a good way to do it. Possibly any reference links available too. Thank you
Thanks for the nice blog! I ran your model. so after training when I run inspect_custom_model notebook it gives error: OSError: Unable to open file (unable to open file: name = 'mask_rcnn_damage_0010.h5', errno = 2, error message = 'No such file or directory', flags = 0, o_flags = 0) I cant find saved weights file.
Thanks for article. Execution of detection or prediction on unseen dataset yields no bounding mask. However if I take sample from train/validation set for some images bounds are detected. What could be reason - is it overfitting or lack of training samples or anchors needs to be adjusted?
Helllo Priya, The post is really cool. Thanks for the nice blog What is the difference between cnn and rcnn and mask rcnn for given problem
Hey , can you help me personally with this project? actually i am dealing with same with my own dataset for 4 months. It will be really helpful for me if you can tell me through email. thanks.
hello nice results.. do you know how to run evaluation in balloon.py like coco.py? thanks
Very helpful and nice article.. .. But one question.. Why validation data have JSON file. It is for the testing not for training.? right..
Perhaps you can understand easily if you start from CNN, R-CNN, Fast R-CNN, Faster R-CNN as Mask R-CNN is Faster R-CNN+FCN Pls go through below blog post covering them https://www.analyticsvidhya.com/blog/2018/10/a-step-by-step-introduction-to-the-basic-object-detection-algorithms-part-1/
please make a video of this full article so understandability of concepts is easy... And please provide a YouTube link This article is very Helpfull for me. Thank you
Hi, This is a great example and thanks for working and sharing this. Can I run the model against a streaming video (of damaged car images stitched into an .mp4, for example) so that the damages get marked (ie. boxed) instantly - something similar to the 2nd video image you have shown above in this article. I'm thinking there should be a way to store/convert the model into a .pb and label.pbtxt and use that to do this live detection ? Any help on this would be greatly appreciated. Thanks again !
Hello Priya, The post is really good. I tried to train with my custom data. I dont have a GPU to train this... I dont know how to work with collabs and kaggle.....can anyone help me with this....
can we have different classes like dent ,scracth and other classes to classify accordingly..