Introduction to Apple’s Core ML 3 – Build Deep Learning Models for the iPhone (with code)
Overview
- Apple’s Core ML 3 is a perfect segway for developers and programmers to get into the AI ecosystem
- You can build machine learning and deep learning models for the iPhone using Core ML 3
- We’ll build a brand new application for the iPhone in this article!
Introduction
Imagine the ability to build amazing applications by using State-of-the-Art machine learning models without having to know in-depth machine learning. Welcome to Apple’s Core ML 3!
Are you an avid Apple fan? Do you use the iPhone? Ever wondered how Apple uses machine learning and deep learning to power its applications and software?
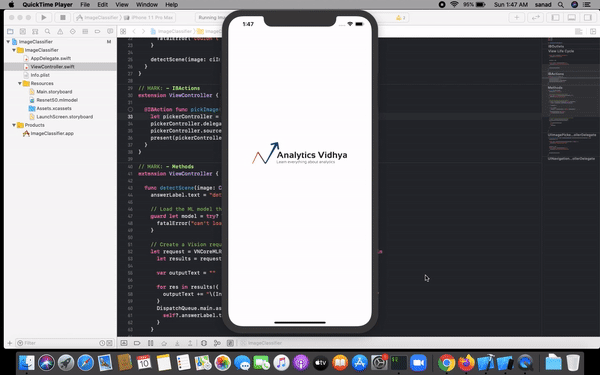
If you answered yes to any of these questions – you’re in for a treat! Because in this article, we will be building an application for the iPhone using deep learning and Apple’s Core ML 3. Here’s a quick look at the app:
Software developers, programmers, and even data scientists love Apple’s AI ecosystem. They’ve come up with some amazing developments in recent years, including Core ML and a personal favorite of mine – the Swift programming language.
Core ML 3 is the framework that powers cool features of the iPhone like FaceID, Animoji, and Augmented Reality. It has come a long way since Core ML was launched in 2017 and now supports a plethora of tools that can help us build great machine learning-based applications quickly.
In this article, we will explore the entire AI ecosystem that powers Apple’s apps and how can you use Core ML 3’s rich ecosystem of cutting edge pre-trained, deep learning models.
Note: A basic knowledge of Core ML is required to understand the concepts we’ll cover. I suggest reading this article to quickly get up to speed.
Table of Contents
- Apple’s AI Ecosystem
- Enter Core ML 3
- What’s new in Core ML 3?
- Build an Image Classification App for iPhone using ResNet50
- Analytics Vidhya’s take on Core ML
Apple’s AI Ecosystem
Apple has done a great job at building tools and frameworks that leverage machine learning. There are numerous options to build AI apps, each with their own pros and cons. Here is a high-level overview of Apple’s AI ecosystem:
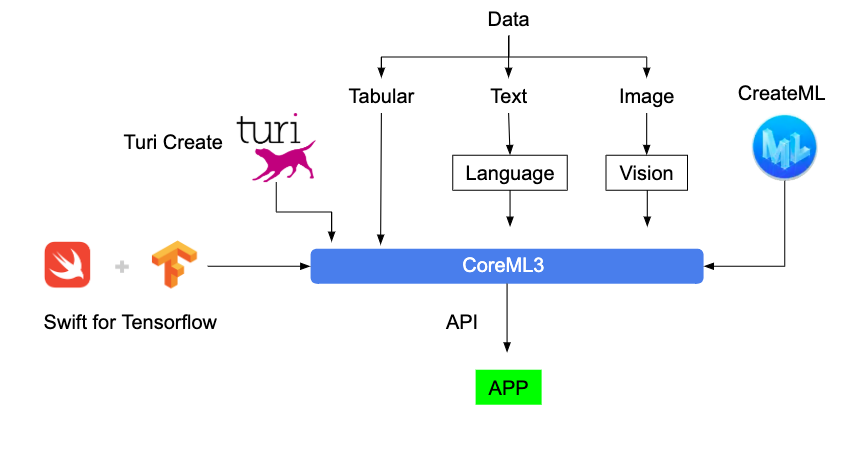
Let’s learn a bit about each tool or framework.
1) Turi Create
This should be your go-to framework if you want to add recommendations, object detection, image classification, image similarity or activity classification to your app.
You don’t need to be an expert in machine learning to use this tool. Why? Because it already has defined models for each task.
What I like about Turi Create is that we can work with it in Python just like our regular workflow. And when we are satisfied with our model, just import it into Core ML for use in iOS, macOS, watchOS, and tvOS apps!
Here are some tasks Turi Create supports right out of the box:

2) CreateML
Create ML enables us to build machine learning models without writing much code.
What I love about this tool is that you can just drag and drop your training data and select the kind of model you want (speech recognition, object detection etc.) and it will automatically start training the model!
Here is an example of training a cat vs dog image classifier:
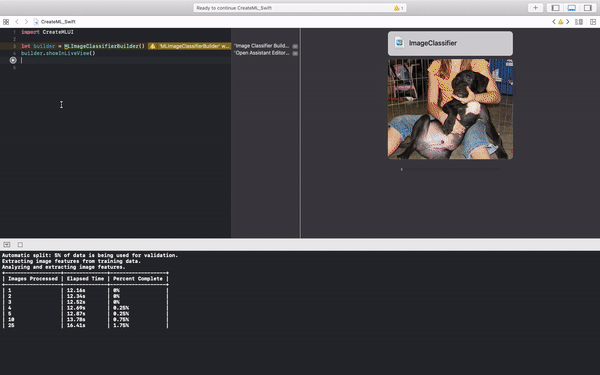
Notice that I have written only two lines of code and dragged and dropped the training data folder – the rest is taken care of by CreateML!
While Turi Create works in Python, we can use CreateML to build on the Mac. And yes, it supports training on a GPU (yay!).
3) Swift for TensorFlow
Swift for TensorFlow has a flexible, high performing TensorFlow/PyTorch like API to build complex Neural Network architectures.
The most fascinating thing about this framework is that its code is as readable as Python’s. Here is the same model code in both Swift and Python (notice the similarity):

Use Swift for TensorFlow when you require high performance from your models and want to deploy them effectively. You can learn how to build Deep Learning models using Swift for TensorFlow in this article.
4) Language and Vision Frameworks
These are Apple’s counterparts for Python’s spaCy and OpenCV frameworks, but with added functionality. These frameworks let us create end-to-end pipelines for performing image processing and text processing, among other things.
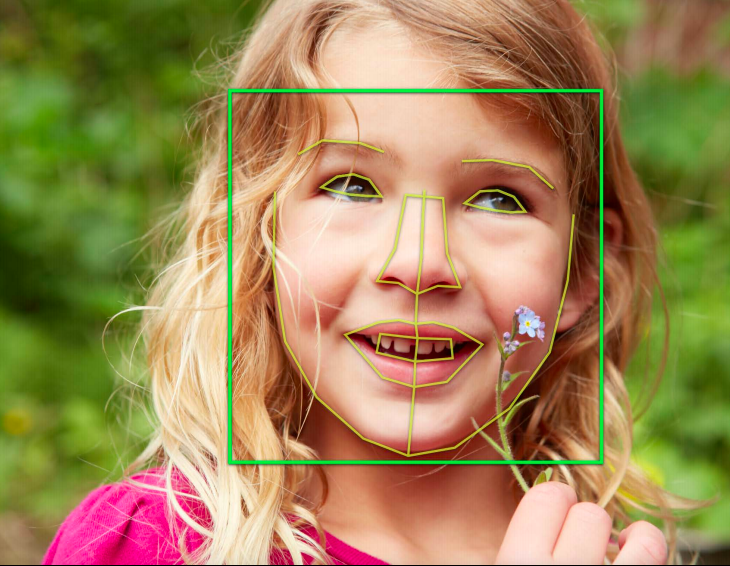
If you want to perform image analysis tasks like face or landmark detection, text detection, barcode recognition, image registration, and general feature tracking, then Vision is for you.
Similarly, if you want to perform tasks like language and script identification, tokenization, lemmatization, parts-of-speech tagging, and named entity recognition, then Language is going to be of use.

Apart from these two, Apple also supports frameworks for working with speech data (and they easily work with CoreML). I will be covering each of these tools in upcoming articles. For now, let’s go to the show stopper – Core ML 3!
Enter Core ML 3
I love Apple’s Core ML 3 framework. It not only enables the tools we saw above but also supports a few features of its own.
First, CoreML3 lets us import trained machine learning or deep learning models from all the major Python frameworks:
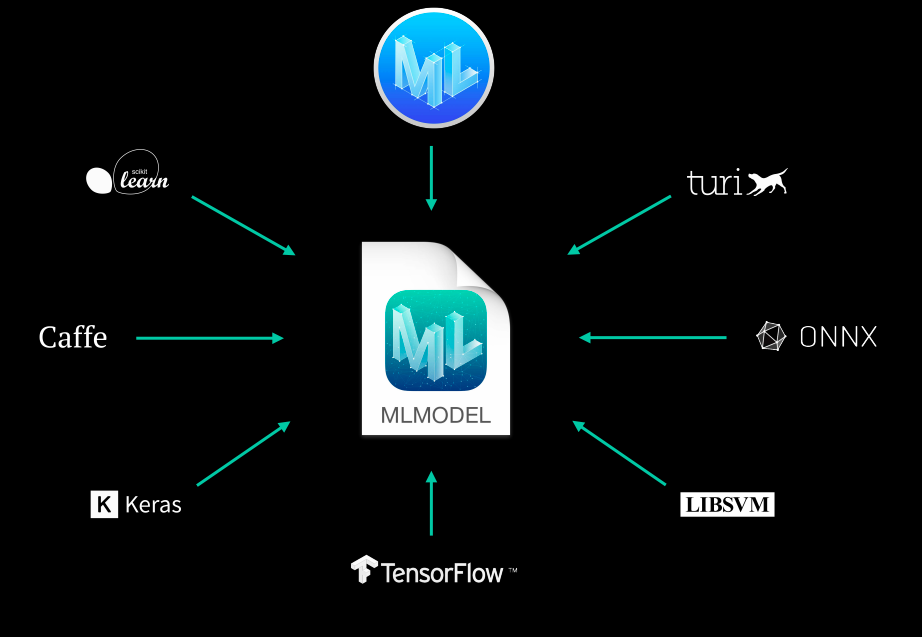
We have covered this feature of Core ML 3 in a previous article which I linked above. Here, we will see another interesting feature of Core ML 3 – how we can utilize the plethora of bleeding-edge pre-trained models that CoreML3 now supports!
Below is this list of models that Core ML 3 supports. Note that some of them (like Squeezenet, DeeplabV3, YOLOv3) are so recent that they would have come out just months ago:

All these models are actually optimized to provide the best performance on mobile, tablets and computers. That’s the great thing about Apple.
That means even though many of these are complex deep learning-based models, we don’t have to worry much about performance while deploying and using them in our apps- How cool is that?
Core ML 3 – What’s Changed?
Did you watch this year’s WWDC conference? There were a few interesting announcements about Core ML 3 and the support that Apple devices will have for this framework. Here’s a quick summary in case you missed it.
1) On-device training
This is by far the greatest highlight for Core ML 3. So far, we only had the support of “on-device inference”. This basically means we train our model on some other machine and then utilize the trained model to make predictions in real-time on the device itself. This led to better user experience because we were not dependent on the internet to get predictions.
Core ML 3 now supports on-device training too! You get access to the iPhone’s CPU, GPU and Neural Engine to train your machine learning and deep learning models.
You can consider Core ML 3 training as a form of transfer learning or online learning, where you only tweak an existing model.
Take Face ID for example. It needs to keep its model up-to-date when the user’s face changes over time (growing a beard, wearing different makeup, getting older, etc.). The basic idea is to initially have a generic model that gives an average performance for everyone, and then make a copy that is customized for each user.
And then over time, this model will become really good for that particular user:

This has multiple benefits:
- The training will happen on the user’s personal device which means high data privacy for the user
- We don’t need to set up huge servers to facilitate model training for millions of app users
- Because the internet is not involved, the models will always be available for prediction!
2) New types of Neural Network layers have been added in Core ML 3

Apart from having layers for different model types, Core ML 3 also features 100+ layers for intermediate operations like Masking, Tensor Manipulation, Boolean logic, Control Flow, among others.
Some of these layer types are used in State-of-the-Art neural network architectures and Core ML 3 already supports them for us.
That simply means we can easily build such models right away for our apps.
Feel free to watch the whole WWDC video if you’re interested in the entire package. For the purposes of this article, we have covered the core basics of Core ML 3. It’s now time to build an iPhone application!
Build an Image Classification App for the iPhone
Before we start building our app, we need to install a couple of things.
System Setup
- macOS: I’m using macOS Catalina (10.15.1)
- Xcode: This is the default software used to build apps for Apple devices. You can download it from the App Store present on your Mac. I’m using version 11.2
- Project: You can download the base code of the project from GitHub using the below command in your terminal:
git clone https://github.com/mohdsanadzakirizvi/CoreML3-Resnet50.git
Note:
- For this article, you need a macOS machine else you will not be able to implement the project
- Any application developed for an Apple device is programmed in Swift
- You don’t need to learn Swift for this tutorial. But if it catches your interest, you can learn it here
Building our deep learning model
Once you download the project, you will see that there are two folders:

The complete version is the fully functional version of the app that you can run by just importing the ResNet50 model. The practice version has missing code that you can use to follow along with this article.
Run the below command to open the project in Xcode:
open ImageClassifier.xcodeproj

I have highlighted three main regions in the Xcode window:
- The play button that is visible on the top left is used to start the app on the simulator
- If you look below the play button, there are files and folders of our project. This is called the project navigator. It helps us navigate between files and folder of our project
- Next to the play button, iPhone 11 Pro Max is written. This denotes the target device you want to test your simulator for
Let’s first run our app and see what happens. Click on the play button on the top left and that will run the simulator.
What do you see?

For now, our app doesn’t do much. It just shows an image and a button to select other images – let’s make it better!
If you open the practice version, you will find the following folder structure:

In the project navigator pane, select ViewController.swift. This is the file that contains much of the code that controls the functionality of our app. Here’s what you will see:
Now that you have made yourself familiar with Xcode and the project code files, let’s move to the next stage.
Adding a pre-trained model into our app
Head to the official Core ML 3 website to download pre-trained models directly:
https://developer.apple.com/machine-learning/models/
In the image section, you will find the ResNet50 model:
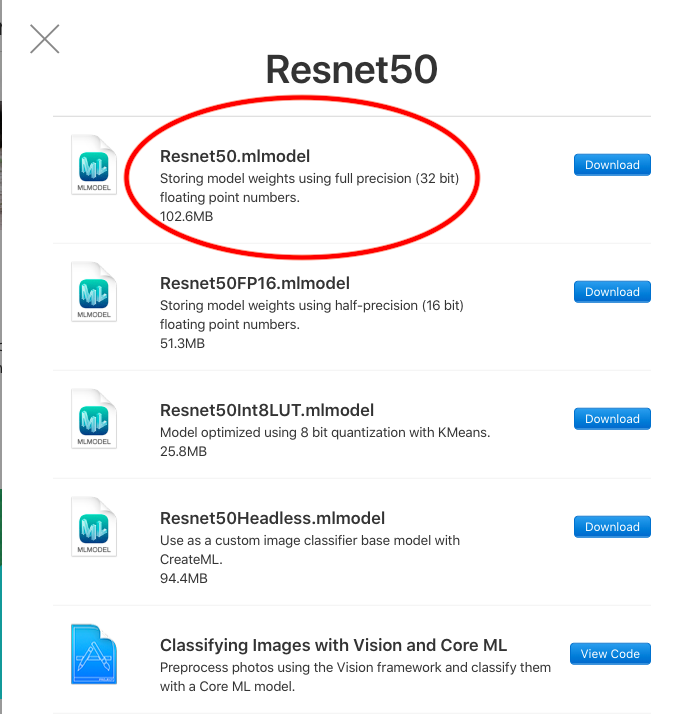
You can download any version you want. The bigger the size, the more accurate the model will be. Similarly, the smaller the size, the faster the model will be.
- Drag your Resnet50.mlmodel file into the Xcode window in the project navigator pane
- A window will pop up with some options. Let the default options be and click “Finish”
- When we drag a file like this into Xcode, it automatically creates references to the file in the project. This way we can easily access that file in our code
Here is the whole process for reference:

Making the first prediction
In order to make our first prediction, we need to load the ResNet50 model that we just downloaded. Then, take an image, convert it to the format the model expects and make the prediction.
Write the following code below the IBActions (line 33) in the ViewController.swift file:
The above code basically takes in a new image, preprocesses it according to the format ResNet50 expects, and passes it into the network for prediction.
The most important lines of code are these:
 // Load the ML model through its generated class
guard let model = try? VNCoreMLModel(for: Resnet50().model) else {
fatalError("can't load Places ML model")
}
It’s here that we set the model name. If you want to work with frameworks like BERT or YOLO, you just need to make changes in the model name and the rest of your app will work smoothly.
Now, we need to call this function imageClassify() to get predictions on an image. Add the below piece of code to the end of viewDidLoad() (line 19):
Now if you run the app, you will see that it has started making predictions on the scenery picture that shows when the app starts:

Copy the same code in imagePickerController() (line 87) and then the app will be able to make the same predictions for any image you choose.
This is what the final version of the app looks like:
Congratulations – you just built your very first AI app for the iPhone!
Analytics Vidhya’s Take on Core ML 3
Apple has certainly made it easy to create impressive apps using all the latest AI research for image, speech, and text. You can start right away without having much knowledge of these models and learn and explore on the way.
I love the fact that the industry is taking AI seriously and they want to make it very accessible to a broader audience.
I encourage you to explore further and try the latest models like BERT and create even more interesting apps. If anything, you can try SqueezeNet and MobileNet on the same app that we made here and see how different models are performing on the same images.
All the code used in this article is available on Github. You can leave your questions, suggestions, and feedback in the comments section below.
A computer science graduate, I have previously worked as a Research Assistant at the University of Southern California(USC-ICT) where I employed NLP and ML to make better virtual STEM mentors. My research interests include using AI and its allied fields of NLP and Computer Vision for tackling real-world problems.


Is the relearning and image classification app available in the AppStore?
Good article. Typo in the code, should be imageClassify rather than classifyImage.
Thanks for pointing out :), have rectified it!
very clearly and super useful - thank you
Hi Mohd, Thanks for the gtreat article. Very information. On another not, my interest is in building AI models to sample audio stream, and process it to classify the music. I have it on my PC where the inputs are music clips. would like to make a realtime mobile app on IOS or android. Any suggestions of resources that could help in this project? Thansk srikar
CoreML3 does have some support for Audio Classification, you can start from there and dig deeper.
Do you have any references regarding YOLO? I am trying to get my YOLO weights into a swift project and cannot find any documentation on the subject. Thanks!
Hi Brittney, I think the documentation of CoreML3 is on point for this: https://developer.apple.com/machine-learning/models/ They even have an example for it: https://developer.apple.com/documentation/vision/recognizing_objects_in_live_capture