How to Deploy Machine Learning Models using Flask (with Code!)
Introduction
I remember my early days in the machine learning space. I loved working on multiple problems and was intrigued by the various stages of a machine learning project. Like so many others before me, I was enthralled by the model building aspect of the entire lifecycle.
I spoke to domain experts. the project managers, and everyone concerned to ensure their inputs were being included in the model. But then I hit a roadblock – how in the world should I get my model to my clients? I can’t send them a Jupyter notebook!
Everything I had studied or been taught had focused on the model building components. Not a lot of people talk about deploying your machine learning model. What does putting your model into production mean? What does it entail?

These are crucial career-defining questions that every data scientist needs to answer. That’s why I decided to pen down this tutorial to demonstrate how you can use Flask to deploy your machine learning models.
We’ll first understand the concept of model deployment, then we’ll talk about what Flask is, how to install it, and finally, we’ll dive into a problem statement learn how to deploy machine learning models using Flask.
Overview
- Deploying your machine learning model is a key aspect of every ML project
- Learn how to use Flask to deploy a machine learning model into production
- Model deployment is a core topic in data scientist interviews – so start learning!
Table of contents
- Introduction
- What is Model Deployment?
- What is Flask?
- Installing Flask on your Machine
- Understanding the Problem Statement
- First, Let’s Build our Machine Learning Model
- Setup the Twitter API
- Create the Webpage
- Connect the Webpage with the Model
- Working of the Deployed Model
- Frequently Asked Questions
- End Notes
What is Model Deployment?
In a typical machine learning and deep learning project, we usually start by defining the problem statement followed by data collection and preparation, understanding of the data, and model building, right?
But, in the end, we want our model to be available for the end-users so that they can make use of it. Model Deployment is one of the last stages of any machine learning project and can be a little tricky. How do you get your machine learning model to your client/stakeholder? What are the different things you need to take care of when putting your model into production? And how can you even begin to deploy a model?
Here comes the role of Flask.
What is Flask?
Flask is a web application framework written in Python. It has multiple modules that make it easier for a web developer to write applications without having to worry about the details like protocol management, thread management, etc.
Flask gives is a variety of choices for developing web applications and it gives us the necessary tools and libraries that allow us to build a web application.

In this tutorial, we will lean on the resourcefulness of Flask to help us deploy our own machine learning model. You’ll love working with Flask!
Installing Flask on your Machine
Installing Flask is simple and straightforward. Here, I am assuming you already have Python 3 and pip installed. To install Flask, you need to run the following command:
sudo apt-get install python3-flask
That’s it! You’re all set to dive into the problem statement take one step closer to deploying your machine learning model.
Understanding the Problem Statement
We’ll work with a Twitter dataset in this section. Our aim is to detect hate speech in Tweets. For the sake of simplicity, we say a Tweet contains hate speech if it has a racist or sexist sentiment associated with it.
We will create a web page that will contain a text box like this (users will be able to search for any text):

For any searched query, we will scrape tweets related to that text in real-time and for all those scraped tweets we will use the hate-speech detection model to classify the racist and sexist tweets.
How to Deploy Machine Learning Model using Flask?
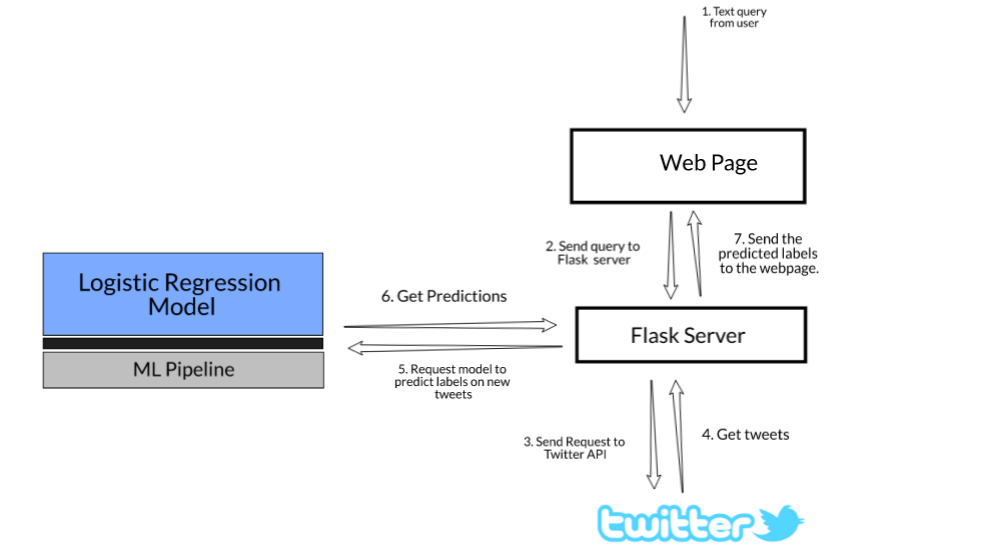
Here are the steps for setting up the project workflow to deploy a machine learning model. This model deployment is an example to detect hate speeches in tweets.
- Model Building
We will build a Logistic Regression Model pipeline to classify whether the tweet contains hate speech or not. Here, our focus will not be on how to build a very accurate classification model but to see how to deploy that model using Flask
- Setup Twitter App
We will create a Twitter app on the Twitter developer’s website and get the authentication keys. We will write a Python script to scrape the tweets related to a particular text query
- Webpage template
Here, we will design a user interface where the user can submit his query
- Get the Tweets
Once we get the query from the user, we will use the twitter API to get the tweets related to the searched query
- Predict class and send results
Next, use the saved model to predict the class of the tweets and send the results back to the webpage
Here’s a diagrammatic representation of the steps we just saw:
First, Let’s Build our Machine Learning Model
We have data about Tweets in a CSV file mapped to a label. We will use a logistic regression model to predict whether the tweet contains hate speech or not.
You can download the complete code and dataset here.
Let’s start by importing some of the required libraries:
Next, we will read the dataset and view the top rows:

The dataset has 31,962 rows and 3 columns:
- id: Unique number for each row
- label: For the normal tweet, it will be 0 and for the racist or sexist tweet, it will be 1. There are 29,720 zeros and 2,242 one’s
- tweet: Tweet posted on Twitter
Now, we will divide the data into train and test using the scikit-learn train_test_split function. We will take only 20 percent of the data for testing purposes. We will stratify the data on the label column so that the distribution of the target label will be the same in both train and test data:
Now, we will create a TF-IDF vector of the tweet column using the TfidfVectorizer and we will pass the parameter lowercase as True so that it will first convert text to lowercase. We will also keep max features as 1000 and pass the predefined list of stop words present in the scikit-learn library.
First, create the object of the TFidfVectorizer, build your model and fit the model with the training data tweets:
Use the model and transform the train and test data tweets:
Now, we will create an object of the Logistic Regression model.
Remember – our focus is not on building a very accurate classification model but instead to see how we can deploy this predictive model to get the results. You can refer to this article – “Comprehensive Hands-on Guide to Twitter Sentiment Analysis” – to build a more accurate and robust text classification model.
Try out the above code in the live coding window below!!
Let’s define the steps of the pipeline:
- Step 1: Create a TF-IDF vector of the tweet text with 1000 features as defined above
- Step 2: Use a logistic regression model to predict the target labels
When we use the fit() function with a pipeline object, both steps are executed. Post the model training process, we use the predict() function that uses the trained model to generate the predictions.
Read more about sci-kit learn pipelines in this comprehensive article: Build your first Machine Learning pipeline using scikit-learn!
Now, we will test the pipeline with a sample tweet:
We have successfully built the machine learning pipeline and we will save this pipeline object using the dump function in the joblib library. You just need to pass the pipeline object and the file name:
It will create a file name “text_classification.joblib“. Now, we will open another Python file and use the load function of the joblib library to load the pipeline model.
Let’s see how to use the saved model:
Setup the Twitter API
The first thing we need to do is get the API key, API secret key, access token, and access token secret from the Twitter developer website. These keys will help the API for authentication. First, go to this page and fill the form.

Once you fill the form successfully you will get the keys.

Install tweepy
Now, we will install tweepy which is a Python library that lets us access the Twitter API.
!pip3 install tweepy
Import the required libraries and add the authentication keys that you received from Twitter. Tweepy tries to make authentication as painless as possible for you.
To begin the process, you need to make the instance of OAuthHandler and pass the API key and API secret key. Then authenticate the instance with the access token and access token secret.
Next, we will define a function “get_related_tweets” that will take the parameter text_query and return 50 tweets related to that particular text query. We will use the search API to get the results from Twitter.
Some of the parameters of the Search API are:
- q – the search query string of 500 characters maximum
- geocode – Returns tweets by users located within a given radius of the given latitude/longitude
- lang – Restricts tweets to the given language, given by an ISO 639-1 code
- result_type – Specifies what type of search results you would prefer to receive. The current default is “mixed.” Valid values include:
- mixed: include both popular and real-time results in the response
- recent: return only the most recent results in the response
- popular: return only the most popular results in the response
- count – The number of results to try and retrieve per page. The maximum you can request at a time is 100 tweets
- max_id – Returns only statuses with an ID less than (that is, older than) or equal to the specified ID. Using this you can automate to get a large number of unique tweets
We will request 50 tweets with the time at which the tweet created, tweet id, and tweet text for the given text query and the function will return a dataframe of all the tweets:
Create the Webpage
Here, we will create a webpage that will look something like this:

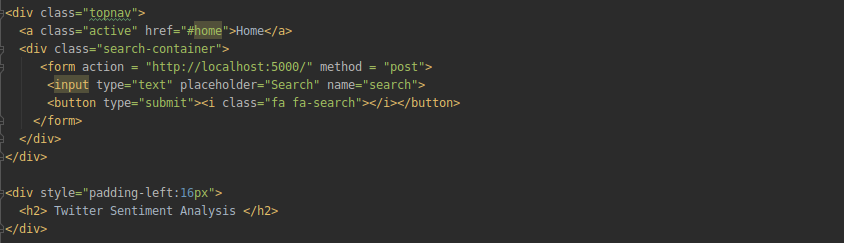
It will have a text box in which a user can type the text query and click on the search button to get the results for the searched text query.
We need to add the form tag to collect the data in the search container, and in the form tag, we will pass the method post and name as “search”. By providing the method, our backend code would be able to know that we have received some data with the name “search” and at the backend, we need to process that data and send some data.
This is only a part of the HTML file. You can download the complete code and other files related to this project here.
Connect the Webpage with the Model
We are done with the frontend part and now we will connect the webpage with the model. The first step would be to load the saved pipeline model and we will define a function requestResults which will get the tweets for the requested query and use the pipeline on it to get the labels and return the final results to send.
Now, first of all, create an object of the Flask class that will take the name of the current module __name__ as an argument. The route function will tell the Flask application which URL to render next on the webpage.
When the Flask server is run, then the Flask application will route to the default URL path and call the home function and it will render the home.html file.
Now, whenever someone sends a text query, Flask will detect a post method and call the get_data function where we will get the form data with the name search and then redirect to the success function.
Finally, the success function will use the requestResults function to get the data and send it back to the webpage.
Now, call the run function to start the Flask server:
app.run(debug=True)

Working of the Deployed Model
We have successfully started the Flask server! Open your browser and go to this address – http://127.0.0.1:5000/. You will see that the Flask server has rendered the default template. Now search for any query, like iplt20:

The Flask server will receive the data and request for new tweets related to iplt20 and use the model to predict the labels and return the results.

Awesome! Here, out of 50 tweets, our model has predicted 3 tweets that contain hate speech. We can add more functionalities, such as to request tweets from a particular country and compare the results of multiple countries on the same topic.
Frequently Asked Questions
A. To integrate Flask with an ML model, you typically load the trained model in your Flask application. Then, you define routes and views to handle requests, preprocess input data, and pass it to the model for predictions. Finally, you return the model’s predictions as a response to the client.
A. To deploy a Flask project, you typically follow these steps:
1. Choose a hosting provider (e.g., Heroku, AWS).
2. Set up a server or container environment.
3. Install Flask and necessary dependencies.
4. Configure the server settings and environment variables.
5. Deploy your Flask application to the server or container.
6. Test the deployment and ensure it’s accessible.
End Notes
And that is how you can perform model deployment using Flask! Deploying your machine learning model might sound like a complex and heavy task but once you have an idea of what it is and how it works, you are halfway there.
How to deploy models is a hot topic in data science interviews so I encourage you to read up and practice as much as you can. And if you want to share your own experience with the community, we would love to hear from you!


Lakshay -appreciate a real step by step approach to ML model deployment using flask. I am unable to create the twitter developer account . Is there an alternative
Hi. Any insights on the memory footprint of the deployed model? How much memory consumed dirong fit/predict methods? Of special interest is predict since, it's the one will be called for the most at production.
Hi Lakshay Thanks for the great tutorial! I have a question - Each time we do pipeline.predict() is the model getting trained all over again? Or is the trained model saved in the .joblib file?
Thank you very much for the tutorial, its really good and simple
Thanks for the great tutorial! Just some notes about changes to the code. Tweepy v4.0.0 was released and renamed API.search to API.search_tweets. Also, running the Flask app now requires users to upgrade their Twitter Developer profile from 'Essential' to 'Elevated' in order to properly access the API for this project. Great job, looking forward to reading more of your projects!