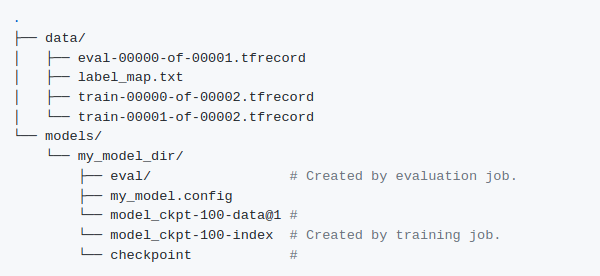
Detailed steps from training a detector on a custom dataset to inferencing on jetson nano board or cloud using TensorFlow 1.15
Complete code available on GitHub
★ The tutorial for TensorFlow Object Detection API V2 is available as a jupyter notebook
★ The tutorial for TensorFlow Object Detection API V1 is available as a jupyter notebook
Some common difficulties include
* finding the compatible TensorFlow (and associated cuda) version with the Object Detection API library
* converting custom data to tf-record format
* getting confused between the process-flow with TF 1.0 and TF 2.0
* manually updating the model config file for training
* running the training process and resolving issues with config file
* exporting models from one format to another for inferencing
* getting mixed up with different model format types — checkpoints, frozen graphs, saved_model (“.pb”), tensorRT inference graphs, etc
* running inference on trained models
* converting the trained model to quantized formats for deployment on boards such as Jetson Nano
* tensorRT version and cuda compute capability mismatch between building engine and deployment engine
And this list is never-ending….
Using it, developers and researchers can easily
★ push custom datasets for training using TF
★ configure model files with all the parameters using pythonic API
★ select between TF1.0 and TF 2.0 based on which network to use and cuda version availability
★ train, export, optimize, infer on your own datasets
★ optimize models using TensorRT and export it to cloud servers or embedded boards such as Jetson Nano
TRADITIONAL PROCESS FLOW — A brief overview
Mentioned below is the process usually involved in training and deploying a custom detector using TF. Along with describing the process flow highlighted are the issues that one faces while making everything work; also mentioned are the differences in both TF 1.0 and 2.0 versions of the Object Detection library
Process A: TensorFlow compatibility with Object Detection installations
* To work with Object Detection 2.0, use TensorFlow 2.3.0. Versions 2.0.0 and 2.1.0 usually result in errors with “tensorflow_core.keras.utils”. Version 2.2.0 leads to errors while training with “CollectiveAllReduceExtended” module.
* When working with TensorFlow 2.3.0, Cuda 10.1 is required.
* To work with Object Detection 1.0, use TensorFlow version 1.15.0 or 1.15.2.
* When working with TensorFlow 1.15, Cuda 10.0 is required.
* There are still certain errors with TFLite conversion (will be dealt in upcoming blogs)
* TensorFlow provides dataset tools to convert data to acceptable TF Records format
* But these examples are only for most-used datasets such as COCO, Pascal VOC, OpenImages, Pets-Dataset, etc. User is required to reformat and arrange their dataset as per the formats of COCO, VOC, OID, etc, based on the example notebook chosen
* Another way is to update the example codes in order to ingest the custom dataset, which is itself a tough process
★ To enable easy loading of the custom dataset, we modified the examples and added further parsers to support multiple data annotations types and directly convert it to TF-Records.
Process C: Updating configurations and starting the training process
* After the re-arrangement, training can be started. Again training for TF 1.0 and TF 2.0 models are different.
★ With Monk Object Detection we have added pythonic functions to update configuration files and removed the need to have a rigid folder structure for the workspace. The training process for both the TF versions is almost the same as Monk’s wrapper.
* Both the object detection APIs provide trained models in checkpoint (“.ckpt”) format.
* For inference in TF 1.0 usually a frozen graph format is used.
* For inference in TF 2.0 usually a saved model format is used.
* Procedure for converting the models differs in both the APIs and is usually tough to figure out, especially for beginners
★ To ease up the process we added parsers for both keeping the outer wrapper format the same, meaning, using both TF 1.0 API and TF 2.0 API is quite similar.
Process E: Model optimization for TensorRT inference
* Exported models are finally converted to optimized versions using TensorRT.
* Supported optimizations include Floating Point 32 bits and 16 bits(FP32, FP16) and Integer 8-bit (INT8) quantizations.
* Quantization process for converting an exported model from TF 1.0 and TF 2.0 are quite different.
* TensorRT has further issues with versions. Meaning, a model optimized with TensorRT version 5.1.5 cannot run on a deployment machine with TensorRT version 5.1.6. One very specific issue comes with Object Detection 1.0 which uses TensorFlow 1.15.0. This TensorFlow comes with tensorRT 5.1.5 and no such version is available in Jetpacks.
* Another issue with TensorRT is the cuda compute capability. Meaning, a model optimized on a GPU with compute capability version 7.0 ( a V100 Nvidia GPU) cannot run on a GPU with compute capability 5.3 (a jetson nano board) unless proper measures are taken.
★ This blog clarifies all the doubts with training and optimizing object detection models
Process F: Setting up everything on the Jetson Nano board
* Since both the APIs require different TensorFlow versions the installation processes differ, with jetpack versions, cuda versions, with TF 1.0 requiring further attention when it comes to tensorRT version.
Lets’s take up each object detection API module one at a time starting with Version 1.0
Complete Code for TensorFlow Object Detection API 1.0 is available as a jupyter notebook
Process A: Installation on the development machine
Libraries to be installed
* Pre-reqs: numpy, scipy, pandas, pillow, OpenCV-python
* TensorFlow-GPU V1.15.0 with TensorRT 5.1.5; if deployment on Nano board is not required
* TensorFlow-GPU V1.15.2 with TensorRT 6.0.1; if deployment on Nano board is required
* TF Object Detection API 1.0 using Monk Object Detection Toolkit
(Make sure CUDA 10.0 and CUDNN 7 is installed with NVidia Driver on the system)
When the model is to be deployed on Jetson Nano Board configure your development (training) machine as per the instructions below
# Go to https://developer.nvidia.com/tensorrt
# Download
# - nv-tensorrt-repo-ubuntu1804-cuda10.0-trt6.0.1.5-ga-20190913_1-1_amd64.deb (For Ubuntu18.04)
# - nv-tensorrt-repo-ubuntu1604-cuda10.0-trt6.0.1.5-ga-20190913_1-1_amd64.deb (For Ubuntu16.04)

# Run the following commands to install trt (in a terminal)

$ sudo dpkg -i nv-tensorrt-repo-ubuntu1804-cuda10.0-trt6.0.1.5-ga-20190913_1-1_amd64.deb
$ sudo apt-key add <key value will be mentioned as the output of previous command>
$ sudo apt-get update
$ sudo apt-get install tensorrt
$ sudo apt-get install uff-converter-tf
$ sudo apt-get install python3-libnvinfer-dev
* Install Bazel 0.26.1 and clone TensorFlow from GitHub
# Install bazel version 0.26.1
# Download bazel deb package from https://github.com/bazelbuild/bazel/releases/tag/0.26.1

$ sudo dpkg -i bazel_0.26.1-linux-x86_64.deb

# Clone Tensorflow and switch to tensorflow 1.15.2

$ git clone https://github.com/tensorflow/tensorflow.git
$ cd tensorflow
$ git checkout v1.15.2
* Configure TensorFlow
# Configure tensorflow

$ ./configure

    - Do you wish to build TensorFlow with XLA JIT support? [Y/n]: Y

    - Do you wish to build TensorFlow with OpenCL SYCL support? [y/N]: N

    - Do you wish to build TensorFlow with ROCm support? [y/N]: N

    - Do you wish to build TensorFlow with CUDA support? [y/N]: Y

    - Do you wish to build TensorFlow with TensorRT support? [y/N]: Y

    - And press enter (set default) for all other config questions asked by the setup
* Build and install TensorFlow (This takes up around 5 hours on AWS P3.2x instance)
# Build tensorflow using bazel

$ bazel build --config=opt --config=cuda //tensorflow/tools/pip_package:build_pip_package


# Once built create a wheel file for python installation and run pip installer

$ bazel-bin/tensorflow/tools/pip_package/build_pip_package tensorflow_pkg

$ cd tensorflow_pkg && pip install tensorflow*.whl
* Finally build Object Detection API 1.0
# Compile Object Detection API v1

$ cd Monk_Object_Detection/12_tf_obj_1/installation

$ chmod +x install_cuda10_tensorrt6_part2.sh && ./install_cuda10_tensorrt6_part2.sh
When the model is to not to be deployed on Jetson Nano Board configure your development (training) machine as per the instructions below
* Install all necessary libraries and compile Object Detection API 1.0
* Install TensorRT 5.1.5 as prebuilt TensorFlow 1.15.0 supports that
# Go to https://developer.nvidia.com/tensorrt
# Download
# - nv-tensorrt-repo-ubuntu1804-cuda10.0-trt5.1.5.0-ga-20190427_1-1_amd64.deb (For Ubuntu18.04)
# - nv-tensorrt-repo-ubuntu1604-cuda10.0-trt5.1.5.0-ga-20190427_1-1_amd64.deb(For Ubuntu16.04)

# Run the following commands to install trt (in a terminal)

$ sudo dpkg -i nv-tensorrt-repo-ubuntu1804-cuda10.0-trt5.1.5.0-ga-20190427_1-1_amd64.deb
$ sudo apt-key add <key value will be mentioned as the output of previous command>
$ sudo apt-get update
$ sudo apt-get install tensorrt
$ sudo apt-get install uff-converter-tf
$ sudo apt-get install python3-libnvinfer-dev
When using google colab follow the instructions mentioned below (TensorRT might not function well on colab)
# Switch to TF 1.0 version (Run the following line)
$ %tensorflow_version 1.x
# Now reset the runetime if prompted by colab

# Run the following commands
$ git clone https://github.com/Tessellate-Imaging/Monk_Object_Detection.git
$ cd Monk_Object_Detection/12_tf_obj_1/installation
$ chmod +x install_colab.sh && ./install_colab.sh
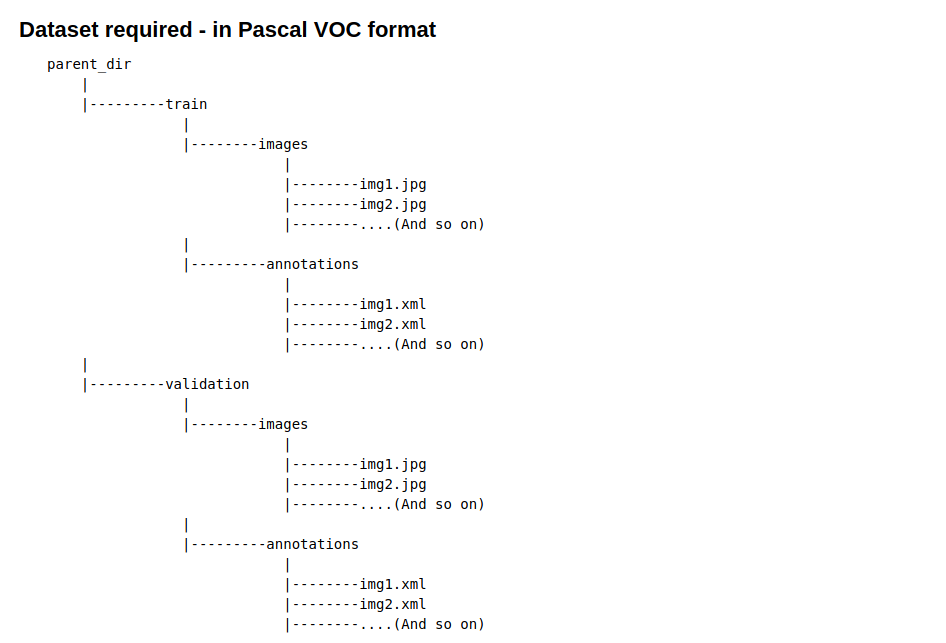
Process B: Setting up the dataset
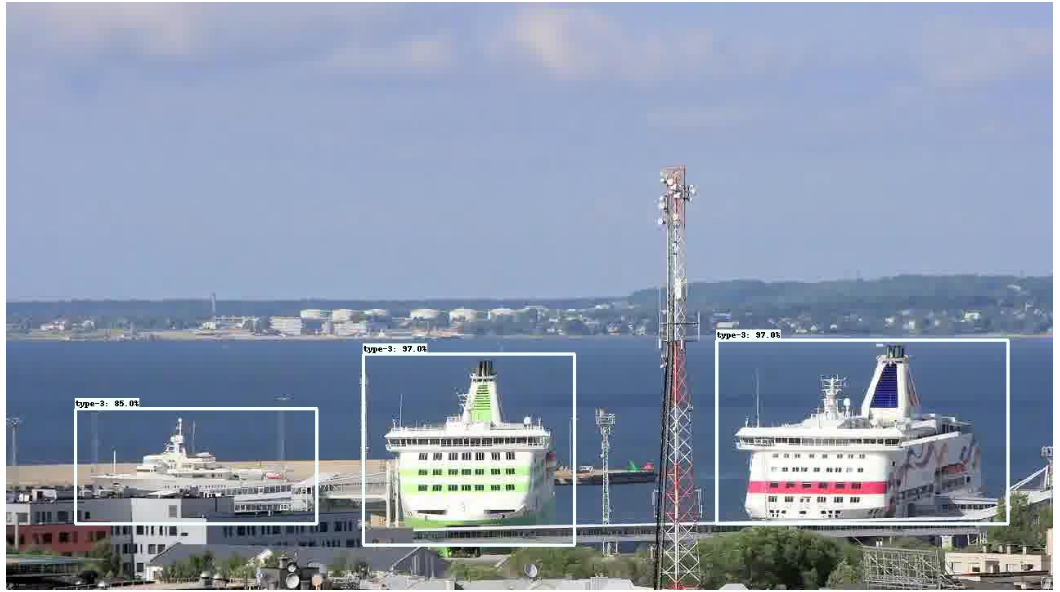
Monk Object Detection parser requires the dataset to be either in COCO or Pascal VOC formats. For this tutorial, let’s stick with pascal VOC format
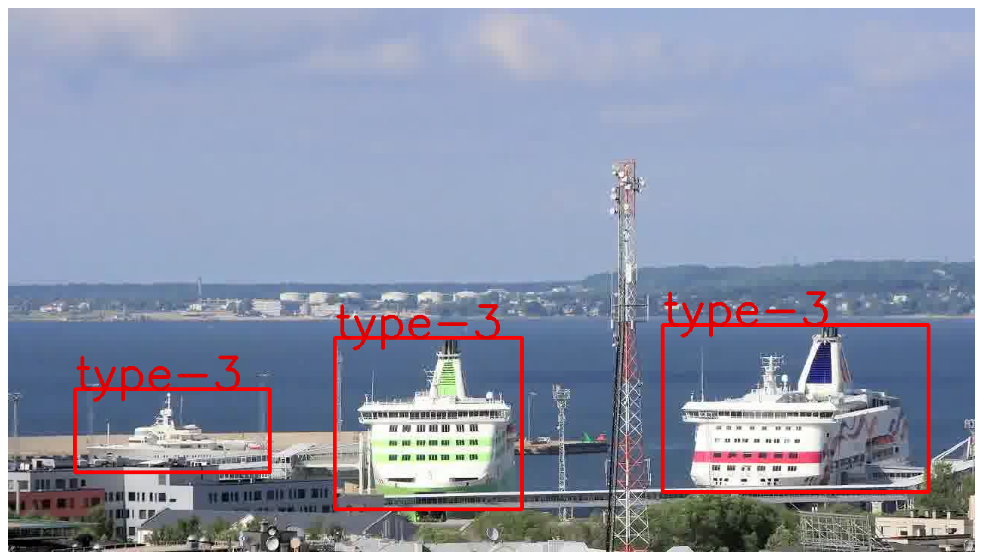
Image owned by the author
To convert your dataset from any format to Pascal VOC check these detailed tutorials
Process C: Updating configurations and starting the training process
★ Load the training engine
from train_detector import Detector

gtf = Detector();
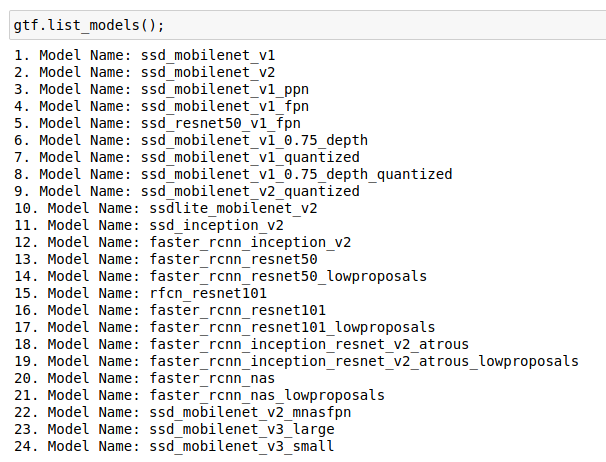
★ Load all available models in TF 1.15 Model Zoo
* At present, it supports 24 different models with variants for SSD and Faster RCNN
Image owned by the author
★ Load training and validation dataset
* Load dataset post-conversion of annotations to VOC format
* Set batch size as per the GPU available. For this tutorial AWS EC2 P3.2x machine with V100 GPU (16 GB VRAM) was used and a batch size of 24 suited it well.
* TensorRT optimization creates a plan and then builds it. Building the plan is what optimizes the model for the GPU it is being built on.
* As discussed earlier a model optimized on a GPU with different cuda compute capability cannot run on jetson nano, hence Monk library makes sure that the plan is compiled on a development machine (cloud or colab) whereas it is built at runtime on deployment machine (jetson nano)
* With INT8 optimization such a feature cannot be executed, both the plan compilation and build have to be on the same machine, and jetson nano boards are not quite compatible with 8-bit integer operations
* The detector training runs a session which executes sys.exit() function, hence a wrapper running on it will shut the python system.
* To overcome this issue, a script named train.py is provided, which can be run on both jupyter notebooks or a terminal command
* Trained model will be saved in the folder named “output_dir” as per the params set.
# Run in a terminal
$ python Monk_Object_Detection/12_tf_obj_1/lib/train.py

# or run this command on a jupyter notebook
%run Monk_Object_Detection/12_tf_obj_1/lib/train.py
Process D: Export trained model for inference
★ Export the trained checkpoint model
* The export function runs a session which executes sys.exit() function, hence a wrapper running on it will shut the python system.
* To overcome this issue, a script named export.py is provided, which can be run on both jupyter notebooks or a terminal command
* Exported model will be saved in the folder named “export_dir” as per the params set.
# Run in a terminal
$ python Monk_Object_Detection/12_tf_obj_1/lib/export.py

# or run this command on a jupyter notebook
%run Monk_Object_Detection/12_tf_obj_1/lib/export.py
Process E: Model optimization for TensorRT inference
★ Optimize the exported model
* The optimization function runs a session which executes sys.exit() function, hence a wrapper running on it will shut the python system.
* To overcome this issue, a script named optimize.py is provided, which can be run on both jupyter notebooks or a terminal command
* Optimized model will be saved in the folder named “trt_fp16_dir” as per the params set.
# Run in a terminal
$ python Monk_Object_Detection/12_tf_obj_1/lib/optimize.py

# or run this command on a jupyter notebook
%run Monk_Object_Detection/12_tf_obj_1/lib/optimize.py
Process F-1: Running inference on the development machine
★ Load the inference engine
from infer_detector import Infer
gtf = Infer();
★ Load the model
* Load exported model first and run the steps and repeat the same by loading the optimized model (steps remain the same)
# To load exported model
gtf.set_model_params('export_dir/frozen_inference_graph.pb', "ship/classes.txt")

# To load optimized model
gtf.set_model_params('trt_fp16_dir/trt_graph.pb', "ship/classes.txt")
* Analysis with exported (Unoptimized) model on AWS P3.2x V100 GPU
Average Image loading time : 0.0091 sec
Average Inference time     : 0.0103 sec
Result extraction time     : 0.0801 sec
total_repetitions          : 100
total_time                 : 1.0321 sec
images_per_sec             : 96
latency_mean               : 10.3218 ms
latency_median             : 10.3234 ms
latency_min                : 9.4773 ms
* Analysis with the optimized model on AWS P3.2x V100 GPU
* Around 2.5x speed up with processing post optimization
Average Image loading time : 0.0092 sec
Average Inference time     : 0.0042 sec
Result extraction time     : 0.0807 sec
total_repetitions          : 100
total_time                 : 0.4241 sec
images_per_sec             : 235
latency_mean               : 4.2412 ms
latency_median             : 4.2438 ms
latency_min                : 4.0156 ms
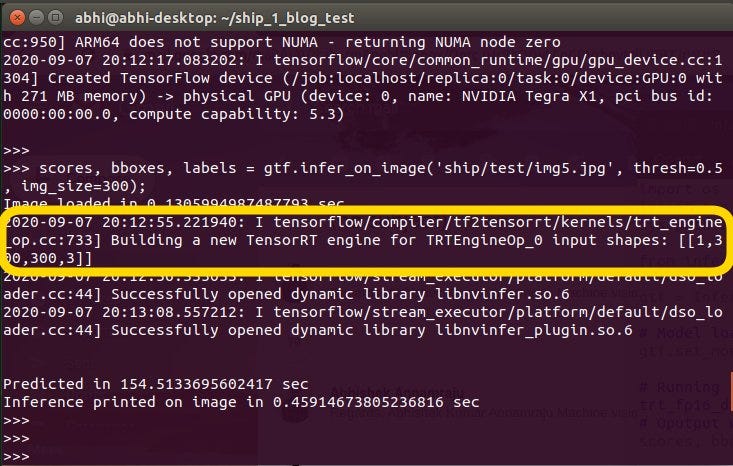
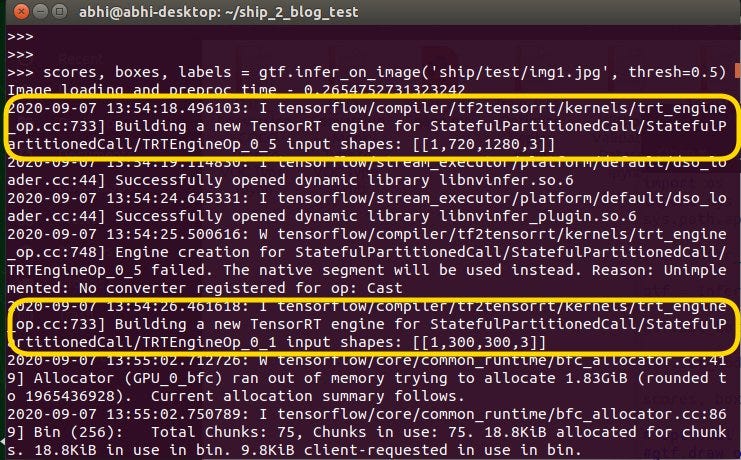
Process F-3: Installation steps on Jetson Nano board
Highlighted regions show jetson nano’s TesnorRT building (optimizing) the plan (model) (Image owned by author)
Running it again will not take that much time.
* Benchmark analysis on jetson nano board
gtf.benchmark_for_speed('ship/test/img1.jpg')
# With Jetson Nano power mode - 5W ModeAverage Image loading time : 0.0275 sec
Average Inference time     : 0.0621 sec
total_repetitions          : 100
total_time                 : 6.2172sec
images_per_sec             : 16
latency_mean               : 67.1722 ms
latency_median             : 60.7875 ms
latency_min                : 57.4391 ms
# With Jetson Nano power mode - MAXN ModeAverage Image loading time : 0.0173 sec
Average Inference time     : 0.0426 sec
total_repetitions          : 100
total_time                 : 4.2624 sec
images_per_sec             : 23
latency_mean               : 42.6243 ms
latency_median             : 41.9758 ms
latency_min                : 40.9001 ms
★ Complete Code for TensorFlow Object Detection API 1.0 is available as a jupyter notebook
★ Download all pre-trained weights from google drive
Part 2—
Detailed steps from training a detector on a custom dataset to inferencing on jetson nano board or cloud using TensorFlow 2.3
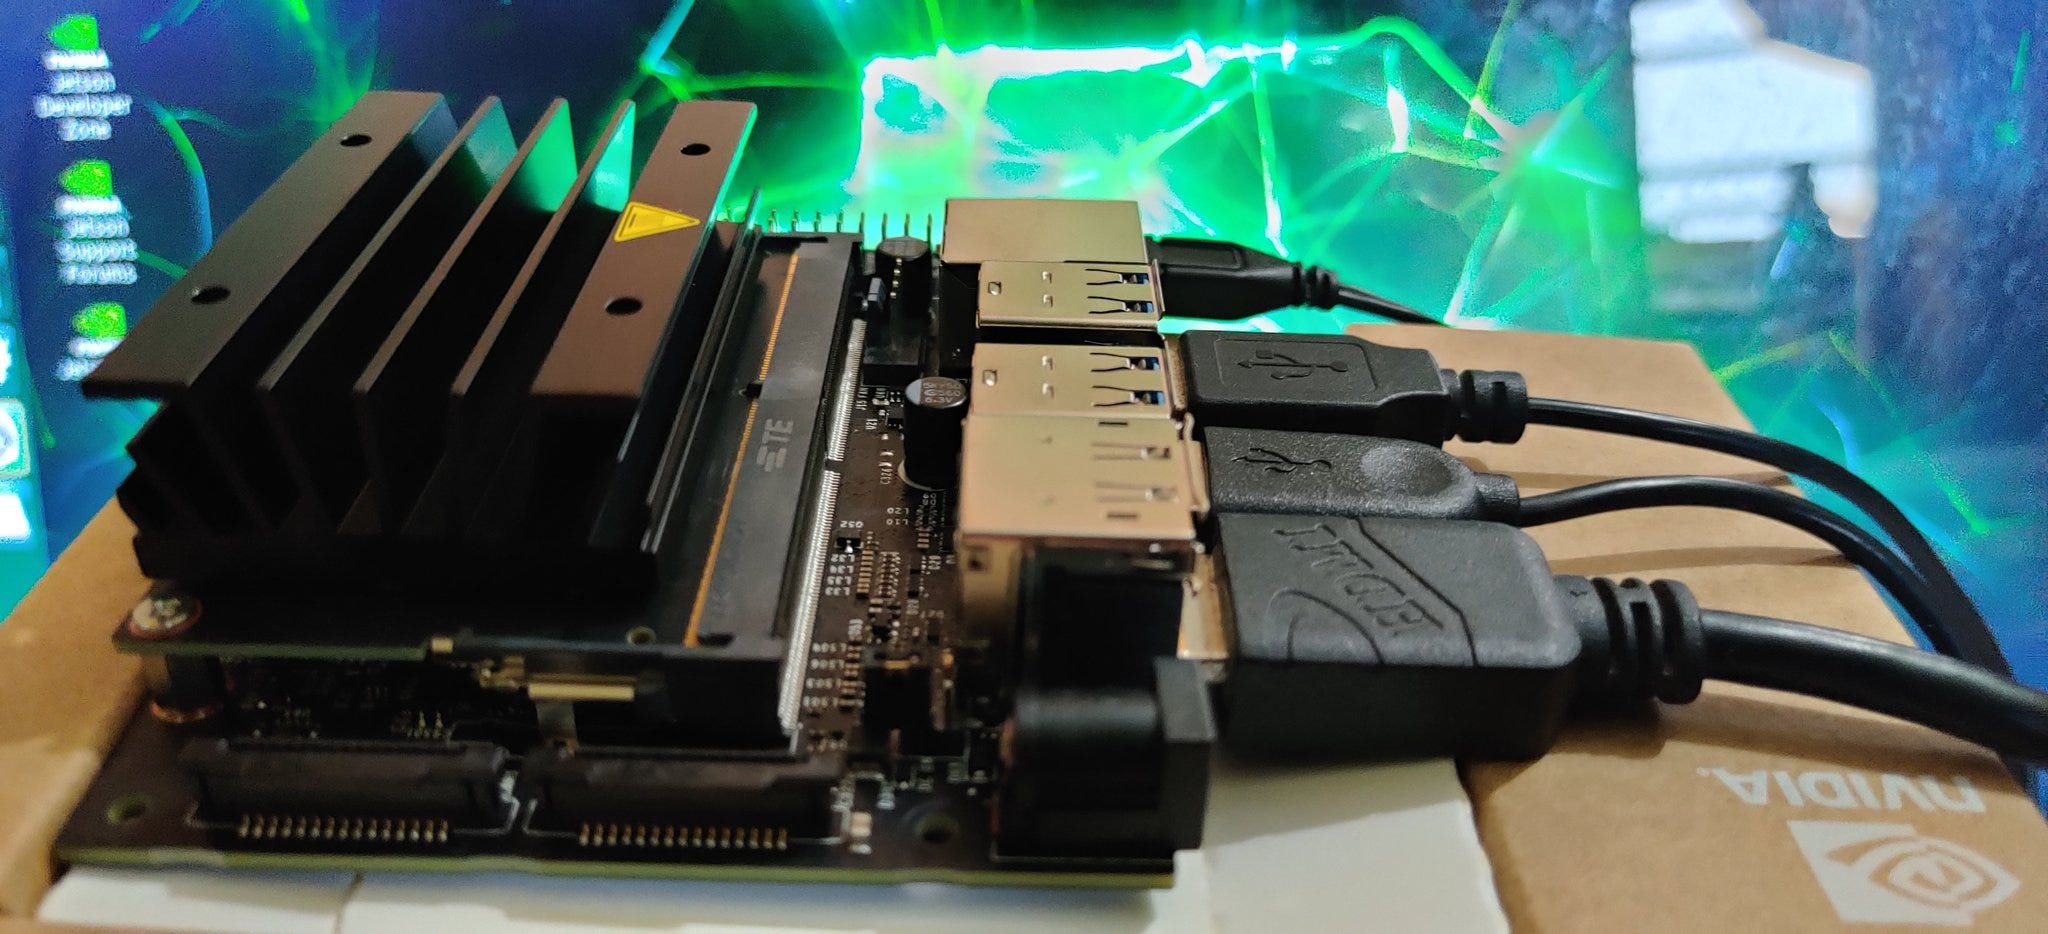
Boot up that Jetson Nano board!!! (Image owned by author)
TF OBJECT DETECTION API 2.0
Complete Code for TensorFlow Object Detection API 2 is available as a jupyter notebook
Process A: Installation on your development machine
Libraries to be installed
* Pre-reqs: numpy, scipy, pandas, pillow, OpenCV-python
* TensorFlow-GPU V2.3.0 with TensorRT 6.0.1
* TF Object Detection API 2.0 using Monk Object Detection Toolkit
* TensorRT installation will be dealt in upcoming sections
(Make sure CUDA 10.1 and CUDNN 7 is installed with Nvidia Driver on the system)
Run the following steps in your development (training) machine
$ git clone https://github.com/Tessellate-Imaging/Monk_Object_Detection.git

#For Cuda 10 systems
$ cd Monk_Object_Detection/13_tf_obj_1/installation && chmod +x install_cuda10.sh && ./install_cuda10.sh

#For Google colab
$ cd Monk_Object_Detection/13_tf_obj_1/installation && chmod +x install_colab.sh && ./install_colab.sh
Process B: Setting up the dataset
This is the same as in Part 1. Monk Object Detection parser requires the dataset to be either in COCO or Pascal VOC formats. For this tutorial, let’s stick with pascal VOC format
Image owned by the author
To convert your dataset from any format to Pascal VOC check these detailed tutorials
Process C: Updating configurations and starting the training process
★ Load the training engine
from train_detector import Detector

gtf = Detector();
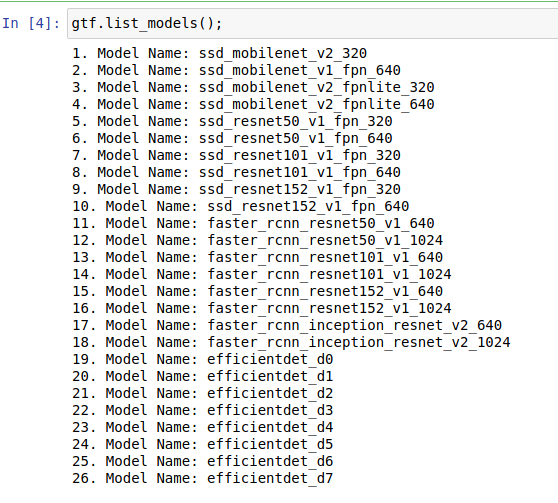
★ Load all available models in TF 2.0 Model Zoo
* At present it supports 26 different models with variants for SSD, Faster RCNN, and EfficientDet
* Support for Centernet models will be added soon, original pipeline has errors in training
Image owned by the author
★ Load training and validation dataset
* Load dataset post-conversion of annotations to VOC format
* Set batch size as per the GPU available. For this tutorial, AWS EC2 P3.2x machine with V100 GPU (16 GB VRAM) was used, and a batch size of 24 suited it well.
★ Set directory which will store the exported params
gtf.export_params(output_directory="export_dir");
★ Set tensorRT optimization parameters
* TensorRT optimization creates a plan and then builds it. Building the plan is what optimizes the model for the GPU it is being built on.
* As discussed earlier a model optimized on a GPU with different cuda compute capability cannot run on jetson nano, hence Monk library makes sure that the plan is compiled on a development machine (cloud or colab) whereas it is built at runtime on deployment machine (jetson nano)
* With INT8 optimization such a feature (build on runtime) cannot be executed, both the plan compilation and build have to be on the same machine, and jetson nano boards are not quite compatible with 8-bit integer operations
* The detector training runs a session which executes sys.exit() function, hence a wrapper running on it will shut the python system.
* To overcome this issue, a script named train.py is provided, which can be run on both jupyter notebooks or a terminal command
* Trained model will be saved in the folder named “output_dir” as per the params set.
# For terminal users
$ python Monk_Object_Detection/13_tf_obj_2/lib/train.py

# For jupyter notebook or colab users
%run Monk_Object_Detection/13_tf_obj_2/lib/train.py
Process D: Export trained model for inference
★ Export the trained checkpoint model
* The export function runs a session which executes sys.exit() function, hence a wrapper running on it will shut the python system.
* To overcome this issue, a script named export.py is provided, which can be run on both jupyter notebooks or a terminal command
* Exported model will be saved in the folder named “export_dir” as per the params set.
# For terminal users
$ python Monk_Object_Detection/13_tf_obj_2/lib/export.py

# For jupyter notebook and colab users
%run Monk_Object_Detection/13_tf_obj_2/lib/export.py
Process E: Model optimization for TensorRT inference
★ Install TensorRT version 6.0.1
* Go to Nvidia TensorRT page and download TRT6 packages based on OS and CUDA.
* Mentioned below are steps for Ubuntu OS and Cuda 10.1
# Optimizing For TensorRT - Feature Not tested on colab
# This requires TensorRT 6.0.1 to be installed
# Go to https://developer.nvidia.com/tensorrt

# Download
# - nv-tensorrt-repo-ubuntu1804-cuda10.1-trt6.0.1.5-ga-20190913_1-1_amd64.deb (For Ubuntu18.04)
# - nv-tensorrt-repo-ubuntu1604-cuda10.1-trt6.0.1.5-ga-20190913_1-1_amd64.deb (For Ubuntu16.04)
# Run the following commands to install trt (in a terminal)

$ sudo dpkg -i nv-tensorrt-repo-ubuntu1804-cuda10.1-trt6.0.1.5-ga-20190913_1-1_amd64.deb
$ sudo apt-key add /var/nv-tensorrt-repo-cuda10.1-trt6.0.1.5-ga-20190913/7fa2af80.pub
$ sudo apt-get update
$ sudo apt-get install tensorrt
$ sudo apt-get install uff-converter-tf
$ sudo apt-get install python3-libnvinfer-dev
★ Optimize the exported model
* The optimization function runs a session which executes sys.exit() function, hence a wrapper running on it will shut the python system.
* To overcome this issue, a script named optimize.py is provided, which can be run on both jupyter notebooks or a terminal command
* Optimized model will be saved in the folder named “trt_fp16_dir” as per the params set.
# For terminal users
$ python Monk_Object_Detection/13_tf_obj_2/lib/optimize.py

# For jupyter notebook and colab users
%run Monk_Object_Detection/13_tf_obj_2/lib/optimize.py
Process F-1: Running inference on the development machine
★ Load the inference engine
from infer_detector import Infer

gtf = Infer();
★ Load the model
* Load exported model first and run the steps; later repeat the same by loading the optimized model (steps remain the same)
# To load exported model
gtf.set_model_params(exported_model_dir = 'export_dir')

# To load optimized model
gtf.set_model_params(exported_model_dir = 'trt_fp16_dir')
* Analysis with exported (Unoptimized) model on AWS P3.2x V100 GPU
Average Image loading time : 0.0110 sec
Average Inference time     : 0.0097 sec
Result extraction time     : 0.0352 sec
total_repetitions          : 100
total_time                 : 0.9794 sec
images_per_sec             : 102
latency_mean               : 9.7949 ms
latency_median             : 9.7095 ms
latency_min                : 9.1238 ms
* Analysis with the optimized model on AWS P3.2x V100 GPU
* Around1.5x speed up with processing post optimization
Average Image loading time : 0.0108 sec
Average Inference time     : 0.0062 sec
Result extraction time     : 0.0350 sec
total_repetitions          : 100
total_time                 : 0.6241 sec
images_per_sec             : 160
latency_mean               : 6.2422 ms
latency_median             : 6.2302 ms
latency_min                : 5.9401 ms
Process F-2: Setting up everything on Jetson Nano board
>>>>> Finally clone the Monk Object Detection library
Note: Don’t run the installation for 13_tf_obj_2 as done in the development machine. Install tf object detection with TF 2.0 has some issues. The inference code has been made in a way that it doesn’t need object detection API tools.
Abhishek is a computer vision engineer at Tessellate Imaging, and his current research areas include post-training model optimization and privacy-preserving deep learning. He’s a GSoC (2016) scholar and has published research papers on cascade classifiers, shape-based object analysis, and traffic sign recognizer. He is an avid reader and an opensource contributor at opensource Monk AI toolkit (https://github.com/Tessellate-Imaging)
A verification link has been sent to your email id
If you have not recieved the link please goto
Sign Up page again
Loading...
Please enter the OTP that is sent to your registered email id
Loading...
Please enter the OTP that is sent to your email id
Loading...
Please enter your registered email id
This email id is not registered with us. Please enter your registered email id.
Don't have an account yet?Register here
Loading...
Please enter the OTP that is sent your registered email id
Loading...
Please create the new password here
We use cookies on Analytics Vidhya websites to deliver our services, analyze web traffic, and improve your experience on the site. By using Analytics Vidhya, you agree to our Privacy Policy and Terms of Use.Accept
Privacy & Cookies Policy
Privacy Overview
This website uses cookies to improve your experience while you navigate through the website. Out of these, the cookies that are categorized as necessary are stored on your browser as they are essential for the working of basic functionalities of the website. We also use third-party cookies that help us analyze and understand how you use this website. These cookies will be stored in your browser only with your consent. You also have the option to opt-out of these cookies. But opting out of some of these cookies may affect your browsing experience.
Necessary cookies are absolutely essential for the website to function properly. This category only includes cookies that ensures basic functionalities and security features of the website. These cookies do not store any personal information.
Any cookies that may not be particularly necessary for the website to function and is used specifically to collect user personal data via analytics, ads, other embedded contents are termed as non-necessary cookies. It is mandatory to procure user consent prior to running these cookies on your website.


thanks for great tutorial it is very useful for me especially i'm study about Jetson Nano board in deep learning projects
Thanks for the tutorial. please make video for the above tutorial . i got confused with the terminal command.