Streamlit Web API for NLP: Tweet Sentiment Analysis
This article was published as a part of the Data Science Blogathon.
Introduction
Developing Web Apps for data models has always been a hectic task for non-web developers. For developing Web API we need to make the front end as well as back end platform. That is not an easy task. But then python comes to the rescue with its very fascinating frameworks like Streamlit, Flassger, FastAPI. These frameworks help us to build web APIs very elegantly, without worrying about the Front end as these frameworks already provide default UIs.
About Streamlit
Streamlit is one of the frameworks in Python which is used for building Web APIs very easily. With streamlit, we need not worry about front end tasks as it handles those itself without writing a line of code. We can Rapidly build all the apps we need with Streamlit. For more on Streamlit just visit here.
Installation
After creating a new environment just type the following command and you are good to go
pip install streamlit
You may need to download other libraries for different data modeling tasks. Hence I am leaving that up to you. Now let us start our project.
After installing just run the below command to check the installation:
streamlit hello
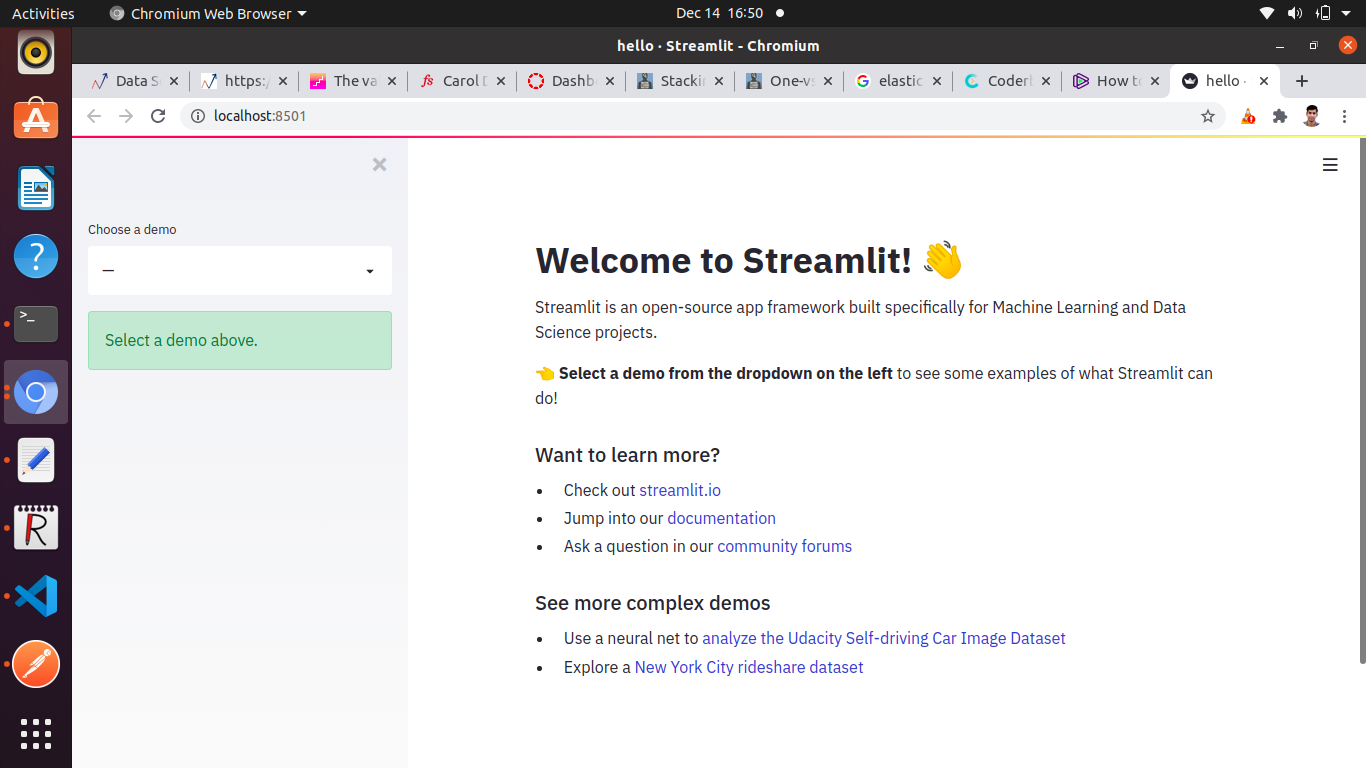
If you see the below screen after browsing the server then you are good to go.

Project Overview
The original problem was given by Kaggle to classify the tweets as disastrous or not based on the tweet’s sentiment. Then I build an end to end project out of it. In this blog, we only gonna create Web API using Streamlit. for the whole project you can refer here.
Streamlit Web API Development
After installing streamlit let’s start developing our Web API. At first, we need to install and import the required libraries.
import streamlit as st  ## streamlit
import pandas as pd  ## for data manipulation
import pickle   ## For model loading
import spacy  ## For NLP tasks
import time

from PIL import Image   ## For image
from io import StringIO  ## for text input and output from the web app
After importing libraries we first need to load the trained model which we have saved as a pickle file.
def load_model():
#declare global variables
    global nlp
    global textcat

nlp = spacy.load(model_path)  ## will load the model from the model_path
textcat = nlp.get_pipe(model_file)   ## will load the model file
Now after loading the model from our system we will use it to make a prediction on the tweet for classification. The model will first vectorize the text and then will make the prediction.
def predict(tweet):
    print("news = ", tweet)  ## tweet
    news = [tweet]
    txt_docs = list(nlp.pipe(tweet))
    scores, _ = textcat.predict(txt_docs)
    print(scores)
    predicted_classes = scores.argmax(axis=1)
    print(predicted_classes)
    result = ['real' if lbl == 1 else 'fake' for lbl in predicted_classes]
    print(result)
    return(result)
The predict function will take the tweet as input and then first will vectorize the tweet and then will classify it using our model. We have two categories here real or fake. If the prediction is 1 it is a real tweet means it is affirmative about disaster otherwise it’s a fake.
def run():
    st.sidebar.info('You can either enter the news item online in the textbox or upload a txt file')
    st.set_option('deprecation.showfileUploaderEncoding', False)
    add_selectbox = st.sidebar.selectbox("How would you like to predict?", ("Online", "Txt file"))
    st.title("Predicting fake tweet")
    st.header('This app is created to predict if a tweet is real or fake')
    if add_selectbox == "Online":
        text1 = st.text_area('Enter text')
        output = ""
        if st.button("Predict"):
            output = predict(text1)
            output = str(output[0]) # since its a list, get the 1st item
            st.success(f"The news item is {output}")
            st.balloons()
      elif add_selectbox == "Txt file":
           output = ""
          file_buffer = st.file_uploader("Upload text file for new item", type=["txt"])
         if st.button("Predict"):
             text_news = file_buffer.read()

# in the latest stream-lit version ie. 68, we need to explicitly convert bytes to text
          st_version = st.__version__ # eg 0.67.0
          versions = st_version.split('.')
          if int(versions[1]) > 67:
               text_news = text_news.decode('utf-8')
            print(text_news)
          output = predict(text_news)
          output = str(output[0])
          st.success(f"The news item is {output}")
          st.balloons()
The above run function will take the input from the user via our app as a text or text file and after pressing the predict button it will give the output.
if __name__ == "__main__":
load_model()
run()
if __name__ == “main”: is used to execute some code only if the file was run directly, and not imported. it implies that the module is being run standalone by the user and we can do corresponding appropriate actions.
Now we can run our app in our system as localhost using:
streamlit run app.py
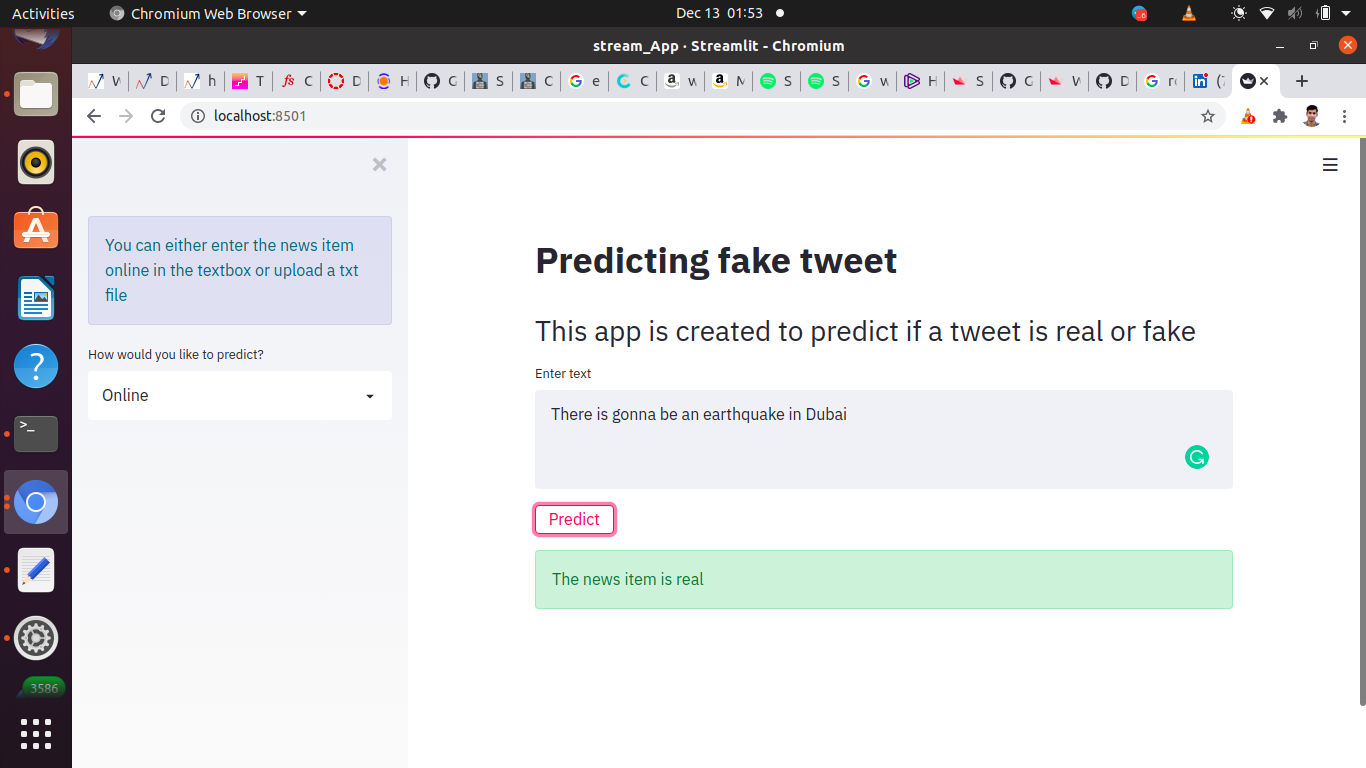
After running this app we would see the further web page where you can give text input and get the prediction after clicking on the predict button.

That is it for this small blog. You can deploy this app on any cloud service as well. For that Heroku would be the easiest and cheapest choice. If you have any queries, feedback, or suggestions feel free to comment below or reach me here.
Reference
https://www.streamlit.io/
Image Sources: localhost
Gif:https://www.google.com/imgres?imgurl=https%3A%2F%2Fmedia1.tenor.com%2Fimages%2F2d438ca55094b4b591a5b8432457aaa9


Thank's, It's a great thing that this article suggested the importance of Streamlit Web API for NLP.
Really like these new tips, which I haven't heard of before, like the Streamlit Web API for NLP. Can’t wait to implement some of these as soon as possible.
This is amazing, I will try this for my project, Thanx