Training StyleGAN using Transfer learning on a custom dataset in google colaboratory
This article was published as a part of the Data Science Blogathon.
Summary
- Share my knowledge of training the style GAN step by step on a custom dataset in google colab using transfer learning with sample code snippet
- How to use pre-trained weights to generate images from the custom dataset
- Generate new images using different seed values
Introduction
Generative Adversarial Networks or GANs are a recent innovation in machine learning and were first introduced by Ian J. Goodfellow and his colleagues in 2014. It is a set of Neural Networks working against each other in the form of a two-person zero-sum game of Game Theory (where one’s Win is another’s loss). It is a form of generative models for unsupervised learning.
Here there is a Generator (that generates new instances on data from a point in a latent space) and a Discriminator (that distinguished the generated data from the Generator with the actual or true data value). Initially, the Generators produces unreal or fake data and Discriminator can classify it as fake but as the training continues, the Generator starts to learn the distribution of real data and starts producing real-like data.
This continues until the Discriminator fails to classify it as unreal and all the data output from the Generator looks like a dead-ringer of the real data. Thus here the Generators output is connected to the Discriminators input and loss is computed based on the Discriminator’s output (that is Real or Not Real) and through backpropagation, the weights of the Generators are updated for the subsequent training( epochs).
StyleGAN has multiple GAN variants in the market today but in this article, I am focusing on the StyleGAN introduced by Nvidia in December 2018. The architecture of StyleGAN uses baseline progressive GAN, that is, the size of generated images increases gradually from a very low resolution (4×4) to very high resolution (1024×1024) and uses Bi-linear-sampling instead of the nearest neighbor up/down-sampling used in baseline progressive GAN. The primary purpose of this blog is to explain how to train the StyleGAN on a custom dataset using transfer learning and hence, for more details on the GAN architecture, refer to the NVlabs/stylegan -official TensorFlow GitHub link (GitHub – NVlabs/stylegan: StyleGAN – Official TensorFlow Implementation)
Transfer Learning Use already trained model weights on another similar dataset and train the custom dataset.
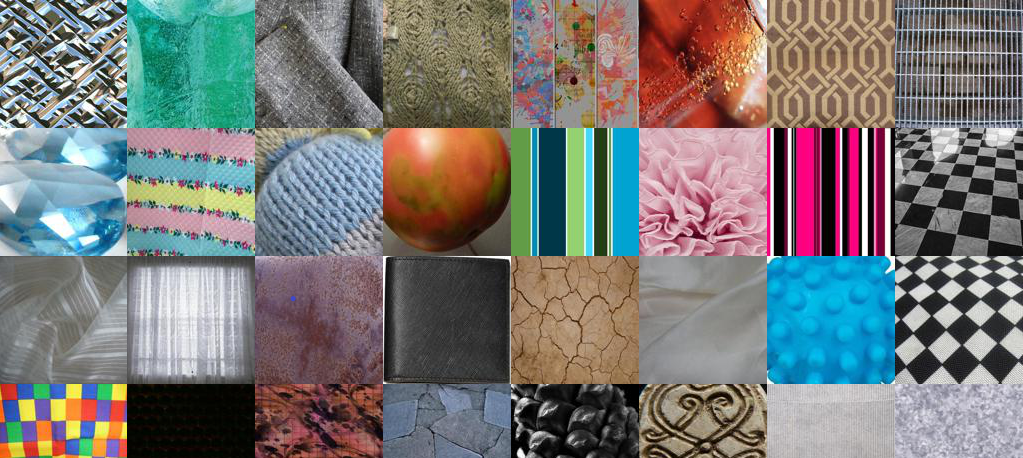
Custom Dataset Comprises of 2500 texture images from fashion. Few sample texture images below for reference. You can replace your own custom dataset here.
Key points and Prerequisite:
- GPU is a must and StyleGAN will not train in the CPU environment. For demonstration, I am have used google colab environment for experiments and learning.
- Ensure Tensorflow version 1.15.2 is selected. StyleGAN will work with tf 1.x only
- StyleGAN training will take a lot of time (in days depending on the server capacity like 1 GPU,2 GPU’s, etc)
- If you are working on any GAN related real-time project, then you would want to train your GAN on a tesla P-80 or P-100 sort of dedicated server, because of usage restrictions and timeouts in colab.
- if you have a google-pro (not mandatory), you can save up to 40-50 % of training time for this article, I have trained the GAN for 3500 iterations only as it will take a long time to train the complete GAN ( getting high-resolution images), one needs to run for at least 25000 iterations ( Recommended ). Also, my image resolution is 64×64, but the styleGAN is trained on 1024×1024 resolution images.
- I have used the below-pre-trained weights for training my custom dataset (refer to official Tensorflow Github link for more details)
stylegan-ffhq-1024x1024.pkl |
StyleGAN trained with Flickr-Faces-HQ dataset at 1024×1024. |
Training the style GAN on a custom dataset in google colab using transfer learning
1. Open colab and open a new notebook. Ensure under Runtime->Change runtime type -> Hardware accelerator is set to GPU
2. Authenticate your account and mount the G Drive
from google.colab import drive
drive.mount('/content/drive', force_remount=True)
3. Ensure Tensorflow version 1.15.2 is selected. StyleGAN will work with tf 1.x only.
%tensorflow_version 1.x
import tensorflow
print(tensorflow.__version__)
4. From GitHub – NVlabs/stylegan: StyleGAN – Official TensorFlow Implementation) clone the stylegan.git
!git clone https://github.com/NVlabs/stylegan.git
!ls /content/stylegan/
You should see something like this
config.py              LICENSE.txt             run_metrics.py
dataset_tool.py        metrics                 stylegan-teaser.png
dnnlib                 pretrained_example.py   training
generate_figures.py    README.md               train.py
5. Add stylegan folder to python for importing dnnlib module
import sys
sys.path.insert(0, "/content/stylegan")
import dnnlib
6. Extract the custom dataset from G Drive to the colab server folder of your choice
!unrar x "/content/drive/My Drive/CustomDataset.rar" "/content/CData/"
7. Stylegan requires that the images are square and for very good resolution, images need to be 1024×1024. But in this demonstration, I will be using a resolution of 64×64 and the next step is to resize all the images to this resolution.
# resize all the images to same size
import os
from tqdm import tqdm
import cv2
from PIL import Image
from resizeimage import resizeimage
path = '/content/CData/'
for filename in tqdm(os.listdir(path),desc ='reading images ...'):
image = Image.open(path+filename)
image = image.resize((64,64))
image.save(path+filename, image.format)
8. Once the custom dataset is copied to colab and resized, convert the custom images to tfrecords using the below commands. This is a requirement for stylegan, so this step is mandatory for training the stylegan.
! python /content/stylegan/dataset_tool.py create_from_images /content/stylegan/datasets/custom-dataset /content/texture
replace your custom dataset path (instead of /content/texture)
9. Once the tfrecords are successfully created, you should be to view them under like
/content/stylegan/datasets/custom-dataset/custom-dataset-r02.tfrecords - 22
/content/stylegan/datasets/custom-dataset/custom-dataset-r03.tfrecords - 23
/content/stylegan/datasets/custom-dataset/custom-dataset-r04.tfrecords -24
/content/stylegan/datasets/custom-dataset/custom-dataset-r05.tfrecords -25
/content/stylegan/datasets/custom-dataset/custom-dataset-r06.tfrecords -26
These tfrecords correspond to 4x4 , 8x8 ,16x16, 32x32 and 64x64 resolution images (baseline progressive) respectiviely
10. Now go to the stylegan folder and open the train.py file and make the following changes
Replace line no 37 below # Dataset. from
desc += '-ffhq'; dataset = EasyDict(tfrecord_dir='ffhq'); train.mirror_augment = True    TO
desc += '-PATH of YOUR CUSTOM DATASET'= EasyDict(tfrecord_dir='PATH of YOUR CUSTOM DATASET'); train.mirror_augment = True
uncomment line no 46 below # Number of GPUs. and comment line no 49
line number 52, train.total_kimg = 25000 is recommended for complete GAN training of 1024x1024 resolution image. I have set it to 3500. Training will stop after this much iterations
11. Before we start the GAN training, couple of more change needs to be done. we need to tell which pickled pre-trained model will be used for training our own custom dataset. Stylegan also uses inception-v3 so, we need to get the inception_v3_features.pkl as well
Go to the link networks – Google Drive you will see a file karras2019stylegan-ffhq1024x1024.pkl file. This pre-trained version trained for generating high-resolution human faces. There are other models for celebrities, cats, cars, etc. you need to get a copy of this file onto your G drive and get the URL link from the file in your G-Drive. The URL link will look something like
https://drive.google.com/uc?id=1FtjSVZawl-e_LDmIH3lbB0h_8q2g51Xq
Similarly, we need to copy the inception_v3_features.pkl to our G Drive and get the URL link. Now go to the path under stylegan/metrics and open python file frechet_inception_distance.py. We need to do a small change here in line number 29 like below
Replace the below code with-
inception = misc.load_pkl('https://drive.google.com/uc?id=1MzTY44rLToO5APn8TZmfR7_ENSe5aZUn') # inception_v3_features.pkl
inception = misc.load_pkl(''YOUR G-Drive inception-v3_features.pkl LINK url') # inception_v3_features.pkl
We are now all set to go for training our own stylegan
12. Run the below command to start the training
! python /content/stylegan/train.py (! nohup python /content/stylegan/train.py if you want it to run in the background and you do not wish to see the progress in your terminal directly. Do note this will take a lot of time depending on the configurations mentioned above) you should observe something like below
Training...
tick 1 kimg 140.3 lod 3.00 minibatch 128 time 4m 34s sec/tick 239.7 sec/kimg 1.71 maintenance 34.5 gpumem 3.6
network-snapshot-000140 time 6m 33s fid50k 331.8988
WARNING:tensorflow:From /content/stylegan/dnnlib/tflib/autosummary.py:137: The name tf.summary.scalar is deprecated. Please use tf.compat.v1.summary.scalar instead.
WARNING:tensorflow:From /content/stylegan/dnnlib/tflib/autosummary.py:182: The name tf.summary.merge_all is deprecated. Please use tf.compat.v1.summary.merge_all instead.

tick 2 kimg 280.6 lod 3.00 minibatch 128 time 15m 18s sec/tick 237.1 sec/kimg 1.69 maintenance 407.2 gpumem 3.6
tick 3 kimg 420.9 lod 3.00 minibatch 128 time 19m 16s sec/tick 237.3 sec/kimg 1.69 maintenance 0.7 gpumem 3.6
tick 4 kimg 561.2 lod 3.00 minibatch 128 time 23m 15s sec/tick 238.1 sec/kimg 1.70 maintenance 0.7 gpumem 3.6
tick 5 kimg 681.5 lod 2.87 minibatch 128 time 31m 54s sec/tick 518.6 sec/kimg 4.31 maintenance 0.7 gpumem 4.7
tick 6 kimg 801.8 lod 2.66 minibatch 128 time 42m 53s sec/tick 658.0 sec/kimg 5.47 maintenance 0.8 gpumem 4.7
tick 7 kimg 922.1 lod 2.46 minibatch 128 time 53m 52s sec/tick 657.7 sec/kimg 5.47 maintenance 0.9 gpumem 4.7
tick 8 kimg 1042.4 lod 2.26 minibatch 128 time 1h 04m 49s sec/tick 656.6 sec/kimg 5.46 maintenance 0.8 gpumem 4.7
tick 9 kimg 1162.8 lod 2.06 minibatch 128 time 1h 15m 49s sec/tick 658.5 sec/kimg 5.47 maintenance 0.8 gpumem 4.7
tick 10 kimg 1283.1 lod 2.00 minibatch 128 time 1h 26m 40s sec/tick 650.0 sec/kimg 5.40 maintenance 0.8 gpumem 4.7
network-snapshot-001283 time 6m 10s fid50k 238.2729
tick 11 kimg 1403.4 lod 2.00 minibatch 128 time 1h 43m 39s sec/tick 647.7 sec/kimg 5.38 maintenance 371.7 gpumem 4.7
tick 12 kimg 1523.7 lod 2.00 minibatch 128 time 1h 54m 27s sec/tick 647.5 sec/kimg 5.38 maintenance 0.8 gpumem 4.7
tick 13 kimg 1644.0 lod 2.00 minibatch 128 time 2h 05m 15s sec/tick 647.4 sec/kimg 5.38 maintenance 0.9 gpumem 4.7
tick 14 kimg 1764.4 lod 2.00 minibatch 128 time 2h 16m 04s sec/tick 647.3 sec/kimg 5.38 maintenance 0.8 gpumem 4.7
tick 15 kimg 1864.4 lod 1.89 minibatch 64 time 2h 41m 25s sec/tick 1520.8 sec/kimg 15.19 maintenance 0.8 gpumem 4.7
tick 16 kimg 1964.5 lod 1.73 minibatch 64 time 3h 15m 48s sec/tick 2060.2 sec/kimg 20.58 maintenance 2.9 gpumem 4.7
tick 17 kimg 2064.6 lod 1.56 minibatch 64 time 3h 50m 11s sec/tick 2060.1 sec/kimg 20.58 maintenance 3.1 gpumem 4.7
tick 18 kimg 2164.7 lod 1.39 minibatch 64 time 4h 24m 36s sec/tick 2061.2 sec/kimg 20.59 maintenance 3.1 gpumem 4.7
tick 19 kimg 2264.8 lod 1.23 minibatch 64 time 4h 59m 00s sec/tick 2061.1 sec/kimg 20.59 maintenance 3.0 gpumem 4.7
tick 20 kimg 2364.9 lod 1.06 minibatch 64 time 5h 33m 24s sec/tick 2061.1 sec/kimg 20.59 maintenance 2.9 gpumem 4.7
network-snapshot-002364 time 7m 46s fid50k 164.6632
tick 21 kimg 2465.0 lod 1.00 minibatch 64 time 6h 15m 16s sec/tick 2042.9 sec/kimg 20.41 maintenance 469.6 gpumem 4.7
tick 22 kimg 2565.1 lod 1.00 minibatch 64 time 6h 49m 11s sec/tick 2032.3 sec/kimg 20.30 maintenance 2.9 gpumem 4.7
tick 23 kimg 2665.2 lod 1.00 minibatch 64 time 7h 23m 07s sec/tick 2032.5 sec/kimg 20.31 maintenance 2.9 gpumem 4.7
tick 24 kimg 2765.3 lod 1.00 minibatch 64 time 7h 57m 03s sec/tick 2033.5 sec/kimg 20.32 maintenance 2.9 gpumem 4.7
tick 25 kimg 2865.4 lod 1.00 minibatch 64 time 8h 31m 00s sec/tick 2034.1 sec/kimg 20.32 maintenance 2.9 gpumem 4.7
The training will end once the train.total_kimg value specified in the train.py file is reached.
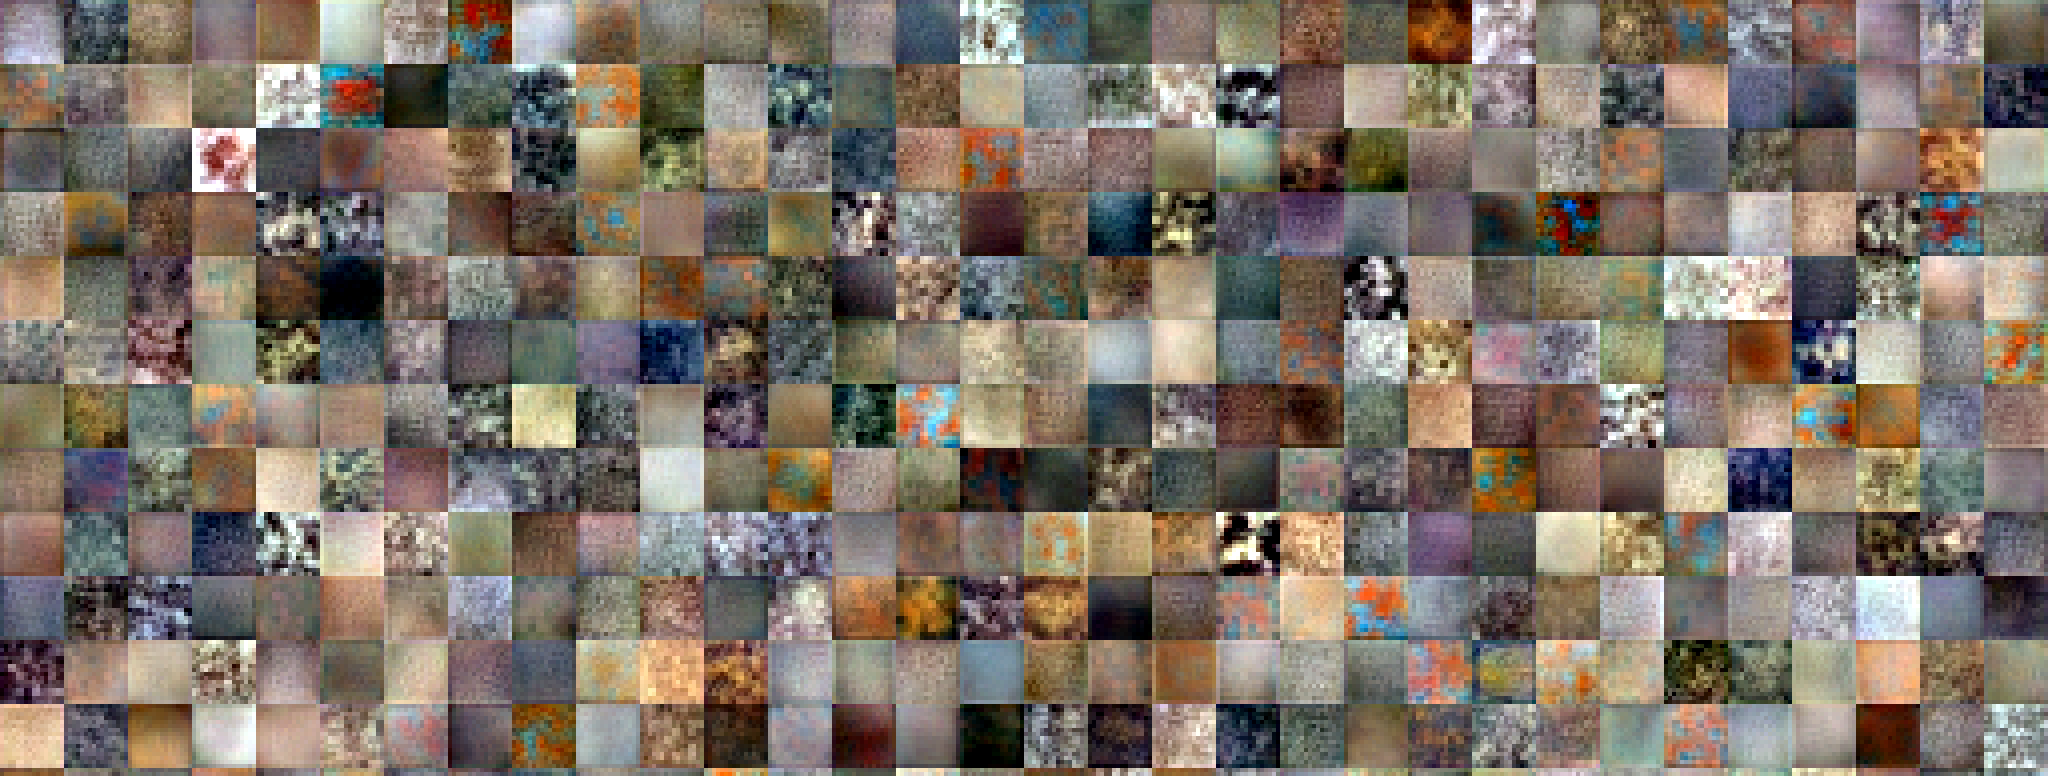
Let us now see the image generated by our stylegan on custom data
Real (Original) Images 64 x 64 Resolution
.jpg)
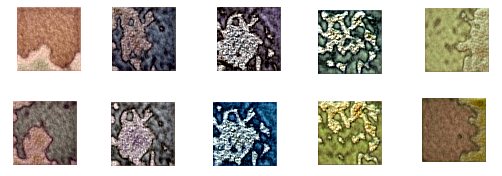
After Initial Iterations -fakes generated by S-GAN
.jpg)
After >1000 Iterations of training
After > 3500 Iterations of training
.jpg)
We can see the model has started generating real-like images as the training iterations progress. I had terminated the training after close to 4000 iterations as this is just an experiment and demonstration. But as we train the model for a longer duration, the images will be finer and finer and after say 9000 or 10000 rounds of training, the GAN will start generating the dead-ringer of the original pictures. Amazing isn’t it !!!
Now let us see how to use pre-trained custom weights for generating images similar to our custom dataset
How to use pre-trained weights to generate images from the custom dataset
Once, our training is over, there will a directory created like below
and under this, you can see a lot of network-snapshot pickle files created. we need to get the latest .pkl file and use the weights of that file for the pre-train model as shown in the code snippet below
# 4.0 International License. To view a copy of this license, visit# http://creativecommons.org/licenses/by-nc/4.0/ or send a letter to# Creative Commons, PO Box 1866, Mountain View, CA 94042, USA.
import pickle
import numpy as np
import dnnlib
import dnnlib.tflib as tflib
import config
def main():
tflib.init_tf()
url = '/content/network-snapshot-003685 .pkl'
with open(url,'rb') as f :
# _G = Instantaneous snapshot of the generator. Mainly useful for resuming a previous training run.
# _D = Instantaneous snapshot of the discriminator. Mainly useful for resuming a previous training run.
# Gs = Long-term average of the generator. Yields higher-quality results than the instantaneous snapshot.

# Print network details.
Gs.print_layers()

# Pick latent vector.
rnd = np.random.RandomState()
latents = rnd.randn(1, Gs.input_shape[1])

# Generate image.
os.makedirs(config.result_dir, exist_ok=True)
#if __name__ == "__main__":
main()

on running this code , output image example1.png will be created under /content

The output quality will be based on the network_snapshot.pkl we use
Generate new images using different seed values -different points in a latent space
Images generated from different seed values (Different points in the latent space)
Code snippet
!python /content/stylegan2/run_generator.py generate-latent-walk --network=/content/results/00000-sgan-/content/stylegan/datasets/custom-dataset-1gpu/network-snapshot-003685.pkl --seeds=200,1000,2500,4000,200 --frames 10 --truncation-psi=0.8
The above code will generate 10 images. Here I used the pre-trained weights trained using stylegan of my custom model and used run_generator.py (available in stylegan2) to generate different images. We can come with a logic of picking the seeds that look similar (you need to try few experiments to arrive at this) and interpolate them to get completely new images that were not present in the original dataset. Also, the quality of output will depend on what stage of training our model has finished. In my case, it was terminated around 4000 epochs.
Conclusion
In this blog, I have shared the knowledge I gained during the experimentation of stylegan / stylegan2 in the google colab server. Below are a few python programs examples for style mixing which you can refer to
- stylegan – pretrained_example.py
- stylegan – generate_figure.py
- stylegan2 – run_generator.py
Official stylegan gitup link
- GitHub – NVlabs/stylegan: StyleGAN – Official TensorFlow Implementation
- GitHub – NVlabs/stylegan2: StyleGAN2 – Official TensorFlow Implementation


Hey, i am not able to found module dnnlib on collab as well as on Kaggle, Please help me out