Introduction to AdaBoost Algorithm with Python
Introduction
In the last article, we saw the Gradient boosting machine and how it works. It works on correcting the errors of previous models by building a new model on the error. The article on Gradient boosting Machine is available on the following link- Gradient Boosting Machine for Data Scientists
Machine learning algorithms have revolutionized the way we tackle complex problems in various domains. From predicting stock prices to diagnosing diseases, these algorithms play a crucial role. In this article, we delve into the realm of regression using the powerful scikit-learn library in Python. While scikit-learn offers an extensive collection of pre-built models, understanding how these algorithms work from scratch is paramount for any aspiring data scientist or machine learning enthusiast. Among these algorithms, regression stands out as a fundamental technique for predicting continuous outcomes based on input features.
One such regression technique is the Adaptive Boosting algorithm, commonly known as AdaBoost. AdaBoost is a boosting technique that iteratively corrects the errors of previous models by assigning higher weights to misclassified data points. By sequentially training weak learners on these weighted data points, AdaBoost constructs a strong ensemble model capable of making accurate predictions. In this article, we not only explore the theoretical underpinnings of AdaBoost but also provide a hands-on implementation using Python’s scikit-learn library. Additionally, we discuss the importance of hyperparameter tuning in optimizing the performance of AdaBoost, demonstrating how variations such as the base estimator and learning rate impact model accuracy. Through this comprehensive exploration, readers will gain a deeper understanding of AdaBoost and its practical applications in real-world scenarios.
Note: If you are more interested in learning concepts in an Audio-Visual format, We have this entire article explained in the video below. If not, you may continue reading.
AdaBoost Algorithm
In the case of AdaBoost, higher points are assigned to the data points which are miss-classified or incorrectly predicted by the previous model. This means each successive model will get a weighted input.
Let’s understand how this is done using an example.
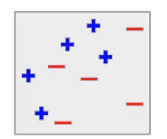
Say, this is my complete data. Here, I have the blue positives and red negatives. Now the first step is to build a model to classify this data.
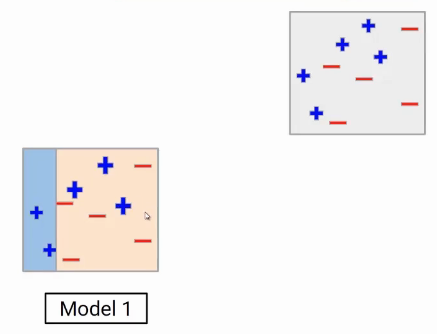
Model1
Suppose the first model gives the following result, where it is able to classify two blue points on the left side and all red points correctly. But the model also miss-classify the three blue points here.
Model 2
Now, these miss- classified data points will be given higher weight. So these three blue positive points will be given higher weights in the next iteration. For representation, the points with higher weight are bigger than the others in the image. Giving higher weights to these points means my model is going to focus more on these values. Now we will build a new model.
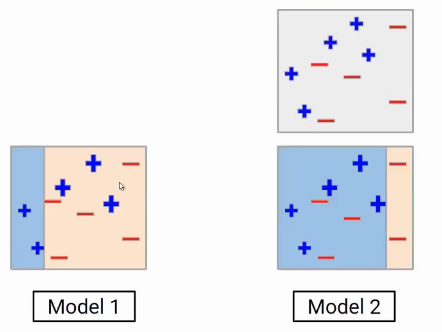
In the second model you will see, the model boundary has been shifted to the right side in order to correctly classify the higher weighted points. Still, it’s not a perfect model. You will notice three red negatives are miss-classified by model 2.
Model 3
Now, these miss-classified red points will get a higher weight. Again we will build another model and do the predictions. The task of the third model is two focus on these three red negative points. So the decision boundary will be something as shown here.
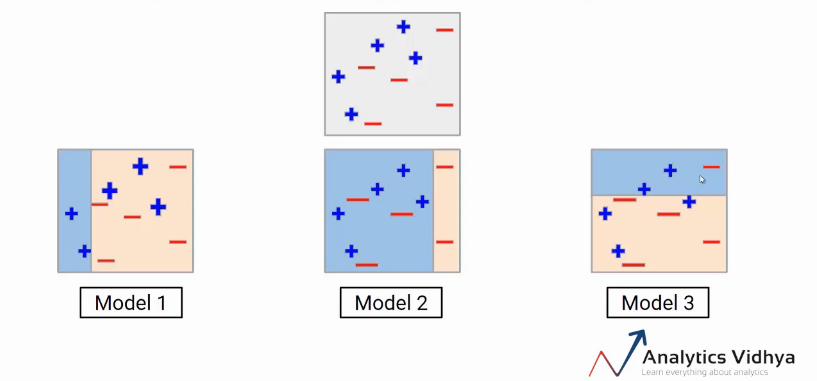
This new model again incorrectly predicted some data points. At this point, we can say all these individual models are not strong enough to classify the points correctly and are often called weak learners.
Ensemble
And guess what should be our next step. Well, we have to aggregate these models. One of the ways could be taking the weighted average of the individual weak learners. So our final model will be the weighted mean of individual models.
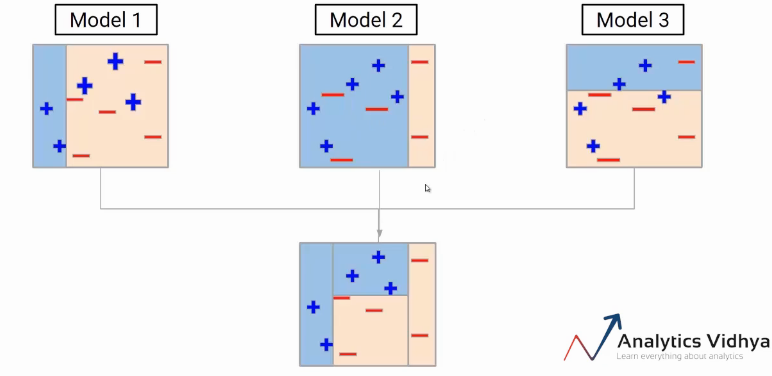
After multiple iterations, we will be able to create the right decision boundary with the help of all the previous weak learners. As you can see the final model is able to classify all the points correctly. This final model is known as a strong learner.
Let’s once again see all the steps taken in AdaBoost.
- Build a model and make predictions.
- Assign higher weights to miss-classified points.
- Build next model.
- Repeat steps 3 and 4.
- Make a final model using the weighted average of individual models.
Implementation
Now we will see the implementation of the AdaBoost Algorithm on the Titanic dataset.
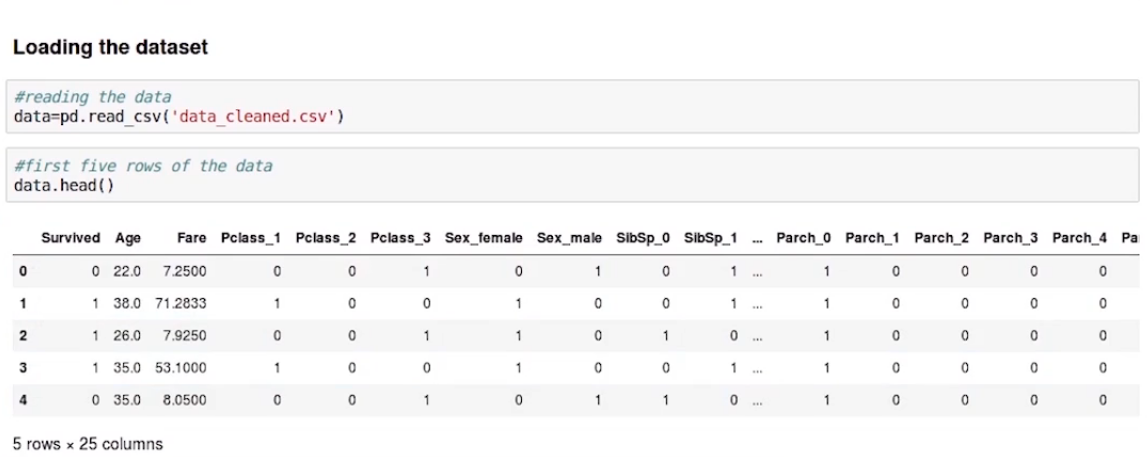
First, import the required libraries pandas and NumPy and read the data from a CSV file in a pandas data frame.

Here are the first few rows of the data. Here we are using pre-processed data. So we can see it is a classification problem with those who were survived classified as 1 and those who not labeled as 0.
In the next step, we will separate the independent and dependent variables, Saving the features in x and the target variable in y. Later, divide the data into train and test set using train_test split from sklearn. As shown below.
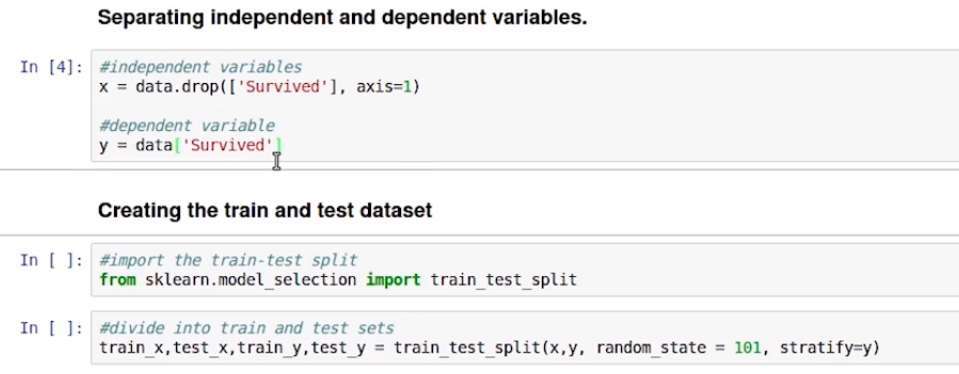
Here the stratify is set to y, it is to make sure that the proportion of both the classes remain the same in both the train and test data. Say if you have 60% of class 1 and 40% of class 0 in train data then you would have the same distribution in the test.
Now we will import the AdaBoostClassifier from sklearn.ensemble and create an instance of the same. We have set the random state value to 96, to reproduce the result. Then we used train_x and train_y to train our model.
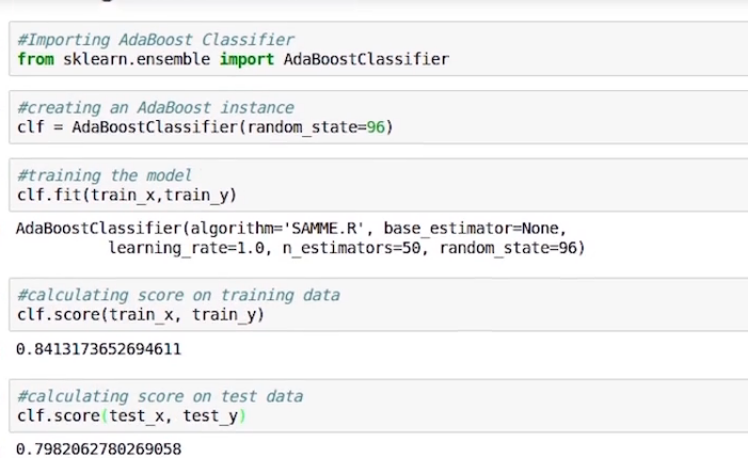
Now let’s check the score on training data, it comes around .84. Now we will do the same for the test data and it comes out to be .79.
Hyper-parameter Tuning
Let’s have a look at the hyper-parameters of the AdaBoost model. Hyper-parameters are the values that we give to a model before we start the modeling process. Let’s see all of them.
- base_estimator: The model to the ensemble, the default is a decision tree.
- n_estimators: Number of models to be built.
- learning_rate: shrinks the contribution of each classifier by this value.
- random_state: The random number seed, so that the same random numbers generated every time.
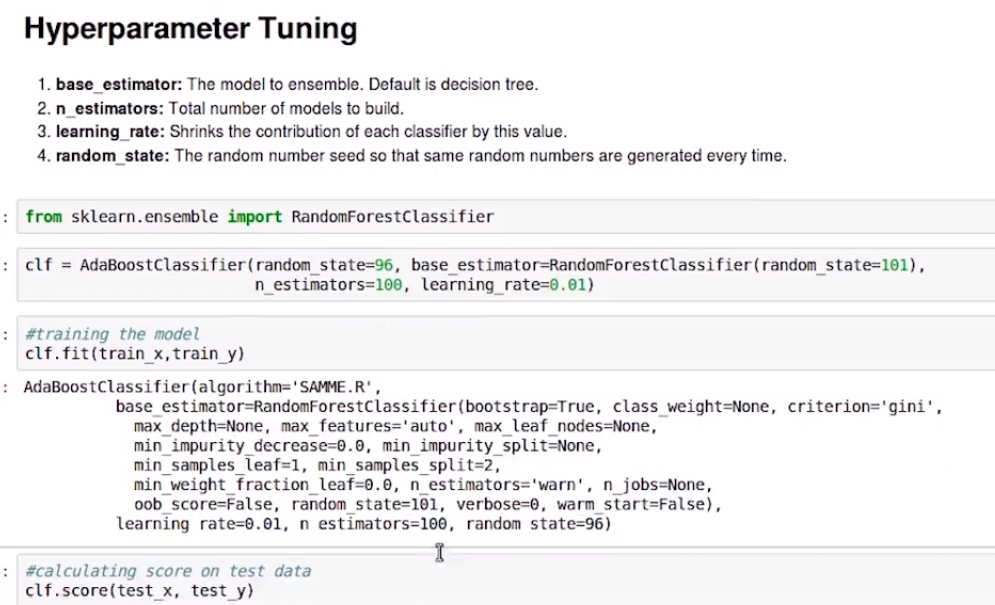
To experiment with hyper-parameters, this time we have set the base_estimator as RandomForestClassifier. We are using 100 estimators and learning_rate as 0.01. Now we train the model using the train_x and train_y as previously. Next is to check the score of the new model.
On the basis of the performance, you can change the hyper-parameters accordingly.
Conclusion
AdaBoost, an adaptive boosting algorithm, enhances model performance by assigning higher weights to misclassified data points in each iteration. This iterative process focuses on improving the accuracy of weak learners, ultimately creating a strong classifier through ensemble learning. Through a Python implementation utilizing the AdaBoostClassifier, we observed its effectiveness in binary classification tasks, achieving a training score of approximately 0.84 and a test score of around 0.79. Moreover, hyper-parameter tuning, such as adjusting the base estimator, number of estimators, and learning rate, further offers avenues for optimizing model performance.
Additionally, exploring alternatives like RandomForestClassifier as the base estimator showcases the versatility of AdaBoost. Overall, this article provides a comprehensive understanding of AdaBoost, its implementation in Python, and the significance of ensemble learning techniques in enhancing classification accuracy. Through integrating existing boosting techniques and innovative approaches like deep learning, the realm of ensemble learning continues to evolve, promising even more robust solutions for diverse machine learning tasks.
You can also enroll in our free Python Course Today!
Frequently Asked Questions
A. The AdaBoost algorithm, short for Adaptive Boosting, is an ensemble method utilized for classification tasks. It works by sequentially training a series of weak learners on the training set, where each subsequent learner focuses more on the data points that were misclassified by the previous ones. By adjusting the weights of these data points, AdaBoost aims to minimize the overall error rate. Eventually, the predictions of all weak learners are combined through a weighted sum to form the final prediction. Unlike methods like bagging or random forest, AdaBoost prioritizes the most challenging instances, enhancing its performance metrics and making it a powerful tool alongside neural networks and xgboost.
A. For beginners looking to understand the implementation of AdaBoost, importing necessary libraries like numpy and pandas is the first step. Next, utilizing x_train and y_train data, AdaBoost sequentially trains a series of weak classifiers, often simple models like logistics regression, to optimize performance on the given dataset, such as iris. By adjusting weights based on misclassifications, AdaBoost mitigates overfitting while improving accuracy. Through this iterative process, AdaBoost combines the predictions of multiple weak classifiers to form a robust ensemble model, showcasing its efficacy in enhancing machine learning models for various classification tasks.
A. AutoML, short for Automated Machine Learning, streamlines the model development process by automating various stages, including importing essential libraries like numpy and pandas, initializing diverse algorithms such as SVM and DecisionTreeClassifier, and implementing techniques like logistic regression. Through sample weights and optimization, AutoML fine-tunes model parameters to enhance performance on datasets. Leveraging majority vote, AutoML combines predictions from multiple models for improved accuracy. Additionally, AutoML facilitates seamless integration with GitHub repositories and offers tutorials for beginners to swiftly navigate its functionalities, making it a comprehensive solution for automating machine learning workflows, particularly evident in tasks like implementing AdaBoost and evaluating models on x_test data.


