Containerized Your Machine Learning WorkFlow With Docker : A Hands-on Guide
This article was published as a part of the Data Science Blogathon
Overview
- In this article, we will learn about Container technology and Docker and how to use them to package any application
- We will containerize a machine-learning application using docker and will push the created Docker image to DockerHub to be available to others
Prerequisites
- Python
- Flask
- Machine learning
Introduction
Years back, Virtual machines(VMs) were the main tool to host an application as it encapsulates code and configuration files along with required dependencies to run an application. It provides the same functionality as that of a physical system.
For running multiple applications we have to spin up multiple virtual machines and for managing a set of virtual machines we need a hypervisor.

Source: Applications sharing Infrastructure
Move from virtual machines to containers
The limitation to this mechanism(virtual machines) is that it is not efficient, as running multiple applications will replicate their own operating systems which consumes a lot of resources, and as running applications increases we need more space to allocate to the resources.
Another downside of this is, Suppose we have to share our application with others, and when they try to run the application most of the time it doesn’t run due to dependencies issues and for that, we have just to say that “It works on my laptop/system“. So for others to run the applications they have to set up the same environment as it was run on the host side which means a lot of manual configuration and installation of components.
The solution to these limitations is a technology called Containers.
Building Machine Learning models in Jupyter Notebooks is not the end solution for any POC/Project, we need to push it to production to solve real-life problems in real-time.
So, the first step is to containerize/package our application that we can run our application on any cloud platform to get advantages of managed services and autoscaling and reliability, and many more.
To package our application we need tools such as Docker. So let’s get our hands working on awesome tools and see the magic.
Containers
A container is a standard unit of software that packages up code and all its dependencies so the application runs quickly and reliably from one computing environment to another.
Now, multiple Virtual Machines are replaced with multiple containers running on a single host operating system. The applications running in containers are completely isolated and have access to the OS filesystem, resources, and packages. For the creation and execution of containers, we need container management tools, such as Docker.

Source: Applications sharing Operating System
Docker
Docker is a container management tool, which packages the application code, configuration, and dependencies into a portable image that can be shared and run on any platform or system. With docker, we can containerize multiple apps and run them on the same machine/system, as all will share the same services of the operating system kernel, they use fewer resources than virtual machines(VMs).
A Docker container image is a lightweight, standalone, executable package of software that includes everything needed to run an application: code, runtime, system tools, system libraries, and settings.
Container images become containers at runtime and in the case of Docker containers – images become containers when they run on Docker Engine.
Docker Engine
Docker Engine is the container runtime that runs on various Linux (CentOS, Debian, Fedora, Oracle Linux, RHEL, SUSE, and Ubuntu) and Windows Server operating systems.
Docker Engine enables containerized applications to run anywhere consistently on any infrastructure, solving “dependency hell” for developers and operations teams, and eliminating the “it works on my laptop!” problem.
Docker containers that run on Docker Engine are:
- Standard: Docker created the industry standard for containers, so they could be portable anywhere
- Lightweight: Containers share the machine’s OS system kernel and therefore do not require an OS per application, driving higher server efficiencies and reducing server and licensing costs
- Secure: Applications are safer in containers and Docker provides the strongest default isolation capabilities in the industry
Docker Installation
Docker is an open platform for developing, shipping, and running applications. Docker enables us to separate our applications from our infrastructure so we can deliver software quickly.
We can download and install Docker on multiple platforms. Refer to the official Docker page to install Docker based on the operating system in your local system.
Once you have installed the Docker, you can verify the installation is successful by running the docker command on the terminal/command prompt.
The output will be similar as below, if you get a permission error try to execute it in root user mode (in Linux used Sudo docker).

Source: Author
Dockerfile
A simple file that consists of instructions to build a Docker Image. Each instruction in a docker file is a command/operation, for example, what operating system to use, what dependencies to install or how to compile the code, and many such instructions which act as a layer.
The best part is all layers are cached and if we modified some instructions in the Dockerfile then during the build process it will just rebuild the changed layer.
A sample Dockerfile will look as below
FROM ubuntu:18.04 WORKDIR /app COPY . /app RUNpip install -r requirements.txtEXPOSE 5000 CMD python app.py
Each instruction creates one layer:
- FROM creates a layer from the base image, here we have used ubuntu:18.04 Docker image
- WORKDIR specifies the working directory
- COPY adds files from your Docker client’s or host system current directory, here we are adding current directory files to the container’s app directory
- RUN specifies what commands to run within the container, here running pip command to install dependencies from requirements.txt file
- EXPOSE specifies which port to expose our application, here it’s 5000
- CMD specifies what command to run at the start of the container
Docker Image
Once a docker file is created, we can build a docker image from it. Docker Image provides the execution environment for an application, bundling all necessary code, config files, and dependencies.
A Docker image consists of read-only layers each of which represents a Dockerfile instruction. The layers are stacked and each one is a delta of the changes from the previous layer.
We can build a docker image with a docker file using the docker build command.
Once the docker image is built we can test it using the docker run command, which will create a container using the docker image and runs the application.
Docker Registry
Once the docker image is built and tested, we can share it with others so that they can use our application. For that, we need to push the docker image to the public docker image registry such as DockerHub, Google Container Registry(GCR), or any other registry platforms.
We can also push our docker images to private registries to restrict the access of the docker image.
Machine Learning Application
Machine learning application will consist of complete workflow from processing input, feature engineering to generating output. We will see a simple Sentiment Analysis application, which we will containerize using docker and push that application to the DockerHub to be available to others.
Sentiment Analysis
We will not go into detail about machine learning applications, just an overview we will containerize a Twitter sentiment analysis application. The code and data files can be found in Github.
You can either clone this application or you can containerize your own application, the process will be the same.
The git repository will have the following files
- app.py: Main application
- train.py: Script to train and save trained model
- sentiment.tsv: Data file
- requirements.txt: It contains required packages/dependencies
- Dockerfile: To create the docker image
- Template folder: It contains our web page for application
- model folder: It contains our trained model
Below is how a requirements.txt will look like, we can also specify the version for each library that we need to install
numpy
pandas
scikit-learn
flask
nltk
regex
In our app.py, we will load our trained model and do the same preprocessing as we did in the training.
The Flask app will serve two endpoints, home, and predict
@app.route('/')
def home():
    return render_template('home.html')
@app.route('/predict',methods=['POST'])
def predict():
    if request.method == 'POST':
        message = request.form['message']
        clean_test = remove_pattern(test,"@[w]*")
        tokenized_clean_test = clean_test.split()
        stem_tokenized_clean_test = [stemmer.stem(i) for i in tokenized_clean_test]
        message = ' '.join(stem_tokenized_clean_test)
        data = [message]
        data = cv.transform(data)
        my_prediction = clf.predict(data)
    return render_template('result.html',prediction = my_prediction)
We have to load the trained model, vectorizer, and stemmer(used in training) also we have set to receive requests on 5000 port on localhost (0.0.0.0)
if __name__ == '__main__':

    ##initialize stemmer
    stemmer = PorterStemmer()

    ##load vectorizer and model
    with open('model/logistic_clf.pkl', 'rb') as f:
        cv, clf = pickle.load(f)

    app.run(host='0.0.0.0',port=5000)
Containerization
Our Machine Learning Application is ready, we can now use Docker to package it.
First, we will create a Dockerfile, we have seen how to write a Dockerfile so will use the same instructions.
We need to decide the base image on which we want to run our application, so we will start with a python image that will have a python environment pre-installed so we don’t have to worry about installing the python programming language.
FROM python:3.8-slim-buster
We can create a directory in a container where we can keep our code, config, and other related files.
WORKDIR /app
We can now copy our files present in the local directory in the image ‘app’ directory using the COPY command
COPY . /appNow we have to install our application dependencies, we will do that by using a requirements.txt file that we have created in the above section.
RUN pip3 install -r requirements.txtThe RUN command will execute the pip3 command the same as we execute in our local system, this will install the packages specified in the requirements.txt file.
We can expose our application to the port using the EXPOSE command
Expose 5000
We can specify what command to run when our image is executed inside the container using the CMD commend.
CMD ["python3","app.py"]
The complete Dockerfile will look as
FROM python:3.8-slim-buster
WORKDIR /app
COPY . /app
RUN pip install -r requirements.txt
EXPOSE 5000
CMD ["python3","app.py"]
save this to file named as Dockerfile it’s the default name as the name of the Dockerfile is not important
Now we can create our docker image using Dockerfile
docker build -t app:v1
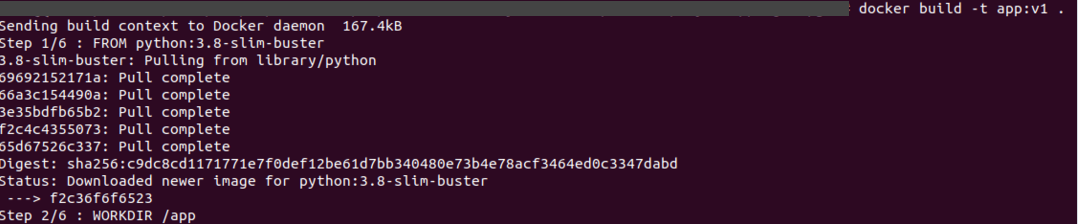
Source: Author
It will create a docker image, we can check using the docker images command
docker images

Source: Author
We can test it by running the image using the docker run command
docker run app:v1

Source: Author
Now we can go to ‘0:0:0:0/5000’ or IP of the docker displayed, to check if our application is running or not.
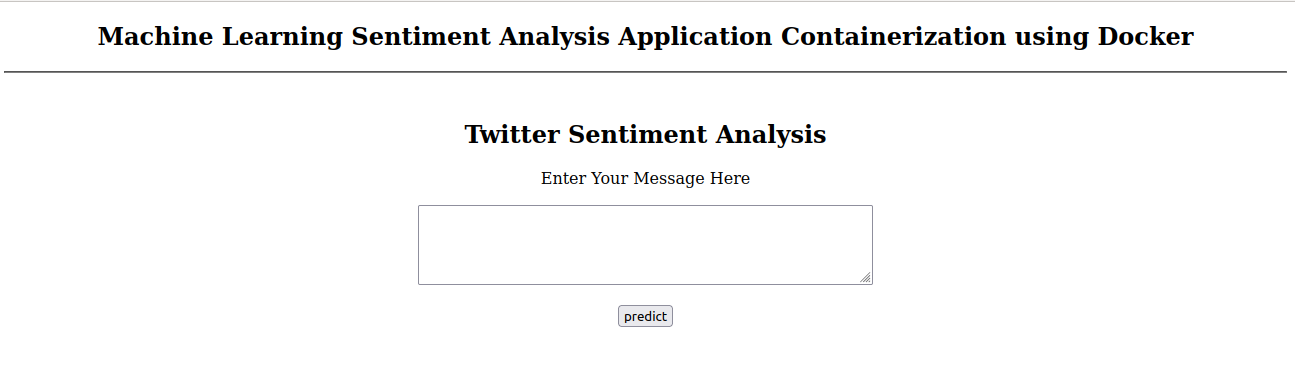
Source: Author
We can stop the application by CTRL+C.
Congratulations, we have successfully containerized our machine learning application.
Now, it’s time to share this application with others. To do so we will first create an account on DockerHub, a public image registry, and push our image to it.
The first time it will ask for credentials, so we can use the docker login command to log in to DockerHub
Before pushing the docker image to the image registry we need to tag it to a proper name and version, a tag provides version control over application releases, as a new tag would indicate a new release.
To tag a docker image we can use the docker tag command.
#docker tag source target
docker tag app:v1 dmoonat/app:v1.0.0
where
app:v1 is our image
dmoonat is (my) repository in DockerHub where I will push the image (you have to push to your own repository as it required login credentials), and app:v1.0.0 is the image name and version.
Now we can push the docker image using the docker push command.
docker push dmoonat/app:v1.0.0
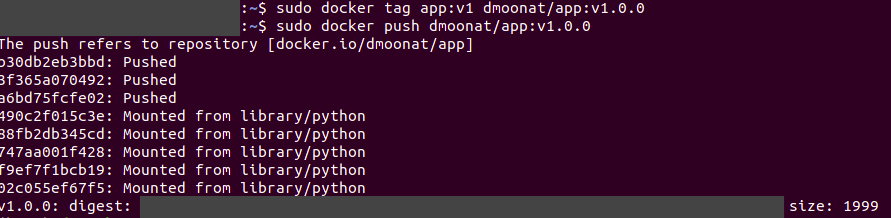
Source: Author
We can check our DockerHub account if an image is uploaded or not, once it’s been uploaded we can easily share the link to anyone to test our application. The other party/person should have docker installed in their system.
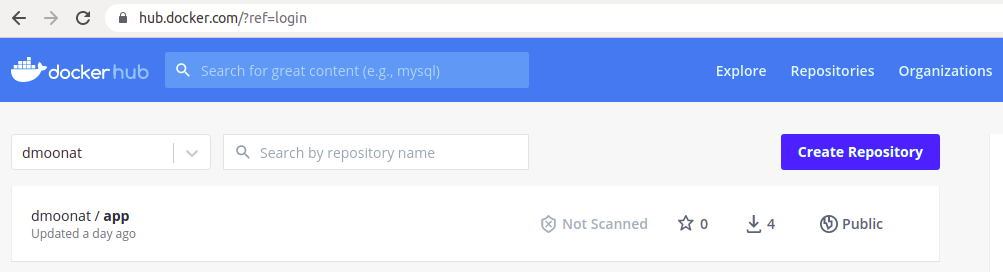
Source: Author
They just have to use the docker pull command to pull the image from DockerHub
docker pull dmoonat/app:v1.0.0
and they can test our application using the docker run command
docker run dmoonat/app:v1.0.0
What if we don’t want to install docker to test the application?
No worries, we can use Play with Docker, which provides a virtual machine browser where we can build and run Docker containers.
End Notes
Note: This article is about containerizing a machine learning
workflow and not about understanding the concepts of machine learning and getting better accuracy.
Here, We have seen the Sentiment Analysis Application similarly we can
use the same process to package any machine learning application or any
other application also.
In this article, we have learned about how to install docker and how to containerized a machine learning application using Docker. Also how to share docker image with others using a public docker image registry.
References
About Me
I am a Machine Learning Engineer, Solving challenging business problems through data and machine learning
The media shown in this article are not owned by Analytics Vidhya and are used at the Author’s discretion.


