Create CNN Model and Optimize Using Keras Tuner – Deep Learning
This article was published as a part of the Data Science Blogathon
In this article, we will learn about how the convolutional neural network works and how we can optimize it using the Keras tuner. But before going ahead we will take a brief intro on CNN
The pooling operation used in convolutional neural networks is a big mistake, and the fact that it works so well is a disaster
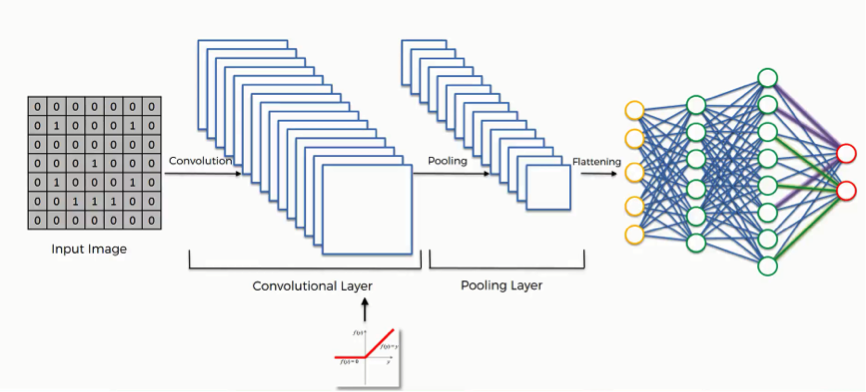
Convolutional Neural Network
We know that CNN is the subset of deep learning, It is similar to the basic neural network. CNN is a type of neural network model which allows working with the images and videos, CNN takes the image’s raw pixel data, trains the model, then extracts the features automatically for better classification.
Now we start building our CNN model:
Importing Libraries
Import libraries
#import pandas
import pandas as pd
#importing numpy
import numpy as np
#importing tensorflow
import tensorflow as tf
#importing keras from tensorflow
from tensorflow import keras
# importing Sequential from keras
from tensorflow.keras.models import Sequential
#importing Dense and Conv2D layers from keras
from tensorflow.keras.layers import Dense,Conv2D
Here we importing some important libraries and the modules that are required for building the convolutional model. The Conv2D layer is the convolutional layer required to creating a convolution kernel that is convolved with the layer input to produce a tensor of outputs.
Dataset
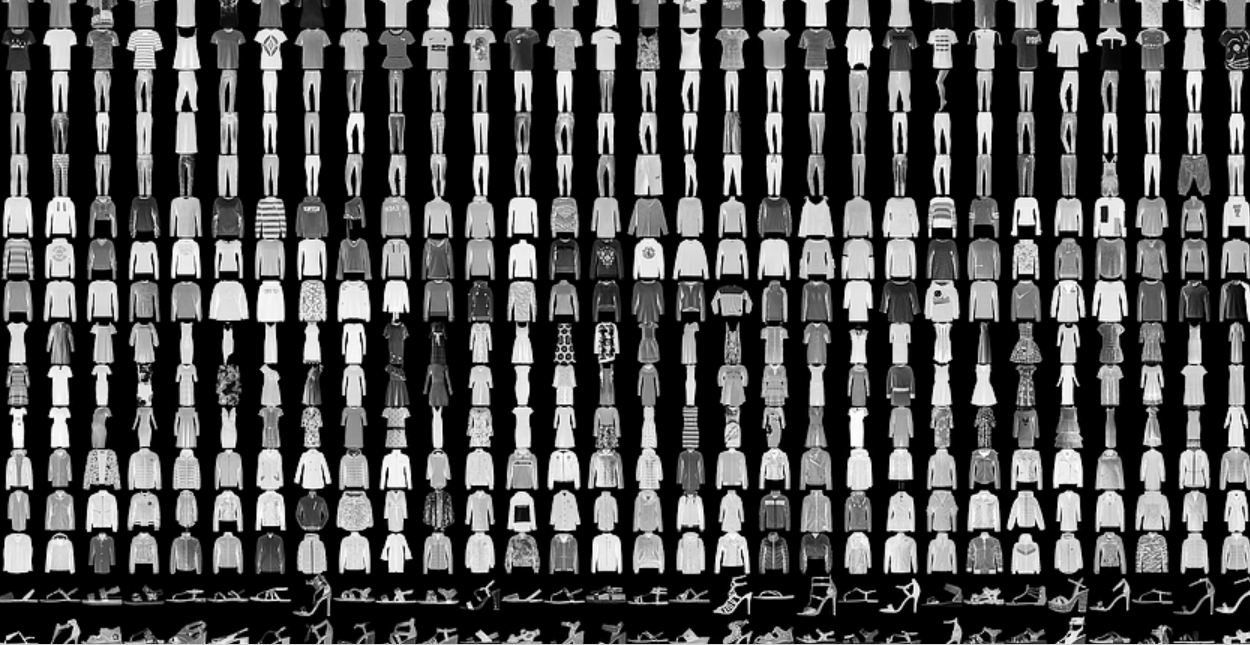
Let’s talk about the dataset that we are used for training our CNN model, we used the fashion MNIST dataset consisting of a training set of 60,000 examples and a test set of 10,000 examples. Each example is a 28×28 grayscale image, associated with a label from 10 classes.
If you want to download the dataset then you can see the link below:
DATASET: Fashion_MNIST
for those who don’t want to download the dataset from Kaggle, we can use the Keras library. The Keras library contains the inbuild dataset module in which there is fashion_MNIST dataset is also present, So we will use the Keras and load the dataset.
df = tf.keras.datasets.fashion_mnist
# spliting the data into train and testing part
(train_df,train_labl),(test_df,test_labl) = df.load_data()
Scaling Images
When you see the images they are grayscale images, so we convert or scale down them into 0 to 1 which is easier to build the model, for that we do:
#scaling the train data
train_df=train_df/255.0
#scaling test data
test_df = test_df/255.0
After Scaling is over now we will reshape the training and testing data, because if we see one image then you see that the values are not well organized, for that we have to reshape the training and testing data.
train_df[0]

Reshaping Data
#rehaping the images into equal dim.
train_df = train_df.reshape(len(train_df),28,28,1)
test_df = test_df.reshape(len(test_df),28,28,1)
Hypertuning the Model
Now the main step comes, here we have to create a function that is used to hyper-tune the model with several layers and parameters. First, we have to create a function:
def build_model(hp):
    # create model object
    model = keras.Sequential([
    #adding first convolutional layer
    keras.layers.Conv2D(
        #adding filter
        filters=hp.Int('conv_1_filter', min_value=32, max_value=128, step=16),
        # adding filter size or kernel size
        kernel_size=hp.Choice('conv_1_kernel', values = [3,5]),
        #activation function
        activation='relu',
        input_shape=(28,28,1)),
    # adding second convolutional layer
    keras.layers.Conv2D(
        #adding filter
        filters=hp.Int('conv_2_filter', min_value=32, max_value=64, step=16),
        #adding filter size or kernel size
        kernel_size=hp.Choice('conv_2_kernel', values = [3,5]),
        #activation function
        activation='relu'
    ),
    # adding flatten layer
    keras.layers.Flatten(),
    # adding dense layer
    keras.layers.Dense(
        units=hp.Int('dense_1_units', min_value=32, max_value=128, step=16),
        activation='relu'
    ),
    # output layer
    keras.layers.Dense(10, activation='softmax')
    ])
    #compilation of model
    model.compile(optimizer=keras.optimizers.Adam(hp.Choice('learning_rate', values=[1e-2, 1e-3])),
              loss='sparse_categorical_crossentropy',
              metrics=['accuracy'])
    return model
Here we create a function called buiild_model() in that we have created the Sequential object, in the Sequential, we create our first convolutional layer with the help of the Conv2D module that is present inside the Keras library. In the Conv2D where we using certain parameters:
- Filters: Creating a range of integers that takes a certain values
- kernel_size: An integer or tuple/list of 2 integers, specifying the height and width of the 2D convolution window.
- activation: Activation function to use.
- input_shape: It contains a shape of the image with the axis.
So, here we create the 2 convolutional layers by applying certain sizes of filters, then we create a Flatten layer. The Flatten layer flatten the input, Example: if the input is (batch_size,4,4) then output is (batch_size,8). Then we create an output layer using Dense and compile it with certain parameters.
Optimize Model
Now we will use the Keras module RandomSearch for the optimization of hyperparameter and search the best parameters using the search() method.
#importing random search
from kerastuner import RandomSearch
#creating randomsearch object
tuner = RandomSearch(build_model,
                    objective='val_accuracy',
                    max_trials = 5)
# search best parameter
tuner.search(train_df,train_labl,epochs=3,validation_data=(train_df,train_labl))
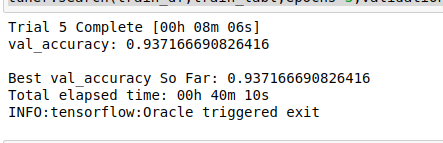
Resultant of the above code concludes that RandomSearch takes 5 trials and finds the best parameters from the ranges, after finding the best parameter we apply on over the model and get the best model.
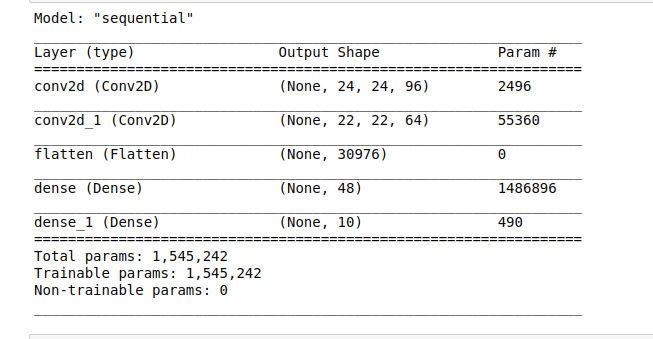
model=tuner.get_best_models(num_models=1)[0]
#summary of best model
model.summary()
Fitting Data
Now we fit our testing data with the no of values that we have obtained from the hyper tuning of the model.
model.fit(test_df,test_labl,
          epochs=10,
          validation_split=0.1,i
          nitial_epoch=3)
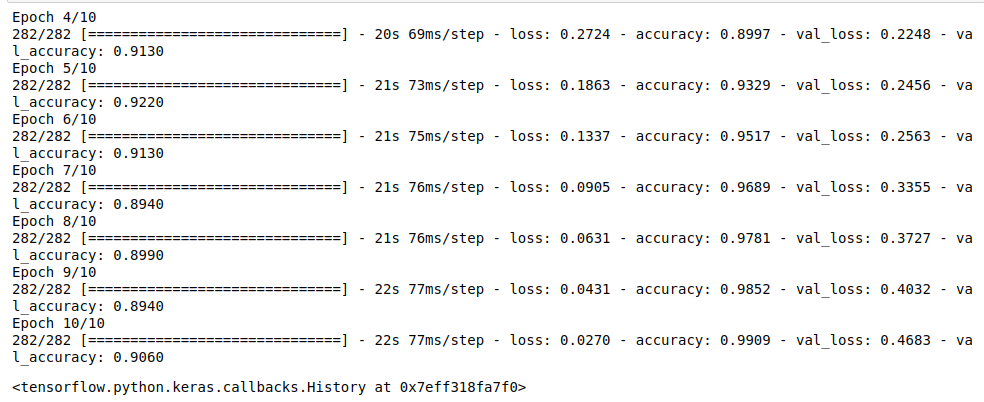
You can see that the accuracy of our model is quite perfect. After completing all epochs the val_accuracy of our model is 0.9060 which is very good accuracy.
Save model
It’s time to Save our model.
file_name = 'CNN'
model.save('file_name')
EndNote
I hope you like this article thank you for reading this article, if you have any query then ask me in the comment section.
connect with me on LinkedIn: Mayur_Badole
Thank You.
The media shown in this article are not owned by Analytics Vidhya and are used at the Author’s discretion.


