Deploying Machine learning Application on AWS Fargate
This article was published as a part of the Data Science Blogathon
Overview
In this article, we will learn how to run/deploy containerized machine learning application on AWS Fargate, serverless service of AWS cloud
Prerequisites
- Basic Command-Line Knowledge( I will use Linux )
- Machine learning
- Basic knowledge of AWS cloud and AWS cloud account
- Docker and containerization
Note: Please refer to this article to learn about docker and how to containerize machine learning workflow. We will use the same machine learning workflow and flask app that we have built in the article.
Introduction
We have come a long way in technology, with advancements now if we need to deploy our websites or application we don’t have to worry about the infrastructure, servers, and networking management or to scale infrastructure up or down based on network traffic.
We can leverage the concept of cloud computing.
What is Cloud Computing?
Cloud Computing is the on-demand delivery of services such as computing power, servers, databases, software to users over the internet with pay-as-per-use pricing.
Now we don’t have to buy and maintain physical data centers and
servers, we can access technology services, such as computing power,
storage, and databases, on an as-needed basis from a various cloud provider like
Amazon Web Services (AWS), Cloud Cloud Platform(GCP), or Azure Cloud.
Types of Cloud Computing Models
Infrastructure as a Service (IaaS)
IaaS provides access to networking features, computers (virtual or on dedicated hardware), and data storage space. It provides flexibility and we have full control over resources. Example: AWS EC2
Platform as a Service (PaaS)
With the PaaS model, we don’t have to manage the underlying infrastructure
(usually hardware and operating systems) and can just focus on development. Example: AWS Elastic Beanstalk
Software as a Service (SaaS)
SaaS provides us with a complete product that is run and managed by the service provider. Example: Gmail
Advantages of Cloud Computing
- Flexible access: Enables access to cloud services from anywhere over the internet
- High availability: Ensures resource availability based on consumers requirement, enables fault tolerance
- Flexible scaling: Enables scaling of resources to meet demand, manual or automatic resource scaling
- Reduce IT cost: Reduces upfront capital expenditure, improves resource utilization, reduces energy and space consumption with a pay-as-per-use pricing model
- Business continuity: Reduces the impact of downtime
AWS
Amazon Web Services(AWS) offers reliable, scalable, and cost-effective cloud computing services. It provides Infrastructure as a service(IaaS), Platform as a Service(PaaS), Software as a Service(SaaS) also a new model known as Function as a Service(FaaS) eg. AWS Lambda which is a serverless entity.
Before going further, if you don’t have an AWS account please create one to follow along with the hands-on.
Amazon Elastic Container Service(ECS)
Amazon ECS is a container orchestration platform developed by Amazon, it is similar to Kubernetes.
Amazon Elastic Container Service (ECS) helps schedule and orchestrate containers across a group of servers.
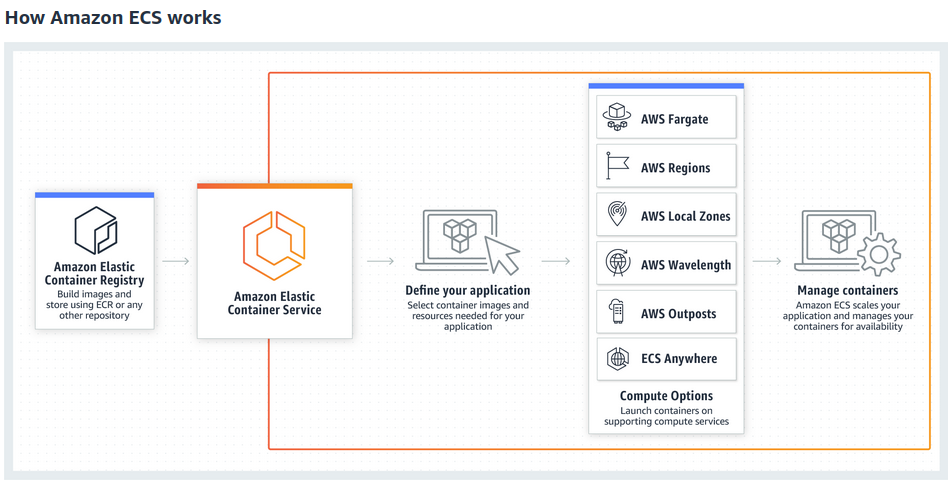
Source: AWS ECR
The two major ECS components are Tasks and Services.
A Task is one or more containers that are to be scheduled together by ECS.
A Service is like an Auto Scaling group for tasks. It defines the number of tasks to run across the cluster, where they should be running, automatically associates them with a load balancer, and horizontally scales based on metrics that you define like memory utilization, etc.
Another important AWS service is Elastic Container Registry(ECR), It is a registry to store, manage our container images.
What is Fargate?
AWS Fargate is a serverless compute engine for Amazon ECS that runs containers without requiring us to worrying about the underlying infrastructure. With Fargate, we specify an image present in ECR to deploy and the amount of CPU and memory it requires. Fargate handles the updating and securing of the underlying Linux OS, Docker daemon, and ECS agent as well as all the infrastructure capacity management and scaling.
Let’s get our hands working on the AWS cloud.
Steps to Deploy Application on AWS Fargate
Step1: The first step is login to your AWS management console and searches for ECR
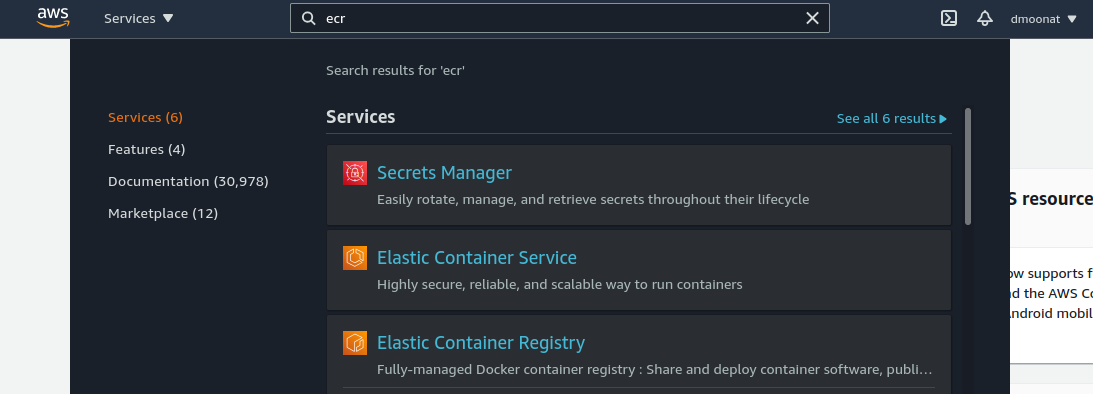
Source: Author
Step2: Click on ‘Get started’ on the landing page, it will ask you to create a repository. Fill in the details as per your need. You can create a Private or Public repository, give a repository name and click ‘Create repository’
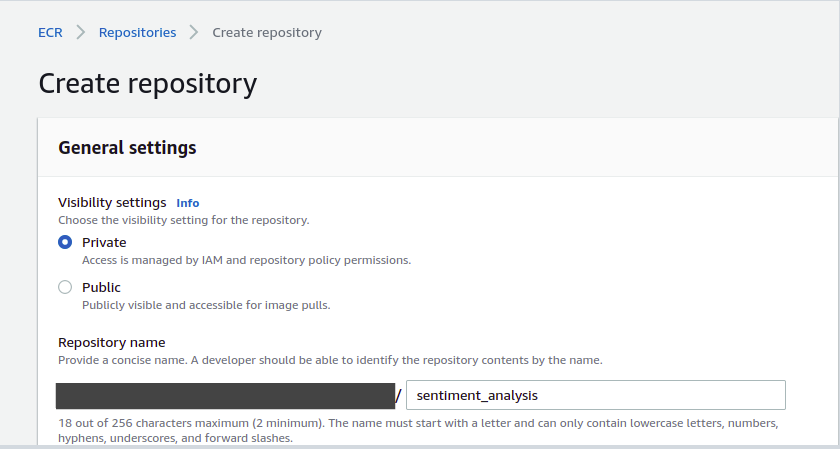
Source: Author
Step3: Your ECR repository is ready, click on the repository radio button, and a ‘View push commands’ button will be visible
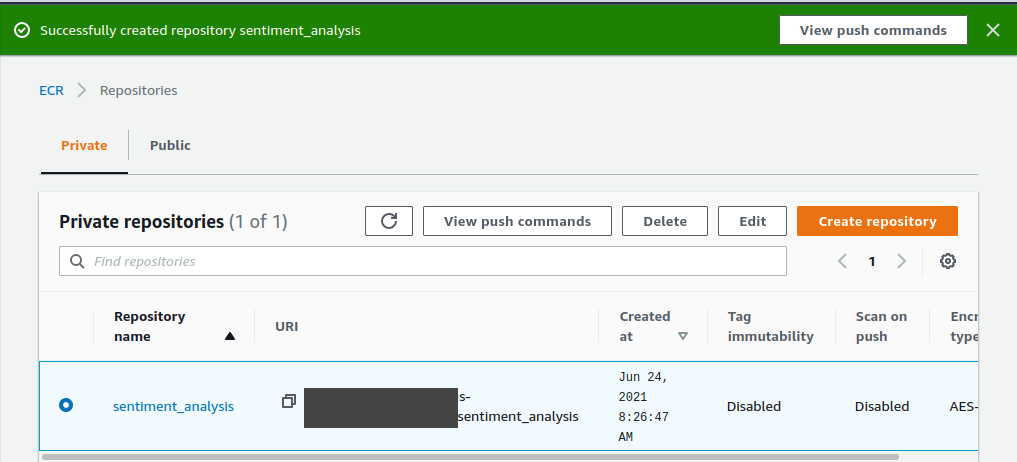
Source: Author
Step4: Now click on the ‘View push commands’, It will pop up the commands to upload a docker image to the Elastic container registry(ECR)
Note: You should have a docker image in place to push to ECR If not, follow my previous part to create one or have your own application docker image ready
You can check for available images using the docker images command, Here I have my app docker image ready which I want to deploy so I will push it to ECR.

Source: Author
Before running AWS commands we need to install AWS CLI, follow this to install it in your system.
AWS Command Line Interface(CLI) is a command-line tool to manage AWS.
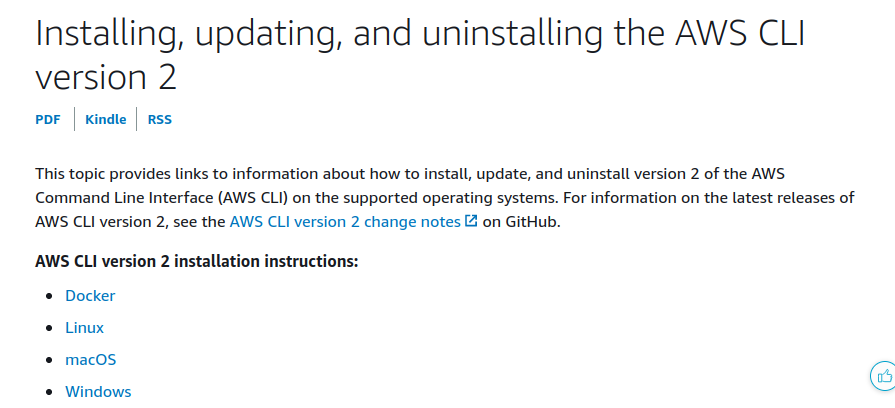
Source: AWS
I have a Linux system, so I will use the following command to install the CLI. Refer to this blog.

Source: Author
We can check if the installation is successful or not using the ‘aws –version’ command.
Now we have to configure it with AWS account credentials to execute AWS commands. Click on your account and click on ‘My Security Credentials‘ and then click on create. The credentials will be created and you can download them.
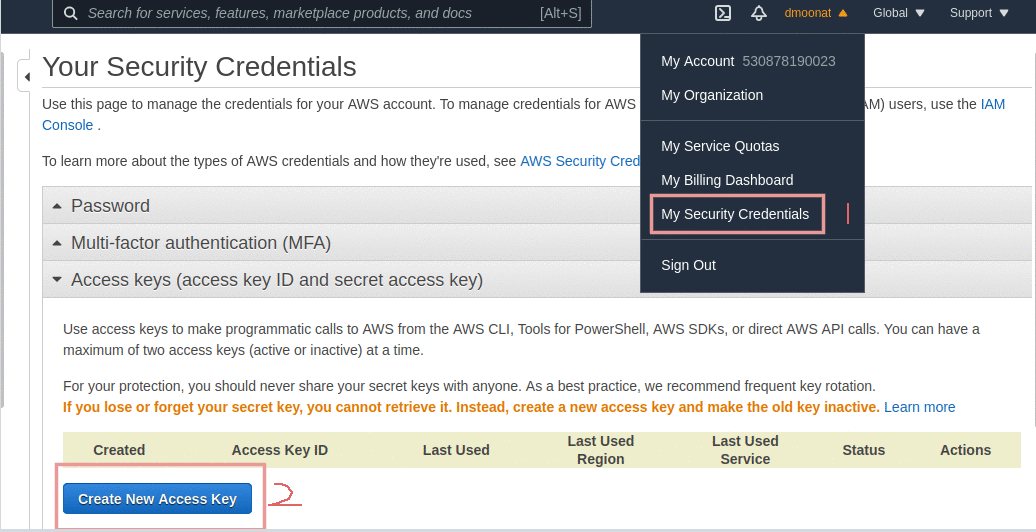
Source: Author
Now, on the terminal run ‘aws configure command to configure your credentials, specify your credentials, and set any region and for the output format, you can press enter (or use json as the output format).

Source: Author
Now we are all set to push our docker image to ECR.
Step5: Follow the commands based on the Operating system you are working on, run commands on your local terminal. If you get permission denied error executing the commands then use sudo before docker commands.

Source: Author
If you have already created the docker image then don’t run the build command and if not created then go to the directory where you have the Dockerfile and run the specified commands.

Source: Author
Great, we have pushed our docker image to ECR, you can verify from the console.
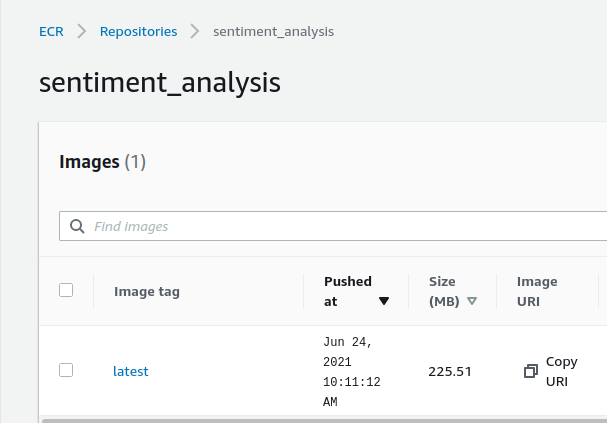
Source: Author
Copy the image URI for further reference.
Step6: Now we need to create a cluster. Check the left panel for Clusters and click on it. On the redirected page click on ‘Create Cluster’. Select ‘Networking only‘ and click next to configure the cluster. Assign a name to cluster and add tags to it (It is useful when you work in an organization to differentiate between projects and to take note of billing) and click create.

Source: Author
Step7: Now we need to create ‘Task Definition’. Click on the ‘View cluster’ and on the left side you will ‘Task Definitions’ option, click on it. After that click on ‘Create new Task Definition‘ and select Fargate as launch type and click next to configure it.

Source: Author
Now configure the Task Definition, give it a name, and now specify task Memory and CPU needed to run the task.
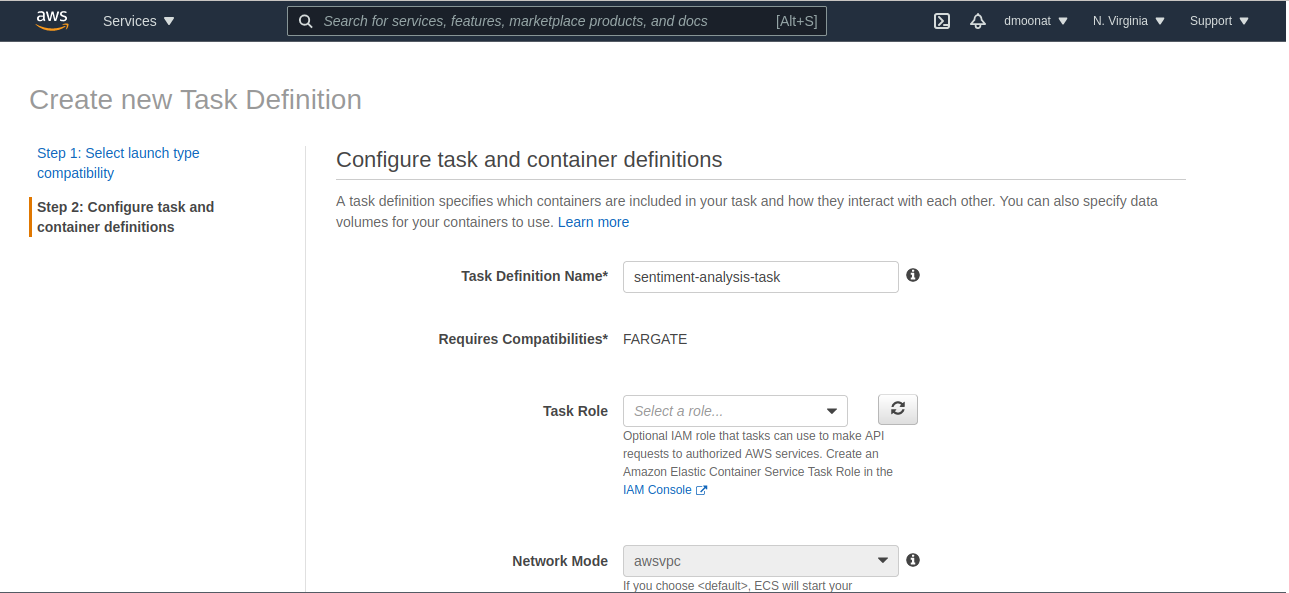
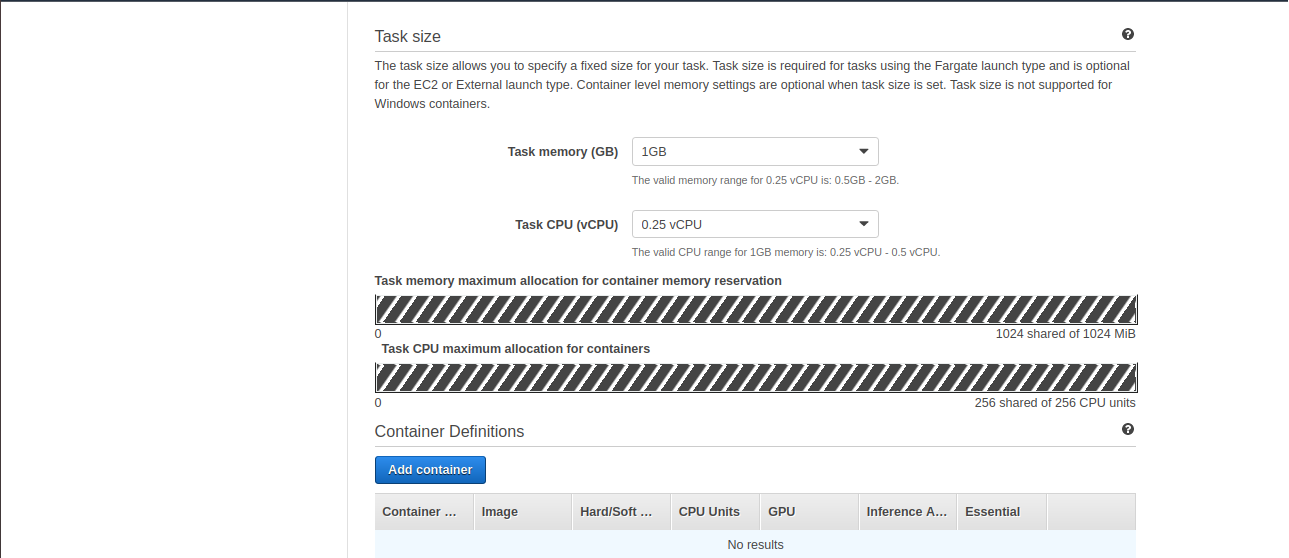
Source: Author
Now click on Add container, to add the container that we have pushed to ECR. Provide a name and image URI that we have copied in the previous step and specify the port mappings to 5000 as it will allow containers to access the port on the host container to send or receive traffic. Click Add and then click Create.
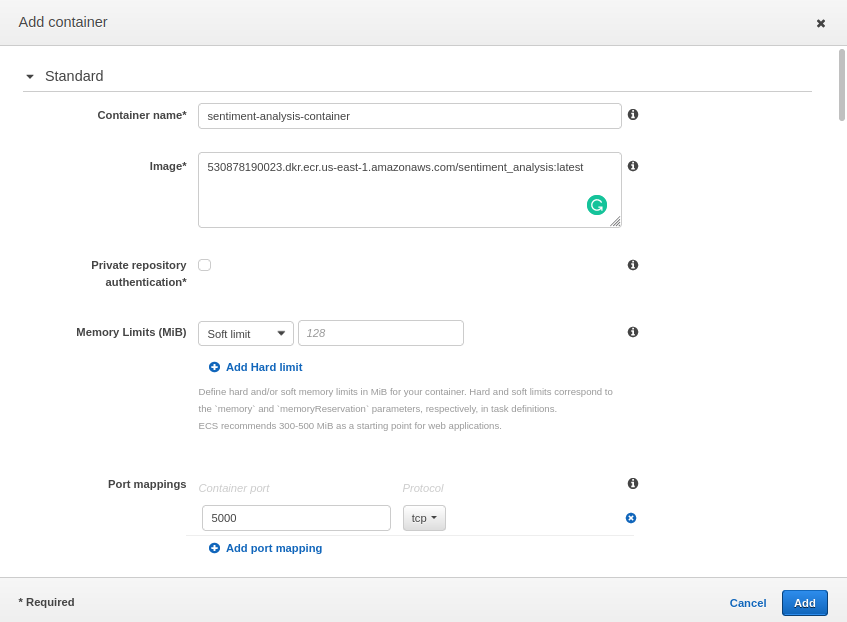
Source: Author
We can now view our ‘Task Definition‘
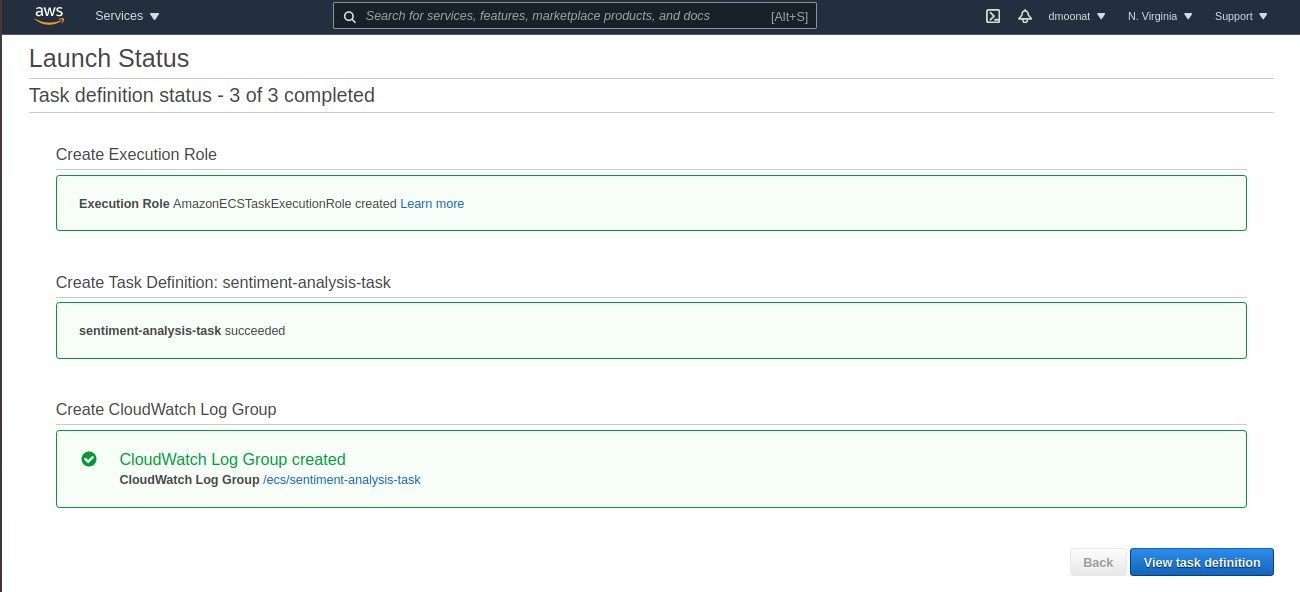
Source: Author
Step8: Click on Actions and Run Task, select launch type as Fargate
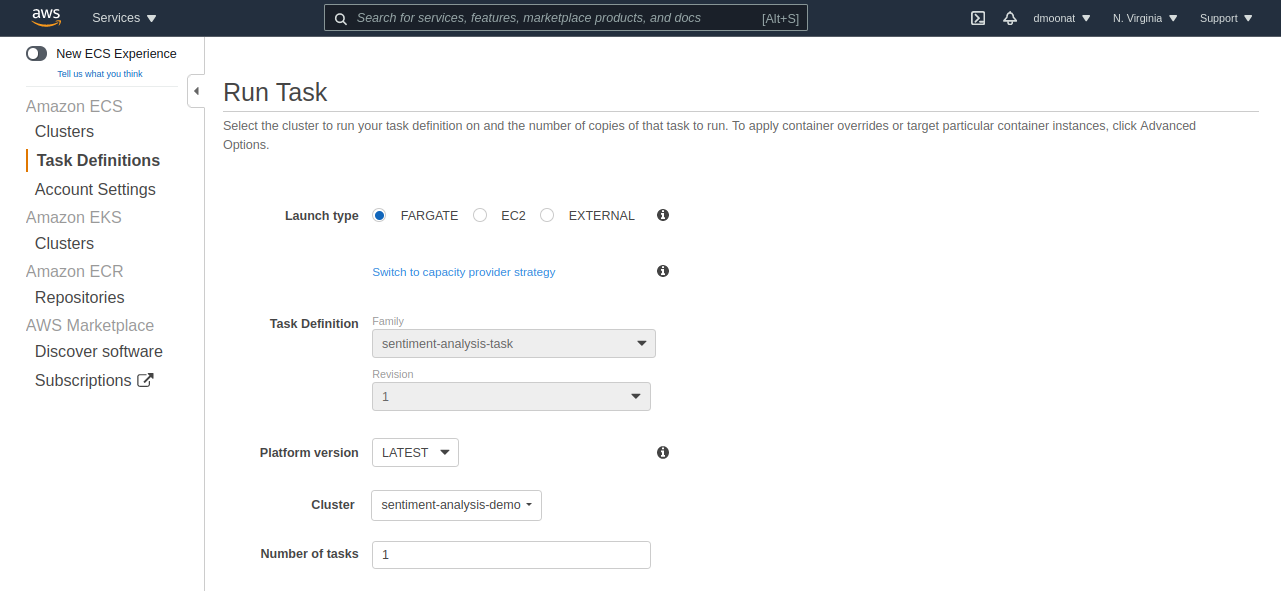
Source: Author
Select the VPC and subnet from the dropdown and click Run Task
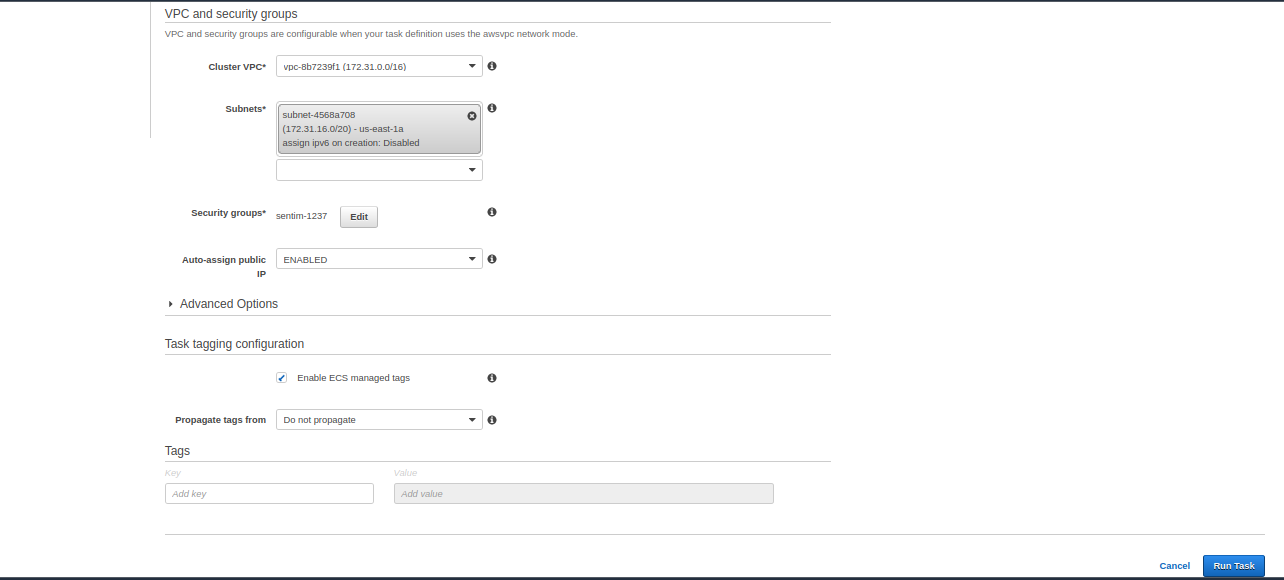
Source: Author
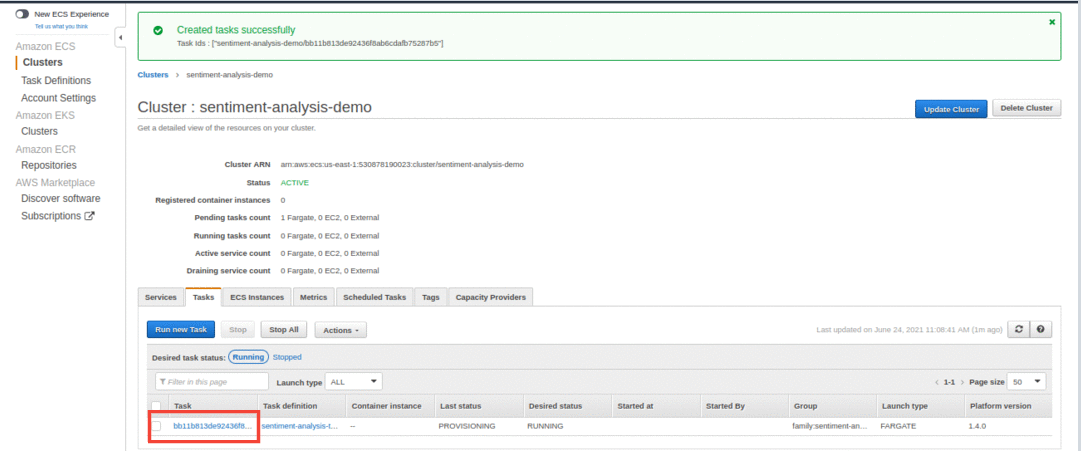
Step9: Our Task is created successfully, now we need to add an inbound rule to the security group to access our application on port 5000.
Click on the created task and on the next page click on ENI Id under the Network section also note the Public IP.
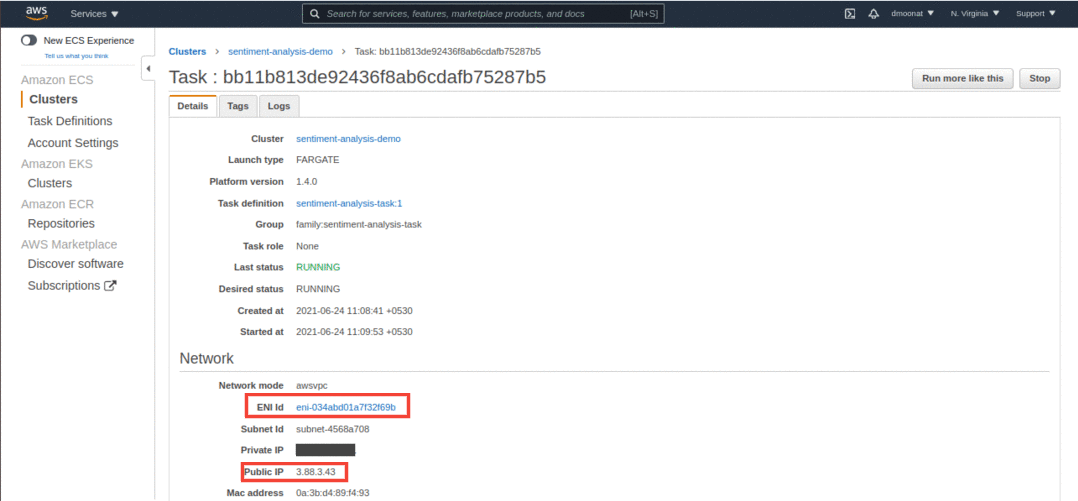
Source: Author
It will redirect to the network interface page, click on the check box, and then on the security group under the Details section.
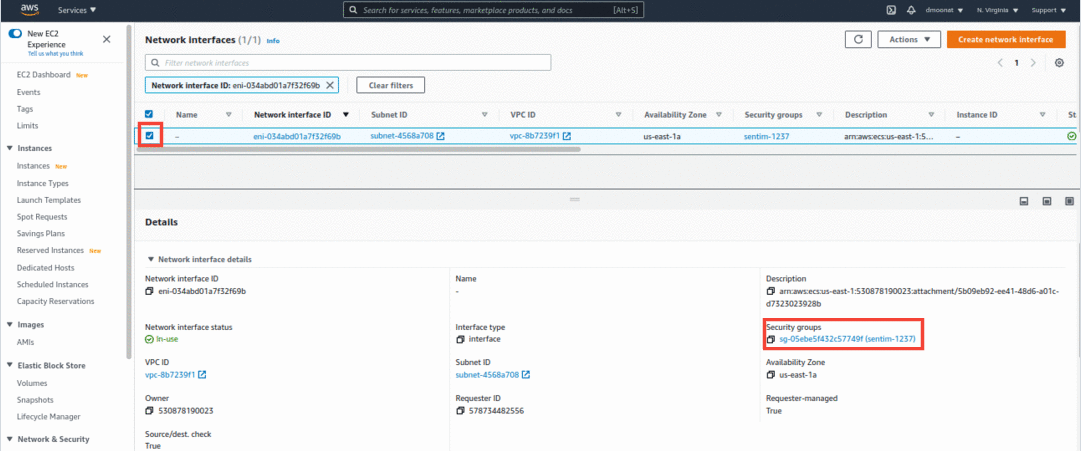
Source: Author
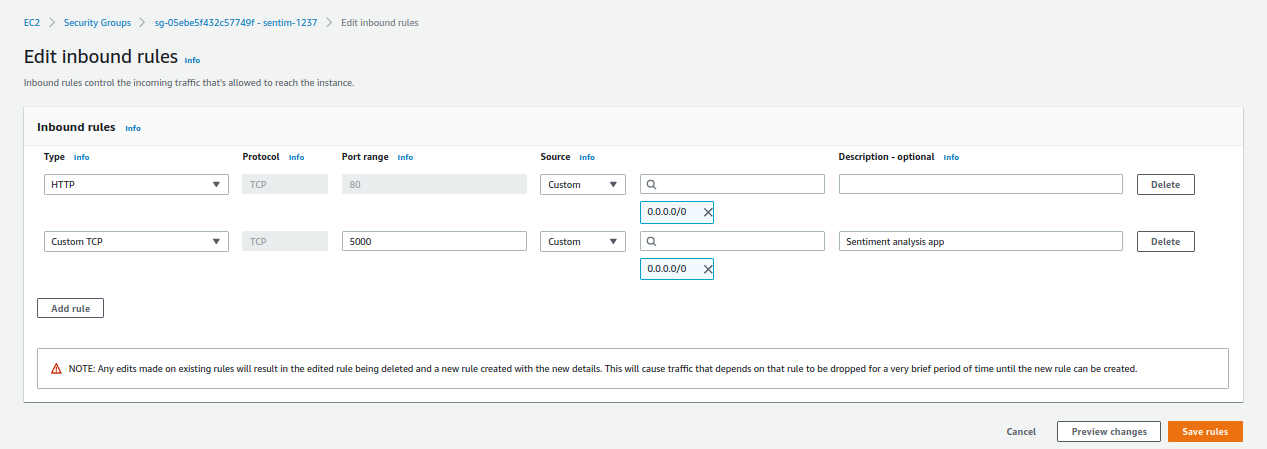
Now click on Edit inbound rules and click Add rule. Add a custom TCP rule with port 5000 and source to be 0.0.0.0/0 (to make the application accessible through all IPs) and click Save rules.
Source: Author
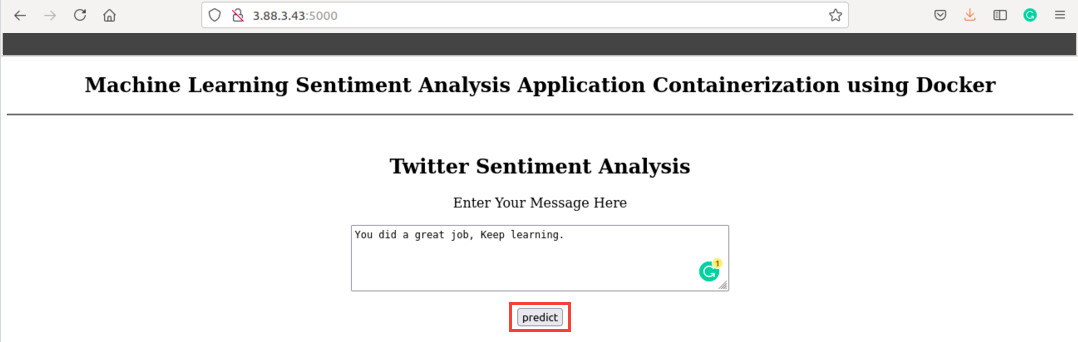
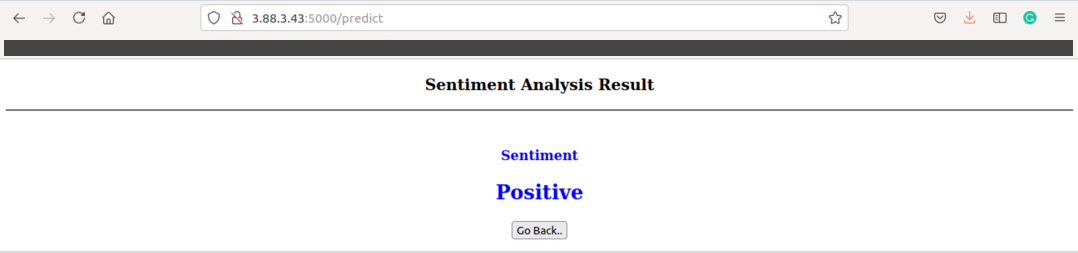
Now we can access our application using Public IP under Network section and port 5000
Source: Author
You did a great job, so give yourself a pat on the back!!!
Note: Before Wrapping up, I want to mention an important thing, to delete all your created AWS resources so that you don’t incur any extra cost.
First, you can stop the running Task and then delete the Cluster


Source: Author
End Notes
In this article, we have learned about Cloud Computing and AWS Cloud. How to set up AWS CLI and how to push our docker image to ECR and run our containerized application using AWS Fargate.
Reference
https://aws.amazon.com/what-is-cloud-computing/
https://aws.amazon.com/blogs/compute/building-deploying-and-operating-containerized-applications-with-aws-fargate/
About me
I am a Machine Learning Engineer, Solving challenging business problems through Data, Machine Learning, and Cloud.
Connect with me: Linkedin
The media shown in this article are not owned by Analytics Vidhya and are used at the Author’s discretion.


