Resume Screening with Natural Language Processing in Python
This article was published as a part of the Data Science Blogathon
Contents
- Why do we need Resume Screening?
- What is Resume Screening?
- Resume Screening using Machine Learning
- Code
- Conclusion
1. Why do we need Resume Screening?
For each recruitment, companies take out online ads, referrals and go through them manually.
Companies often submit thousands of resumes for every posting.
When companies collect resumes through online advertisements, they categorize those resumes according to their requirements.
After collecting resumes, companies close advertisements and online applying portals.
Then they send the collected resumes to the Hiring Team(s).
It becomes very difficult for the hiring teams to read the resume and select the resume according to the requirement, there is no problem if there are one or two resumes but it is very difficult to go through 1000’s resumes and select the best one.
To solve this problem, today in this article we will read and screen the resume using machine learning with Python so that we can complete days of work in few minutes.
2. What is Resume Screening?
Choosing the right people for the job is the biggest responsibility of every business since choosing the right set of people can accelerate business growth exponentially.
We will discuss here an example of such a business, which we know as the IT department. We know that the IT department falls short of growing markets.
Due to many big projects with big companies, their team does not have time to read resumes and choose the best resume according to their requirements.
To solve this type of problem, the company always chooses a third party whose job is to make the resume as per the requirement. These companies are known by the name of Hiring Service Organization. It’s all about the information resume screen.
The work of selecting the best talent, assignments, online coding contests among many others is also known as resume screen.
Due to lack of time, big companies do not have enough time to open resumes, due to which they have to take the help of any other company. For which they have to pay money. Which is a very serious problem.
To solve this problem, the company wants to start the work of the resume screen itself by using a machine learning algorithm.
3. Resume Screening using Machine Learning
In this section, we will see the step-wise implementation of Resume screening using python.
3.1 Data Used
We have publically available data from Kaggle. You can download the data using the below link.
https://www.kaggle.com/gauravduttakiit/resume-dataset
3.2 Exploratory Data Analysis
Let’s have a quick view of the data we have.
There are only two columns we have in the data. Below is the definition of each column.
Category: Type of Job Resume fits for.
Resume: Resume of candidates
resumeDataSet.shape
Output:
(962, 2)
There are 962 observations we have in the data. Each observation represents the complete details of each candidate so we have 962 resumes for screening.
Let’s see what different categories we have in the data.
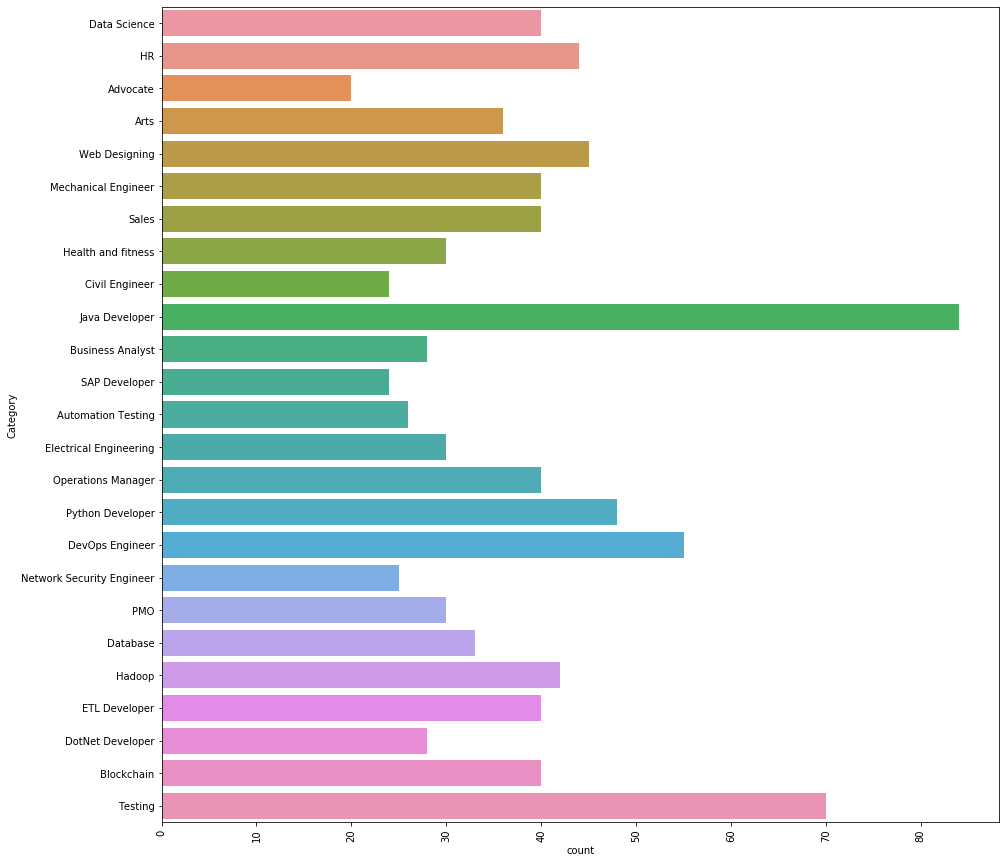
There are 25 different categories we have in the data. The top 3 job categories we have in the data are as follows.
Java developer, Testing, and DevOps Engineer.
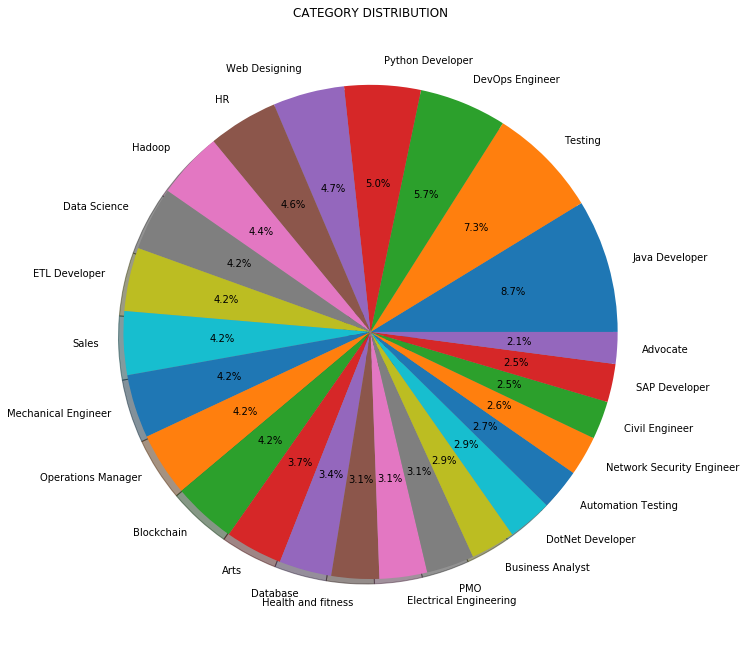
Instead of the count or frequency, we can also visualize the distribution of job categories in percentage as below:
3.3 Data Preprocessing
Step 1: Clean the ‘Resume’ column
In this step, we remove any unnecessary information from resumes like URLs, hashtags, and special characters.
def cleanResume(resumeText):
    resumeText = re.sub('httpS+s*', ' ', resumeText)  # remove URLs
    resumeText = re.sub('RT|cc', ' ', resumeText)  # remove RT and cc
    resumeText = re.sub('#S+', '', resumeText)  # remove hashtags
    resumeText = re.sub('@S+', '  ', resumeText)  # remove mentions
    resumeText = re.sub('[%s]' % re.escape("""!"#$%&'()*+,-./:;<=>?@[]^_`{|}~"""), ' ', resumeText)  # remove punctuations
    resumeText = re.sub(r'[^x00-x7f]',r' ', resumeText)
    resumeText = re.sub('s+', ' ', resumeText)  # remove extra whitespace
    return resumeText
resumeDataSet['cleaned_resume'] = resumeDataSet.Resume.apply(lambda x: cleanResume(x))

Step 2: Encoding ‘Category’
Now, we will encode the ‘Category’ column using LabelEncoding. Even though the ‘Category’ column is ‘Nominal’ data we are using LabelEncong because the ‘Category’ column is our ‘target’ column. By performing LabelEncoding each category will become a class and we will be building a multiclass classification model.
var_mod = ['Category']
le = LabelEncoder()
for i in var_mod:
    resumeDataSet[i] = le.fit_transform(resumeDataSet[i])
Step 3: Preprocessing ‘cleaned_resume’ column
Here we will preprocess and convert the ‘cleaned_resume’ column into vectors. There are many ways to do that like ‘Bag of Words’, ‘Tf-Idf’, ‘Word2Vec’ and a combination of these methods.
We will be using the ‘Tf-Idf’ method to get the vectors in this approach.
requiredText = resumeDataSet['cleaned_resume'].values
requiredTarget = resumeDataSet['Category'].values
word_vectorizer = TfidfVectorizer(
    sublinear_tf=True,
    stop_words='english',
    max_features=1500)
word_vectorizer.fit(requiredText)
WordFeatures = word_vectorizer.transform(requiredText)
We have ‘WordFeatures’ as vectors and ‘requiredTarget’ and target after this step.
3.4 Model Building
We will be using the ‘One vs Rest’ method with ‘KNeighborsClassifier’ to build this multiclass classification model.
We will use 80% data for training and 20% data for validation. Let’s split the data now into training and test set.
X_train,X_test,y_train,y_test = train_test_split(WordFeatures,requiredTarget,random_state=0, test_size=0.2)
print(X_train.shape)
print(X_test.shape)
Output:
(769, 1500)
(193, 1500)
Since now we have train and test data let’s build the model.
clf = OneVsRestClassifier(KNeighborsClassifier())
clf.fit(X_train, y_train)
prediction = clf.predict(X_test)
3.5 Results
Let see the results we have..
print('Accuracy of KNeighbors Classifier on training set: {:.2f}'.format(clf.score(X_train, y_train)))
print('Accuracy of KNeighbors Classifier on test set: {:.2f}'.format(clf.score(X_test, y_test)))
Output:
Accuracy of KNeighbors Classifier on training set: 0.99
Accuracy of KNeighbors Classifier on test set: 0.99
We can see that results are awesome. We are able to classify each Category of a given resume with 99% accuracy.
We can also check the detailed classification report for each class or category.
print(metrics.classification_report(y_test, prediction))
Output:
              precision    recall  f1-score   support

           0       1.00      1.00      1.00         3
           1       1.00      1.00      1.00         3
           2       1.00      0.80      0.89         5
           3       1.00      1.00      1.00         9
           4       1.00      1.00      1.00         6
           5       0.83      1.00      0.91         5
           6       1.00      1.00      1.00         9
           7       1.00      1.00      1.00         7
           8       1.00      0.91      0.95        11
           9       1.00      1.00      1.00         9
          10       1.00      1.00      1.00         8
          11       0.90      1.00      0.95         9
          12       1.00      1.00      1.00         5
          13       1.00      1.00      1.00         9
          14       1.00      1.00      1.00         7
          15       1.00      1.00      1.00        19
          16       1.00      1.00      1.00         3
          17       1.00      1.00      1.00         4
          18       1.00      1.00      1.00         5
          19       1.00      1.00      1.00         6
          20       1.00      1.00      1.00        11
          21       1.00      1.00      1.00         4
          22       1.00      1.00      1.00        13
          23       1.00      1.00      1.00        15
          24       1.00      1.00      1.00         8

    accuracy                           0.99       193
   macro avg       0.99      0.99      0.99       193
weighted avg       0.99      0.99      0.99       193
Where, 0, 1, 2…. are the job categories. We get the actual labels from the label encoder that we used.
le.classes_
Output:
['Advocate', 'Arts', 'Automation Testing', 'Blockchain','Business Analyst', 'Civil Engineer', 'Data Science', 'Database','DevOps Engineer', 'DotNet Developer', 'ETL Developer','Electrical Engineering', 'HR', 'Hadoop', 'Health and fitness','Java Developer', 'Mechanical Engineer','Network Security Engineer', 'Operations Manager', 'PMO','Python Developer', 'SAP Developer', 'Sales', 'Testing','Web Designing']
Here ‘Advocate’ is class 0, ‘Arts’ is class 1, and so on…
4. Code
Here you can see the complete implementation ….
#Loading Libraries
import warnings
warnings.filterwarnings('ignore')
import numpy as np
import pandas as pd
import matplotlib.pyplot as plt
import seaborn as sns
from matplotlib.gridspec import GridSpec
import re
from sklearn.preprocessing import LabelEncoder
from sklearn.model_selection import train_test_split
from sklearn.feature_extraction.text import TfidfVectorizer
from scipy.sparse import hstack
from sklearn.multiclass import OneVsRestClassifier
from sklearn.neighbors import KNeighborsClassifier
from sklearn import metrics
#Loading Data
resumeDataSet = pd.read_csv('../input/ResumeScreeningDataSet.csv' ,encoding='utf-8')
#EDA
plt.figure(figsize=(15,15))
plt.xticks(rotation=90)
sns.countplot(y="Category", data=resumeDataSet)
plt.savefig('../output/jobcategory_details.png')
#Pie-chart
targetCounts = resumeDataSet['Category'].value_counts().reset_index()['Category']
targetLabels  = resumeDataSet['Category'].value_counts().reset_index()['index']
# Make square figures and axes
plt.figure(1, figsize=(25,25))
the_grid = GridSpec(2, 2)
plt.subplot(the_grid[0, 1], aspect=1, title='CATEGORY DISTRIBUTION')
source_pie = plt.pie(targetCounts, labels=targetLabels, autopct='%1.1f%%', shadow=True, )
plt.savefig('../output/category_dist.png')
#Data Preprocessing
def cleanResume(resumeText):
    resumeText = re.sub('httpS+s*', ' ', resumeText)  # remove URLs
    resumeText = re.sub('RT|cc', ' ', resumeText)  # remove RT and cc
    resumeText = re.sub('#S+', '', resumeText)  # remove hashtags
    resumeText = re.sub('@S+', '  ', resumeText)  # remove mentions
    resumeText = re.sub('[%s]' % re.escape("""!"#$%&'()*+,-./:;<=>?@[]^_`{|}~"""), ' ', resumeText)  # remove punctuations
    resumeText = re.sub(r'[^x00-x7f]',r' ', resumeText)
    resumeText = re.sub('s+', ' ', resumeText)  # remove extra whitespace
    return resumeText
resumeDataSet['cleaned_resume'] = resumeDataSet.Resume.apply(lambda x: cleanResume(x))
var_mod = ['Category']
le = LabelEncoder()
for i in var_mod:
    resumeDataSet[i] = le.fit_transform(resumeDataSet[i])
requiredText = resumeDataSet['cleaned_resume'].values
requiredTarget = resumeDataSet['Category'].values
word_vectorizer = TfidfVectorizer(
    sublinear_tf=True,
    stop_words='english',
    max_features=1500)
word_vectorizer.fit(requiredText)
WordFeatures = word_vectorizer.transform(requiredText)
#Model Building
X_train,X_test,y_train,y_test = train_test_split(WordFeatures,requiredTarget,random_state=0, test_size=0.2)
print(X_train.shape)
print(X_test.shape)
clf = OneVsRestClassifier(KNeighborsClassifier())
clf.fit(X_train, y_train)
prediction = clf.predict(X_test)
#Results
print('Accuracy of KNeighbors Classifier on training set: {:.2f}'.format(clf.score(X_train, y_train)))
print('Accuracy of KNeighbors Classifier on test set: {:.2f}'.format(clf.score(X_test, y_test)))
print("n Classification report for classifier %s:n%sn" % (clf, metrics.classification_report(y_test, prediction)))
5. Conclusion
In this article, we learned how machine learning and Natural Language Processing can be applied to improve our day-to-day life through the example of Resume Screening. We just classified almost 1000 resumes in few minutes into their respective categories with 99% accuracy.
Please reach out in the comment section in case of any questions.
Thanks…..Have a nice day ahead 🙂
The media shown in this article are not owned by Analytics Vidhya and are used at the Author’s discretion.


Hi ma'am! I have gone through your blog and code. One thing I couldn't understand that why did you choose "Category" as a target value?? Aren't we finding best resume?? Then, why did you take "Category" as a target value??
So how do we select the best resume from a particular domain.
Hi Vidhya, thank for the explanation. What part of the code if NLP?
How to check wether our model is working good or not how will user give input to find specific resume... for the right job