Simplest way to do Object Detection on custom datasets
This article was published as a part of the Data Science Blogathon
Yes, it’s true!! Now, object detection models can be done with just 5 lines of code using ‘Detecto’
Introduction:
Computer vision (CV) in the field of study in Artificial intelligence where we try to solve many problems using image or video which could be solved trivially also. But, CV helps to increase the speed and the range of solving the problem with ease.
Object Detection is one of the most popular streams under computer vision. It has many applications across different industries such as Manufacturing, Pharmaceutical, Aviation, Retail, E-Commerce, etc.
In the real-world scenario, we have to train the object detection model on the custom datasets. Building custom trained object detection model is not very straightforward irrespective of the framework i.e. TensorFlow or PyTorch.
In this article, we are going to discuss developing custom trained object detection model using ‘Detecto’ which is a Python package that allows you to build fully functioning computer vision and object detection models with just 5 lines of code. And Yes it is true!! It is built upon PyTorch which made the whole process very easy.
Let’s do together one object detection project end to end using Detecto. Here we will try to develop a model which will detect the wheels and headlight of the car from the car images.
Fun Begins!!
Table of Contents:
- Step1: Image collection and Labelling
- Step2: Installation of the required package
- Step3: Custom image augmentation
- Step4: Model Training
- Step5: Model saving, loading, and predicting
Step1: Image collection and labeling:
The first step of any object detection model is collecting images and performing annotation. For this project, I have downloaded 50 ‘Maruti Car Images’ from google image. There is a package called simple_image_download which is used for automatic image download. Feel free to use the following code:
from simple_image_download import simple_image_download as simp
response = simp.simple_image_download
lst=[‘Maruti car’]
for rep in lst:
 response().download(rep, 50)
With this code, we will get 50 downloaded images in our ‘Maruti Car’ folder of the working directory. Feel free to change the number of images to as many as you want. After that, we will randomly split images into two parts i.e. Train (35 images) and Test(15 images)
The next job is labeling the images. There are various image annotation tool is available. For this project, I have used MAKESENSE.AI. It’s a free online tool for labeling. No installation process is required. We can open it using the browser only. Using the link, I dropped my car images and did annotation for Train and Validation datasets separately.
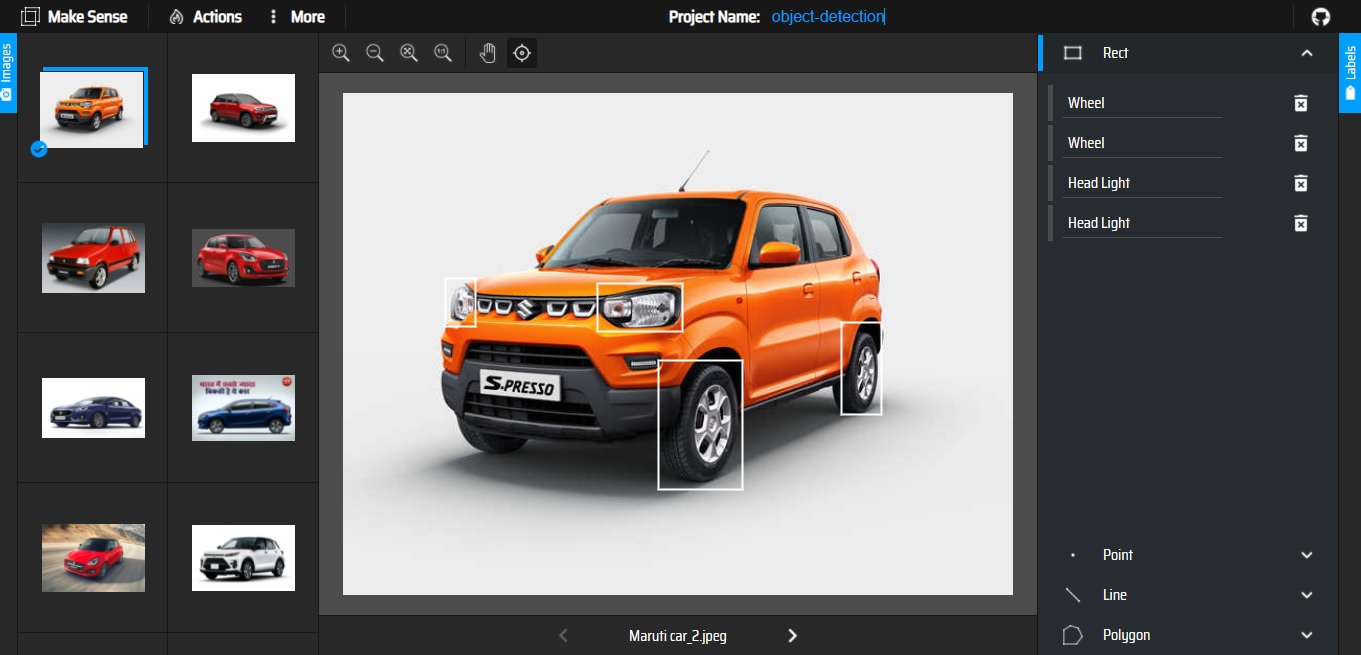
Now, we can export the annotation in XML format as ‘Detecto’ supports it. Then we have placed XML files of train and validation images in the Train and validation folder respectively. So the folder tree looks like this:
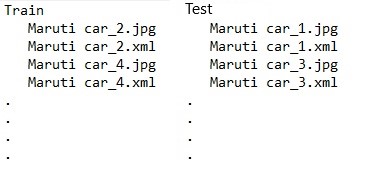
Pic2: Folder Tree
Step2: Installation of the required packages:
As it is already mentioned that ‘Detecto’ is built on top of the PyTorch, we need to first install PyTorch. I have used Google Colab for this project. Then we need to check whether we have the support of GPU or not using the following code:
import torch
print(torch.cude.is_available())
If the print is ‘True’, it means you can use GPU. If it is ‘False’, please change the ‘Hardware Accelerator’ of the Notebook Setting to ‘GPU’. Now, your system is ready with the requisition to install ‘Detecto’. Use the following magic code to install it.
!pip install detecto
Once it’s done, let’s import the libraries using the following code:
from detecto import core, utils, visualize
from detecto.visualize import show_labeled_image, plot_prediction_grid
from torchvision import transforms
import matplotlib.pyplot as plt
import numpy as np
Step3: Custom image augmentation:
Image augmentation is the process of artificially expanding data by creating a modified version of images. Detecto has an inbuilt function to do custom transform by applying to resize, flip, and saturation augmentation. Please, use the following code for augmenting the image dataset.
custom_transforms = transforms.Compose([
transforms.ToPILImage(),
transforms.Resize(900),
transforms.RandomHorizontalFlip(0.5),
transforms.ColorJitter(saturation=0.2),
transforms.ToTensor(),
utils.normalize_transform(),
])
Step4: Model Training:
Now, we have come to that most awaited step i.e. Model Training. Here, magic happens in Five lines of code.
Train_dataset=core.Dataset(‘Train/’,transform=custom_transforms)#L1
Test_dataset = core.Dataset(‘Test/’)#L2
loader=core.DataLoader(Train_dataset, batch_size=2, shuffle=True)#L3
model = core.Model([‘Wheel’, ‘Head Light’])#L4
losses = model.fit(loader, Test_dataset, epochs=25, lr_step_size=5, learning_rate=0.001, verbose=True)#L5
In the first two lines of code(L1 & L2), we have assigned Train and Test dataset. In L3, we have created DataLoader over our dataset. It helps define how we batch and feed our images into the model for training. Feel free to experiment by changing ‘batch_size’.
Now, it’s time to mention the ‘Labels’ or ‘classes’ which are made in L4. Finally, model training will be started via ‘model.fit’ in L5. Here, we can play with different options such as epochs, lr_step_size, and learning rate’. The default model is Faster R-CNN ResNet-50 FPN. We have fine-tuned this model for our custom dataset.
Now, we can look at the loss function using the following code:
plt.plot(losses)
plt.show()
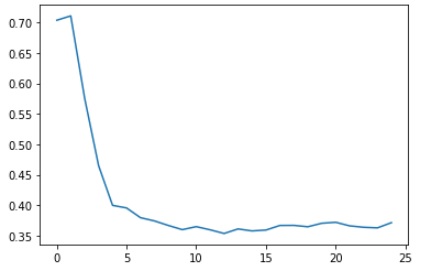
Pic3: Loss Function Plot
Step5: Model saving, loading, and predicting:
Once we are satisfied with a model loss, we need to save the model for future reference. So that we can load it as and when required. Use the following code for saving and loading.
model.save(‘model_weights.pth’)
model = core.Model.load(‘model_weights.pth’, [‘Wheel’, ‘Head Light’])
After loading the model, we want to use it for prediction. Let’s use it for one observation from the Test folder and plot the image with a bounding box. Here, the prediction format is labels, boxes, and scores.
image = utils.read_image(‘Test/Maruti car_27.jpeg’)
predictions = model.predict(image)
labels, boxes, scores = predictions
show_labeled_image(image, boxes, labels)
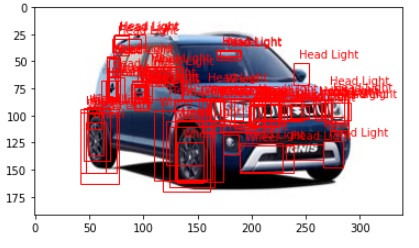
Pic4: Plotting Bounding box without Threshold
There are many unwanted bounding boxes in the above picture. So, we have to remove them. The simplest way to solve the issue is by providing a threshold on the score. For this project, I have put the threshold as 0.6 for both classes. I came to this point through different trials and errors. Use the following code to set up the threshold for bounding boxes and plotting them.
thresh=0.6
filtered_indices=np.where(scores>thresh)
filtered_scores=scores[filtered_indices]
filtered_boxes=boxes[filtered_indices]
num_list = filtered_indices[0].tolist()
filtered_labels = [labels[i] for i in num_list]
show_labeled_image(image, filtered_boxes, filtered_labels)
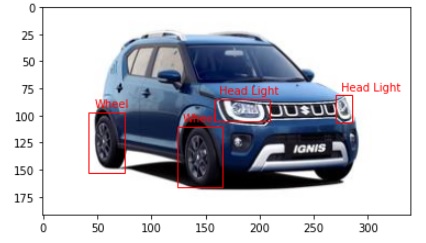
Now, we can see the final output. And yes, it is quite impressive. So, this the end of the project. Let us know your opinion after using this one for your custom dataset.
Happy learnings !!!!
AlanBi is the creator of this package. Kudos to him for making it open for all.
Reference:
- Blog from AlanBi: https://hackernoon.com/build-a-custom-trained-object-detection-model-with-5-lines-of-code-y08n33vi
Your suggestions and doubts are welcomed here in the comment sections. Thank you for reading my article.
About the author:
Tirthankar Das: Data Science professional with 7+ years experience in different domains such as Banking &Finance, Aviation, Manufacturing, and Pharmaceuticals. Happy to connect over LinkedIn
The media shown in this article on Sign Language Recognition are not owned by Analytics Vidhya and are used at the Author’s discretion.


