A Step by Step Guide to Create a CI/CD Pipeline with AWS Services
Overview
In this article, we will learn about how to create a CI/CD Pipeline using AWS Services: AWS CodeCommit, AWS CodeBuild, AWS Pipeline, AWS ECS & Fargate.
Prerequisites
- Basic AWS Cloud Knowledge
Refer to these blogs, as we will use the same application and workflow
Introduction
Once we have developed and deployed the application/product, It needs to be continuously updated based on user feedback or the addition of new features. This process should be automated, as without automation we have to run the same development and deployment steps/commands again and again for every change to the application.
With Continuous Integration and Continuous Delivery Pipeline, we can automate the complete workflow from building, testing, packaging, and deploying, which will be triggered when there are any changes to an existing application or we can say if there is any new commit to an existing code repository.

Source: Parasoft
Advantages of a CI/CD Pipeline
- Frequent releases: With CI/CD we can release the changes based on customer feedback or monitoring input
- Low risk: As the process will be automated, there won’t be any manual intervention and configuration setup
- Increased Productivity: With a structured process, a product will be released independently of other components, as in the case of multiple microservices we can release changes independently thus increasing developer productivity
Now, let’s start building the pipeline.
Application Load Balancer
First, we will create an Application load balancer, which will make our application scalable and highly available.
- In AWS console, search for EC2 and then click on Load balancers
- Choose Application Load Balancer and click Create
- Next, Configure it by giving a name and select the VPC and availability zones
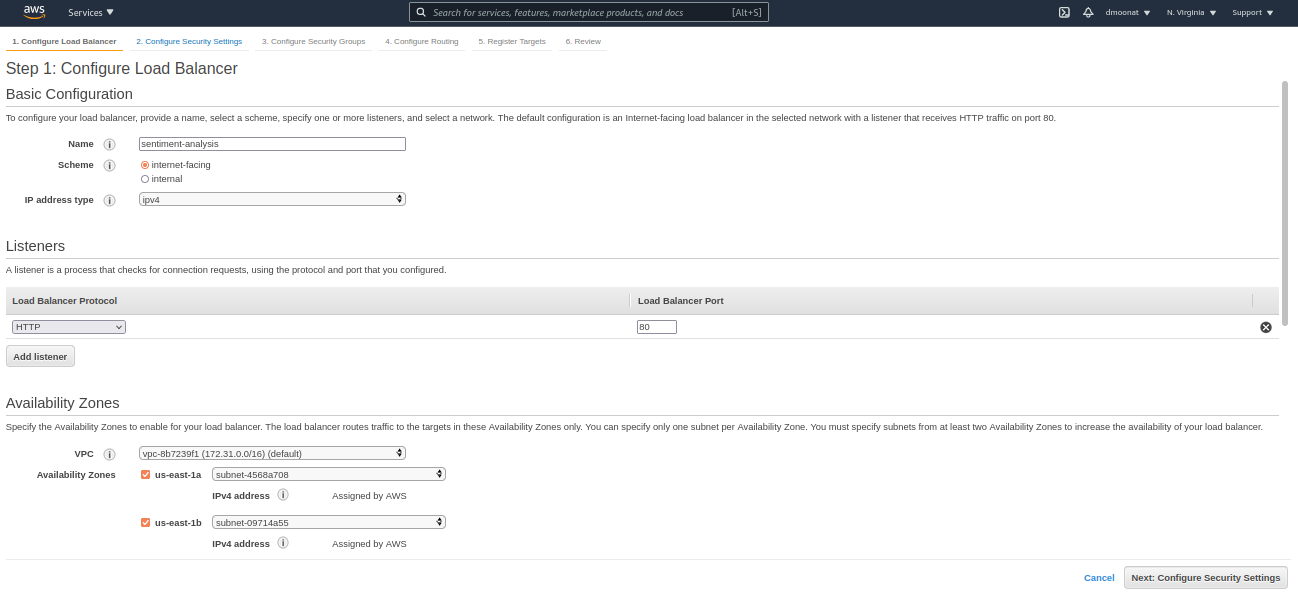
Source: Author
- Click Next, select Create a new security group and then click Next
- Give a name to Target group, for Target type select IP and then click Next
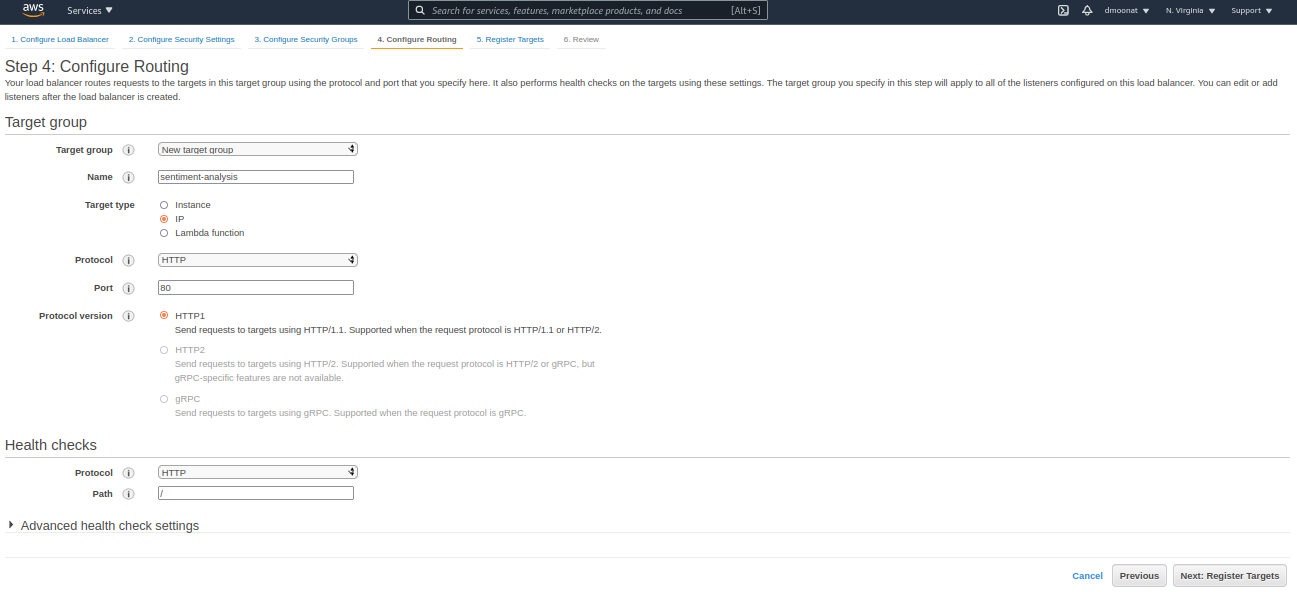
Source: Author
- Click Next, Review it and click Create
- Once created note down the DNS name, which is the public address for the service
AWS Fargate Service
In the previous blog, we have learned how to create a Task definition in ECS which is needed to run Fargate jobs. We will use the same task definition to create a Fargate Service. Please refer to the previous blog to understand the concepts and to follow along.
- Go to Task Definitions in Amazon ECS, tick the radio button corresponding to the existing Task definition and click Actions and Create Service.
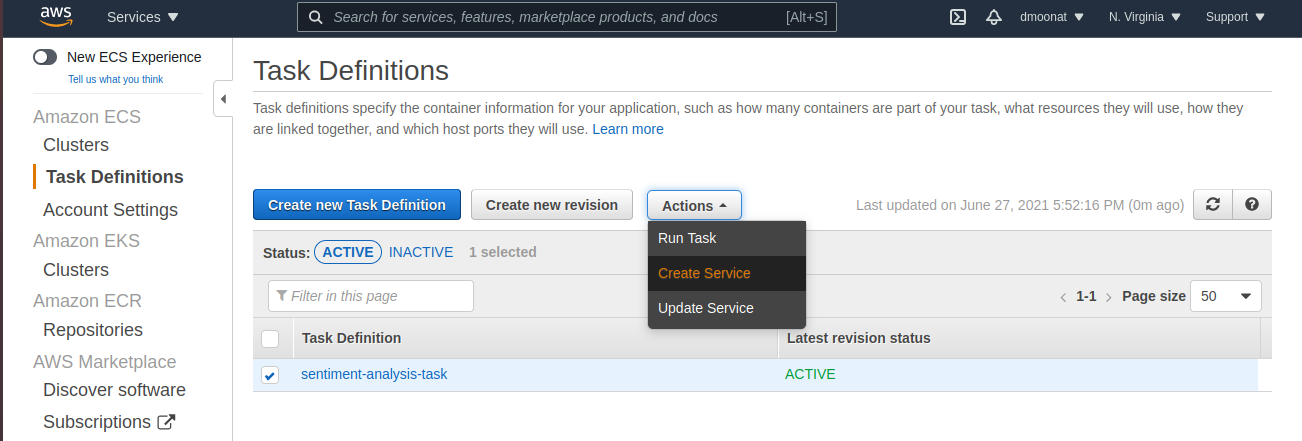
Source: Author
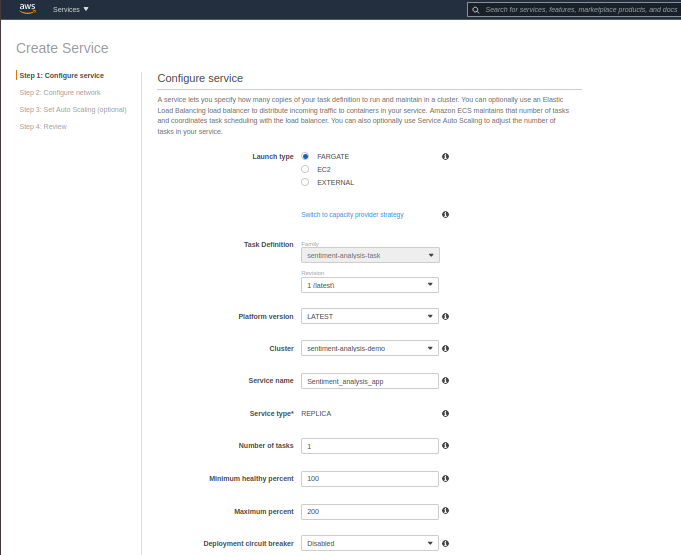
- Choose Fargate as launch type, give it a name, do not change the Deployment type (Rolling update), and click Next.
Source: Author
- Choose the subnets that we have configured in the load balancer
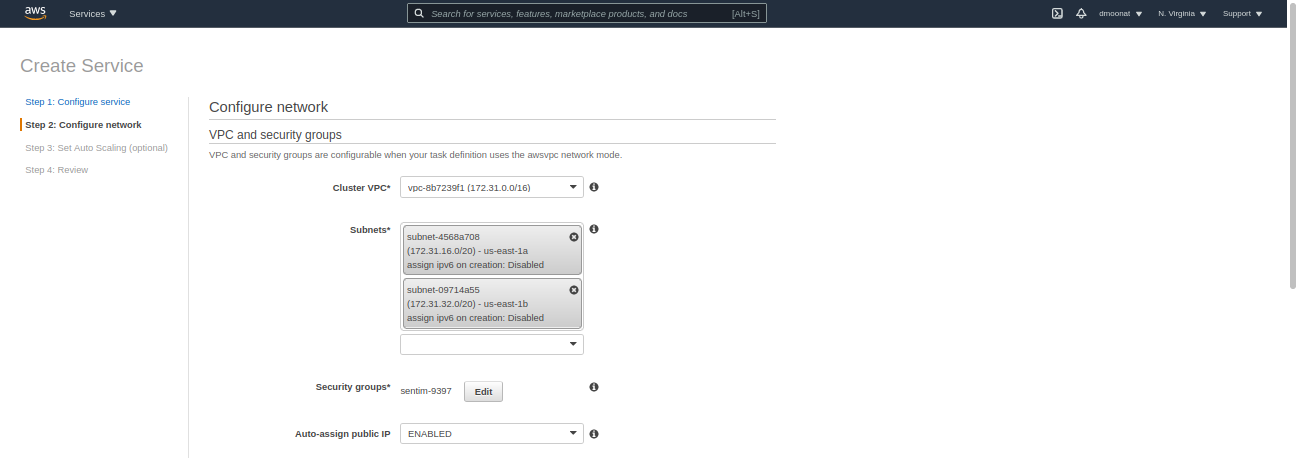
Source: Author
- Choose Application load balancer for the load balancer type, and then click Add to load balancer
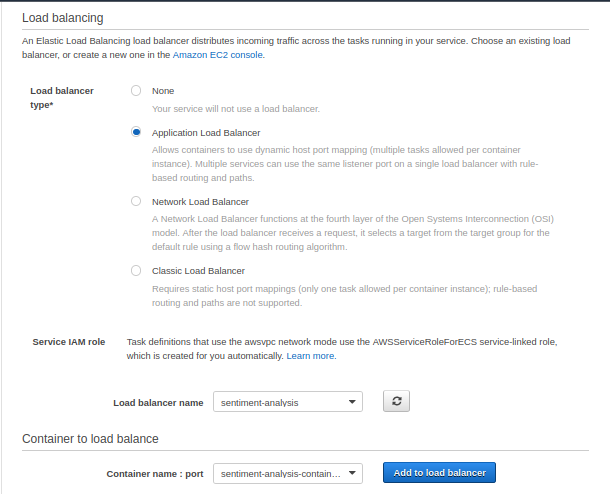
Source: Author
- Select the Target group name that we have created in the Application load balancer and then click Next, Review it and then click Create Service.
- Now we need to configure the Application load balancer security group that we have created earlier, go to the created Application load balancer and click on security groups and then click Edit inbound rules and add a Custom TCP rule with port 5000, as this is the internal port our application is configured in the flask application
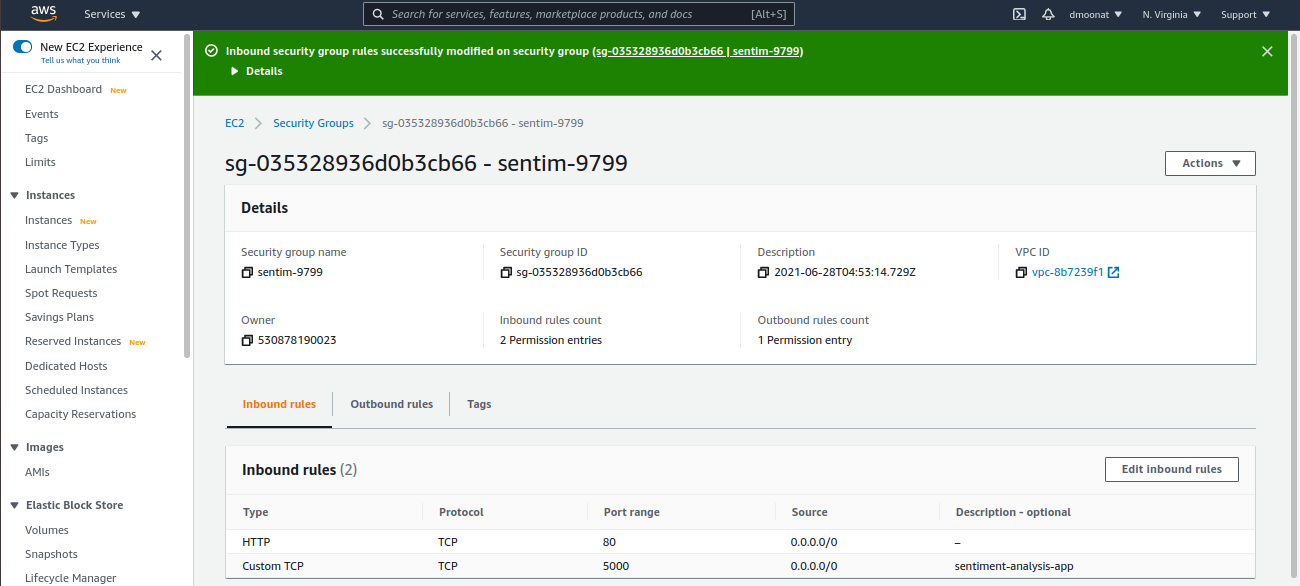
Source: Author
- Now, we can check our application is running by visiting the load balancer DNS name in a browser
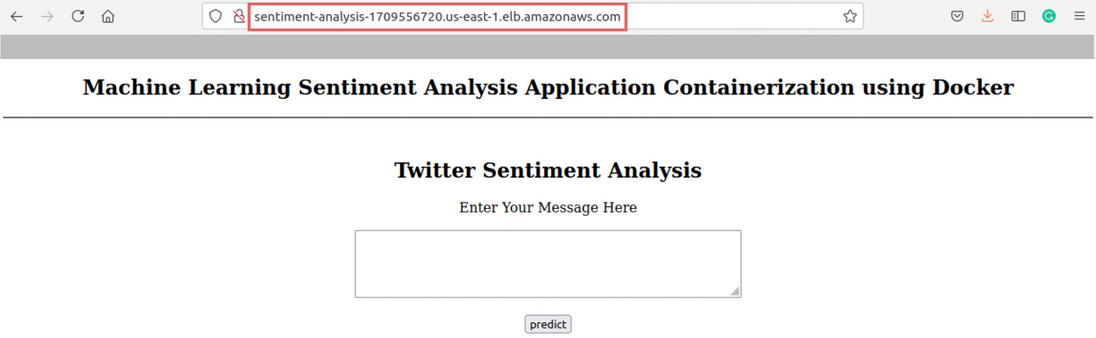
Source: Author
Our Service is up and running! Now we can build a CI/CD Pipeline.
AWS CodeCommit
It is a version control service similar to Github, hosted by AWS. For Demo, we will use a CodeCommit repository and push our application code to it (If you want you can use Github also).
- In AWS console search CodeCommit, create a repository, and give a name to it.
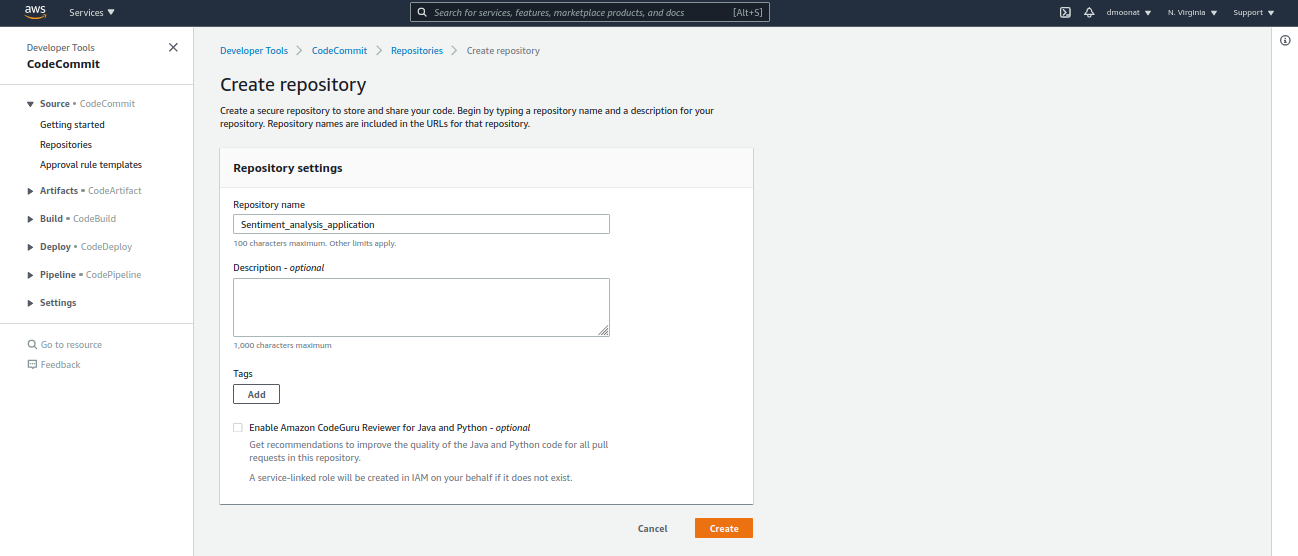
Source: Author
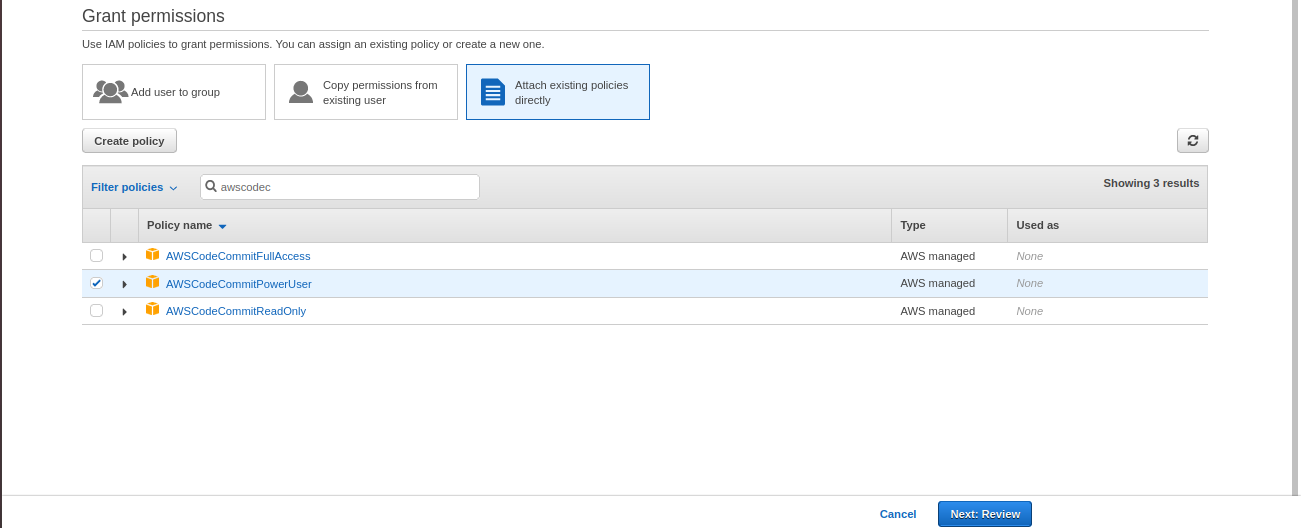
- Once the repository is created we need to add specific permission and create Git credentials to access the CodeCommit repository.
- Go to the IAM console, choose Users and select which User you want to configure for CodeCommit, and attach AWSCodeCommitPowerUser policy from the policies list and Review and then click Add Permission.
Source: Author
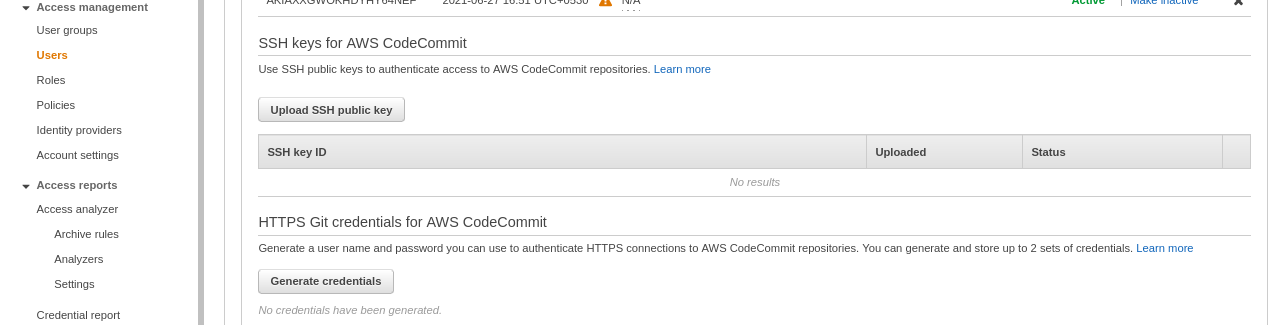
- Now, to generate Git credentials select the User for which you have added CodeCommit Permission and search for HTTPS Git credentials for AWS CodeCommit section and then click Generate credentials and download it.
Source: Author
- Now copy the repository URL and clone it on the local system using git clone

Source: Author
git clone URL
- For username and password, use from credentials file downloaded earlier.
- Now we can push our application to this repository, I am using the same application from my previous post, you can download the source code from my Github or use your own application.
git add .
git commit -m 'app:v1.0'
git push
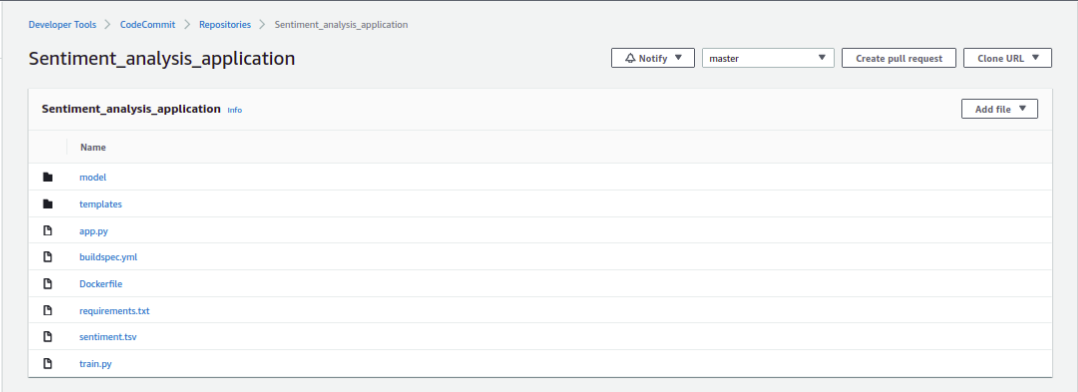
Once you have pushed the code, your CodeCommit repository will look as follows
Source: Author
AWS CodeBuild
The next step is to set up Continuous Integration functionality on the CodeCommit repository.
AWS CodeBuild is managed CI Service which compiles source code, runs tests, and packages the source code which can be used for deployment.
To use CodeBuild, we need a buildspec.yml file that contains commands used to compile, test, and package our code. For our purpose, in the buildspec.yml file, we will write commands to containerized our application using docker and push it to ECR. It will look as follows
#Required mapping. Represents the buildspec version.
version: 0.2

#Required sequence. Represents the commands CodeBuild runs during each phase of the build.
phases:
  pre_build:
    commands:
      - echo Logging in to Amazon ECR...
      - CODEBUILD_RESOLVED_SOURCE_VERSION="${CODEBUILD_RESOLVED_SOURCE_VERSION:-$IMAGE_TAG}"
      - IMAGE_TAG=$(echo $CODEBUILD_RESOLVED_SOURCE_VERSION | cut -c 1-7)
      - echo image_tag $IMAGE_TAG
      - REPO="$AWS_ACCOUNT_ID.dkr.ecr.$AWS_DEFAULT_REGION.amazonaws.com"
      - IMAGE_URI="$AWS_ACCOUNT_ID.dkr.ecr.$AWS_DEFAULT_REGION.amazonaws.com/$IMAGE_REPO_NAME:$IMAGE_TAG"
      - echo Repository $REPO
      - docker login -u AWS -p $(aws ecr get-login-password --region $AWS_DEFAULT_REGION) $REPO
  build:
    commands:
      - echo Build started on `date`
      - echo Building the Docker image...
      - docker build -t $IMAGE_URI .
  post_build:
    commands:
      - bash -c "if [ /"$CODEBUILD_BUILD_SUCCEEDING/" == /"0/" ]; then exit 1; fi"
      - echo Build stage successfully completed on `date`
      - echo Pushing the Docker image...
      - docker push $IMAGE_URI
      - printf '[{"name":"sentiment-analysis-container","imageUri":"%s"}]' "$IMAGE_URI" > images.json
artifacts:
  files: images.json
I won’t go much into details of it as most of the commands are docker related and syntax such as pre_build, build, etc are self-explanatory. If you want to deep dive into it refer to AWS documentation.
One thing to highlight is artifacts files, here we are saving an ‘images.json‘ file containing the container name that we have created earlier in ECS(Task definition container name) and the Image URI of the container that we will push to ECR. This artifacts file will be needed in the CodePipeline stage.
AWS CodePipeline
CodePipeline will automatically build and deploy our application when there are any changes in the code repository.
- Go to CodePipeline console, click Get started and configure the pipeline
- Next, select CodeCommit for source provider (or Github if you are using it, for this, you have to log in to Github) and select the repository and branch to configure for CI/CD
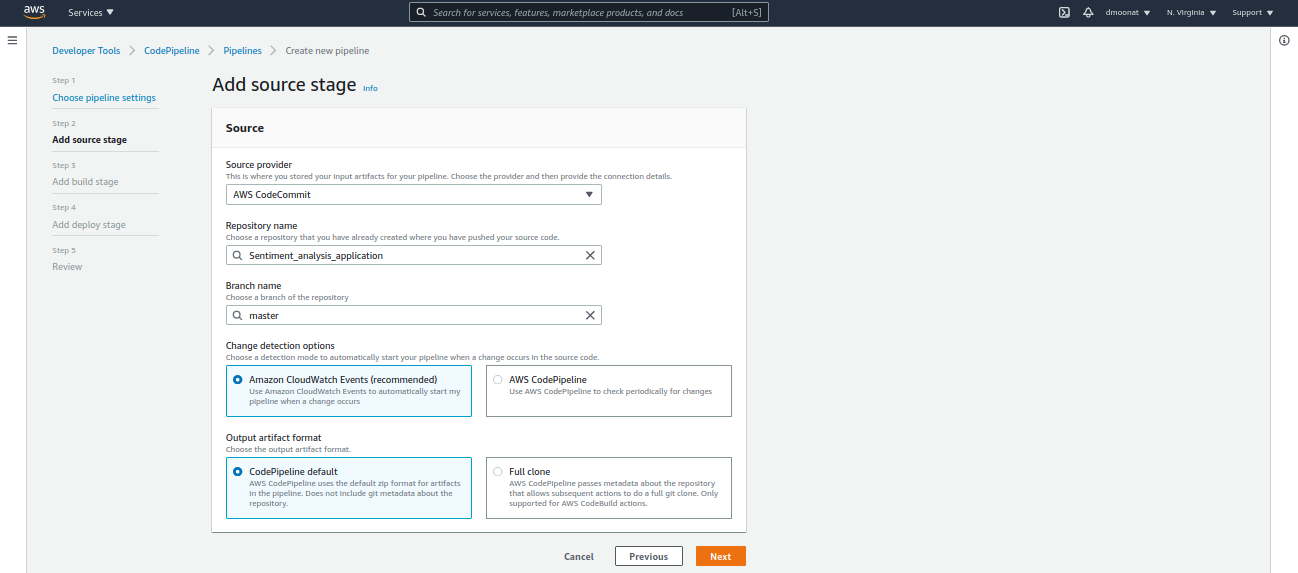
Source: Author
- Next, for the build provider select CodeBuild and create a new build project, give it a name and configure it as follows
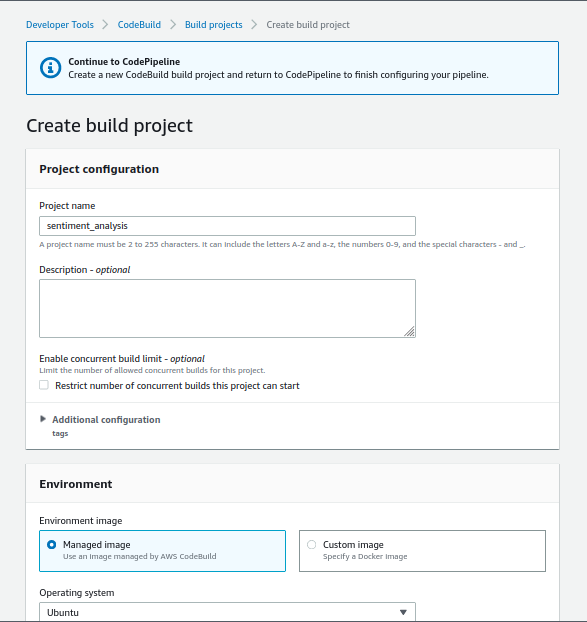
Source: Author
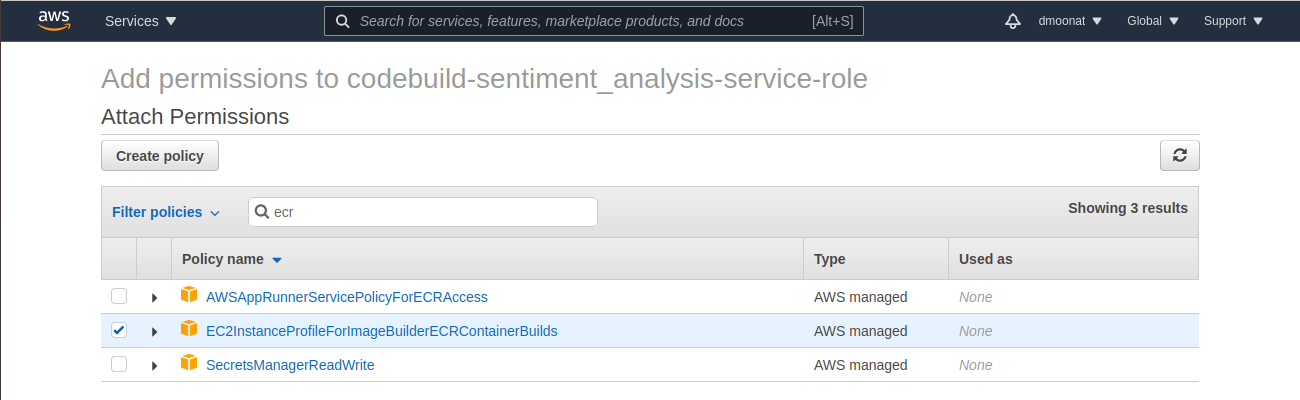
- It will create a New service role, to which we have to add ECRContainerBuilds permission. For that, open the IAM console in a new tab, go to Roles and search and select the above-created role, and click Attach policies. Search for ECR and select the policy as below and click Attach policy
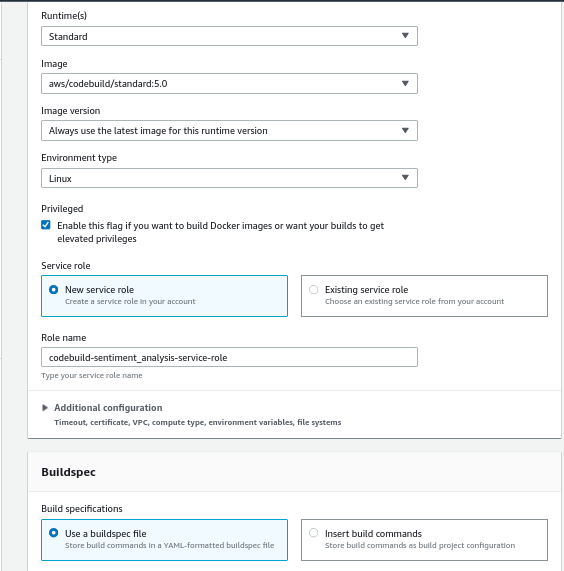
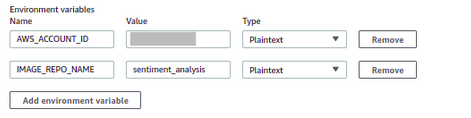
- Now come back to the CodeBuild tab, Expand Additional information, and Add Environment variables, AWS_ACCOUNT_ID and IMAGE_REPO_NAME as we are using these two variables in the buildspec.yml file. You can tick CloudWatch logs and give it a name as it will help to debug the CI process, after that click Continue to CodePipeline and then click Next
Source: Author
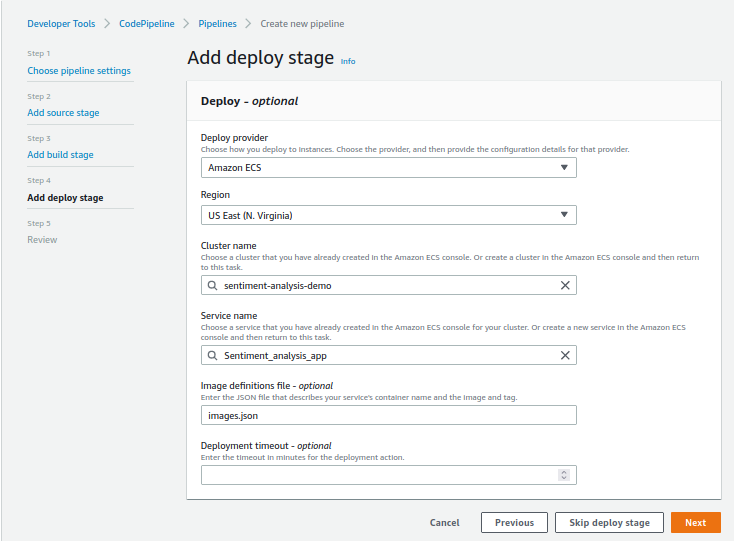
- For Deploy provider, select Amazon ECS, cluster, and service name. Also, add the name of the image definitions file as ‘images.json’ that we will create during the build process
Source: Author
- Click Next, Review it and click Create pipeline
- Once Pipeline is created successfully, it will launch a new container as a Service
Now, let’s test the complete Pipeline by changing the source code and pushing the changes to the Code commit repository.
Make some changes(highlighted text in below image) in the ‘home.html’ file in the templates folder

Source: Author
Now push the changes to the repository

Source: Author
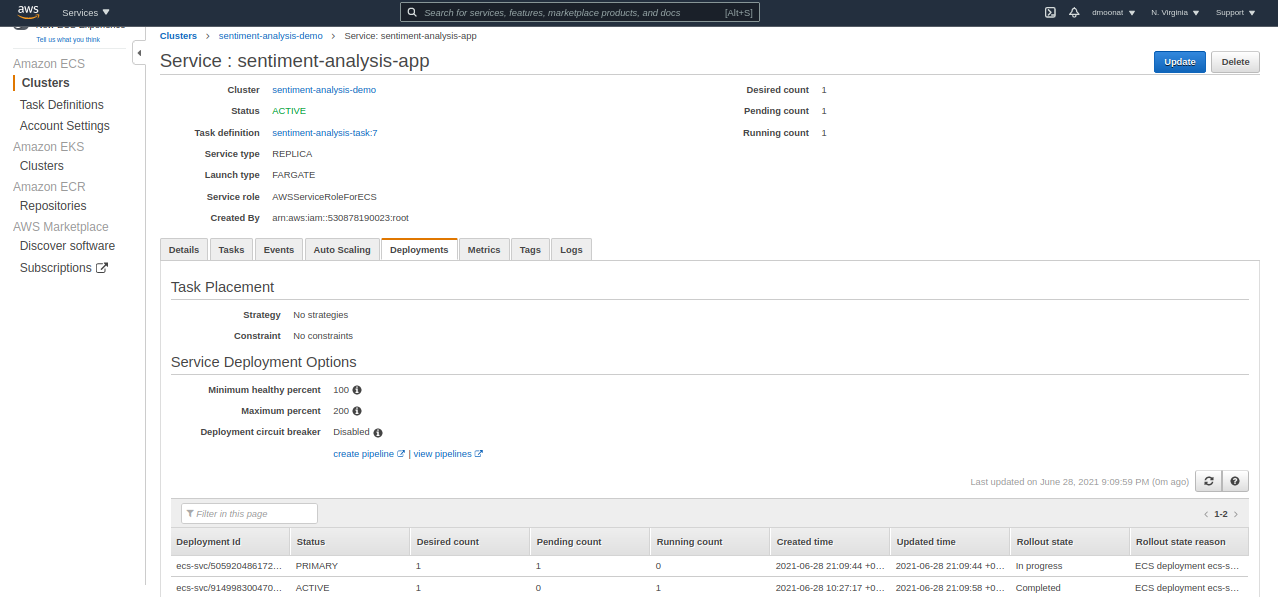
Once the changes are pushed, CodePipeline will trigger the CI/CD process and creates a new deployment of the AWS Fargate Service with the new image build. You can verify it by going to Fargate Services and check the Deployments tab.
Source: Author
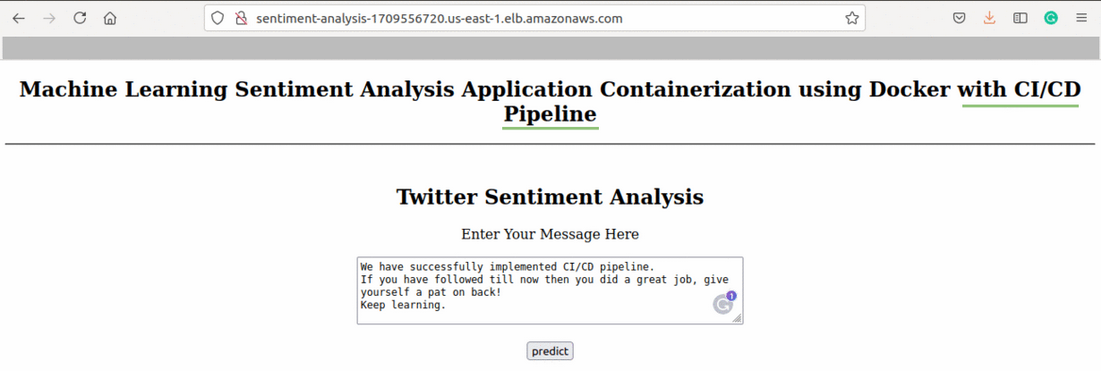
Now, to verify our changes are made and deployed successfully, visit the DNS name in the browser as we did earlier
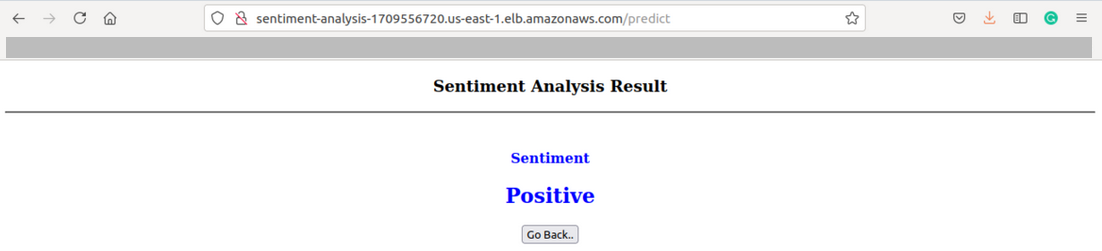
Source: Author
Hooray! We have successfully created a CI/CD Pipeline leveraging AWS services.
Don’t Forget
To clean up the AWS resources, you can delete the Service and cluster created (if you don’t have free credits).
References
https://aws.amazon.com/blogs/compute/building-deploying-and-operating-containerized-applications-with-aws-fargate/
https://docs.aws.amazon.com/codecommit/latest/userguide/setting-up-gc.html
About Author
Machine Learning Engineer, Solving challenging business problems through Data, Machine Learning, and Cloud.
Connect @ Linkedin
The media shown in this article are not owned by Analytics Vidhya and are used at the Author’s discretion.


