Classification of Handwritten Digits Using CNN
This article was published as a part of the Data Science Blogathon
Introduction
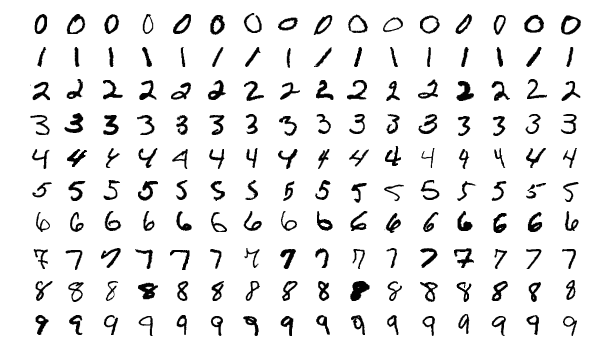
In this blog, we will understand how to create and train a simple Convolutional Neural Network (CNN) for classifying handwritten digits from a popular dataset.
Pre-requisite
Although each step will be thoroughly explained in this tutorial, it will certainly benefit someone who already has some theoretical knowledge of the working of CNN. Also, some knowledge of TensorFlow is also good to have, but not necessary.
Convolutional Neural Network
For those of you new to this concept, CNN is a deep learning technique to classify the input automatically (well, after you provide the right data). Over the years, CNN has found a good grip over classifying images for computer visions and now it is being used in healthcare domains too. This indicates that CNN is a reliable deep learning algorithm for an automated end-to-end prediction. CNN essentially extracts ‘useful’ features from the given input automatically making it super easy for us!
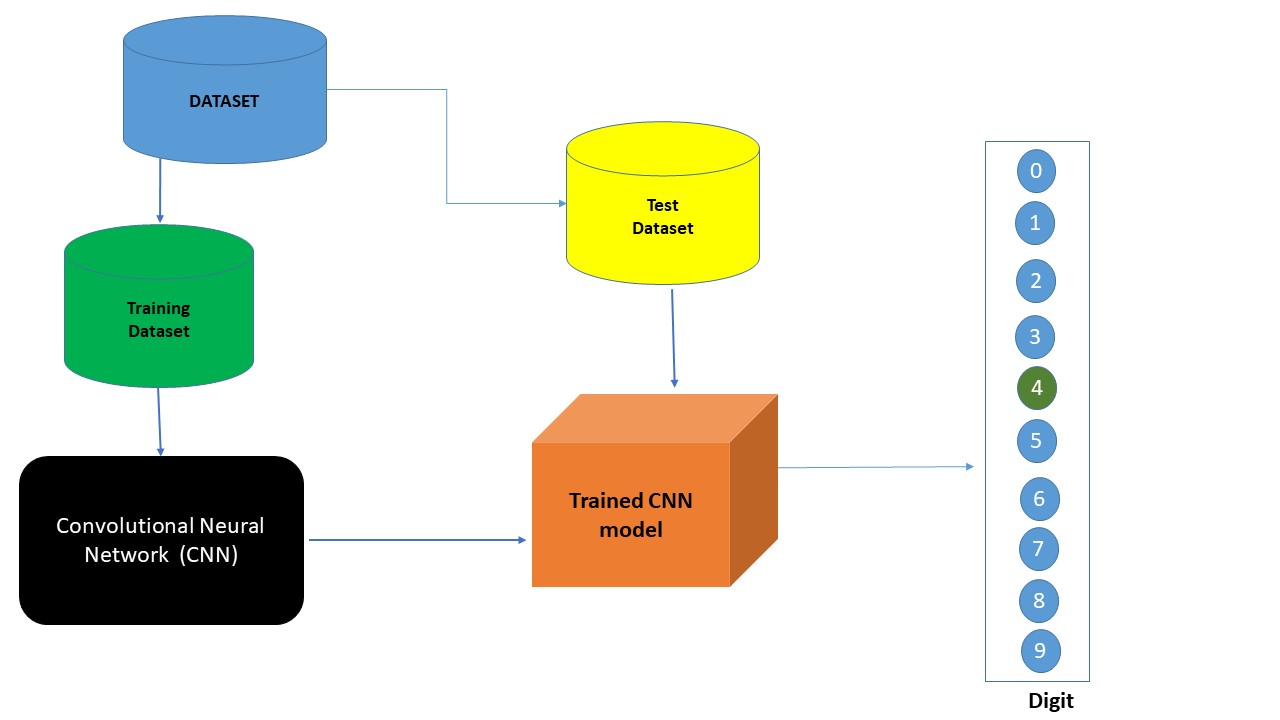
Figure 2: End to end process of CNN
A CNN model consists of three primary layers: Convolutional Layer, Pooling layer(s), and fully connected layer.
(1) Convolutional Layer: This layer extracts high-level input features from input data and passes those features to the next layer in the form of feature maps.
(2) Pooling Layer: It is used to reduce the dimensions of data by applying pooling on the feature map to generate new feature maps with reduced dimensions. PL takes either maximum or average in the old feature map within a given stride.
(3) Fully-Connected Layer: Finally, the task of classification is done by the FC layer. Probability scores are calculated for each class label by a popular activation function called the softmax function.
For more details, I highly recommend you check this awesome tutorial on Analytics Vidhya.
Dataset
The dataset that is being used here is the MNIST digits classification dataset. Keras is a deep learning API written in Python and MNIST is a dataset provided by this API. This dataset consists of 60,000 training images and 10,000 testing images. It is a decent dataset for individuals who need to have a go at pattern recognition as we will perform in just a minute!
When the Keras API is called, there are four values returned namely- x_train, y_train, x_test, and y_test. Do not worry, I will walk you through this.
Loading the Dataset
The language used here is python. I am going to use google colab for writing and executing the python code. You may choose a jupyter notebook as well. I choose google colab because it provides easy access to notebooks anytime and anywhere. It is also possible to connect a colab notebook to a GitHub repository.
Also, the code used in this tutorial is available on this Github repository. So if you find yourself stuck someplace, do check that repository. To keep this tutorial relevant for all, we will understand the most critical code.
- Create and name a notebook.
- After loading the necessary libraries, load the MNIST dataset as shown below:
(X_train, y_train) , (X_test, y_test) = keras.datasets.mnist.load_data()
As we discussed previously, this dataset returns four values and in the same order as mentioned above. Also, x_train, y_train, x_test, and y_test are representations for training and test datasets. To get how a dataset is divided into training and test, check out the picture below which I used during a session where I talked about C
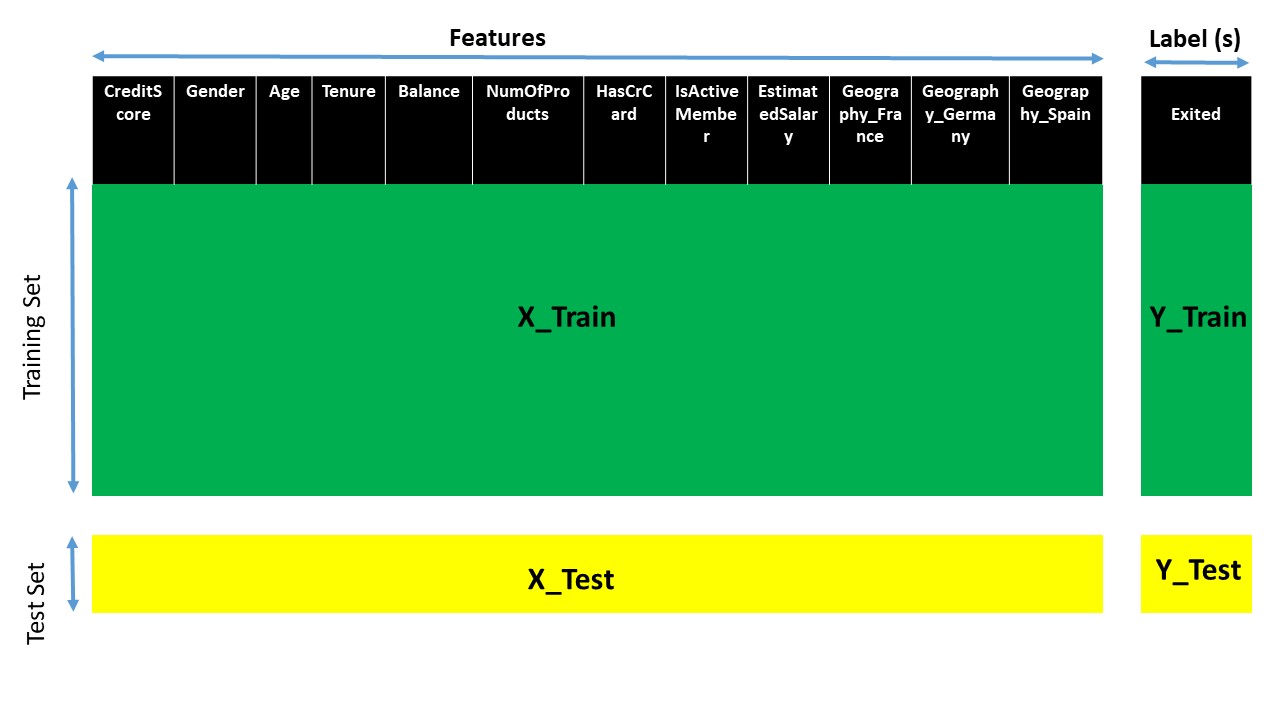
Figure 3: Dividing the dataset into training and test set
Voilà! You just loaded your dataset and are ready to move to the next step which is to process the data
Processing the Dataset
Data has to be processed, cleaned, rectified in order to improve its quality. CNN will learn best from a dataset that does not contain any null values, has all numeric data, and is scaled. So, here we will perform some steps to ensure that our dataset is perfectly suitable for a CNN model to learn from. From here onwards till we create CNN model, we will work only on the training dataset.
If you write X_train[0] then you get the 0th image with values between 0-255 (0 means black and 255 means white). The output is a 2-dimensional matrix (Of course, we will not know what handwritten digit X_train[0] represents. To know this write y_train[0] and you will get 5 as output. This means that the 0th image of this training dataset represents the number 5.
So, let’s scale this training and test datasets as shown below:
X_train = X_train / 255
X_test = X_test / 255
After scaling, we should convert the 2-d matrix to a 1-d array by using this:
X_train = X_train.reshape(-1,28,28,1) #training set
X_test = X_test.reshape(-1,28,28,1) #test set
Now that the dataset is looking good, it is high time that we create a Convolutional Neural Network.
Creating and Training a CNN
Let’s create a CNN model using the TensorFlow library. The model is created as follows:
convolutional_neural_network = models.Sequential([
    layers.Conv2D(filters=25, kernel_size=(3, 3), activation='relu', input_shape=(28,28,1)),
    layers.MaxPooling2D((2, 2)),
    layers.Conv2D(filters=64, kernel_size=(3, 3), activation='relu'),
    layers.MaxPooling2D((2, 2)),
    layers.Conv2D(filters=64, kernel_size=(3, 3), activation='relu'),
    layers.MaxPooling2D((2, 2)),
    layers.Flatten(),
    layers.Dense(64, activation='relu'),
    layers.Dense(10, activation='softmax')
])
Take some time to let this entire code sink in. It is important that you understand every bit of it. In the CNN model created above, there is an input layer followed by two hidden layers and finally an output layer. In the most simpler terms, activation functions are responsible for making decisions of whether or not to move forward. In a deep neural network like CNN, there are many neurons, and based on activation functions, neurons fire up and the network moves forward. If you do not understand much about activation functions use ‘relu’ as it is used most popularly.
Once the model has been created, it is time to compile it and fit the model. During the process of fitting, the model will go through the dataset and understand the relations. It will learn throughout the process as many times as has been defined. In our example, we have defined 10 epochs. During the process, the CNN model will learn and also make mistakes. For every mistake (i.e., wrong predictions) the model makes, there is a penalty and that is represented in the loss value for each epoch (see GIF below). In short, the model should generate as little loss and as high accuracy as possible at the end of the last epoch.
GIF 1: Training CNN and the improved accuracies during each epoch
Making Predictions
To evaluate the CNN model so created you can run:
convolutional_neural_network.evaluate(X_test, y_test)
It is time to use our test dataset to see how well the CNN model will perform.
y_predicted_by_model = convolutional_neural_network.predict(X_test)
The above code will use the convolutional_neural_network model to make predictions for the test dataset and store it in the y_predicted_by_model dataframe. For each of the 10 possible digits, a probability score will be calculated. The class with the highest probability score is the prediction made by the model. For example, if you want to see what is the digit in the first row of the test set:
y_predicted_by_model[0]
The output will be something like this:
array([3.4887790e-09, 3.4696127e-06, 7.7428967e-07, 2.9782784e-08,
       6.3373392e-08, 6.1983449e-08, 7.4500317e-10, 9.9999511e-01,
       4.2418694e-08, 3.8616824e-07], dtype=float32)
Since it is really difficult to identify the output class label with the highest probability score, let’s write another code:
np.argmax(y_predicted[0])
And with this, you will get one of the ten digits as output (0 to 9).
Conclusion
In this blog, we begin by discussing the Convolutional Neural Network and its importance. The tutorial also covered how a dataset is divided into training and test dataset. As an example, a popular dataset called MNIST was taken to make predictions of handwritten digits from 0 to 9. The dataset was cleaned, scaled, and shaped. Using TensorFlow, a CNN model was created and was eventually trained on the training dataset. Finally, predictions were made using the trained model.
I would encourage the readers to try this out on their own by tweaking the model hyperparameters a bit to see if they are able to achieve higher accuracies or not. If you face any issue, let us know in the comment section and we would be happy to support.
References
- Team, K. (n.d.). Keras documentation: MNIST digits classification dataset. Keras. https://keras.io/api/datasets/mnist/.
- manav_m. (2021, May 1). CNN for Deep Learning: Convolutional Neural Networks (CNN). Analytics Vidhya. https://www.analyticsvidhya.com/blog/2021/05/convolutional-neural-networks-cnn/.
- YouTube. (2020, October 14). Simple explanation of convolutional neural network | Deep Learning Tutorial 23 (Tensorflow & Python). YouTube. https://www.youtube.com/watch?v=zfiSAzpy9NM&list=PLeo1K3hjS3uvCeTYTeyfe0-rN5r8zn9rw&index=61.


What a nice article author. Thank you. Keep it up.