Facial Landmark Detection Simplified With Opencv
This article was published as a part of the Data Science Blogathon
Introduction
Today we are going to use OpenCV and MediaPipe to detect 468 facial landmarks in an image.
OpenCV is the cross-platform open-source library for computer vision, machine learning, and image processing using which we can develop real-time computer vision applications. It is mainly used for image or video processing and also analysis including object detection, face detection, etc.
Facial landmarks are used to localize and represent important regions of the face, such as:
· Mouth
· Eyes
· Eyebrows
· Nose
· Jawline etc.
Applications
Facial landmarks have many applications such as:
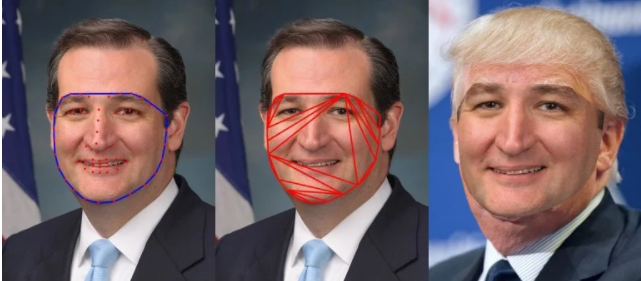
Face Replacement:
If we have facial landmark feature points estimated on two different faces, we can align one face to the other, and then flawlessly we can clone one face onto the other.
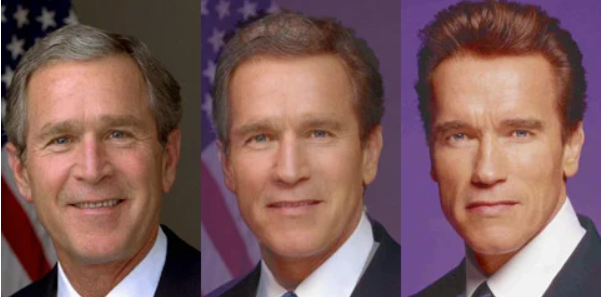
Face Morphing:
Facial landmarks can be used to produce in-between images by aligning faces that can be morphed.
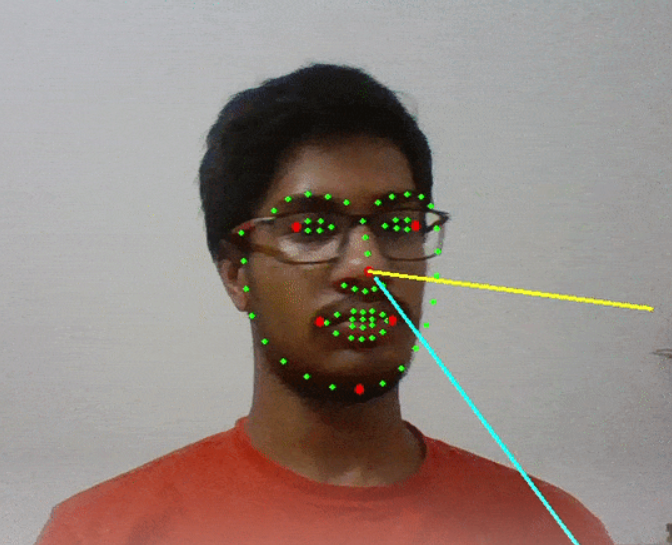
Head pose estimation:
Once we know a few facial landmark points, then we also estimate the pose of the head.
MediaPipe Face Mesh
MediaPipe Face Mesh estimates 468 3D face landmarks in real-time even on mobile devices. It requires only a single camera input by applying machine learning (ML) to infer the 3D surface geometry, without the need for a dedicated depth sensor. It delivers better real-time performance.
FACE LANDMARK MODEL
The model for 3D face landmarks has been employed using transfer learning and it is trained on a network with different objectives: the network predicts 3D landmark coordinates on synthetic rendered data. The resulting network performed reasonably well on real-world data.
The 3D landmark network takes input as a cropped video frame without additional depth input. The model outputs the positions of the 3D points, reasonably aligned in the input.
GEOMETRY PIPELINE
The Geometry Pipeline is a crucial component, it estimates the face geometry objects within the 3D Metric space. On each frame, the following steps are executed respectively:
- The Metric 3D space coordinates are obtained that is, face landmark screen coordinates
are converted into the Metric 3D space coordinates. - Face pose the transformation matrix is estimated as a rigid linear mapping from the canonical face metric landmark which is then sent into the runtime face a metric landmark that minimizes a difference between the two.
- Then the runtime face metric landmarks create a face mesh.
Let’s Implements it.
First, let us check if our webcam ids working fine and print the frames per second (fps) on the output screen.
import cv2
import time
cap = cv2.VideoCapture(0)
pTime = 0
while True:
success, img = cap.read()
imgRGB = cv2.cvtColor(img, cv2.COLOR_BGR2RGB)
cTime = time.time()
fps = 1/(cTime-pTime)
pTime = cTime
cv2.putText(img, f'FPS:{int(fps)}', (20, 70), cv2.FONT_HERSHEY_SIMPLEX, 1, (0, 255, 0), 2)
cv2.imshow("Test", img)
cv2.waitKey(1)
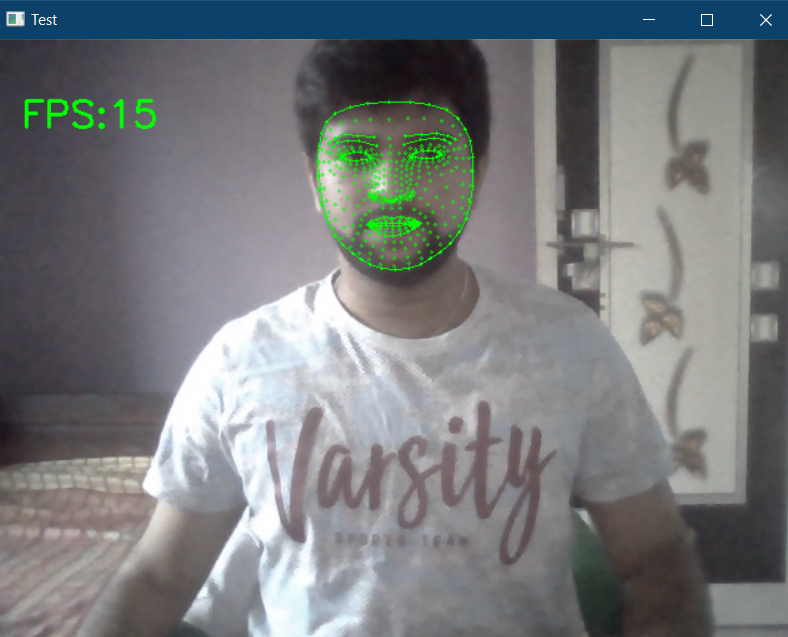
It should open a window if you have a webcam or else, instead of zero inside the ‘VideoCapture’ function you can mention the path to a video. And on the top left corner, you can see the FPS (varying) as shown below.

Now let’s create a new python file and start creating our module for facial landmark detection.
Install the required modules.
- pip install opencv-python

- pip install mediapipe
import cv2
import mediapipe as mp
import time
cap = cv2.VideoCapture(0)
pTime = 0
NUM_FACE = 2

mpDraw = mp.solutions.drawing_utils
mpFaceMesh = mp.solutions.face_mesh
faceMesh = mpFaceMesh.FaceMesh(max_num_faces=NUM_FACE)
drawSpec = mpDraw.DrawingSpec(thickness=1, circle_radius=1)
Here in the above code, we are taking the input from the webcam and the variable ‘NUM_FACE’ tells how many faces to detect and locate the facial landmark from the frames. To draw the facial points we use ‘mpDraw’ variable. We will use ‘mp.solutions.face_mesh’ to create the face mesh. In order to control the thickness of the connection lines and the points we will use ‘drawSpec’.
while True:
    success, img = cap.read()
    imgRGB = cv2.cvtColor(img, cv2.COLOR_BGR2RGB)
    results = faceMesh.process(imgRGB)
    if results.multi_face_landmarks:
        for faceLms in results.multi_face_landmarks:
            mpDraw.draw_landmarks(img, faceLms,mpFaceMesh.FACE_CONNECTIONS, drawSpec, drawSpec)
for id,lm in enumerate(faceLms.landmark):
print(lm)
ih, iw, ic = img.shape
x,y = int(lm.x*iw), int(lm.y*ih)
# uncomment the below line to see the 468 facial landmark
# cv2.putText(img, str(id), (x, y), cv2.FONT_HERSHEY_SIMPLEX, 0.3, (0, 255, 0), 1)
print(id, x,y)

cTime = time.time()
fps = 1/(cTime-pTime)
pTime = cTime
cv2.putText(img, f'FPS:{int(fps)}', (20,70), cv2.FONT_HERSHEY_SIMPLEX, 1, (0,255,0), 2)
cv2.imshow("Test", img)
cv2.waitKey(1)
Then inside the while loop read the frames and convert the frames into RGB, pass that image to ‘faceMesh.process()’, and then draw the detected landmarks on the face. In order to see the 468 face landmarks uncomment the “cv2.putText()” function inside for loop. The statement ‘print(id, x, y)’ will print out the id and coordinates. Then the output is given below.
Now in order to create a module, so that we can use it in different projects, first we need to create a class with a function in it.
import cv2
import mediapipe as mp
import time
NUM_FACE = 2


class FaceLandMarks():
    def __init__(self, staticMode=False,maxFace=NUM_FACE, minDetectionCon=0.5, minTrackCon=0.5):
        self.staticMode = staticMode
        self.maxFace =  maxFace
        self.minDetectionCon = minDetectionCon
        self.minTrackCon = minTrackCon

        self.mpDraw = mp.solutions.drawing_utils
        self.mpFaceMesh = mp.solutions.face_mesh
        self.faceMesh = self.mpFaceMesh.FaceMesh(self.staticMode, self.maxFace, self.minDetectionCon, self.minTrackCon)
        self.drawSpec = self.mpDraw.DrawingSpec(thickness=1, circle_radius=1)

    def findFaceLandmark(self, img, draw=True):
        self.imgRGB = cv2.cvtColor(img, cv2.COLOR_BGR2RGB)
        self.results = self.faceMesh.process(self.imgRGB)

        faces = []

        if self.results.multi_face_landmarks:
            for faceLms in self.results.multi_face_landmarks:
                if draw:
                    self.mpDraw.draw_landmarks(img, faceLms, self.mpFaceMesh.FACE_CONNECTIONS, self.drawSpec, self.drawSpec)

                face = []
                for id, lm in enumerate(faceLms.landmark):
                    # print(lm)
                    ih, iw, ic = img.shape
                    x, y = int(lm.x * iw), int(lm.y * ih)
                    #cv2.putText(img, str(id), (x,y), cv2.FONT_HERSHEY_SIMPLEX, 0.3, (0,255,0), 1)
                    #print(id, x, y)
                    face.append([x,y])
                faces.append(face)
        return img, faces


def main():
    cap = cv2.VideoCapture(0)
    pTime = 0
    detector = FaceLandMarks()
    while True:
        success, img = cap.read()
        img, faces = detector.findFaceLandmark(img)
        if len(faces)!=0:
            print(len(faces))
        cTime = time.time()
        fps = 1 / (cTime - pTime)
        pTime = cTime
        cv2.putText(img, f'FPS:{int(fps)}', (20, 70), cv2.FONT_HERSHEY_SIMPLEX, 1, (0, 255, 0), 2)
        cv2.imshow("Test", img)
        cv2.waitKey(1)


if __name__ == "__main__":
    main()
Conclusion
In the above code, the function name is ‘findFaceLandmarks’ which detects the facial landmark and does the same function as explained above. The class ‘FaceLandMarks()’ takes static mode, a maximum number of faces, and minimum detection confidence and minimum tracking confidence. Then create the main function to run the code.
The entire code is available at https://github.com/BakingBrains/Face_LandMark_Detection.
References:
– https://www.youtube.com/watch?v=V9bzew8A1tc&t=2125s
– https://learnopencv.com/facial-landmark-detection/
– https://google.github.io/mediapipe/solutions/face_mesh.html
My LinkedIn
Thank you
I am an enthusiastic AI developer, I love playing with different problems and building solutions.


Awesome article!!! Mediapipe is a way better alternative than dlib honestly with all those version specific errors it throws. Learnt something new, keep at it :))
Thanks friend. Appreciate it. Happy Learning!!
Thanks friend. Appreciate it. Happy learning!!