A Complete Guide on Machine Learning Model Deployment Using Heroku
This article was published as a part of the Data Science Blogathon
Overview of Model Deployment Using Heroku

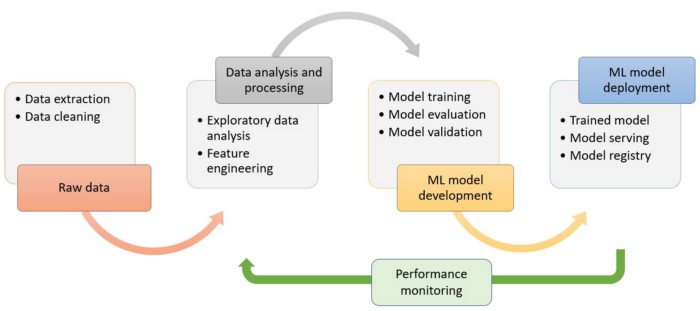
One of the most prevalent misunderstandings and mistakes for a failed ML project is spending a significant amount of time optimizing the ML model. Instead, teams that have completed a successful machine learning project devote time to gathering data, developing efficient data pipelines to reduce training-serving skew, and constructing dependable model serving infrastructure. The diagram below depicts the stages of machine learning development.
We can create a Machine Learning model, but it should predict the results for new data from the users. It is easy to consume by other applications after the deployment as a microservice.
I was so happy when I deployed my first Machine Learning model, where I spent a day working on the errors of Heroku and finally deployed it successfully.
This post aims to show you how to plan precisely when working with model deployment while explaining what to be aware of along the way. View the outcome of the final product here. (You may require patience when visiting the web apps because Heroku puts apps to sleep after a period of inactivity – the app will wake up with a delay of a few seconds.)
The post consists of three parts, they are:
- Setting up a Flask web application
- Creating a Machine Learning model
- Deploy the app on Heroku
Setting up a Flask Web Application for Model Deployment Using Heroku
We want the user to interact with our webpage, as opposed to a static website where the user merely reads the content. Web applications are websites that have functionality and an interactive element.
In our scenario, a user will have six input fields, and we provide a prediction to the user by collecting sample data. Before that, we must first comprehend how a browser interacts with other online pages by making requests. A standard browser will submit a GET request using the HTTP protocol and a POST request to send data through the web page. Hopefully, you will figure it out along the way.
To handle user requests, we have to create a lot of code as Python programmers. Instead of developing repeated code to handle requests, a guy named Armin Ronacher decided to put it in a library and call it flask as a joke.
Flask is a web server framework that requires us to organize our code in a specific way. Begin by creating two folders in your MyApp directory called Models and Templates. For the time being, we won’t be using the Static folder, but feel free to include any optional CSS code. You should create a python file on the same root level as the files and name it app.py, just like I did. After that, make an index HTML file and save it in the templates directory. The fact that the app.py and index.html files are empty is unimportant; instead, concentrate on the framework.
Virtual Environment
We can easily install flask using pip (pip install Flask) and run our web application because flask is just a third-party library. A difficulty arises when the web application is dependent on specific versions of python and other third-party libraries. Imagine that your web application is working great until a third-party library update comes along and changes the names of particular functions. Your programme will become unusable as a result of this. We can use a so-called virtual environment to get around this problem(virtualenv).
Consider a virtual environment to be a folder that is ignorant of any other libraries on your computer. It can access only the libraries installed in this location.
We’ll need you to install virtualenv on your current Python installation to build a virtual environment. To put it another way, open a terminal (or command) line and write the following:
pip install virtualenv
Use the following command to check whether you have it installed in the system:
virtualenv --version
After installation, you can create a virtual environment. We should generate virtual environment files inside the MyApp directory. Now change your current directory using CMD or open the MyApp folder and choose New Terminal.
Depending upon your system, use the following commands:
python3 -m venv virtual (Mac)
py -3 -m venv virtual (Windows)
Now the above command creates a virtual folder with necessary files. For the activation of the environment, use the below command.
. virtual/bin/activate (Mac)
virtualScriptsactivate (Windows)
Use deactivate to close the environment. Now you should see something similar to this in CMD.
(virtual) myapp %
Now you can explore the bin folder inside virtual that consists of pip and python pre-installed. New libraries installed will be added to this folder.
Finally, use this command to download the flask framework.
pip install Flask
Now you can see the flask files in your bin folder, and complement our mindset by saying words: I can accomplish anything if I focus my mind on it.
Creating a Machine Learning Model to Be Deployed Using Heroku
The second stage in our trip is to train a Machine Learning (ML) model, but our primary focus is on deployment, so we don’t spend much time on this section.
We will build a simple Linear Regression model on Insurance data. The model will predict the insurance charges for patients based on six features; age, sex, BMI, children, smoker, region.
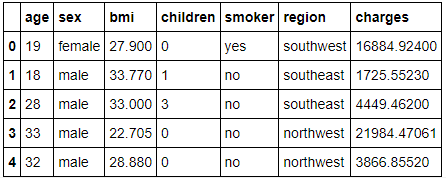
Image by Author
The focus here is on the deployment in Heroku rather than the model performance, so it makes no difference if the model is Linear regression, XGBoost, RF, or any other model.
Here we have a quick overview of two ways of creating a model:
Firstly, we create a model by importing the libraries and then train, save the trained model.
The second way is we use the Pycaret library to train our model and then save it for further requirements.
The below code helps in the creation of a model by following the general way.
Python Code:
model = xgb.sklearn.XGBClassifier(nthread=-1, seed=1)
model.fit(x, y)

# Save the model
filename = 'model.sav'
pickle.dump(model, open(filename, 'wb'))
In the above code, we import libraries such pandas, xgb and pickle then read the data from CSV and split the features into x and y. Now define the xgb classifier and fit the model with our data. After this save our model using pickle.
Now we look at the second way of creating the model, and if you are not familiar with this library, check here.
from pycaret.regression import *
r2 = setup(data, target = 'charges', session_id = 123, normalize = True,
           polynomial_features = True, trigonometry_features = True,
           feature_interaction=True, bin_numeric_features= ['age', 'bmi'])
The above code performs preprocessing tasks such as scaling, automatic feature engineering and binning of numeric features and setups the data for model training.
For training the model, we use the below code:
# Model Training and Validation
lr = create_model('lr')
Here you can view the residual plot of our linear regression model by using the below code:
# plot residuals of trained model
plot_model(lr, plot = 'residuals')
Now we save the trained model and further helps in the prediction of results for new data.
# save transformation pipeline and model
save_model(lr, model_name = 'deployment_28042020')
Based on your convenience, train and save the model that is helpful in deployment.
App File of the Heroku Based App
Let’s open the ‘app.py’ file and begin adding code. The app file is the heart of your Heroku-based web application. It will monitor particular ports for user requests and respond with specific functions according to the type of request.
The application consists of three sections. Importing libraries and initializing the flask app are the first steps. To inform Flask where our app is, we utilize the Flask( name ) method. Flask will look for templates and static files in the same directory as our app.
from flask import Flask,request, url_for, redirect, render_template, jsonify
from pycaret.regression import *
import pandas as pd
import pickle
import numpy as np
# Initalise the Flask app
app = Flask(__name__)
Now we use the load_model function to import our saved or pre-trained model.
# Loads pre-trained model
model = load_model('deployment_28042020')
Our web application will have one page, referred to as the default or main page. The home URL is the / route. By default, this should lead to the index.html file, which is the home page.
When a user hits the main page, we want to do a specified action. We constructed a function, which would respond to user queries based on the POST requests.
A POST request is made by a user when the information is being sent back to the webserver. We allow the user to fill in age, sex, BMI, children, smoker, and region. We retrieve this information from an HTML file by using the request.form.values() function. Now, we convert the list of features to NumPy array and store it in the final. We create a data frame by using the final. Then use the predict model function of pycaret to apply ML pipeline and generate predictions using the trained model. Finally, we display the predicted result on the webpage.
cols = ['age', 'sex', 'bmi', 'children', 'smoker', 'region']

@app.route('/')
def home():
    return render_template("home.html")

@app.route('/predict',methods=['POST'])
def predict():
    int_features = [x for x in request.form.values()]
    final = np.array(int_features)
    data_unseen = pd.DataFrame([final], columns = cols)
    prediction = predict_model(model, data=data_unseen, round = 0)
    prediction = int(prediction.Label[0])
    return render_template('home.html',pred='Expected Bill will be {}'.format(prediction))

@app.route('/predict_api',methods=['POST'])
def predict_api():
    data = request.get_json(force=True)
    data_unseen = pd.DataFrame([data])
    prediction = predict_model(model, data=data_unseen)
    output = prediction.Label[0]
    return jsonify(output)

if __name__ == '__main__':
    app.run(debug=True)
You can see two functions where predict consumed by our web application hosted on Heroku in the preceding code. Consider what you’d have to do if you wanted to integrate our prediction with other corporate apps. You’d have to make an API call to give the input data and retrieve the predicted results, where our predicted API can be helpful in the future.
Templates
Now we will make the default page, which will greet the user. As I did in the previous walk-through, we will divide the home page code into two sections. If you have never read or written HTML code before, I recommend watching a simple HTML tutorial video.
The initial section of my index file is made up entirely of optional CSS code. Here we had linked styles.css stored in a static folder with other font formats.
The second part consists of a form with six input fields. Notice the required attribute, which ensures input from the user. Here name attribute was used as a reference in the app.py file that helps request.form.values() function to get the data.
Predict Insurance Bill
{{pred}}
You may have noticed the brackets in the previous paragraph. When you see something like this, you should automatically assume that we are using Jinja. Flask supports Jinja, a templating language that uses the percent% and syntax to add placeholder blocks and other code chunks. In this scenario, we had used url_for(‘predict’) in the app.py file to call the predict function. At last, we display the predicted result to the user that we render in our app.py.
Testing App
One last step before we deploy the application on Heroku is to examine the web app locally. Open Anaconda Prompt and navigate to the folder where you had saved app.py on your computer. Run the python file with the below code:
python app.py
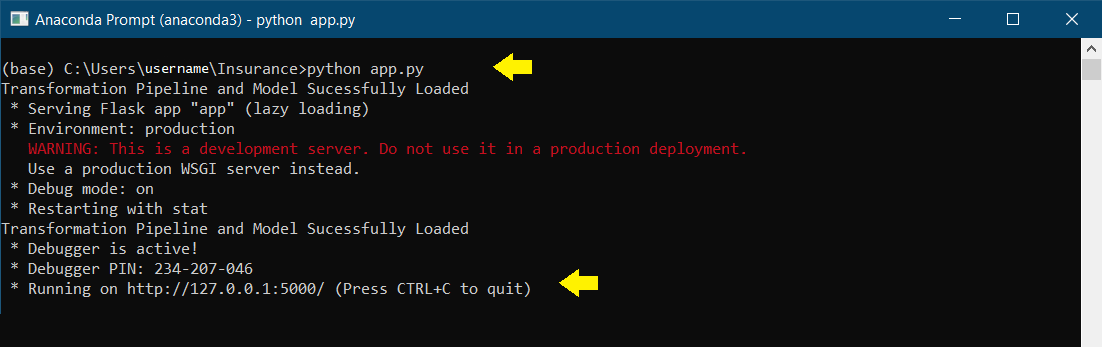
Image by Author
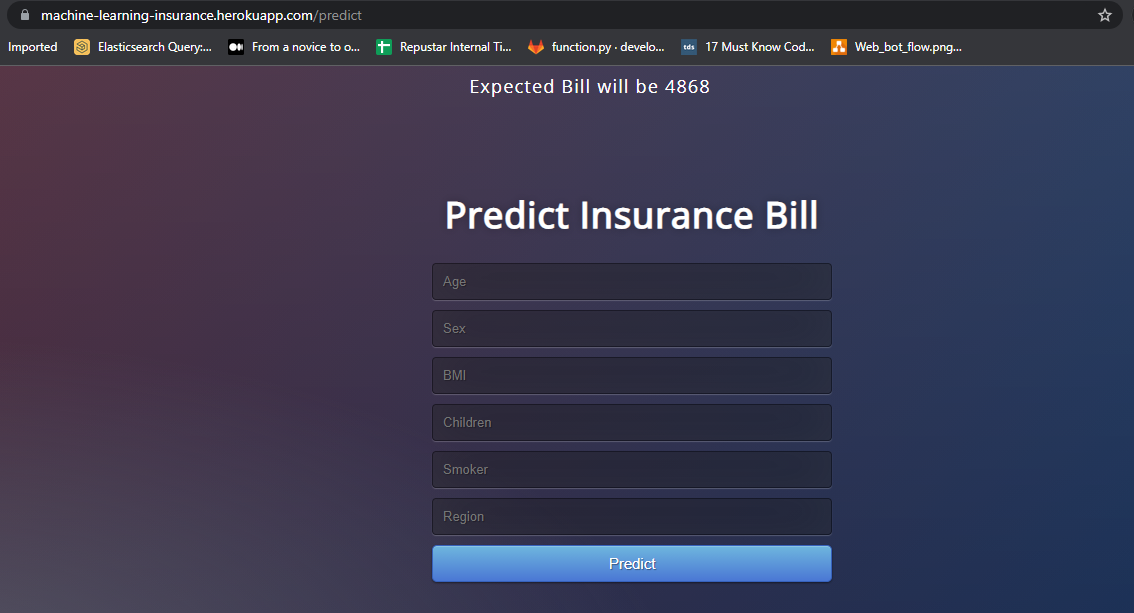
After the execution, copy and paste the URL into a browser, and it will open a web application hosted on your local machine (127.0.0.1). Try entering test values to check whether the predict function is working. In the example below, a 19-year-old female smoker in the southwest with no children might expect to pay $20,900.
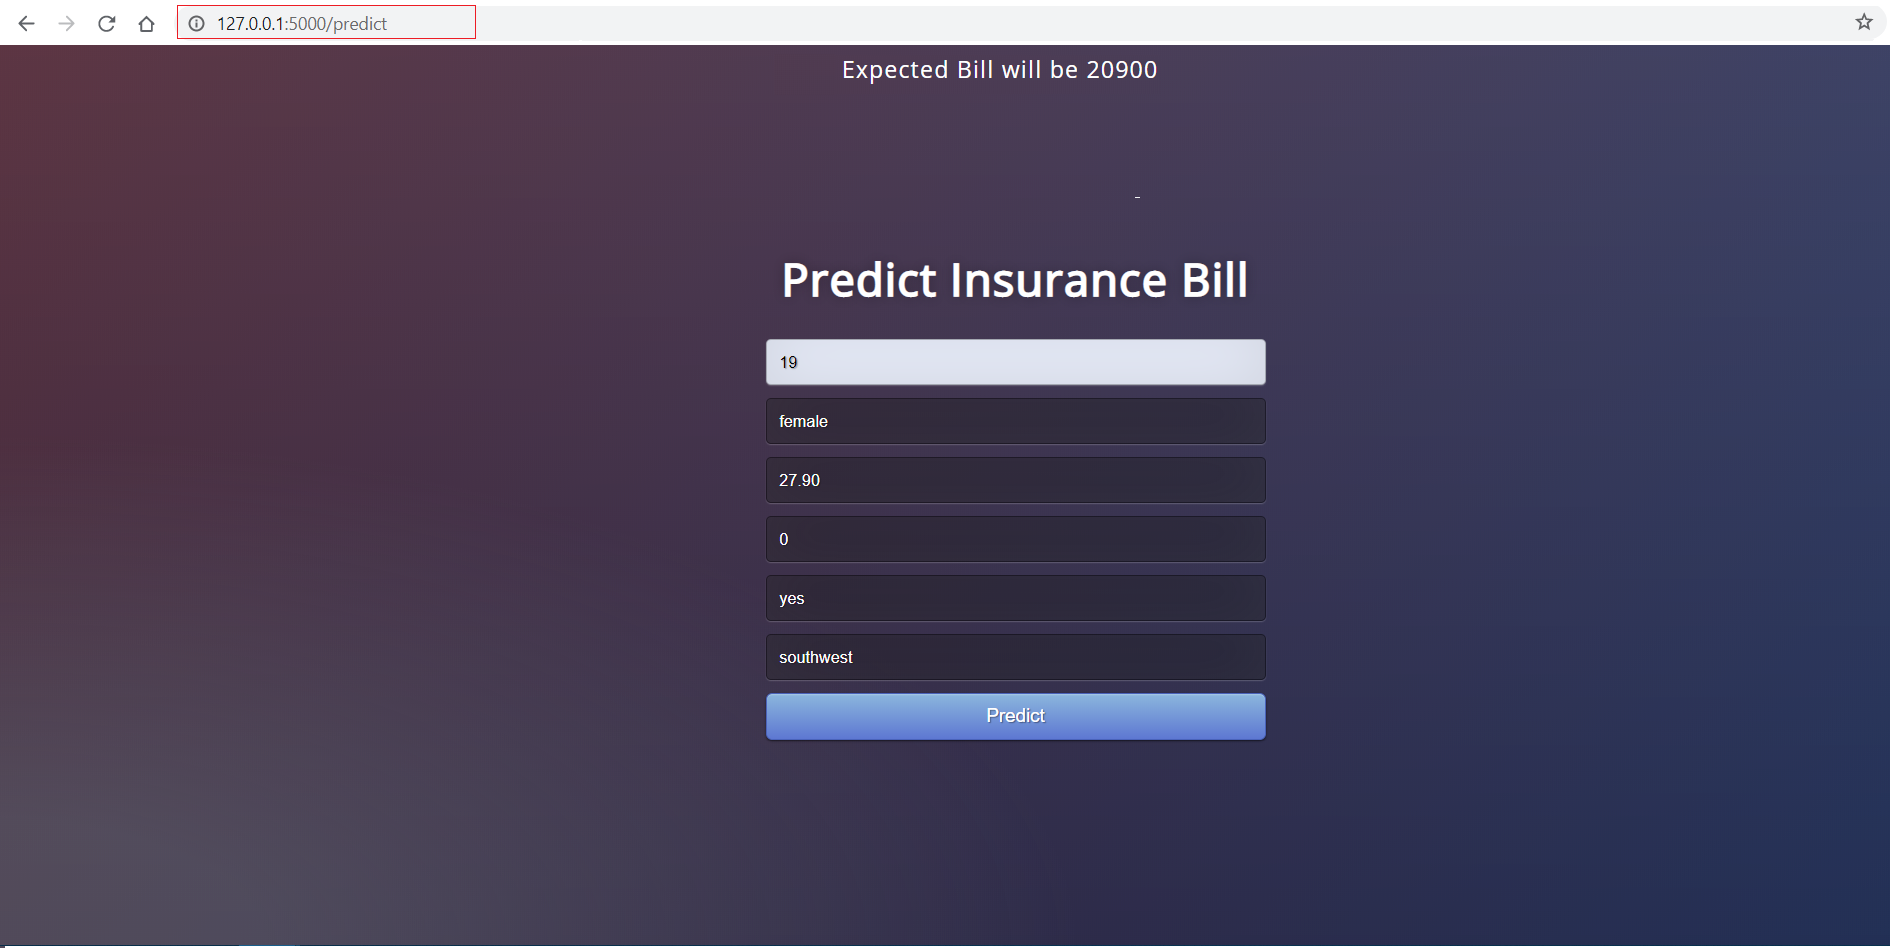
Image by Author
Congratulations! You’ve now created your first machine learning application. Now it is time to take this application from your local machine into the cloud so other people can use it with a Web URL.
Model Deployment using Heroku
Before going into our deployment process a quick brief about Heroku.
Heroku is a container-based cloud Platform as a Service (PaaS). Developers use Heroku to deploy, manage, and scale modern apps. Our platform is elegant, flexible, and easy to use, offering developers the simplest path to getting their apps to market.
Heroku is fully maintained, allowing developers to focus on their core product rather than having to worry about servers, hardware, or infrastructure. It provides tools, services, workflows, and support for polyglot—all intended to improve developer productivity.
We’re ready to start our Heroku deployment now that our model has been trained, the machine learning pipeline has been set up, and the application has been tested locally. There are a few ways to upload your application source code onto Heroku. The easiest way is to link a GitHub repository to your Heroku account.
Although flask is fantastic, they help in local development. It does not handle the kind of queries that a typical web server does. We’ll need to install the gunicorn python library to take care of a large number of requests.
We need to tell Heroku to use the gunicorn now that we’ve installed it. We accomplish this by generating a file called procfile that has no extension (for instance, Procfile.txt is not valid.). The file consists of commands to execute on the startup.
It’s just one line of code that tells a web server which files to run first when someone logs into the application. In this case, the name of our application file is app.py, and the name of the application is also app.
requirements.txt
It is a text file containing the python packages required to execute the application. If these packages do not found in the environment application is running, it will fail. I recommend you mention the particular versions of all your libraries.
Steps for Model Deployment Using Heroku
Once files had uploaded to the GitHub repository, we are now ready to start deployment on Heroku. Follow the steps below:
1. After sign up on heroku.com then click on Create new app.

Image by Author
2. Enter App name and region.
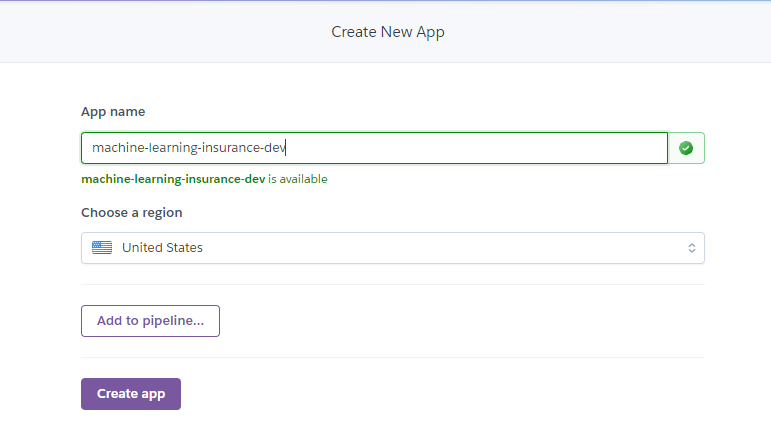
3. Connect to your GitHub repository where code is uploaded.
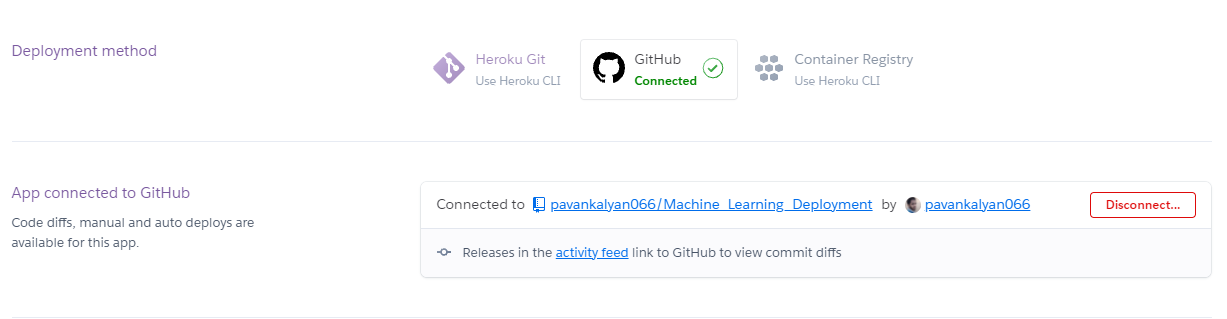
In the search, choose the repository where you had uploaded the project code.
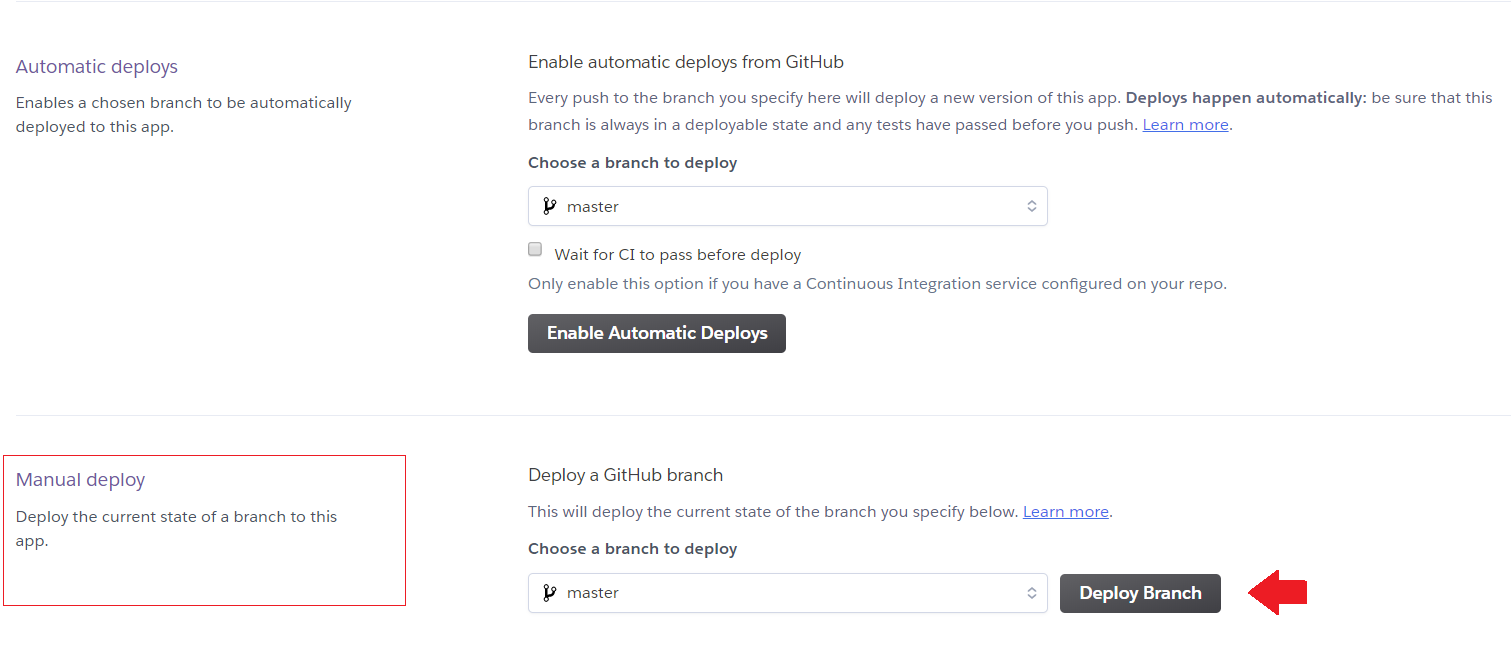
4. Deploy branch
5. Wait 5–10 minutes and BOOM
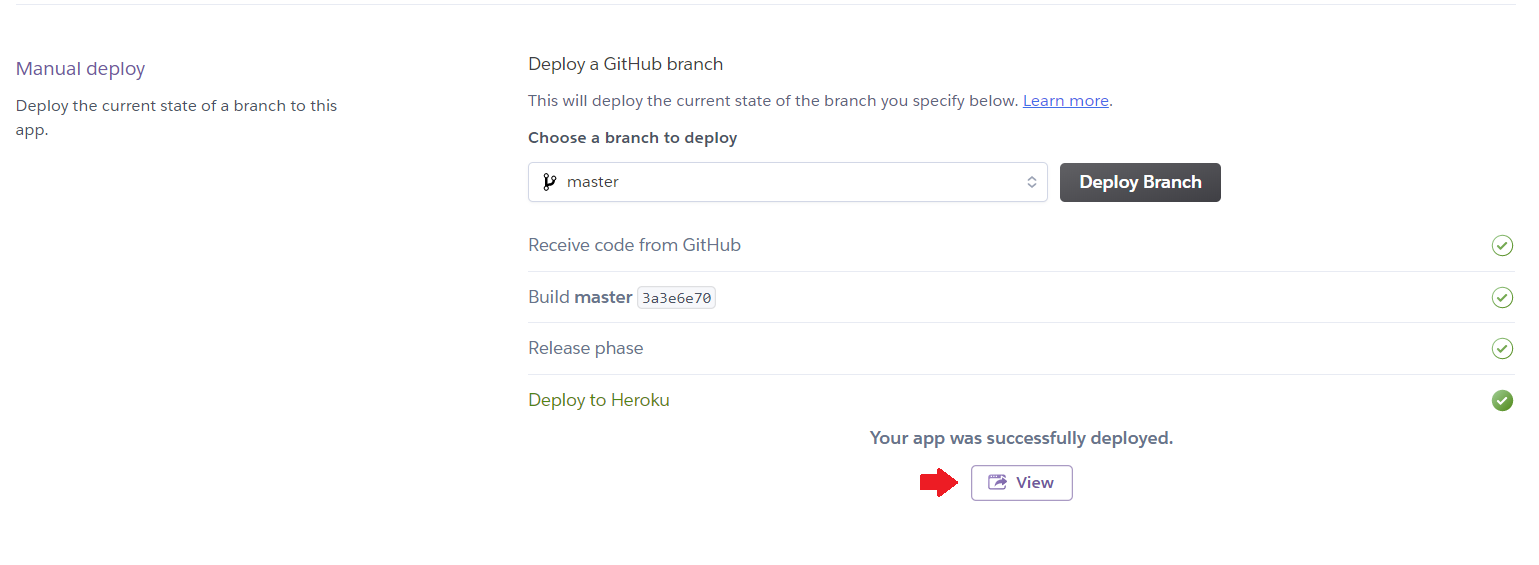
The app is published at URL: https://machine-learning-insurance.herokuapp.com/
Another way you can use the command line to interact with Heroku.
Login to Heroku
Open the command line from the project folder and type
heroku login
Now, use the email and password used while creating your Heroku account. The above command will open a browser window, and if you prefer to go with the command line, use the below command.
heroku login -i
The login might be unsuccessful when you are in the wrong environment. In this case, the latter command might be helpful: conda deactivate
Tell Git about you
Before sending our files from git to Heroku, config your git name and email. It is necessary because every Git commit uses this information.
Follow the below command to do it:
git config --global user.name "John"
and then type this:
git config --global user.email [email protected]
Do not forget to change your email address and name in those lines while maintaining the double quotes. If you choose the — global option, you only have to do this once.
Create a git repository for your web app
Use the below command to create a local git repository:
git init
Then use the below command to add your local files:
git add .
The dot above means it adds the entire directory to the repository.
Use the below command to commit your files:
git commit -m "Initial commit"
The comments can be of your choice.
Create an empty app on Heroku
The following steps consist of creating a new app on Heroku and upload the files to that app, and we will be using git for sending the files.
Use the below command to create Heroku app
heroku create
After the finish of app creation, you can able to get the overview in Heroku account.
Moving all of our files, pushing them to Heroku, and then activating the app are the final steps:
git push heroku master
Use the below command to activate the app and set the number of dynos (anything higher than one will cost)
heroku ps:scale web=1
Access app and see performance
If everything went good, then you should be ready to access your app at:
.herokuapp.com
One can open it by using the URL above or typing:
heroku open
It may take some time for it to work fine, so be patient. If everything is good, you should now have a web-based app. You should be proud of your accomplishments.
Good to know
The following commands have helped in dealing with all of the common issues encountered on the way:
- heroku local: is Used for opening Heroku on the local server.
- heroku logout: should be self-explanatory.
- heroku run ‘ls -al’: To list the directory contents, you’ll need a copy of your dyno. It is helpful if you want to double-check that new files had added to Heroku.
- heroku logs –tail: this command provides you with the information about the app’s performance once it is up and running.
- heroku restart: should be self-explanatory.
- heroku apps:rename to change the name of your app.
- Conclusion
We had covered a lot of things together in this guide, where I hope my work inspired you for many deployments hereafter. Go through this Github link to access the resources used in this post.
I hope you had enjoyed this post. Thank you for reading. Have a great day.
Image Source
- Image 1 – https://unsplash.com/s/photos/machine-learning?utm_source=unsplash&utm_medium=referral&utm_content=creditCopyText
Myself Pavan Kalyan with 2 years of experience in developing, deploying scalable Machine Learning models and interested to explore data, discover useful insights. I like to participate in the Machine Hack and Kaggle competitions.


