An Introduction to Deepfakes with Only One Source Video
Introduction to Deepfakes
Deepfakes are AI-generated synthetic videos of any person or celebrity that impersonates the actual person and makes them act or say anything they originally never did. The process of creation of deepfakes is technically complex and generally requires a vast amount of data which is then fed to a neural network to train and generate the synthetic video.
Impact of Deepfakes
Deepfakes and AI avatars can have varying impacts depending on how it’s used. While the negative effects of deepfake can be scary and frightening to imagine, it also can be useful in other circumstances and use cases.
Pros of Deepfakes-
- Deepfakes can be used as a form of art to bring people from the past back to life. For example, a painting of the Mona Lisa can be used for generating a synthetic image of talking Mona Lisa as a form of art.
- Deepfake technology can be used to create AI avatars in training videos. Startups like London-based Synthesia have been getting more attention from the corporate world during the COVID pandemic since lockdowns and health concerns have made video shoots involving real people much more difficult to pull off.
- Deepfakes can be used to create personal avatars to try on clothes or new hairstyles before trying them in real.
Deepfakes can also be used in identity protection and anonymization in various fields like investigative news reporting, finance, etc.
Cons of Deepfakes-
- Deepfakes can be used to spread fake news with morphed videos of celebrities.
- Deepfakes can also be misused for creating misinformation campaigns on social media that can shift public opinion and lead to negative consequences.
Creating Deepfakes
While deepfakes can be used or misused in multiple ways, creating them is becoming easier with more advancements in AI with every passing day.
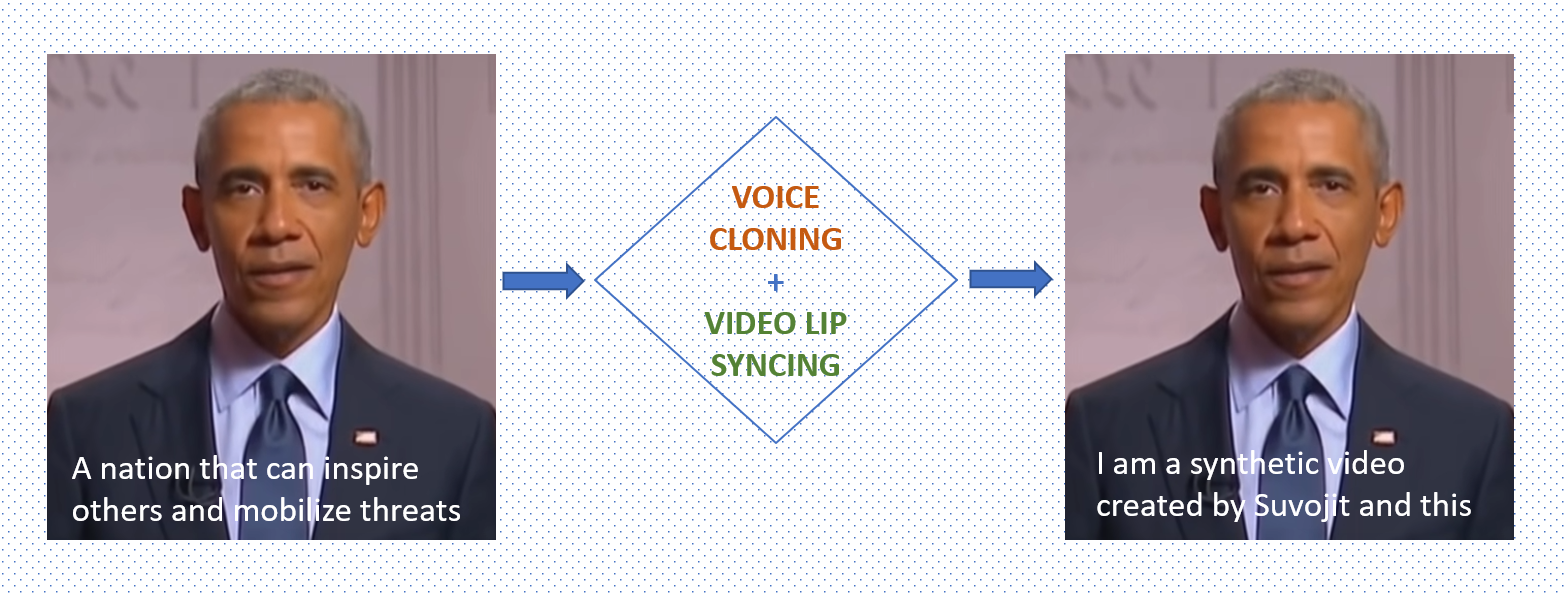
We can now create a deepfake with just 1 small source video of the person. Yes, that is now easily possible with the latest advancements in neural networks. Read to know more!
Let’s break down the solution into two parts –
- Voice Cloning
- Video Lip Syncing
Voice Cloning part of Deepfakes
SV2TTS is a framework for deep learning that can be trained to quantify and represent audio as numbers and parameters based on only a small few seconds of audio of the voice of a person. This numeric depiction of the voice sample can be used to guide and train a text-to-speech model to generate new audio with the exact same voice with any text data as input. Thus, Using the extracted audio from the sample source video, a voice clone can be easily created with SV2TTS.

Figure: SV2TTS Workflow
SV2TTS Workflow
- The Speaker Encoder receives the audio of the target person extracted from the source video and passes the encoded output with embeddings to the Synthesizer.
- The Synthesizer gets trained on target audio and pairs of text transcripts and synthesizes the input
- The neural vocoder converts the spectrograms generated by the synthesizer into output waveforms
Video Lip Syncing part of Deepfakes
Wav2lip is a lip-syncing GAN that takes an audio sample and an equal-length video sample of a person talking as input and syncs the lip of the person to the input audio. Thus, it produces a synthetic video of the same person speaking the input audio instead of the actual audio in the original sample video.
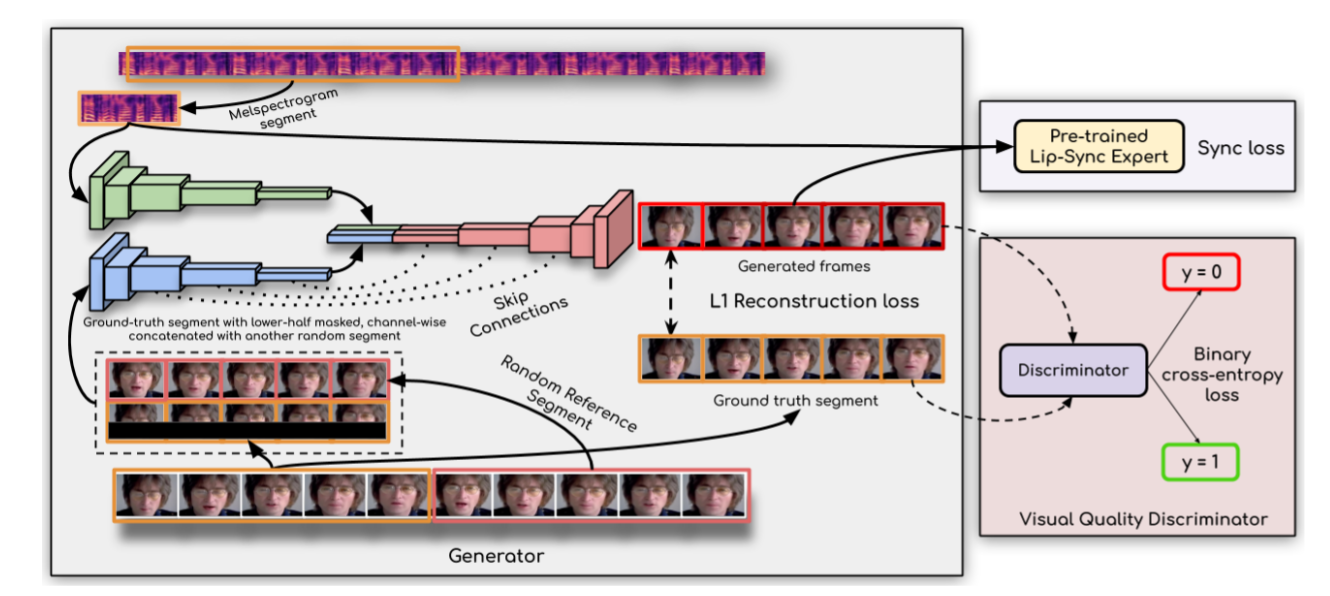
Figure: Wav2Lip Workflow
Video Lip Syncing Workflow
- The generator uses an identity encoder, speech encoder, and face decoder to generate the frames of the video
- The discriminator penalizes the generator for inaccuracies in generation during the training process
- The generator-discriminator tussle results in the final output video with the highest possible accuracy
Sample Synthetic Video
Here’s a synthetic video I created of Barack Obama talking to us! The text transcript used to create the voice clone audio reads – “Hey guys, this is Barack Obama. As you can see, this is not a real video. My creator, Suvojit, generated this synthetic video with Generative Adversarial Networks….”
Deep Diving into the steps and code of SV2TTS
Let’s take a deep dive into the steps and code behind SV2TTS and Wav2Lip.
Source Video
Choose the source video – the video can be of any length and should have only the target character speaking in the front with as few breaks as possible. Note that the final synthetic video generated will be the same size as the input video, so you can crop the video as per requirement.
Audio Extraction
Extract the audio from the source video. This audio will serve as the training data for SV2TTS to generate the voice clone.
Import Libraries
For SV2TTS, import the necessary libraries in a notebook.
# importing all the necessary libraries
import os
from os.path import exists, join, basename, splitext
import sys
from IPython.display import display, Audio, clear_output
from IPython.utils import io
import ipywidgets as widgets
import numpy as np
from dl_colab_notebooks.audio import record_audio, upload_audio
from synthesizer.inference import Synthesizer
from encoder import inference as encoder
from vocoder import inference as vocoder
from pathlib import Path
Clone SV2TTS Repo
Clone the real-time voice cloning repo based on SV2TTS and install the requirements.
sys.path.append(name_of_proj)
#url of svt2tts
git_repo_url = 'https://github.com/CorentinJ/Real-Time-Voice-Cloning.git'
name_of_proj = splitext(basename(git_repo_url))[0]
# clone repo recursively and install dependencies
if not exists(name_of_proj):
  # clone and install
  !git clone -q --recursive {git_repo_url}
  # install dependencies
  !cd {name_of_proj}
  !pip install -q -r requirements.txt
  !pip install -q gdown
  !apt-get install -qq libportaudio2
  !pip install -q https://github.com/tugstugi/dl-colab-notebooks/archive/colab_utils.zip
Load Pre-trained Model
Download and load the pre-trained model and synthesizer.
# load pretrained model

encoder.load_model(project_name / Path("encoder/saved_models/pretrained.pt"))

# create synthesizer object

synthesizer = Synthesizer(project_name / Path("synthesizer/saved_models/pretrained/pretrained.pt"))

# load model to vocoder

vocoder.load_model(project_name / Path("vocoder/saved_models/pretrained/pretrained.pt"))
Upload Audio and Compute Embeddings
Set the sample rate, encoder embeddings, and option to upload or record the audio. In this case, we will be uploading the audio.
# choose appropriate sample rate
SAMPLE_RATE = 22050
# create option to upload or record audio, enter audio duration
rec_upl = "Upld (.mp3 or .wav)" #@param ["Recrd", "Upld (.mp3 or .wav)"]
record_seconds =   600#@param {type:"number", min:1, max:10, step:1}
embedding = None
# compute embeddings
def _compute_embedding(audio):
  display(Audio(audio, rate=SAMPLE_RATE, autoplay=True))
  global embedding
  embedding = None
  embedding = encoder.embed_utterance(encoder.preprocess_wav(audio, SAMPLE_RATE))
#function for recording your own voice and computing embeddings
def _record_audio(b):
  clear_output()
  audio = record_audio(record_seconds, sample_rate=SAMPLE_RATE)
  _compute_embedding(audio)
#function for uploading audio and computing embeddings
def _upload_audio(b):
  clear_output()
  audio = upload_audio(sample_rate=SAMPLE_RATE)
  _compute_embedding(audio)
if record_or_upload == "Record":
  button = widgets.Button(description="Record Your Voice")
  button.on_click(_record_audio)
  display(button)
else:
  #button = widgets.Button(description="Upload Voice File")
  #button.on_click(_upload_audio)
  _upload_audio("")
Generate Voice Clone
Finally, synthesize the audio and generate the output waveform
# text for the voice clone to read out in the synthetically generated audio
text = "Hey guys this is Barack Obama. As you can see, this is not a real video. My creator, Suvojit generated this synthetic video with Generative Adversarial Networks. Like and share this video, and message Suvojit if you want to know more details. Bye" #@param {type:"string"}
def synthesize(embed, text):
  print("Synthesizing new audio...")
  # synthesize the spectrograms
  specs = synthesizer.synthesize_spectrograms([text],
)
  generated_wav = vocoder.infer_waveform(specs[0])
  # generate output waveform
  generated_wav = np.pad(generated_wav, (0, synthesizer.sample_rate), mode="constant")
  clear_output()
  display(Audio(generated_wav, rate=synthesizer.sample_rate, autoplay=True))
Lip-Sync: Clone Wav2Lip Repo
Now it’s time to generate the lip sync video. Clone the Wav2Lip repository and download the pre-trained model for highly accurate lip sync. Mount Google drive and upload and copy the contents.
#download:  https://github.com/Rudrabha/Wav2Lip#training-on-datasets-other-than-lrs2
!git clone https://github.com/Rudrabha/Wav2Lip.git
# copy checkpoints from google drive to session storage
!cp -ri "/content/gdrive/MyDrive/Files/Wav2lip/wav2lip_gan.pth" /content/Wav2Lip/checkpoints/
!cp -ri "/content/gdrive/MyDrive/Files/Wav2lip/wav2lip.pth" /content/Wav2Lip/checkpoints/
!cd Wav2Lip && pip install -r requirements.txt
!wget "https://www.adrianbulat.com/downloads/python-fan/s3fd-619a316812.pth" -O "Wav2Lip/face_detection/detection/sfd/s3fd.pth"
Preprocessing Audio and Video Data
Now set up the files for processing.
%cd sample_data/
%rm input_audio.wav
%rm input_video.mp4
from google.colab import files
uploaded = files.upload()
%cd ..
!cd Wav2Lip && python inference.py --checkpoint_path checkpoints/wav2lip_gan.pth --face "/content/sample_data/input_video.mp4" --audio "/content/sample_data/input_audio.wav"
from google.colab import files
# download the voice generated in previous steps to session storage
files.download('/content/Wav2Lip/results/result_voice.mp4')
from IPython.display import HTML
from base64 import b64encode
# read binary of the audio file
mp4 = open('/content/Wav2Lip/results/result_voice.mp4','rb').read()
data_url = "data:video/mp4;base64," + b64encode(mp4).decode()
HTML(f"""
<video width="50%" height="50%" controls>
      <source src="{data_url}" type="video/mp4">
</video>
""")
Upload Input Files for Wav2Lip
Upload input_video.mp4 & input_audio.wav files. Input audio was generated in the previous step from SV2TTS.
%cd sample_data/
from google.colab import files
uploaded = files.upload()
%cd ..
Generate The Lip-Sync Video
Create the wav2lip video with the pre-trained model.
# set the args for checkpoint and input files and generate the lip sync video
!cd Wav2Lip && python inference.py --checkpoint_path checkpoints/wav2lip_gan.pth --face "/content/sample_data/input_video.mp4" --audio "/content/sample_data/input_audio.wav"
Download the Deepfake to your PC
That’s it! Now you can download the deepfake to your google drive and to your pc.
files.download('/content/Wav2Lip/results/result_voice.mp4')
The combination of Audio Cloning and Lip Syncing GAN can thus be used to produce a deepfake of anyone saying anything that you just type in, from just a small 10-second sample video of the person. For reference to the original research papers, you can find them below.
References
- Papers
- Image Sources
Featured Image , Barack Obama , SV2TTS Workflow , Wav2Lip Workflow
About The Author
Suvojit is a Data Scientist at Infosys R&D working in the field of computer vision and NLP. As a Data Scientist, he enjoys exploring new and innovative ideas and techniques in the field of AI and tries to solve real-world machine learning problems by thinking out of the box. He writes about the latest advancements in Artificial Intelligence and Natural Language processing. You can follow him on LinkedIn.


Wonderful article. I have a question though : For Step 2 : For recognizing lip synchs(output) , Is he audio input in digital format from the audio cloning step the input for this step ?