An Introduction to TFLearn using Python
This article was published as a part of the Data Science Blogathon.
Overview
Hello readers!
Hope you know about TensorFlow. TensorFlow is an open-source artificial intelligence library using data flow graphs to build models developed by Google. Using this, we can create large-scale neural networks with n number of layers. This TensorFlow is considered the best library to perform text-based applications, face recognition, image recognition, voice search and many more machine learning and deep learning applications. DeepFace, Facebook’s image recognition system, Apple’s Siri uses TensorFlow for image recognition and voice recognition respectively. Apart from this, TensorFlow is a low-level library. It is quite difficult to use TensorFlow directly as the API is extremely verbose and prone to subtle. It is hard to catch bugs in TensorFlow. To overcome these difficulties, a wrapper framework called TFLearn was developed.
In this article, I am going to give you a glimpse of TFLearn.
What is TFLearn?
TFlearn is a high-level deep learning library built on the top of TensorFlow. It is modular and transparent. It offers excellent facilities and speeds up experimentation. It is easy to use and understand. The code you write in TFLearn is very concise.
Now, look at this TensorFlow code snippet.
with tf.name_scope('conv1'):
  W = tf.Variable(tf.random_normal([5, 5, 1, 32]), dtype = tf.float32, name = 'Weights')
  b = tf.Variable(tf.random_normal([32]), dtype = tf.float32, name = 'biases')
  x = tf.nn.conv2d(x, W, strides = [1, 1, 1, 1], padding = 'SAME')
  x = tf.add_bias(x, b)
x = tf.nn.relu(x)
Here, we are randomly initializing weights, assigning filters to 32. We are creating 32 bias values of random values. Then we are creating a convolution 2D by specifying the input, weight, strides and padding. After defining all these things, we need to add bias and apply the ReLU activation function. This is the syntax for writing one convolution layer in TensorFlow.
Now, look at this TFLearn code snippet.
tflearn.conv_2d(x, 32, 5, activation = 'relu', name = 'conv1')
This is the syntax to create a convolution layer in TFLearn. We are passing the input X, filters to 32, a 5×5 matrix, and ReLU activation in a single line.
Now I hope you can understand how TFLearn is minimizing the lines of code effectively.
Using this TFLearn library, you can build highly modular neural network layers and optimizers. TFLearn offers full transparency with the TensorFlow work system. The code written in TFLearn can be switched to TensorFlow code at any point. TFLearn provides effective graph visualization.
Installation of TFLearn
To install TFLearn, you must have TensorFlow before.
TensorFlow can be installed by
pip install tensorflow
If you are using Anaconda environment, TensorFlow can be installed by
conda install tensorflow
After successful installation of TensorFlow, you can install TFLearn.
pip install tflearn
In the Anaconda environment, TFLearn can be installed by
conda install -c derickl tflearn
Now it’s time to start practicing TFLearn.
Data Set
Here, I am using the famous MNIST data set. MNIST data set is a large database of handwritten digits. It can be downloaded from here. MNIST data set can be used for training models to recognize handwritten digits.
The data set consists of 2 CSV files. One is the training data set and the other is the test data set.
Goal
The train data set consists of 785 columns. The first column is “label” representing the digit. The other columns contain the pixel-values of that label. The test data set is the same as the train data set except for the label column. The goal is to create a model and predict the digits in the test data set.
Import the necessary libraries
Here, I am using Google Colab to run the code. You can use your favorite Python IDE.
The first task is to
load all the necessary libraries. I am using NumPy and Pandas to make the
coding bit easier. I am importing both TensorFlow and TFLearn. I am using
IPython and Matplotlib to visualize images.
import numpy as np
import pandas as pd
import tflearn
import tensorflow as tf
import warnings
warnings.filterwarnings('ignore')
from IPython.display import display, Math, Latex
import matplotlib.pyplot as plt
%matplotlib inline
Loading the data
Let me load the train and test CSV into a data frame.
data=pd.read_csv("/content/drive/MyDrive/at/train.csv")
test=pd.read_csv("/content/drive/MyDrive/at/test.csv")
As the labels are in
the first column of the CSV file, let’s separate them into train and labels. To do standardization, let’s combine the train and test data frame.
train=data.iloc[:,1:]
labels=data.iloc[:,0:1]
data = pd.concat([train,test],ignore_index=True)
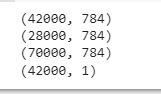
Let me check the shape of the created data frames.
print(train.shape)
print(test.shape)
print(data.shape)
print(labels.shape)
Standardize Data
As we all know, the pixel value ranges between 255 and 0. The data set needs to be standardized to speed up the training.
norm_data = (data - data.mean()) / (data.std())
norm_data = norm_data.fillna(0)
Labels Hot-Encoding
Hot encoding is a process of converting categorical variables into binary vectors. The converted variables can be provided to the machine learning models to improve the prediction accuracy.
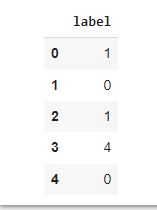
Let’s look at our label column.
labels[0:5]
We must convert this into a binary array.
Label 0 can be converted into [1,0,0,0,0,0,0,0,0,0]
Label 1 can be converted into [0,1,0,0,0,0,0,0,0,0]
Likewise, the labels column can be represented.
This can be done by hot encoding the data frame and storing it into an array.
norm_labels=[]
for value in labels.iterrows():
    new_label=np.zeros(10)
    new_label[value[1]]=1
    norm_labels.append(new_label)
norm_labels=np.array(norm_labels)
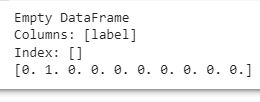
Let’s check the converted labels.
print(labels.iloc[12:12,0:1])
print(norm_labels[12])
Train-Test Split
Now it’s time to split our data set into train and test sets. This will prevent the model from over-fitting and improve the accuracy of the evaluation.
train = norm_data[0:42000].values
test = norm_data[42000:].values
Build the model using TFLearn
Let’s start to build our model.
A neural network will consist of
- An input layer
- Number of hidden layers with ReLU activation
- An output layer with softmax activation
- Backpropagation using SDG
- Cross-entropy with labels
First, let’s define the input layer.
Input Layer
Here, our train data set has 784-pixel columns with each pixel being a 28X28 matrix.
net = tflearn.input_data(shape=[None, 784])
Hidden layer
In the hidden layers, I am using the ReLU activation function. It is a linear function that will output the input if it is positive else it will output zero.
Let’s create three hidden layers so that the model can function better.
net = tflearn.fully_connected(net, 128, activation='ReLu')
net = tflearn.fully_connected(net, 64, activation='ReLu')
net = tflearn.fully_connected(net, 32, activation='ReLu')
Output Layer
Let’s define the final layer of our model. That is the output layer.
The goal of our model is to predict the number. The number could be 0 to 9. There are 10 possible outputs. So, we need to define 10 output neurons. Here, I am using the softmax activation function. The softmax activation function is used to predict a multinomial probability distribution.
net = tflearn.fully_connected(net, 10, activation='softmax')
Fitting the model using TFLearn
Let’s fit our model into the train data set.
net = tflearn.regression(net, optimizer='sgd', learning_rate=0.01, loss='categorical_crossentropy')
model = tflearn.DNN(net)
model.fit(train, norm_labels,show_metric=True,validation_set=0.1,batch_size=100, n_epoch=50)

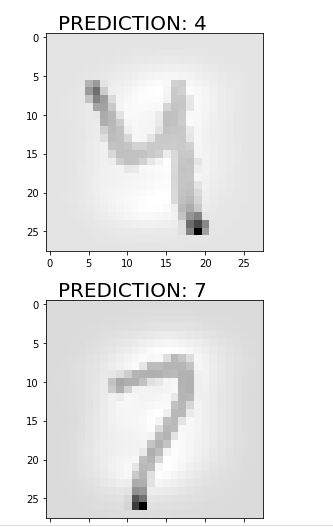
Predict using the models
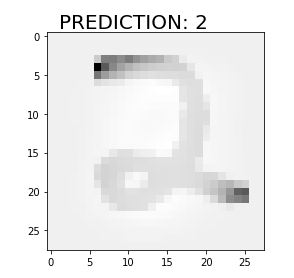
Let’s predict the first ten numbers and display the image.
for i in range(3):
    ran=np.random.randint(0,test.shape[0])
    pred=model.predict(test)[ran]
    pred_digit=pred.argmax()
    digit=test[ran].reshape(28,28)
    plt.imshow(digit, cmap='gray_r')
    plt.text(1, -1,"PREDICTION: {}".format(pred_digit),fontsize=20)
    plt.show()
Predict the test labels
Let’s use the created model to predict the labels in our test data frame.
Here, I am storing the image id and the labels in two lists and converting them into a data frame.
Let’s print the predicted values.
ids=[]
predictions=[]
pred=model.predict(test)
for i, values in enumerate(pred):
    pred_digit=values.argmax()
    ids.append(i+1)
    predictions.append(pred_digit)
sub = pd.DataFrame({
        "ImageId": ids,
        "Label": predictions
    })
print(sub)

Great!
Now, we have successfully created a TFLearn model and predicted the results using the same.
End notes
I hope you enjoyed this brief introduction to TFLearn. In our example, we have created a TFLearn model and predicted the labels in the test data set. This is a simple example. TFLearn has much more applications in the fields of Deep Learning, Computer Vision and Natural Language Processing. TFLearn model works better in cases such as image recognition, text processing, audio recognition, etc. I encourage you to start practicing and keep learning.


