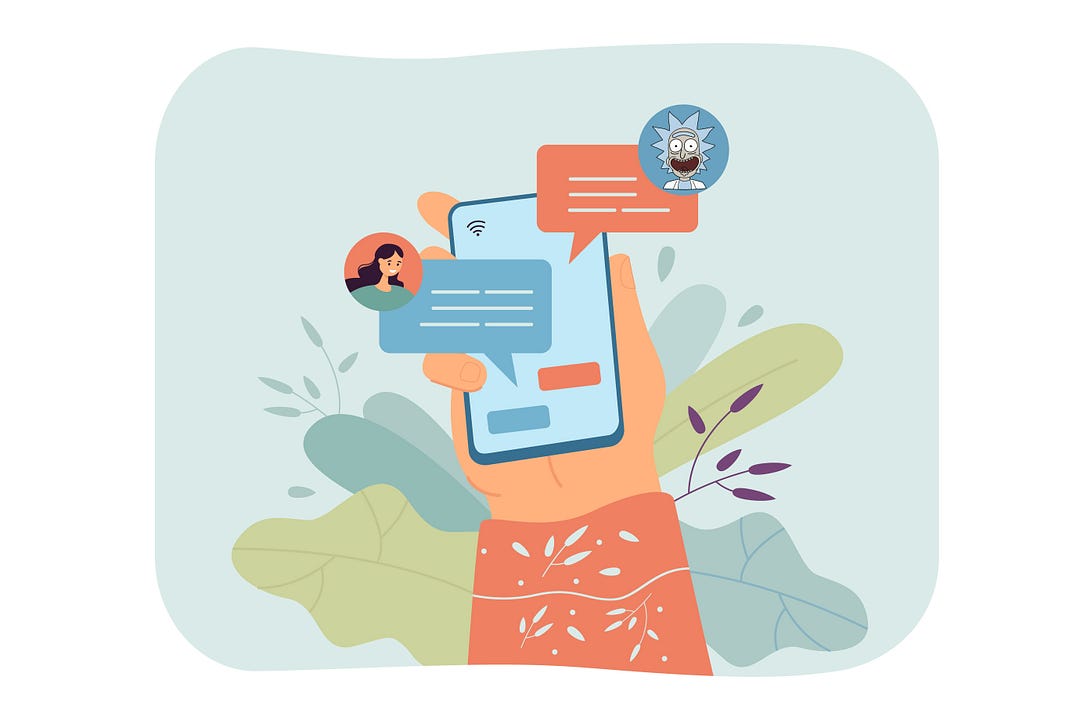
Learn how to build your Discord bot using DailoGPT and HuggingFace API
This article was published as a part of the Data Science Blogathon.
Design your own Discord app using Hugging face API and deploy it on Replit server. Learn tips and tricks about building discord bot server, uptimerobot, Kaggle API, and Replit.
Introduction to building your own Discord bot
If you ever wonder how Discord bot works and how you can create your own bot that speaks like a certain celebrity or certain character from your favorite cartoon shows that you are at the best place to start. We will be learning how to use HuggingFace API and how to use discord python API to create the bot. The blog also includes a guide about replit, Kaggle CLI, and uptimerobot to keep your bot running. We won’t be going deep into fine-tuning our DailoGPT model for that you can check out this blog.
Dataset for Discord Bot
We will use Kaggle CLI to download the Rick&Morty Scripts | Kaggle. If you want to learn how to get your Kaggle API and how to use Kaggle CLI please check you this link.
!kaggle datasets download andradaolteanu/rickmorty-scripts -f RickAndMortyScripts.csv
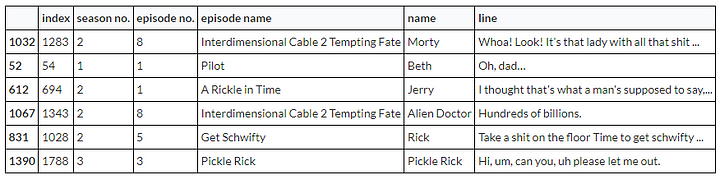
As you can see, we have columns: index, season no., episode no, episode name, name of the character, and line. We will be focusing on the name and line column.
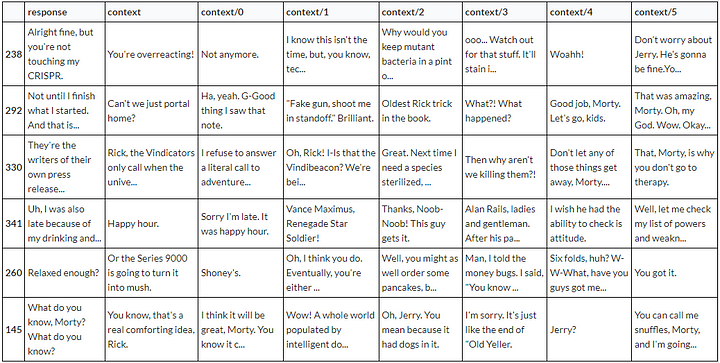
We will convert this dataset so that every response row will contain previous responses as a context/n. There will be six context columns per response.
CHARACTER_NAME = 'Rick'
contexted = []
# context window of size 7 n = 7for i in data[data.name == CHARACTER_NAME].index: if i < n: continue row = [] prev = i - 1 - n for j in range(i, prev, -1): row.append(data.line[j]) contexted.append(row)columns = ['response', 'context'] columns = columns + ['context/' + str(i) for i in range(n - 1)]df = pd.DataFrame.from_records(contexted, columns=columns)
Deploy Discord Bot to Hugging Face
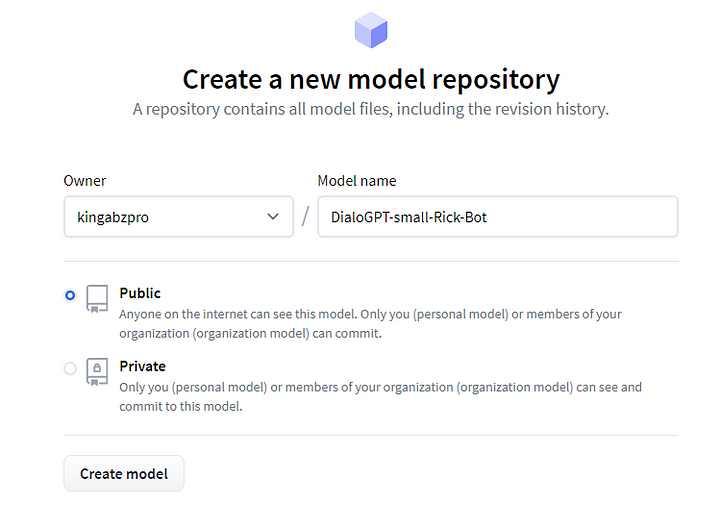
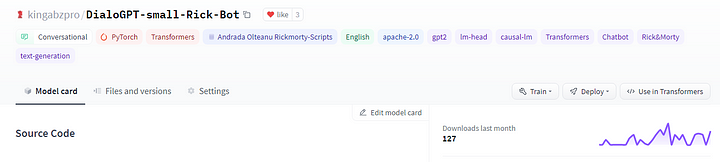
After fine-tuning your model we will deploy the model to the hugging face cloud but before that, we need the HF (Hugging Face) account and create the model (DialoGPT-small-Rick-Bot)
You will need HF API to upload your model and you can get it from settings.

- 1) Install git-lfs: git extension to upload larger files
- 2) Configure git email and user mail
- 3) Use your HF API key and model named to upload both tokenizer and model.
!sudo apt-get install git-lfs!git config --global user.email "[email protected]"
!git config --global user.name "kingabzpro"MY_MODEL_NAME = 'DialoGPT-small-Rick-Bot'
with open('/content/HuggingFace_API.txt', 'rt') as f:
HUGGINGFACE_API_KEY = f.read().strip()model.push_to_hub(MY_MODEL_NAME, use_auth_token=HUGGINGFACE_API_KEY)
tokenizer.push_to_hub(MY_MODEL_NAME, use_auth_token=HUGGINGFACE_API_KEY)You can add tags: conversational, gpt2 etc by editing your model card. You can check out my model here.
Testing your model
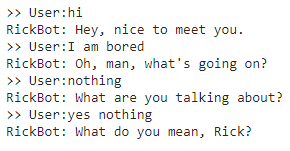
After deploying let’s test it in python script using transformers.
- 1) download both tokenizer and model using a transformer.
- 2) run loop for 4 inputs
- 3) user input is used to generate text
tokenizer = AutoTokenizer.from_pretrained('kingabzpro/DialoGPT-small-Rick-Bot')
model = AutoModelWithLMHead.from_pretrained('kingabzpro/DialoGPT-small-Rick-Bot')
# The loops limits 4 user inputs
for step in range(4):
    # encode the new user input, add the eos_token and return a tensor in Pytorch
    new_user_input_ids = tokenizer.encode(input(">> User:") + tokenizer.eos_token, return_tensors='pt')
    # print(new_user_input_ids)
# append the new user input tokens to the chat history bot_input_ids = torch.cat([chat_history_ids, new_user_input_ids], dim=-1) if step > 0 else new_user_input_ids
# generated a response while limiting the total chat history to 1000 tokens,
chat_history_ids = model.generate(
bot_input_ids, max_length=200,
pad_token_id=tokenizer.eos_token_id,
no_repeat_ngram_size=3,
do_sample=True,
top_k=100,
top_p=0.7,
temperature=0.8
)
# pretty print last ouput tokens from bot
print("RickBot: {}".format(tokenizer.decode(chat_history_ids[:, bot_input_ids.shape[-1]:][0], skip_special_tokens=True)))
As you can see our model is working perfectly. For every user input, there is a response by Rick.
Discord bot
In order to create the Discord bot, first, you need to get into portal Discord Developer Portal. Click on New Application and get started.
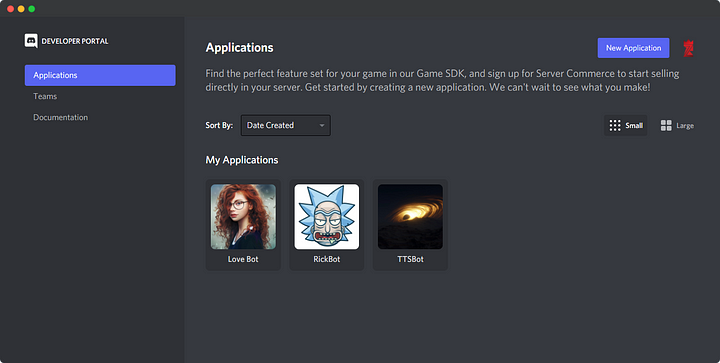
Write the application name.
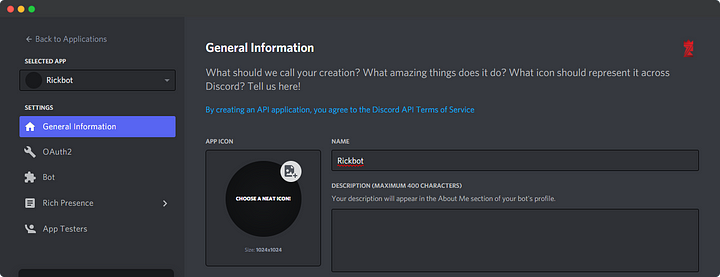
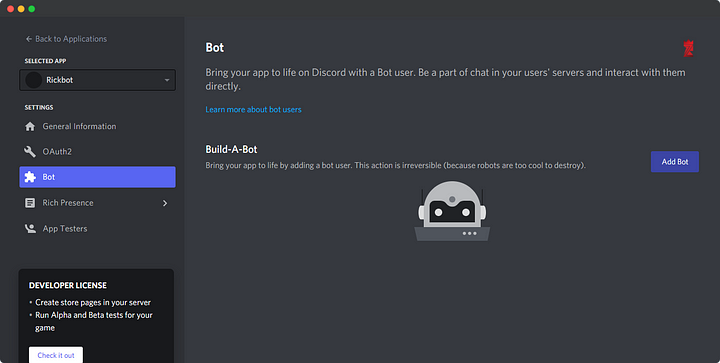
Now click on the Bot tab and then Add Bot. It will promote you to a new window that will ask you to write the bot name and add an image to the bot.
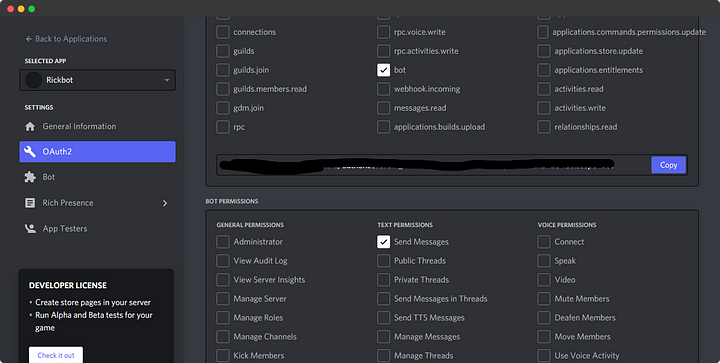
Click on OAuth2 tab and checkmark bot and bot permission: Send Message. Later copy the link and paste it into a new tab.
After pasting the link in the new tab, it will ask you to select the server, and that’s it.

Deployment in Replit
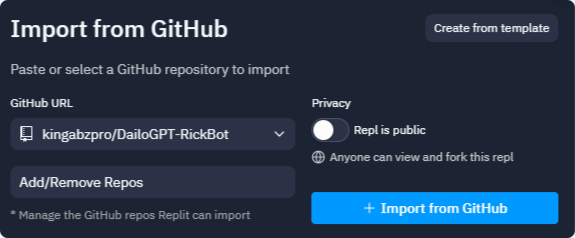
First, you need Replit account: https://replit.com/. We will be using it as a server for our Discord bot. Then create a new python repl or import my GitHub repo. This platform is beginner-friendly and it won’t take more than 5 minutes to understand how to use the editor.

Testing API
Before we need to use replit secret feature to add our HF API and Discord API. Your Discord API key is in the developer portal: Bot tab.

- 1) create a test python file to test HF API
- 2) create a function that sends and receives text using model id and HF API token.
- 3) Print generated response.
The function is working perfectly now we need to add this function into bot.py.
import requests

def query(payload, model_id, api_token):

	headers = {"Authorization": f"Bearer {api_token}"}

	API_URL = f"https://api-inference.huggingface.co/models/{model_id}"

	response = requests.post(API_URL, headers=headers, json=payload)

	return response.json()

model_id = "kingabzpro/DialoGPT-small-Rick-Bot"

api_token = "api_XXXXXXXXXXXXXXXXXXXXXX" # get yours at hf.co/settings/token

data = query('What you think about mom', model_id, api_token)

print(data['generated_text'])
Uptime for Replit
We will be using https://uptimerobot.com to keep our bot running forever. As you can see below that we can Add Monitor and add the URL that we will be creating using flask. It will ping our bot app after 5 minutes which will run the server forever.

Flask WebApp
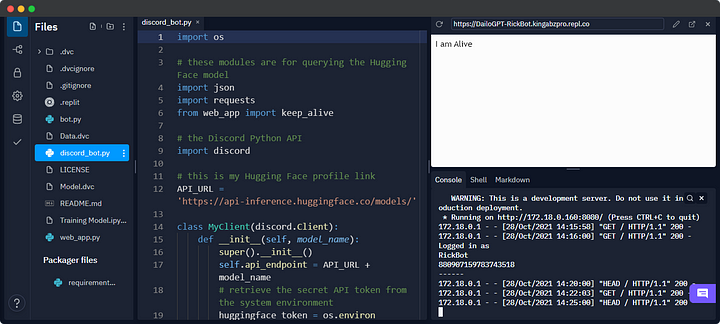
The code below is a simple Flask app that will display “I am Alive” while running. The app server will generate the link in replit, something like this: https://DailoGPT-RickBot.kingabzpro.repl.co. You are going to paste this link into uptimerobot which will ping the web server after 5 minutes.
from flask import Flask

from threading import Thread

app = Flask('')

@app.route('/')

def home():

  return "I am Alive"

def run():

  app.run(host='0.0.0.0',port=8080)

def keep_alive():

  t=Thread(target=run)

  t.start()
Bot Code
This code contains the backbone of our Discord bot and integration of HF API and Flask app.
- 1) We are using the
keep_alivefunction from theweb_appfile that we just create. - 2) Using discord python client.
- 3)
querythe function sends and receives a response from HF API, which is protected by the API key. - 4)
on_readywarms up HF API by sending a “Hello” message. It takes almost 20 seconds to warm up the server. - 5)
on_messagechecks if the message is from bot or user, then it takes user message and sends it to HF API and then displays the response on discord chatbot. Extra error checks or not responding serve are added to make sure we can debug easily.
To learn more, you can look at the code below and read the comments.
import os

# these modules are for querying the Hugging Face model

import json

import requests

from web_app import keep_alive

# the Discord Python API

import discord

# this is Hugging Face profile link

API_URL = 'https://api-inference.huggingface.co/models/'

class MyClient(discord.Client):

    def __init__(self, model_name):

        super().__init__()

        self.api_endpoint = API_URL + model_name

        # retrieve the secret API token from the system environment

        huggingface_token = os.environ['HUGGINGFACE_TOKEN']


        self.request_headers = {

            'Authorization': 'Bearer {}'.format(huggingface_token)

        }

    def query(self, payload):

        """

        send and request text to the HF API

        """

        data = json.dumps(payload)

        response = requests.post(

                                    self.api_endpoint,

                                    headers=self.request_headers,

                                    data=data)

        ret = json.loads(response.content.decode('utf-8'))

        return ret

    async def on_ready(self):

        # print out information when the bot wakes up

        print('Logged in as')

        print(self.user.name)

        print(self.user.id)

        print('------')


        # just so that the model wakes up and starts loading

        self.query({'inputs': {'text': 'Hello!'}})

    async def on_message(self, message):

        """

        this function is called whenever the bot sees a message in a channel

        """

        # ignore the message if it comes from the bot itself

        if message.author.id == self.user.id:

            return

        # form query payload with the content of the message

        payload = message.content

        # while the bot is waiting on a response from the model

        # Setting Discord to typing

        async with message.channel.typing():

          response = self.query(payload)

        bot_response = response['generated_text']

        # we may get ill-formed response about the model

        # or has timed out

        if not bot_response:

            if 'error' in response:

                bot_response = '`Error: {}`'.format(response['error'])

            else:

                bot_response = 'Hmm... something is not right.'

        # send the model's response to the Discord channel

        await message.channel.send(bot_response)

def main():

    # DialoGPT

    client = MyClient('kingabzpro/DialoGPT-small-Rick-Bot')

    keep_alive()

    client.run(os.environ['DISCORD_TOKEN'])

if __name__ == '__main__':

  main()
As you can see our bot serve is running perfectly.
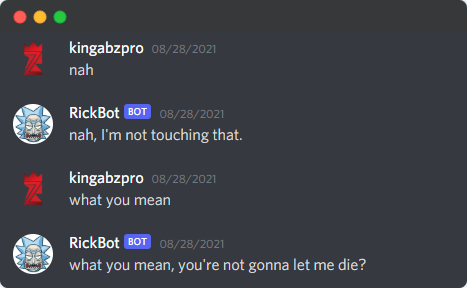
Now let’s check our discord server. As you can see RickBot is online.

Have fun playing around with the bot you trained and deployed.
To avoid all the hassle, you can import my project directly to replit and add your HF API and Discord API key.
Code
You can find code on GitHub and DAGsHub. The generative model is available at the HuggingFace.
Image by Author
Conclusion
My experience of learning from video tutorials and training my own bot was amazing. It got even better when I started playing around with the discord library and server. In this guide, we have learned Hugging Face API, Transformers, Discord server, uptime robot, Kaggle API, and Replit platform. I can’t wait to see how you can use this guide to create your Discord bot and share your experience with me.
Machine learning is simple don’t make it hard, always keep looking out for hacks and tips to improve your workspace.
Reference
- The code is highly influenced by the freeCodeCamp tutorial: Code a Discord Chat Bot That Talks Like Your Favorite Character
- The finetuning model is from medium blog.
- The Kaggle data set is from Rick&Morty Scripts.
About Author
Abid Ali Awan (@1abidaliawan) is a certified data scientist professional who loves building machine learning models and research on the latest AI technologies. Currently testing AI Products at PEC-PITC, their work later gets approved for human trials for example Breast Cancer Classifier.
Image Source
The media shown in this article is not owned by Analytics Vidhya and are used at the Author’s discretion.
I am a technology manager turned data scientist who loves building machine learning models and research on various AI technologies. My vision is to build an AI product that will help identify students who are struggling with mental illness.


