MLOPs Operations: A Beginner’s Guide in Python
This article was published as a part of the Data Science Blogathon
Introduction
According to a report, 55% of businesses have never used a machine learning model before. Eighty-Five per cent of the models will not be brought into production. Lack of skill, a lack of change-management procedures, and the absence of automated systems are some of the key factors for this failure. To overcome these issues, it is vital to combine the mechanics of DevOps and Operations with machine learning development to properly launch a machine learning application.
Let’s start with a comprehensive step-by-step guide to the MLOps Operations lifecycle, which will teach you how to put machine learning models into production.
Definition of MLOps
MLOps, or Machine Learning Operations for Production, is a collection of defined methods for building, deploying, and governing the lifespan of machine learning models. This architecture facilitates cross-functional collaboration and provides an automated framework for tracking everything needed for the complete cycle of machine learning models. MLOps approaches also improve the ML systems’ scalability, security, and reliability, resulting in faster development cycles and more revenues from ML initiatives.

Capabilities of MLOps
The collection of key competencies required in MLOps Operations varies depending on the various needs of industry organizations. Some businesses may demand a single integrated platform that can handle everything from data pretreatment through storage, modelling, deployment, and monitoring. Others may merely need model development, training, and deployment services. We’ll go over the entire list of MLOps’ primary strengths in this section.
Before we go into the complicated theory and some use-case implementation, let’s have a look at some examples.
terraform – Infrastructure as a Code (IaaC) tool to manage infrastructure on cloud platforms with configuration files.
Azure Databricks – Data Analytics platform for creating a workspace and allowing easy integration with libraries for ML.
mlflow – Open source platform helps manage the complete ML lifecycle.
Lifecycle of MLOps
All the processes are iterative, and the success of the overall machine learning system is contingent on each of these phases being completed successfully. Backtracking to the previous stage to check for any defects introduced can be caused by difficulties encountered in one phase. Let’s look at what happens at each stage of the MLOps lifecycle:
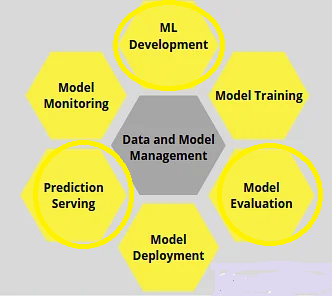
Source: image
ML Development: This is the first phase, which entails building a comprehensive pipeline that starts with data processing and ends with model training and assessment algorithms.
Model Training: After the setup is complete, the model should be trained. To respond to fresh data or handle specific changes, continual training functionality is also required.
Model evaluation entails doing inference over the training model and ensuring that the output results are accurate.
Model Deployment: Once the proof-of-concept stage is complete, we must deploy the model according to industry standards to deal with real-world data.
Serving Predictions: The model is now ready to provide predictions over the incoming data after deployment.
Model Monitoring: Issues such as concept drift can cause results to become erroneous over time, so it’s critical to monitor the model to make sure it’s still working properly.
Data and Model Management is a component of the central system that monitors the management of data and models. It entails storing data, keeping track of multiple versions, facilitating access, ensuring security, and configuring systems across diverse cross-functional teams.
Let’s get started with the fundamental MLOps.
A Hands-on Approach with MLOps Operations
Step 1 ML Development
ML Development is the initial work an ML project begins with. The problem statement, as well as the project outcome, should be thoroughly defined and understood at this point. This is where all the experiments for the proof of concept (POC) phase are carried out. Data selection, feature engineering, model development, and evaluation are among the steps that are carried out.
Features of ML development
1) Experiment tracking and version control are used to ensure reproducibility and the ability to go back to prior versions.
2) Data and model artifacts used in the code to allow access to previously trained modules are stored and tracked.
3) All versions of the experiment have complete information about the hyper-parameters employed.
Information on the metrics used to evaluate the model, and the process employed.
1) On your local device, install terraform CLI and Azure CLI.
a. To install HashiCorp’s terraform, follow the procedures below.
sudo apt-get update && sudo apt-get lnstall -y gnupg software- propertles-common curl
To add the HashiCorp GPG key
curl -fsSL https://apt. releases .hashicorp.com/gpg | sudo apt-key add -
 #Add the official HashiCorp Linux repository
sudo apt-add-repository "deb arch=amd64]
 https://apt.releases . hashicorp .com $(lsb_re lease -cs) main"
To Update to add the repository, and install the Terraform CLI.
sudo apt-get update && sudo apt-get install terraform
#Validate the Installation
terraform -help
To install Azure’s CLI, follow the steps below.
curl -sL https://aka.ms/InstallAzureCLIDeb | sudo bash
az login
1) Infrastructure as Code (IaaC) configuration files are used to set up the infrastructure.
a. Create a directory.
mkdir terraform-azure
cd terraform-azure
Create the main.tf configuration files and save them in the above folder.
#Save this file to the terraform-azure directory and Deploy to Azure
terratorm{
required_provlders {
azurem= 1
source = "nashicop/azurerm
version = "~> 2.65"
 }
}
}
# Feature for Azure provider
provider "azurerm"{
features {}
}
#Resource group for intrastructure
resource =
"azurerm_resource_group" "mlops_demo_rg" 1
name = MLOpsDemo"
location "eastus2" # check your locatlon of the resource group on your portal.
}
# databricks workspace
resource "azurerm_databricks_workspace"
"databricks_workspace_demo"{
name                  =                 "databricks-demo"
resource_group_name =
azurer_resource_group .mlops_demo_rg. name
Location                        =
azurerm_resource_group .mlops_demo_rg. location
sku                    =
"premium"
#Public Storage account for storing things
resource "azurerm_storage_account"
"Storage_account_demo" {
name     =
"mlopsstorageaccountdemo1"
resource_group_name       =
azurerm_resource_group.mlops_demo_rg.name
Locatlon                              =
azurerm_resource_group.mlops_demo_rg.location
account_tler       =         "Standard"
account_repllcation_type = "LRS"
allow_blob_public_access = true
# Public Storage container for storing things
resource "azurerm_storage_container"
"Storage_container_demo" {
mlopsstoragecontainerdemo"
Storage_account_name = azurerm_storage_account.storage_account_demo. name
Container_access_type = "blob"
b. Put in place the infrastructure.
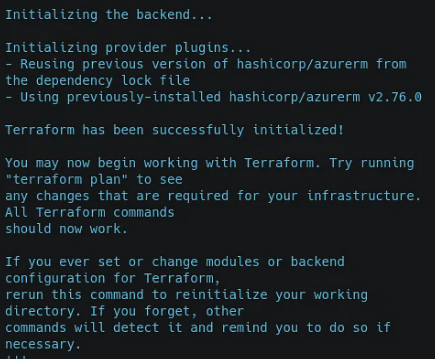
‘terraform init’ is the command to use. It will display the message ‘Terraform has been successfully initialized!’ after successful initialization.
terraform init
output:
2) ‘terraform apply’ is the command to use. Type yes when prompted. The message ‘Apply complete!’ will appear after a successful application.
terraform apply

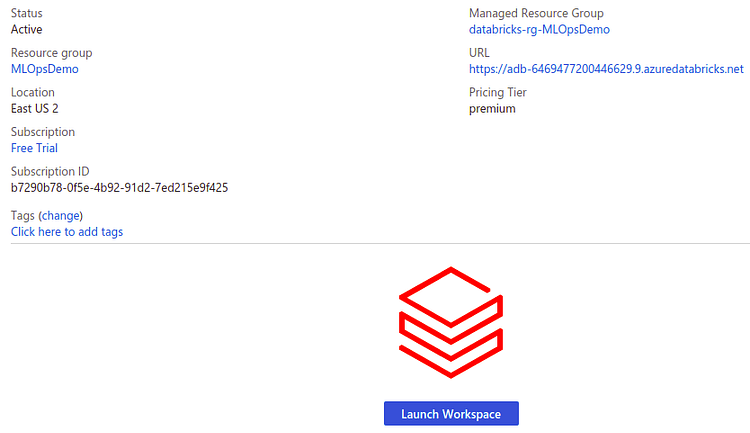
Check that the data bricks resource with the name ‘data bricks-demo’ has been created in the Azure portal. Then, after selecting the resource, select Launch Workspace.
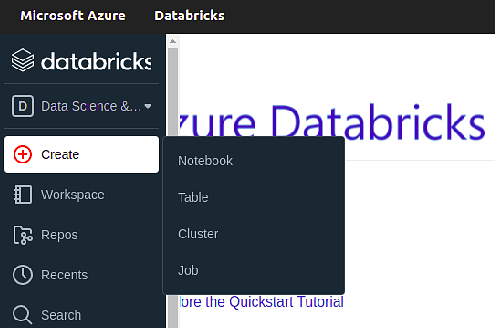
From the left bar, create a new Python notebook to which we will put our code.
Now we’ll use the Keras framework to develop a basic MNIST classifier. For logging the metrics and the model, we’ll use Mlflow. You don’t need to install Mlflow individually because Databricks has it built-in.
- Data Preprocessing:
First import the libraries and dependencies:
!pip install mlflow
import mlflow
import mlflow.keras
import numpy as np
from tensorflow import keras
from tensorflow.keras import layers
Next, assign the value for the Model/data parameters
num_classes = 10
input_shape = (28, 28, 1)
perform the data split between train and test sets
(x_train, y_train), (x_test, y_test) = keras.datasets.mnist.load_data()
Before training the dataset, scale images to the [0, 1| range
 x_train = x_train.astype("float32" ) / 255
x_test = x_test.astype("float32") / 255
Next, make sure images have shape (28, 28, 1)
x_train = np.expand_dims (x_train, -1)
x_test = np.expand_dims(x_test, -1)
Then convert class vectors to binary class matrices
y_train = keras.utils.to_categorical(y_train, num_classes)
y_test = keras.utils.to_categorical(y_test, num_classes)
Step 2 Model Building and Training
Train the model using sequential model,
from keras.models import Sequential
from keras.layers import Activation, Dense
from keras.layers.convolutional import Convolution2D
from keras.layers.convolutional import MaxPooling2D
from keras.layers import Dropout
After importing all the modules required for training, use the Sequential model to train the ML model.
model = keras.Sequential(
[
keras. Input( shape=input_shape),
layers.Conv2D(32 , kernel_size=( 3, 3), activation="relu"),
layers.MaxPooling2D(pool_size=(2, 2)),
layers.Conv2D(64, Kernel_size=(3, 3), activation="relu"),
layers.MaxPooling2D( pool_size=(2, 2)),
layers.flatten(),
layers.Dropout(0.5),
layers.Dense( num_classes, activation="softmax"),
]
)
model.compile(loss="categorical_crossentropy", optimizer="adam" , metrics=[ "accuracy" ] )
#Enable Mlflow log
mlflow.tensorflow. autolog()
# To Train model
model.fit(x_train, y_train, batch_size=128 , epochs=15, validatlon_split=0.1)
Fine-tuning for another epoch
model.fit(x_train, y_train, batch_size128, epochs=l, valldation_split=0. 1)
#Evaluate model
test_loss, test_accuracy = model.evaluate(X_test, y_test)
In case there is an error, it should raise an exception during failure
if test_accuracy<0.80:
   raise Exception ("Model is not accurate, retrain the model!")
Finally, to execute the notebook, you must build a cluster using the create option on the leftmost panel. Give it a name, make sure that we set the cluster mode to ‘Single Node,’ and leave the rest of the options alone.
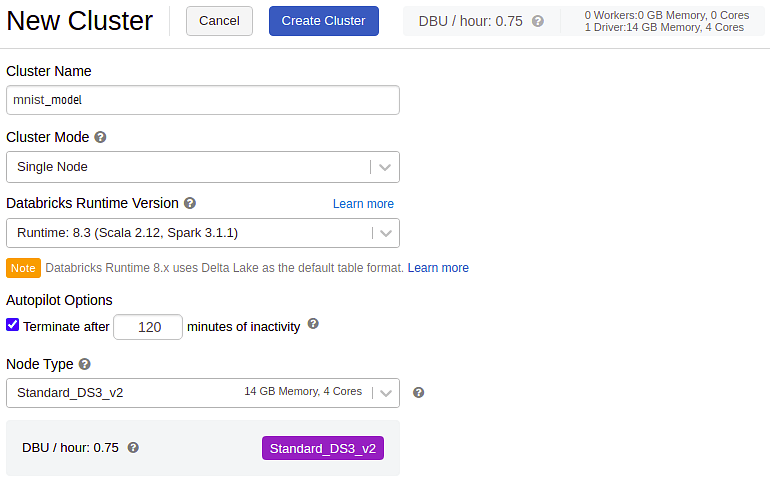
You can attach the MNIST file to the cluster after it has been formed. A green button-like signal will appear on the upper left after the cluster has been successfully attached and started. Hurray! You’re ready to begin your first training session!
Step 3 Training Operationalization
After the training and testing of the model, instead, when new data is ingested or modifications to the code are made, the model must be re-trained regularly. Retraining will also solve the problem of concept drift on a technical level. One such feature is Azure Databricks, which can help automate retraining by performing a scheduled process.
You can now return to the Databricks workspace where your notebook was created.
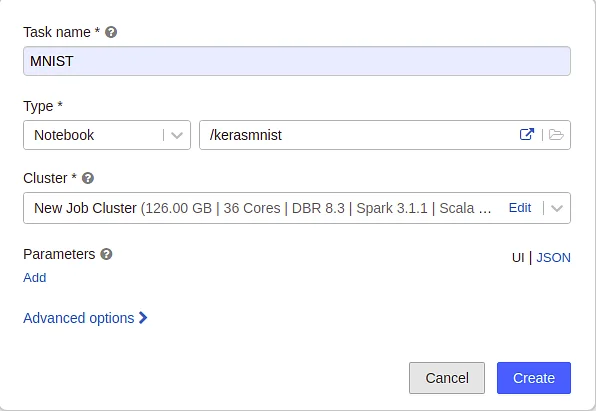
Create a new job by selecting the Create option from the left side. You can also add options and specify their values.
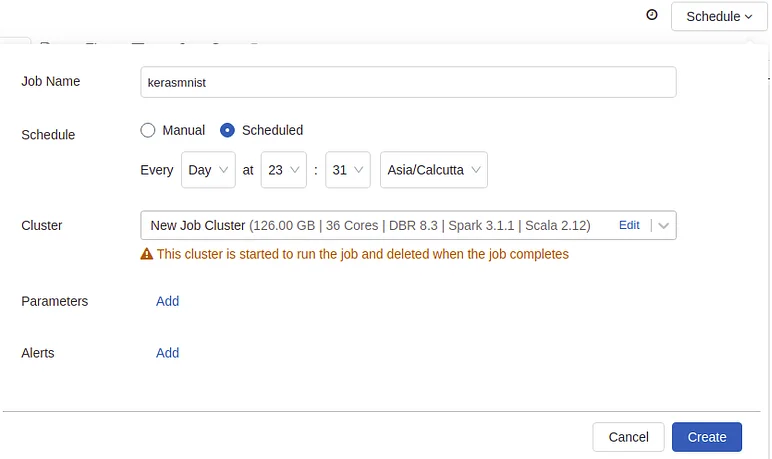
After you’ve created the job, you’ll see a ‘Run Now’ option on your dashboard. When you click it, the job will restart executing the code. When we said we wanted to automate the training operationalization pipeline, we meant exactly that. When you return to your notebook page, you’ll see a schedule option right at the top, where you can set your schedule for automated runs.
You may also control who has access to the runs and to what extent they have access. In businesses where many individuals work on a project and the code requires privacy and security, this option is crucial. To check, go back to the job running dashboard and select the Edit Permissions option.
The following are characteristics of training operationalization:
1) Configure scheduled or event-driven runs that are triggered when new data is present and the model degrades.
2) Set up ongoing training pipelines with specific hyper-parameter values, as well as keeping track of and archiving prior runs.
3) Access to the model registry, which houses the machine learning artifact repository.
Step 4 Model Versioning
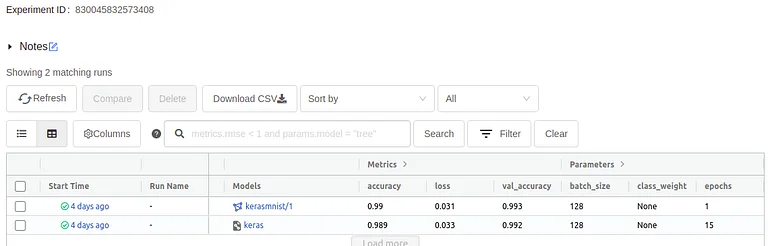
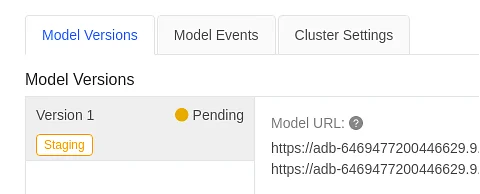
Model versioning makes it easier to maintain track of the various versions of the model that have been developed. It involves storing model files, source code, training parameters like hyper-parameters, and data split information during training. When something goes wrong with the current system and you need to revert to a previous stable version, versioning is vital. Based on the parameters used on a single dashboard, one can easily analyze the performance of multiple versions.
Click the experiments option on the left panel of the Azure Databricks workspace. Then select your experiment, and you’ll get a dashboard like the one below, which displays all of your model’s data.
Display the dashboard.
You can view the source code by clicking on the source. By selecting one model, you will be taken to a screen that displays the parameter settings and the entire project environment.
The following are some of the key elements of model versioning:
1) Tracking and storing different versions of the model.
2) The model variants with their parameter settings are easily accessible and convenient for keeping track of.
3) After each run, it automatically created a MLflow model object. The entire project environment, including the conda.yaml and requirements.txt files, is provided.
Step 5 Registry Model
The model registry gives a larger view to regulate the lifecycle of the ML models, as model versioning helps track models on a model-by-model basis. It’s found in a type of infrastructure known as a central repository. This results in higher-quality manufacturing models.
Select the option to register a model. To see if the model has been registered, go to the left panel and click on the model’s tab. There will be a list of registered models, their versions, and the most recent state of last changed and serving.
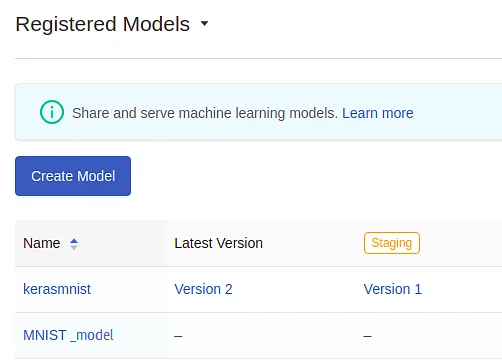
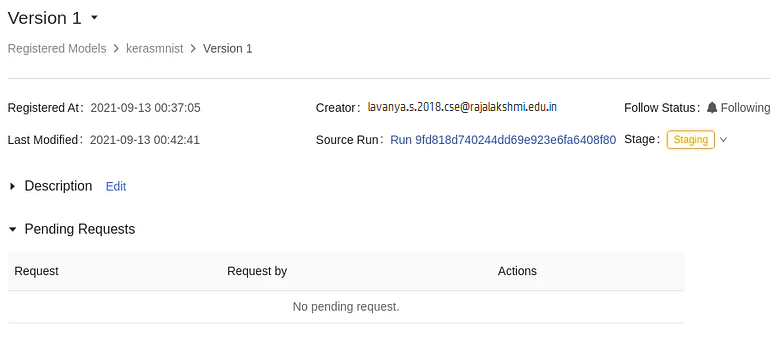
If you select one model and then any version, you will be taken to a page containing the following information.
The following are some of the model registry’s most important features:
1) Throughout the development and deployment lifecycle, a central repository to track, manage, and regulate the versions of the ML model.
2) Model information maintenance and storage make reviewing, rolling back, and approving/rejecting models for other processes easier.
Step 6 Model Governance
Model governance is concerned with the registration, validation, and evaluation of models at various points of the MLOps lifecycle, from staging to production. It aids in the maintenance of model status information, ensuring a smooth transition to deployment. This governance can be performed manually, semi-automatically, or entirely automated.
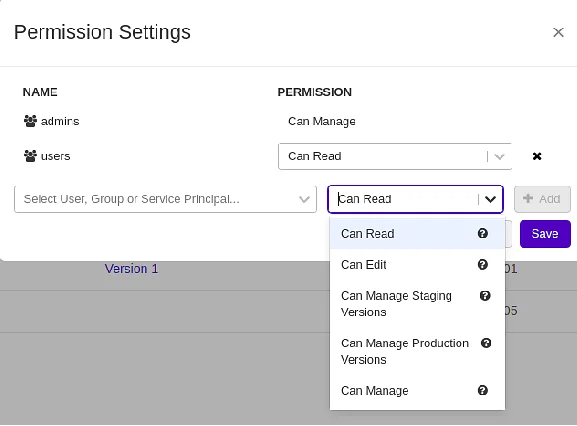
Navigate to the Registered Models tab in Azure Databricks. When you click the drop-down next to registered models, you’ll notice a permissions option. There are many options for who can read, change, manage staging versions, manage production versions, and so on in these permissions.
The following are some of the key characteristics of model governance:
1) The ability to save and add/update model artifacts.
2) Based on the provided evaluation indicators, we can select a winner model from among the several variants. Accuracy, precision, recall, and F-score are examples of metrics.
3) Allowed people can view the stored artifacts and version progress. We will assess the models, after which they will be approved or rejected based on their performance. This ensures that concerns linked to security, privacy, and financial elements are mitigated.
Step 7 Implementation of the Model
One of the most important processes in the machine learning lifecycle is model deployment. In industry, most of the models developed never see the light of day. A model that is not implemented is of limited utility. After the training and validation steps have been finished and accepted, the next critical step is model deployment.
Deployment is a multi-step process that includes features like Continuous Integration (CI), Continuous Delivery (CD), online testing, and production deployment.
You can look through the section of registered models in Databricks.
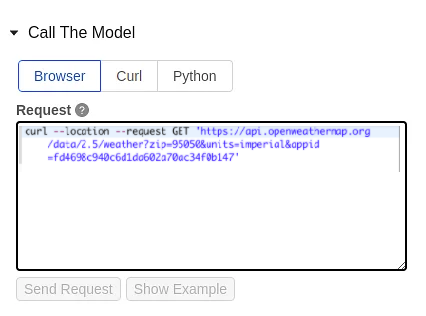
When you click on the serving tab, you’ll see something like this.

Enable serving by clicking the button. You can now begin the serving procedure. We will display the status in the upper left corner. This procedure will construct a cluster for you, which will deploy the currently registered model. The REST API calls can access this. In addition, once they released a new version, it will be deployed automatically. The provided interface shows three distinct ways to call the model: via the browser, curl, or python.
The following are some of the most important characteristics of model deployment:
1) The continuous integration stage involves reading the source code and the model from the model registry to ensure that the model’s input-output format is correct. The target infrastructure’s performance is also validated here.
2) The three essential phases of the continuous delivery stage are deployment to staging, acceptance testing, and deployment to production, followed by progressive delivery.
3) Canary deployment, Shadow deployment, and Blue/green deployment are three different production deployment methodologies.
a) Canary deployment delivers services in small increments, allowing enterprises to test their apps with real users while also analyzing their various versions for improvement.
b) To test the predictions, shadow deployment includes both a new and an older version. After successful testing, they release a newer version. To assure successful operation, they delivered a replica of the production environment traffic to the earlier version.
c) The blue/green deployment keeps two phases running at the same time: staging and production. In the blue environment, new versions are tested for quality assurance, and then real traffic is sent from the green environment to the blue environment. After satisfactory testing, the product is moved to a green environment.
4) Smoke testing, A/B testing, and MAB testing are all examples of online experimentation that are used to see if the new model outperforms the old one. When a new model is being considered for production deployment, the old model continues to run in the background. Later, a fraction of traffic is transferred to the newer version; the final model is selected depending on performance.
Step 8 Make a Serving Prediction
The model would be deployed to its target use case environment after completing the following stages successfully. It will begin receiving actual data traffic in real-time. Real-time streaming inference, near real-time online inference using REST endpoints, offline batch inference, or embedded inference on edge devices are all options for serving.
The following are some of the most important characteristics of prediction serving:
1) With real-world data, test the performance of the target infrastructure.
2) Keep track of performance by storing requests and responses in the serving logs and using them for model analysis and monitoring.
Step 9 Model Monitoring
After deployment, model monitoring is necessary to ensure that the deployed model’s effectiveness is maintained. Ingestion of new data over time might cause differences in the properties of the model, which can lead to model degradation. Performance checks can be carried by using saved serving logs by comparing prediction schemas to ideal schemas. It can deliver a signal to the allowed person when an abnormality is detected, allowing them to take action.
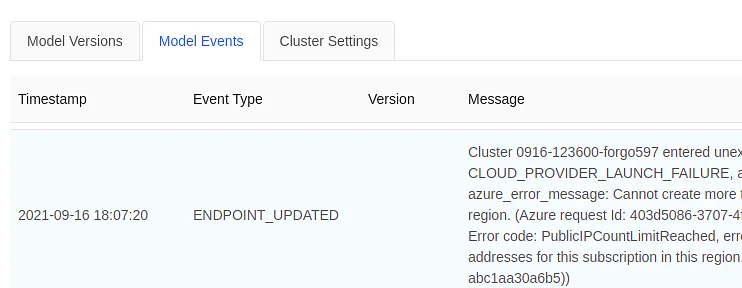
In Databricks, go back to the serving area of registered models.
Model versions, model events, and cluster settings are the three tabs over there. The model versions tab will show you the various variants and their production-ready status.
For all activities performed at that interface, the model events tab provides the timestamp, event type, and message.
The following are some of the most important aspects of model monitoring:
1) Provides protection against the challenges of data and concept drift.
a) The disparity between the data used for training and validation and the data used to make predictions in production is known as data drift.
b) The shift in the link between the input data and the goal data mapping is known as concept drift.
2) Aids in the analysis and improvement of assessment parameters, such as memory usage, resource usage, latency, and throughput.
MLOps Production management in GCP
The AI platform bundle also addresses hyper-scalers like LinkedIn and Uber’s proliferation of internal MLOps systems. Due to “technology sprawl” and the short shelf-life of production machine learning models, data science suppliers such as Cloudera and Anaconda have remarked that managing machine learning models in production has proven difficult.
As a result, MLOps proponents are attempting to integrate continuous model training and monitoring with open source software and application interfaces.
Others, like algorithmia, provide MLOps suites with controls and tools for monitoring machine learning models in production.
About Myself
Hello, my name is Lavanya, and I’m from Chennai. I am a passionate writer and enthusiastic content maker. The most intractable problems always thrill me. I am currently pursuing my B. Tech in Computer Science Engineering and have a strong interest in the fields of data engineering, machine learning, data science, and artificial intelligence, and I am constantly looking for ways to integrate these fields with other disciplines such as science and chemistry to further my research goals.
Linkedin URL: https://www.linkedin.com/in/lavanya-srinivas-949b5a16a/
End Notes
1) We learned why MLOps Operations is necessary, what MLOps entails, and how MLOps progresses. Terraform, Microsoft Azure Databricks, and MLflow support for model management were used to implement the entire lifecycle.
2) Currently, being a good ML developer isn’t enough to meet industry demands; thus, this tutorial is a great place to start if you want to learn MLOps. Implementing hands-on real-world MLOps projects is the greatest method of gaining a thorough grasp of how a real-world machine learning system operates in production.
I hope this article will be more descriptive and interesting!
If you have questions, please leave them in the comments area. In the meantime, check out my other articles here!
Thank you for reading.
The media shown in this article is not owned by Analytics Vidhya and are used at the Author’s discretion.


It's really an amazing article.