Multiclass Classification Using Transformers for Beginners
This article was published as a part of the Data Science Blogathon
Introduction
In the last article, we have discussed implementing the BERT model using the TensorFlow hub; you can read it here. Implementing BERT using the TensorFlow hub was tedious since we had to perform every step from scratch. First, we build our tokenizer, then design a function to process our data, and then develop our model for training.
here hugging face transformers package make implementation easier
This article will discuss the latest method to implement BERT or any other state of art model in the most accessible steps using the Transformers library
for a detailed explanation on BERT. Read my last article.
Implementation of BERT using hugging face transformers library
hugging face is an NLP-focused startup that provides a wide variety of solutions in NLP for TensorFlow and PyTorch.
The Transformers library contains more than 30 pre-trained models and 100 languages, along with 8 major architectures for natural language understanding (NLU) and natural language generation (NLG):
- BERT (from Google);
- GPT-2 (from OpenAI);
- GPT (from OpenAI);
- Transformer-XL (from Google/CMU);
- XLNet (from Google/CMU);
- RoBERTa (from Facebook);
- XLM (from Facebook);
- DistilBERT (from HuggingFace).
The hugging face Transformers library required TensorFlow or PyTorch to load models, and it can train SOTA models in only a few lines of code and pre-process our data in only a few lines of code. The hugging face transformers library gives you the benefit of using pre-trained language models without requiring a vast and costly computational infrastructure and with simple implementation. Most State-of-the-Art models(SOTA) are provided directly and made available in the library in PyTorch and TensorFlow transparently and interchangeably. It works as an API in some sense.
- Loading the Dataset
- Pre-processing the raw data
- Getting BERT Pre-trained model and its tokenizer
- Training and evaluation
- Prediction Pipeline
Loading the Dataset
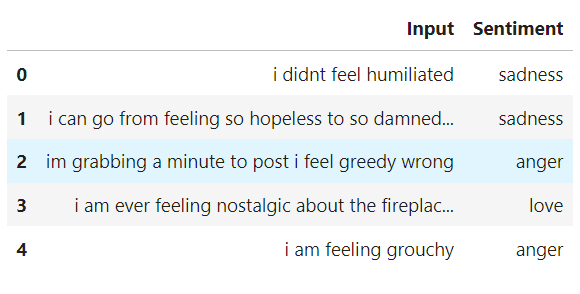
The dataset we are using the Emotions dataset for NLP.
This dataset contains text and their respective emotions, and it has train-data, test-data, and validation data.
‘i was feeling listless from the need of new things, something different; sadness.’
Python Code:
Converting our Sentiment column into Categorical data
Mapping sentiments label with some numbers using a python dictionary and then convert them into a categorical column using to_categorical.
encoded_dict = {‘anger’:0,’fear’:1, ‘joy’:2, ‘love’:3, ‘sadness’:4, ‘surprise’:5}
df_train[‘Sentiment’] = df_train.Sentiment.map(encoded_dict)
df_test[‘Sentiment’] = df_train.Sentiment.map(encoded_dict)
importing to_categorical class from utils:
from tensorflow.keras.utils import to_categorical
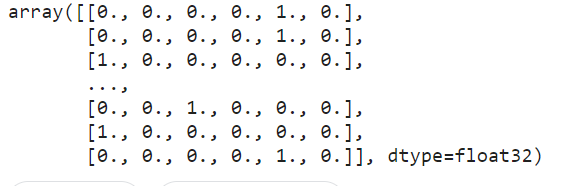
converting our integer coded Sentiment column into categorical data(matrix)
y_train = to_categorical(df_train.Sentiment)
y_test = to_categorical(df_test.Sentiment)
We have successfully processed our Sentiment column( target); now, it’s time to process our input text data using a tokenizer.
Getting transformers Package
you need to install the transformers package and then import it.
!pip install transformers
import transformers
Loading Model and Tokenizer from the transformers package
from transformers import AutoTokenizer,TFBertModel
tokenizer = AutoTokenizer.from_pretrained(‘bert-base-cased’)
bert = TFBertModel.from_pretrained(‘bert-base-cased’)
We need a tokenizer to convert the input text’s word into tokens.
The classAutoTokenizer contains various types of tokenizers.
TFBertModel pre-trained Bert model for TensorFlow.
Here we are loading the bert-base-cased model.

Input Data Modeling
Before training, we need to convert the input textual data into BERT’s input data format using a tokenizer.
Since we have loaded bert-base-cased, so tokenizer will also be Bert-base-cased.
# Tokenize the input (takes some time)
# here tokenizer using from bert-base-cased
x_train = tokenizer(
    text=df_train.Input.tolist(),
    add_special_tokens=True,
    max_length=70,
    truncation=True,
    padding=True,
    return_tensors='tf',
    return_token_type_ids = False,
    return_attention_mask = True,
    verbose = True)
x_test = tokenizer(
    text=df_test.Input.tolist(),
    add_special_tokens=True,
    max_length=70,
    truncation=True,
    padding=True,
    return_tensors='tf',
    return_token_type_ids = False,
    return_attention_mask = True,
    verbose = True)
Tokenizer takes all the necessary parameters and returns tensor in the same format Bert accepts.
- return_token_type_ids = False: token_type_ids is not necessary for our training in this case.
- return_attention_mask = True we want to include attention_mask in our input.
- return_tensors=’tf’: we want our input tensor for the TensorFlow model.
- max_length=70:
we want the maximum length of each sentence to be 70; if a sentence is
bigger than this, it will be trimmed if a sentence is smaller than
70 then it will be padded. - add_special_tokens=True, CLS, SEP token will be added in the tokenization.
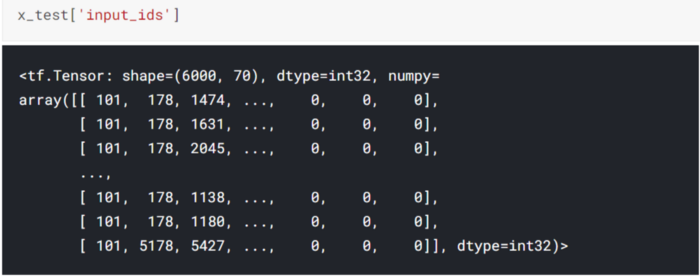
Hereafter data modelling, the tokenizer will return a dictionary (x_train) containing ‘Input_ids’, ‘attention_mask’ as key for their respective
data.
input_ids = x_train[‘input_ids’]
attention_mask = x_train['attention_mask']
Model Building
Importing necessary libraries.
import tensorflow as tf
from tensorflow.keras.optimizers import Adam
from tensorflow.keras.callbacks import EarlyStopping
from tensorflow.keras.initializers import TruncatedNormal
from tensorflow.keras.losses import CategoricalCrossentropy
from tensorflow.keras.metrics import CategoricalAccuracy
from tensorflow.keras.utils import to_categorical
from tensorflow.keras.layers import Input, Dense
We are using functional API to design our model.
max_len = 70
input_ids = Input(shape=(max_len,), dtype=tf.int32, name="input_ids")
input_mask = Input(shape=(max_len,), dtype=tf.int32, name="attention_mask")
embeddings = bert(input_ids,attention_mask = input_mask)[0]
out = tf.keras.layers.GlobalMaxPool1D()(embeddings)
out = Dense(128, activation='relu')(out)
out = tf.keras.layers.Dropout(0.1)(out)
out = Dense(32,activation = 'relu')(out)
y = Dense(6,activation = 'sigmoid')(out)
model = tf.keras.Model(inputs=[input_ids, input_mask], outputs=y)
model.layers[2].trainable = True
Bert layers accept three input arrays, input_ids, attention_mask, token_type_ids
input_ids means our input words encoding, then attention mask,
token_type_ids is necessary for the question-answering model; in this case, we will not pass token_type_ids.
- For the Bert layer, we need two input layers, in this case, input_ids, attention_mask.
- Embeddings contain hidden states of the Bert layer.
- using
GlobalMaxPooling1D then dense layer to build CNN layers using hidden
states of Bert. These CNN layers will yield our output.
bert[0] is the last hidden state, bert[1] is the
pooler_output, for building CNN layers on top of the BERT layer, we have
used Bert’s hidden forms.
Model Compilation
Defining learning parameters and compiling the model.
optimizer = Adam(
    learning_rate=5e-05, # this learning rate is for bert model , taken from huggingface website
    epsilon=1e-08,
    decay=0.01,
    clipnorm=1.0)
# Set loss and metrics
loss =CategoricalCrossentropy(from_logits = True)
metric = CategoricalAccuracy('balanced_accuracy'),
# Compile the model
model.compile(
    optimizer = optimizer,
    loss = loss,
    metrics = metric)
learning_rate = 5e-05 the learning rate for the model will be significantly lower.
Loss = CategoricalCrossentropy since we are passing the categorical data as the target.
Balanced accuracy will take care of our average accuracy for all the classes.
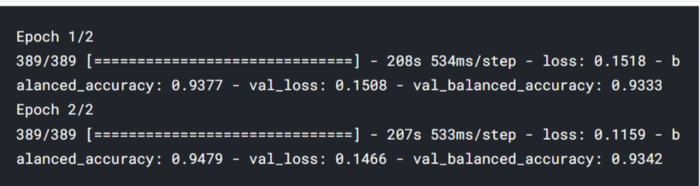
Model Training
You have the model ready with x_train, y_train. You can now train the model.
Training and fine-tuning of the BERT model takes a bit longer time. so be Patience.
train_history = model.fit(
    x ={'input_ids':x_train['input_ids'],'attention_mask':x_train['attention_mask']} ,
    y = y_train,
    validation_data = (
    {'input_ids':x_test['input_ids'],'attention_mask':x_test['attention_mask']}, y_test
    ),
  epochs=1,
    batch_size=36
)
- model.fit returns a history object which keeps all the training history.
- x_test became a dictionary containing ‘input_ids’, ‘attention_mask‘ after pre-processing. We are passing input_ids
- In the validation data, we are passing the test data.
Model Evaluation
Testing our model on the test data.
predicted_raw = model.predict({'input_ids':x_test['input_ids'],'attention_mask':x_test['attention_mask']})
predicted_raw[0]

Taking the index of value having maximum probability.
y_predicted = np.argmax(predicted_raw, axis = 1)
y_true = df_test.Sentiment
Classification Report
from sklearn.metrics import classification_report
print(classification_report(y_true, y_predicted))
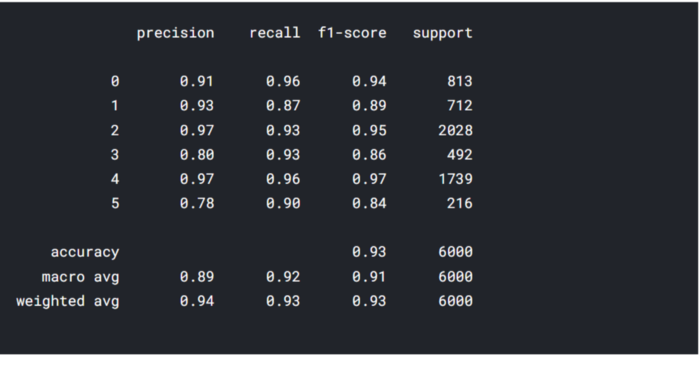
Awesome!! Our output is accurate.
Prediction Pipeline
Converting indexes back to the Sentiment label:
texts = input(str('input the text'))
x_val = tokenizer(
text=texts,
add_special_tokens=True,
max_length=70,
truncation=True,
padding='max_length',
return_tensors='tf',
return_token_type_ids = False,
return_attention_mask = True,
verbose = True)
validation = model.predict({'input_ids':x_val['input_ids'],'attention_mask':x_val['attention_mask']})*100
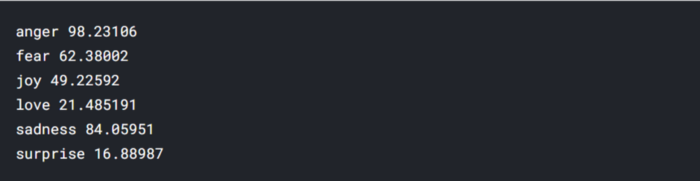
for key , value in zip(encoded_dict.keys(),validation[0]):
print(key,value)
For the inference step, we need to model the data in the same format as training data was and then call model.predict() which returns an array of the probabilities, then find the index of maximum chance and map that with the sentiment label, which will be our output.
Conclusion
In this article, we saw how to implement State-of-the-Art models in NLP by using hugging-face transformers.
It was a bit painful to implement the BERT model and other SOTA models without the transformers library.
There are many versions of BERT; you can read about them on this page. There are many use-cases of these SOTA models like paraphrasing, Question-Answering, Text-Summarisation, Text Generation, etc., which will be discussed in our next article.
Thanks for reading the article; please share below if you liked this article.
Reach out to me on LinkedIn.
Would you like to read Emotion Classification on Twitter Using Transformer? Click here.
The media shown in this article is not owned by Analytics Vidhya and are used at the Author’s discretion.


Can you show how to save and load this model? I saved it using bert.save_pretrained() but once I load the model using bert.from_pretrained(), I get dimensionality error!
The Bert model gives different results on every run. How can this problem be solved?