Using Django Framework For Making Exciting Data Science Projects – An Example Use Case
Introduction
In this article, I will explain to you how will we use Django Framework for creating some really exciting data science projects in Windows Machine. I will show you the complete procedure to create a website and also integrate a machine learning model into it. This website is used to check the quality of the Wine by providing some parameters.
Now, let’s talk something about Django, it is basically used to code the backend of a webpage and it is written in Python Programming language. This is used for fast website development, due to its huge support of python libraries. It was created by experienced developers to take care of most of the pain of the development of the website, allowing you to focus on building your app instead of reinventing the wheel. Django is free of cost and also available open-source.
Table of Contents
1. How to make a virtual environment and use it in our project?
2. How to set up the Django backend for our project?
3. Training the machine learning model
4. Creating an application for that model
5. How to create the URL for our project (final output)
6. How to add the HTML templates to our application?
7. How to use CSS and apply images?
8. Finalizing the changes in our application
Let’s get started, 😀
Creating a Virtual Environment
We will firstly set up the Virtual Environment, by running that command in your windows command prompt-
1. Install Virtualenv (run the following command to install the virtual environment)
$ pip install virtualenv
2. Creating an environment (run the following command to create the virtual environment)
$ py -m venv DjangoMLProject
3. Activate it using that command (run the following command to activate that environment)
$ DjangoMLProjectScriptsactivate.bat
4. You can also deactivate it using (run the following command if you want to deactivate that environment)
$ deactivate
Setting Up Django Framework
Now, we will see how to set up the Django framework for our project:
Firstly installing Django using pip within your virtual environment.
But be ensure that your virtual environment is activated.
$ py -m pip install Django
Creating your first Django project:
$ django-admin startproject WineMLProject
Now, move inside the WineMLProject directory and this type of directory structure appears to you:
WineMLProject/
    manage.py
    WineMLProject/
        __init__.py
        settings.py
        urls.py
        asgi.py
        wsgi.py
To verify that everything is working fine, you can also start the development server:
$ python manage.py runserver
The output of the command prompt will look like this:
Training Machine Learning Model
Create a directory named as ML_Model/ in the main directory. Also, here we have another directory, named ML_Model/ directory that creates a python file named trainModel.py and pastes the following code given below. This file is used for training our model.
Also, download the file named data.csv from my GitHub link and paste it into the same directory. This file contains the data that will be used further for training.
Understanding Technicalities in our Machine Learning Model:
Import necessary libraries: Firstly, we import all the necessary libraries required to do the data processing (Pandas), make manipulations with matrix (Numpy), import machine learning model directly (Scikit-learn), etc.
Machine Learning algorithm: Here, we have used the Random Forest Machine learning algorithm, which gives better accuracy in terms of testing data. If you want to learn about the Random Forest algorithm, you can refer to the link given below.
Understanding Random Forest Regression in a detailed manner
Cross-Validation: Here we have used the stratified shuffle split technique for performing cross-validation, which is inbuilt in the sci-kit-learn. It is used mostly since it will resolve the problem of class biases while we split the given dataset into train and test split.
Finally, after the cross-validation, we can easily find the best accuracy from all the accuracies and that can be used for the final model formation, which we will be deploying on the server.
# These libraries are used by the machine learning model.

import pandas as pd

from sklearn.model_selection import train_test_split

from sklearn.model_selection import StratifiedShuffleSplit

from sklearn.ensemble import RandomForestRegressor

import joblib

# This is the data file, you can download this file from the github link provided.

wine=pd.read_csv("data.csv")

print("Dataset Loaded...")

# Performing train test split with stratified shuffle split.

train_set, test_set = train_test_split(wine, test_size=0.2, random_state=42)

split = StratifiedShuffleSplit(n_splits=1, test_size=0.2, random_state=42)

for train_index, test_index in split.split(wine, wine['Alchohol']):

strat_train_set = wine.loc[train_index]

strat_test_set = wine.loc[test_index]

wine = strat_train_set.copy()

wine = strat_train_set.drop("Wine", axis=1)

wine_labels = strat_train_set["Wine"].copy()

# Random Forest Regressor is used for prediction.

model = RandomForestRegressor()

model.fit(wine, wine_labels)

print("Model Training Ends...")

test_features=strat_test_set.drop("Wine", axis=1)

test_labels=strat_test_set["Wine"].copy()

y_labels=model.predict(test_features)

x=list(y_labels)

y=list(test_labels)

accuracy=[]

for i in range(len(test_labels)):

if x[i]>y[i]:

accuracy.append((y[i]/x[i])*100)

else:

accuracy.append((x[i]/y[i])*100)

joblib.dump(model, "rf_model.joblib")

print("Model Saved...")

acc=sum(accuracy)/len(x)

print("Final Accuracy of the Model: ", acc)
The ML Model will be saved in your ML_Model/ directory, and this will look like this.
ML_Model/
    trainModel.py
    data.csv
    rf_model.joblib
Creating New App
Now creating a separate app, in which we can start doing our work.
Write this command in your cmd, but be sure you must be in the main working directory.
$ python manage.py startapp WineApp
This will create a separate app, WineApp which looks like the following:
WineApp/
    __init__.py
    admin.py
    apps.py
    migrations/
        __init__.py
    models.py
    tests.py
    views.py
Now, inside your WineApp directory, create a directory named templates this will store all HTML Templates, also create a directory named static that stores all static files like CSS/Javascript and Images.
Then, paste the following code into your views.py file.
# These libraries are used by Django for rendering your pages.

from django.http import HttpResponse

from django.shortcuts import render, redirect

import joblib

loaded_rf_model = joblib.load("ML_Model/rf_model.joblib")

def index(request):

if request.method == 'POST':

# These are all the variables that we obtained from the user through a POST Request.

alchohol_content=request.POST.get('alchohol_content','default')

malic_acid=request.POST.get('malic_acid','default')

Ash=request.POST.get('Ash','default')

alc_ash=request.POST.get('alc_ash','default')

Magnesium=request.POST.get('Magnesium','default')

Phenols=request.POST.get('Phenols','default')

Flavanoid=request.POST.get('Flavanoid','default')

NFPhelons=request.POST.get('NFPhelons','default')

Cyacnins=request.POST.get('Cyacnins','default')

Intensity=request.POST.get('Intensity','default')

Hue=request.POST.get('Hue','default')

OD280=request.POST.get('OD280','default')

Proline=request.POST.get('Proline','default')

labels=[[float(alchohol_content),

float(malic_acid),

float(Ash),

float(alc_ash),

float(Magnesium),

float(Phenols),

float(Flavanoid),

float(NFPhelons),

float(Cyacnins),

float(Intensity),

float(Hue),

float(OD280),

float(Proline)

]]

# Now, predicting the quality of wine based on our parameters.

our_labels = loaded_rf_model.predict(labels)

if our_labels[0]<=400:

wine_quality="A Poor Quality Wine"

if 400<our_labels[0]<=800:

wine_quality="A Average Quality Wine"

if 800<our_labels[0]<=1200:

wine_quality="A Good Quality Wine"

if 1200<our_labels[0]<=1500:

wine_quality="A Exclusive Wine"

if our_labels[0]>1500:

wine_quality="A Premium & Fresh Wine"

details={

"answer":our_labels[0],

"wine_quality":wine_quality,

}

# Now rendering our results page with the data.

return render(request,"results.html",details)

return render(request,"index.html")
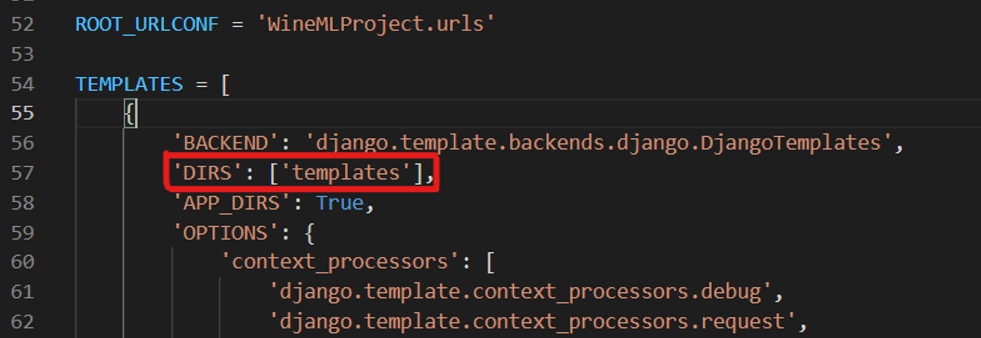
Now, go to WineMLProject/settings.py and follow that commands.
Register your templates/ directory inside the TEMPLATES, as shown in the figure below.
Register your app in the INSTALLED_APPS, as shown in the figure below.

Finally, paste this code to register the static/ directory.
import os
STATIC_ROOT=  os.path.join(BASE_DIR, 'WineApp/static')
STATIC_URL = '/static/'
Creating URLs
Go to WineMLProject/urls.py and paste that code. Also, be sure to remove all the code that is previously written in it.
from django.contrib import admin
from django.urls import path, include
urlpatterns = [
    path('admin/', admin.site.urls),
    path('', include('WineApp.urls')),
]
Now, go to WineApp/ directory, and create a file again named urls.py and copy the following code in it.
The above code will manage the URLs of your main webpage and the urls.py file created in WineApp/ directory will manage the URLs of your separate app.
from django.contrib import admin
from django.urls import path
from . import views
urlpatterns = [
    path('admin/', admin.site.urls),
    path('', views.index, name="index")
]
Adding HTML Templates
Inside your WineApp/templates/ directory create a HTML file named as index.html. This will contain your main index page which will be rendered first to the user.
Secondly, in the same directory, create an HTML file named results.html. On this page, the results of the quality of wine will be shown.
You can download both files index.html and results.html from my GitHub Repo.
Adding CSS & Images
Now inside your WineApp/static folder, copy the images and CSS files that are given in my GitHub Repo.
Finalizing the changes in our website
Finally, run that command in your command prompt to migrate all your changes.
$ python .manage.py migrate
Damm! You have created your first data science web app. Now you can run your app by starting the server.
$ python .manage.py runserver
This completes our today’s discussion on the project which involves Django, HTML, CSS with machine learning, and finally, we are come up with one of the exciting Data Science projects.
Here is my Linkedin profile in case you want to connect with me. I’ll be happy to be connected with you.
Github Link
Here is my Github profile to find the complete code which I have used in this article.
End Notes
Thanks for reading!
I hope that you have enjoyed the article. If you like it, share it with your friends also. Something not mentioned or want to share your thoughts? Feel free to comment below And I’ll get back to you.
The media shown in this article is not owned by Analytics Vidhya and are used at the Author’s discretion


