Google Cloud Platform with ML Pipeline: A Step-to-Step Guide
This article was published as a part of the Data Science Blogathon.
Table of Contents
Introduction
Machine Learning Pipeline
Data Preprocessing
Flow of pipeline
1. Creating the Project in Google Cloud
2. Loading data into Cloud Storage
3. Loading Data Into Big Query
Training the model
Evaluating the Model
Testing the model
Summary
Shutting down the project
Introduction
Cloud computing is a technology that uses the computer system resources like cloud storage, computing power, and they manage data on remote servers and access them via the internet.
To know more about Cloud computing.
In the last 5 years, the demand for cloud computing keeps on increasing day by day. Many new cloud service providers came to the market. One of the most popular cloud services is the Google cloud platform.
Google’s next step towards Cloud
In this article, we are going to deep dive into the ML pipeline in GCP (Google cloud platform).
Machine Learning Pipeline
Machine Learning pipeline is the sequential steps where the data travel from collection to the model deployment. They are iterative as every step is performed again and again to improve the accuracy of the model and achieve successful results. This journey from data to deployment is called the Machine learning pipeline.
To know more about automation in Machine learning AutoML Blog.
Let us go through them every step in building an end-to-end pipeline right from cleaning data, loading the data into the cloud storage, creating BigQuery datasets and training the model and testing them using BigQuery ML. Don’t worry. This process may look so long. But we can go through them very clearly.
Dataset
We have used data from the Kaggle dataset.
Dataset: Diabetes Dataset
Link: https://www.kaggle.com/vikasukani/diabetes-data-set
Task: Build a Model to Predict and detect whether a Person has Diabetes or Not
Data Pre-processing
As this data is in Kaggle, you can use the Kaggle kernel for the preprocessing.
Here I have used Google colab notebook.
We can directly fetch the data from the Kaggle platform to Google colab through Kaggle API.
To know – How to import Kaggle Datasets directly to the Google Colab – 3 steps
Loading the data
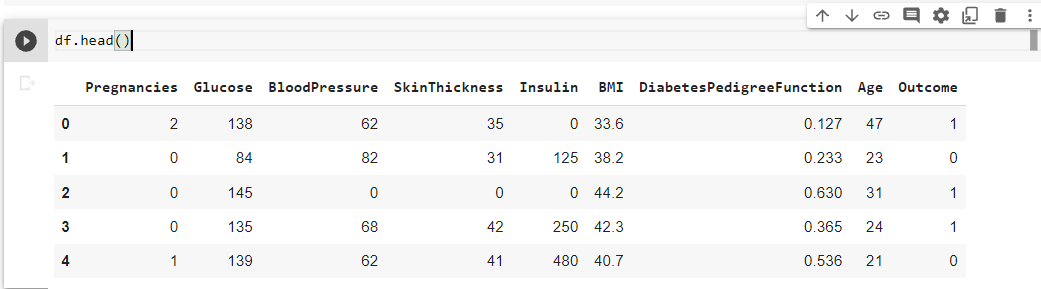
import pandas as pd
df = pd.read_csv('/content/diabetes-dataset.csv')
# To check for missing values
df.isnull().sum()
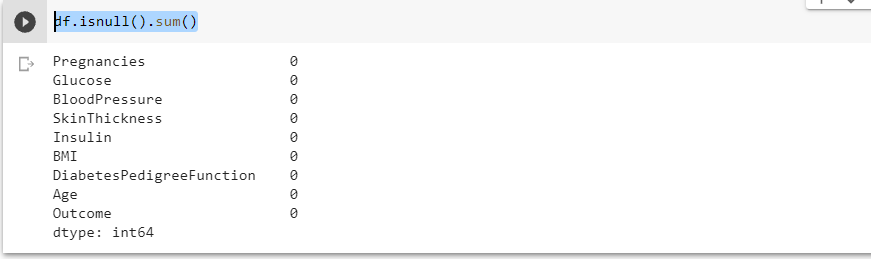
There are no null values in any of the columns
To find the number of persons having diabetes and the number of persons not having diabetes
# Number of diabetes and non-diabetes persons
print(df.Outcome.value_counts())
Feature selection
Here, we will take the features that impact the outcome column.
# select feature colulmn
feature_columns = df[['Glucose', 'BloodPressure', 'SkinThickness', 'Insulin',
      'BMI', 'DiabetesPedigreeFunction', 'Age']]
feature_columns.head()
# Outcome colummn
outcome_column = df['Outcome']
outcome_column.head()
Splitting Train and Test data
From the collected data, we are splitting the data into two parts for train and test in the ratio of 80-20.
# import package
from sklearn.model_selection import train_test_split
# split into training and testing sets
X_train, X_test, y_train, y_test = train_test_split(feature_columns, outcome_column, test_size=0.2, random_state=5)
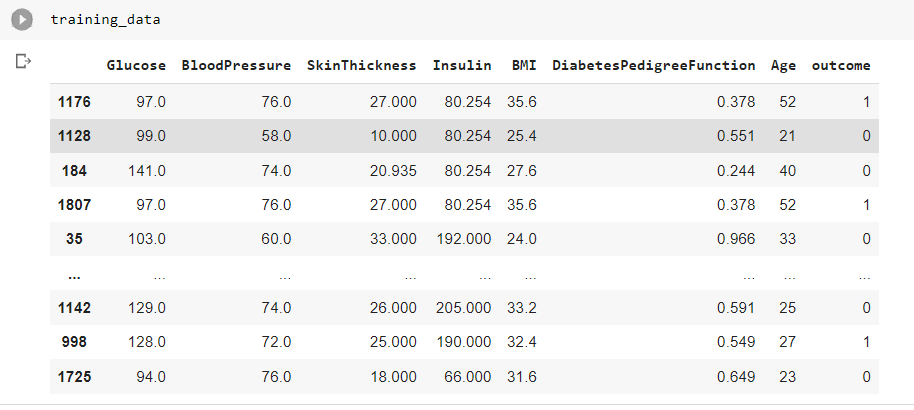
Training Data – Combining X_train and y_train
training_data = X_train
training_data['outcome'] = y_train.values
Testing Data – Combining X_test and y_test
test_data = X_test
test_data['outcome'] = y_test.values

Converting data to CSV
Now let us convert this training data and testing data frames into CSV files. Because when we are creating a pipeline, we have to import this data into google cloud storage bucket. For that, it should be in some supported formats like CSV.
training_data.to_csv("Training_data.csv")
test_data.to_csv("Test_data.csv")
To see the full version of this notebook: Preprocessing Notebook
Flow of Pipeline

This chart represents the flow of design from the beginning of loading the data to the model testing. First, we upload the training and testing data to the google cloud storage and we access the data from Google BigQuery using SQL and create models there. Finally, the model is tested and evaluated.
Creating the Project in Google Cloud
What is a project in GCP?
A project is an entity that organizes all our resources and services. In the project, we can define all our users, APIs, authentication, resources, computations. and we can monitor all these activities through the project.
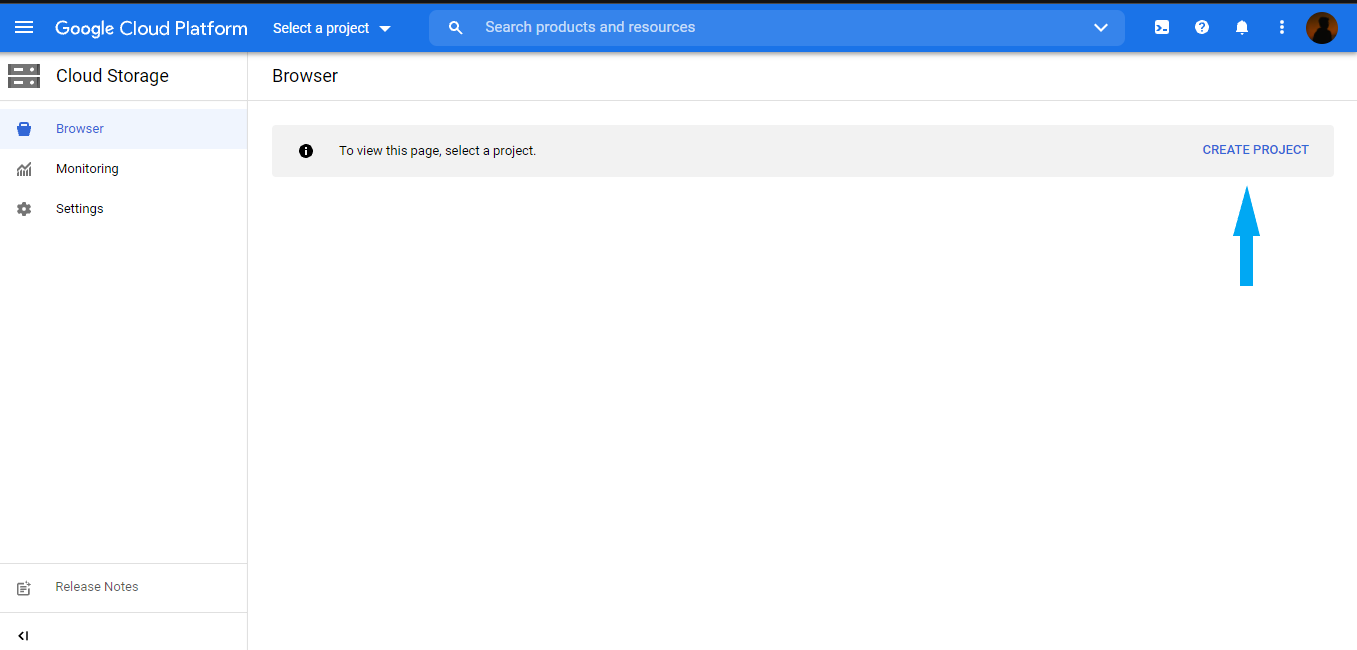
Step 1: In the Google cloud console, Click on Create Project
Step 2: Give a unique Project Name and Location of the project.
Click on Create Project

Loading Data into Cloud Storage
Intro to Cloud Storage
Google Cloud Storage is the object storage location in which we can store any amount of data.
Features:
==> We can store various formats of data. It can store structured data, unstructured data, binary data, video files, audio files, etc.
==> Data availability can be set by ourselves. We can choose the geographic location of placement of our data. It provides three types of locations. The choice of the region is an important factor in cost pricing.
-
Multi-region: Highest availability across the largest area
-
Dual-region: High availability and low latency across 2 regions.
-
Region: Lowest latency with a single region
==> GCP provides multiple different classes for storing the data. We can choose a suitable class based on how long we use the data and how often we access the data.
-
Standard: Best for short term storage and frequent access.
-
Nearline: Best for backups and accessed less than once in a month.
-
Coldline: Best for disaster recovery and data is accessed less than once a quarter.
-
Archive: Best for long-term data and accessed less than a year.
The choice of the bucket is important because of the cost-efficiency. If we want to store and access data for a month and we choose Archive Bucket ( long term), then it is a waste of money and resources. Because Archive bucket is meant for long term memory which is accessed once a year.
==> Data in the storage is encrypted by default. We can also customize the default encryption easily.
==> It provides APIs for accessing data from other tools.
==> It can be accessed by services like BIgQuery, Dataproc for creating tables, etc
==> It is one of the cheapest storage services on GCP.
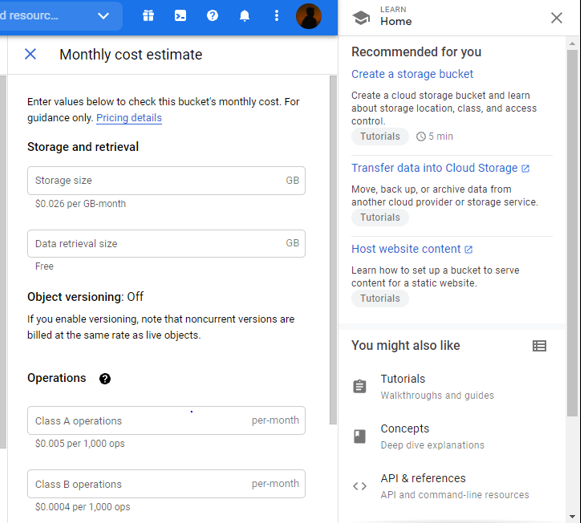
For storage $0.020/ GB – Month and for retrieval – Free
Loading Data into Cloud Storage
-
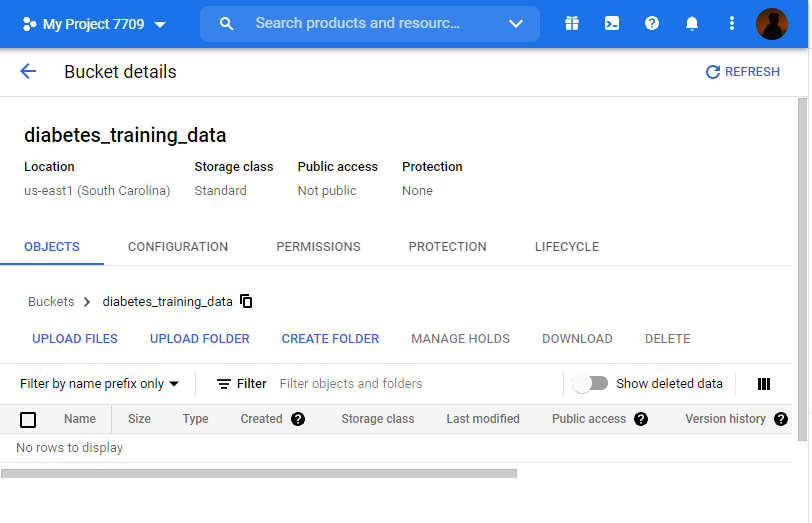
In the GCP console, there is a navigation menu in the top left and from that click on Cloud Storage under Storage options.
It will appear like the above picture.
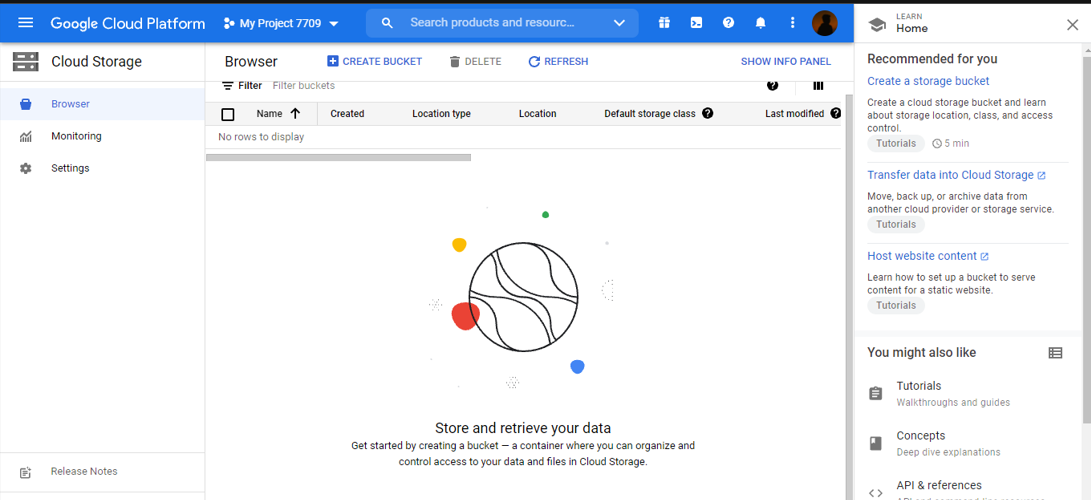
+ We already have the Training data CSV file and the Test data CSV file.
First, we will create Bucket for Training data and then for test data.
2. Click on CREATE BUCKET
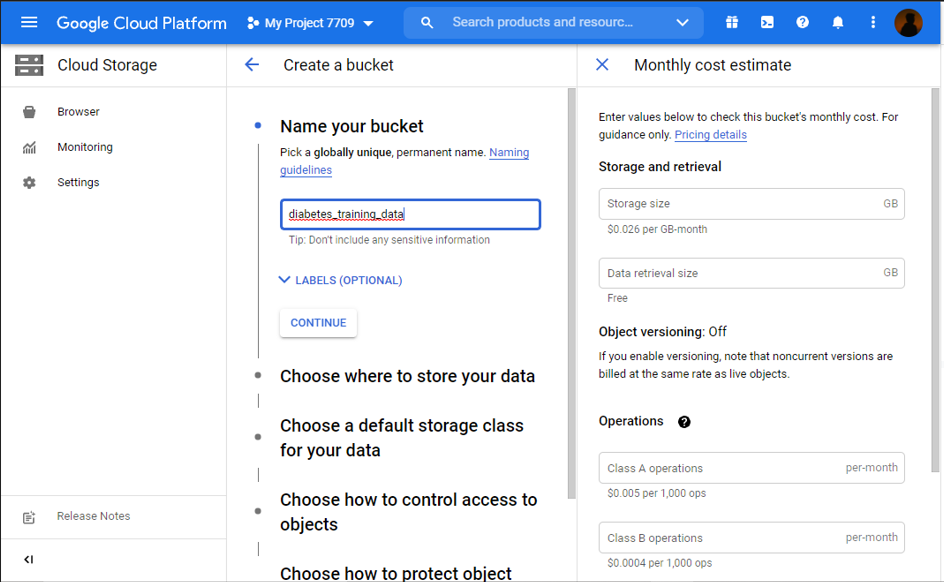
3. Name Your bucket.
It should be unique and follow guidelines. To see bucket naming guidelines Click Here
Here, we have taken Diabetes data. So the name of the bucket is diabetes_trainig_data.
4. Choose a region and location for storing the data.

While choosing regions, availability and latency for the data should be kept in mind. Because a Single region is used for low latency data. Dual-regions provides high availability but low latency across the chosen 2 regions. Multi-region provides the highest availability of data across the largest area.
For our experiment, we choose a single region and the location is set as us-east1(South Carolina).
You can choose the location as your wish.
5. Choose a default storage class for our data.
Here, we have used the Standard storage class as we use it for temporary access and we don’t need it for future use.

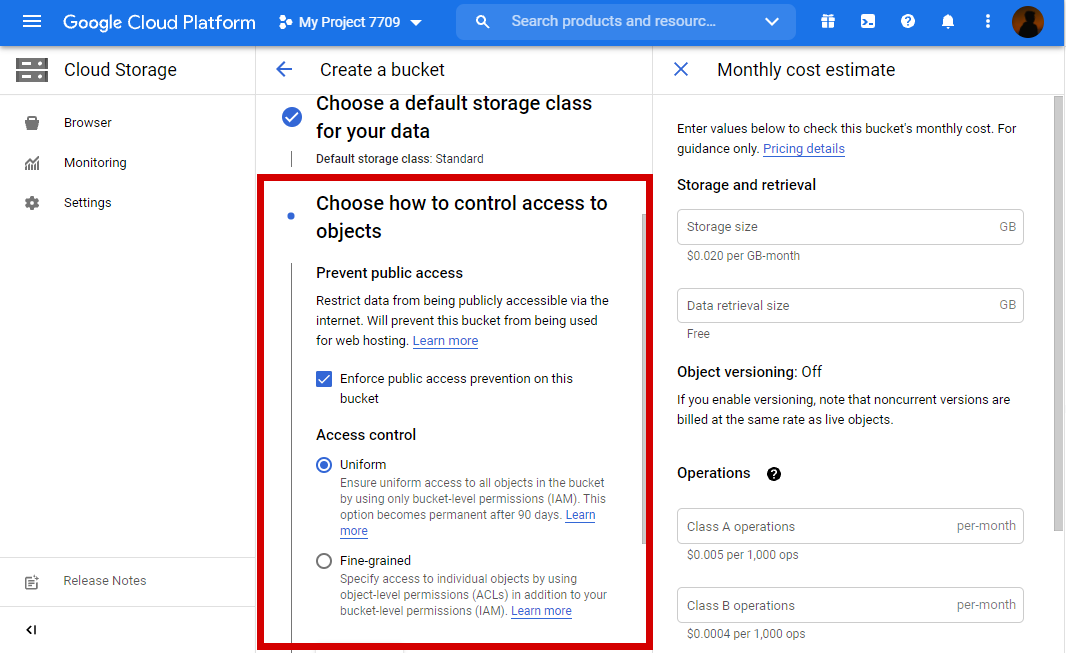
6. Choose how to control access to objects.
Prevent Public class
This need to be configured to prevent the public to access our data. It will prevent data from being publicly accessible via the internet. It will prevent the bucket from being used for web hosting.
Access control: Set Uniformly accessing all objects.
7. Choose how to Protect object data.
Data is always protected by Cloud storage by default. But we can also customise some extra settings for additional data protection. In this section, we have 3 options for protection,
No protection: No more additional protection is enabled.
Object Versioning( Best for data recovery):
This is used for restoring deleted or overwritten objects.
Retention Policy( Best for Compliance)
This is used for preventing the deletion or modification of the bucket objects after being uploaded.
For our data, we already have default protection in cloud storage and we don’t need additional protection. So we are going with the “No protection option”.

8. Click on CREATE Bucket
We have created the bucket for training data.
Now, we have to upload the CSV file of the training data.
Let us create the bucket for test data. The procedure for creating the test data bucket is as same as training data bucket creation. So, giving a brief step for test data.
-
Click on Create Bucket.
-
Name the bucket as diabetes_test_data
-
Choose region and location.
-
Choose standard Storage Class.
-
Select prevent public access for protection
-
Create Bucket.
-
Upload the Test data CSV file.
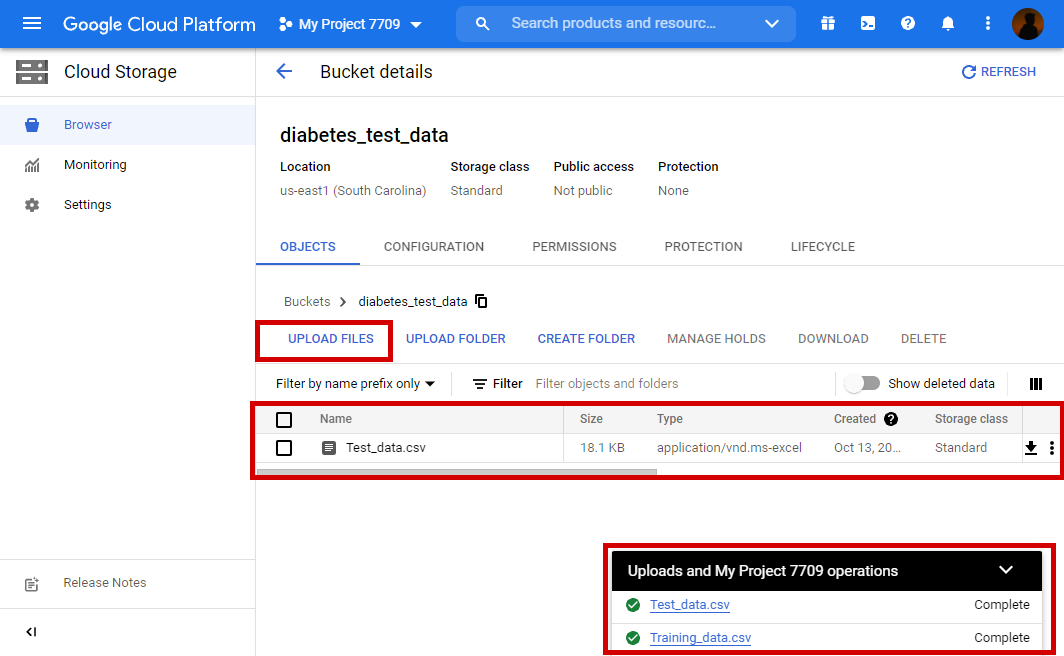
Now we have created buckets and uploaded the data in respective buckets.
Loading Data Into Big Query
Big Query
Big Query is a data warehouse for GCP. It is a tool for building a machine learning pipeline with the help of SQL programming. It is very easy to build datasets using BigQuery. It is serverless and fast. It supports querying using ANSI SQL. It is cost-effective.cost-effective
It has 2 pricing models.
-
Pay as you go – Standard cost is $5/TB data
-
Flat rate – Appr $40,000/month for large-sized data processing firms.
To open Big Query Workspace,
-
Click on the navigation menu in the left top corner.
-
Scroll down to the Big Data section and select BigQuery.
-
After clicking Big Query, there appear Subcategories. On that select SQL workspace.
On the left side, Explorer Panel, Click on the project we used for Cloud Storage.
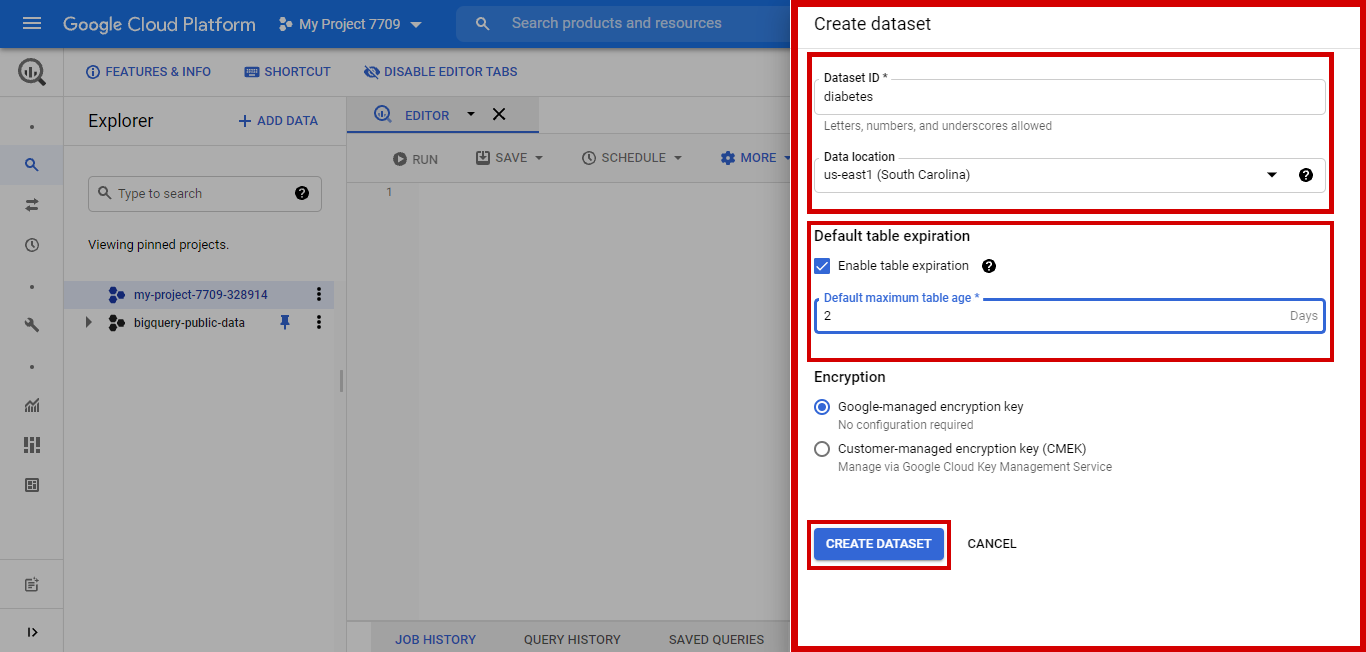
There will be a drop-down option. Select create Dataset

-
Give Dataset ID. Here the Dataset ID is diabetes.
-
Select the Data Location. Here location selected is us-east1(South Carolina)
-
Set Default table expiration age. We have set it as 2 days.
-
The encryption type is configured as a Google-managed encryption key.
-
Click Create Dataset
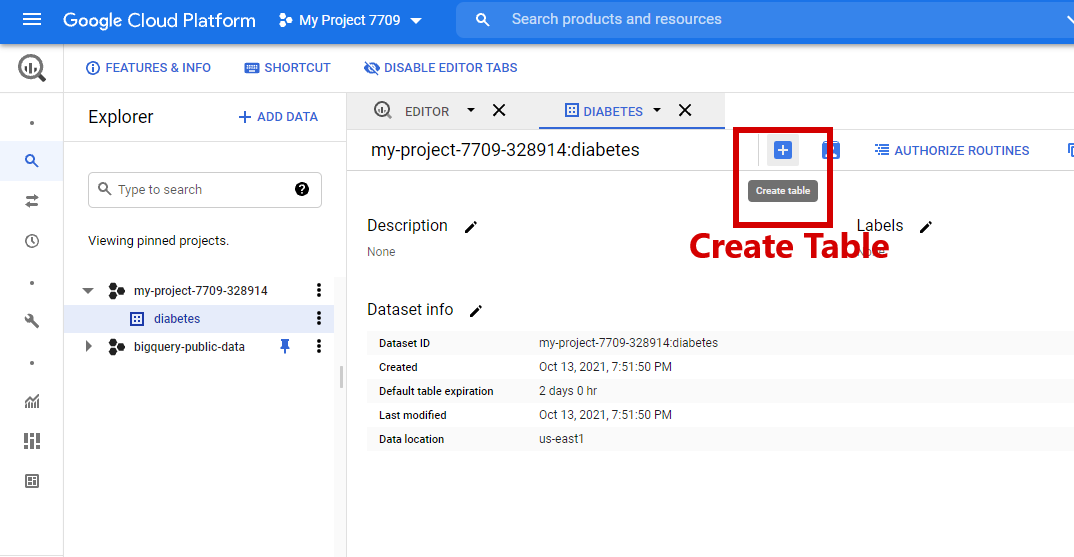
Next, click on the diabetes dataset option, and open the dataset by clicking on open.

Next, create Diabetes_Training_Data and Diabetes_Test_Data tables from the data in the Cloud Storage buckets.
In the diabetes dataset, Click Create Table.
Steps for Creating Table
-
In the SOURCE, there will be a “Create table” from the option. Change it from “Empty table” to “Google Cloud Storage”.
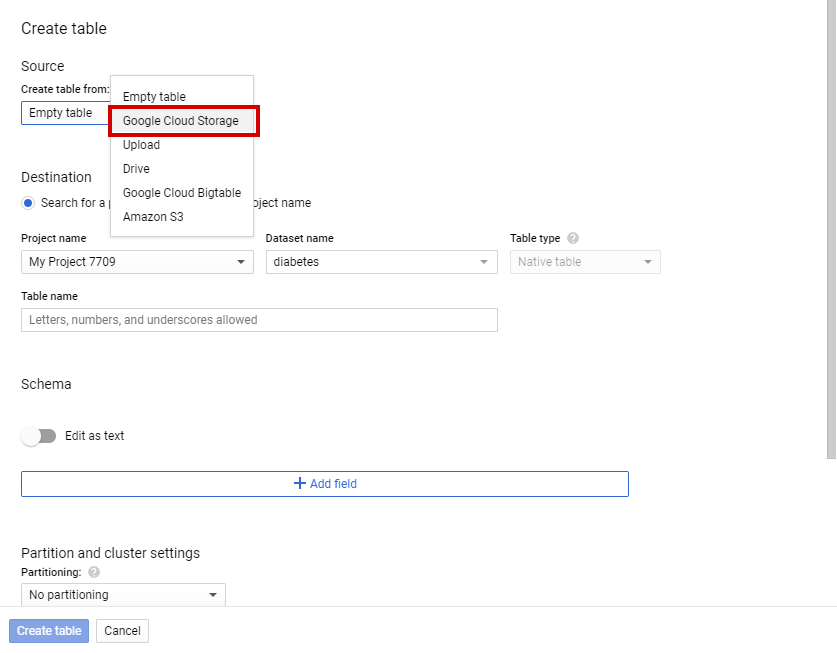
-
After that, browse the training data CSV file stored in the cloud storage bucket. Automatically the file format will be changed to CSV.
3. In the DESTINATION section, select search for a project.
4. Select Project Name and dataset and table type.
5. Give a name to the table for training data.
6. In the SCHEMA section, select the Auto-detect schema and input parameters check box.
7. In the PARTITION AND CLUSTERING SETTINGS section, from the drop-down menus, choose no partitioning as we don’t require partitions.

8. Expand Advanced Options,
There are options for null values and unknown values. We already cleaned the data. So there are no null values in our data. So we can skip this option & move forward.
9. Set the Header rows to skip. Because Our dataset has a header as the first row. We are setting it as 1.
10. Set google managed encryption and Create Table.

Now, we have created a training data table.
Repeat the same steps for creating a table for test data and name the table as Diabetes_Test_Data.
Training the model
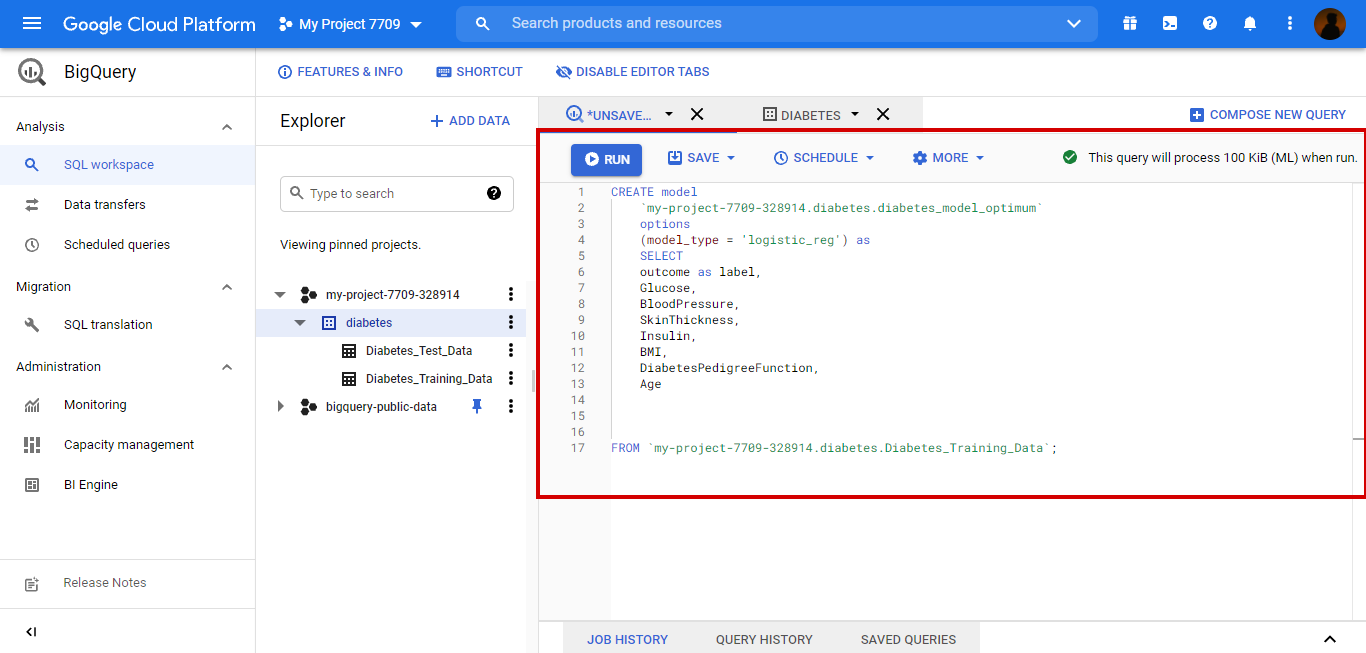
For training the model, we are going to write an SQL command.
CREATE model
`my-project-7709-328914.diabetes.diabetes_model_optimum`
Options
(model_type = ‘logistic_reg’) as
SELECT
outcome as label,
Glucose,
BloodPressure,
SkinThickness,
Insulin,
BMI,
DiabetesPedigreeFuncyion,
Age
FROM  `my-project-7709-328914.diabetes.diabetes_model_optimum`
This is the code for creating the model with logistic regression.
As this problem is based on binary classification, We use logistic regression. Here, we focus on pipeline building. We are not concentrating on the working of the algorithm.
From the above code, we can infer that,
-
We create a model with the diabetes_model_optimum name in the Diabetes dataset.
-
A logistic regression model has been created.
-
The outcome is the label that will be predicted on test data.
-
The outcome is the column that identifies whether the person is having diabetes or not.
-
The columns from Glucose, blood pressure, SkinThinckness, Insulin, BMI, DiabetesPedigreeFunction, Age will be used to predict the outcome column.
Now the model is created.
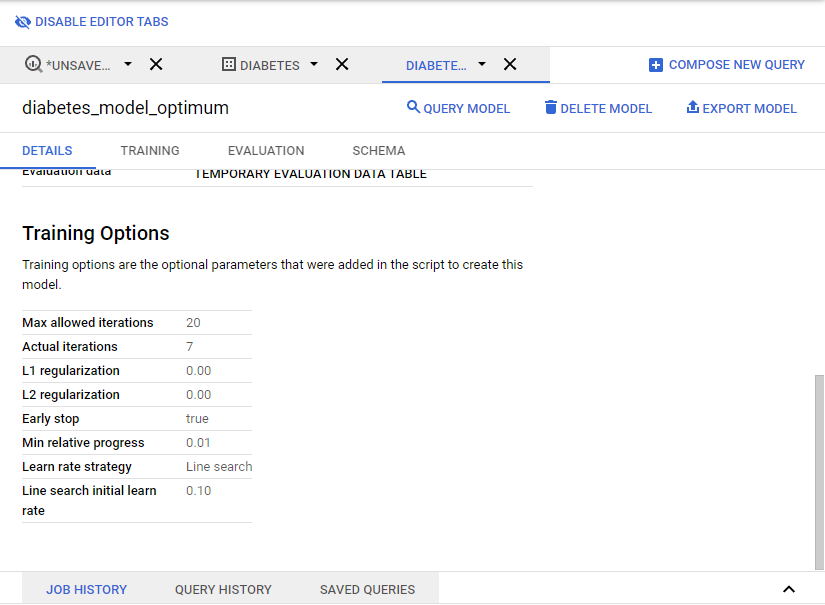
We will see the details of the training.
Training options are the optional parameters that were added in the script to create this model.
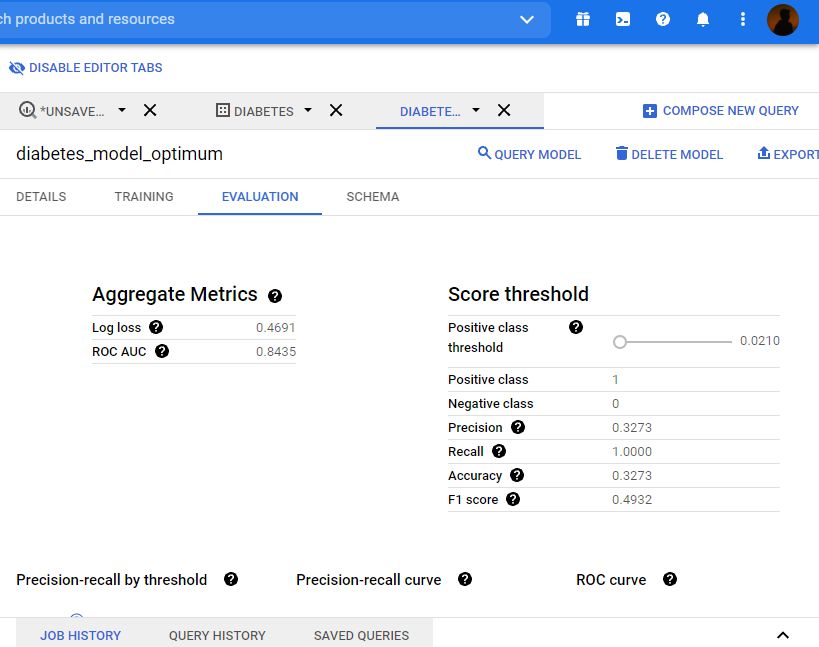
ROC AUC, Precision, Recall, Accuracy, F1 score will be automatically calculated and displayed in the dashboard.

Evaluating the Model
We can use
ml.evaluate
The function to evaluate the models in BigQuery.
SELECT * FROM
ml.evaluate (model `my-project-7709-328914.diabetes.diabetes_model_optimum`,
(
SELECT outcome AS label, *
FROM
`my-project-7709-328914.diabetes.Diabetes_Training_Data` )
)
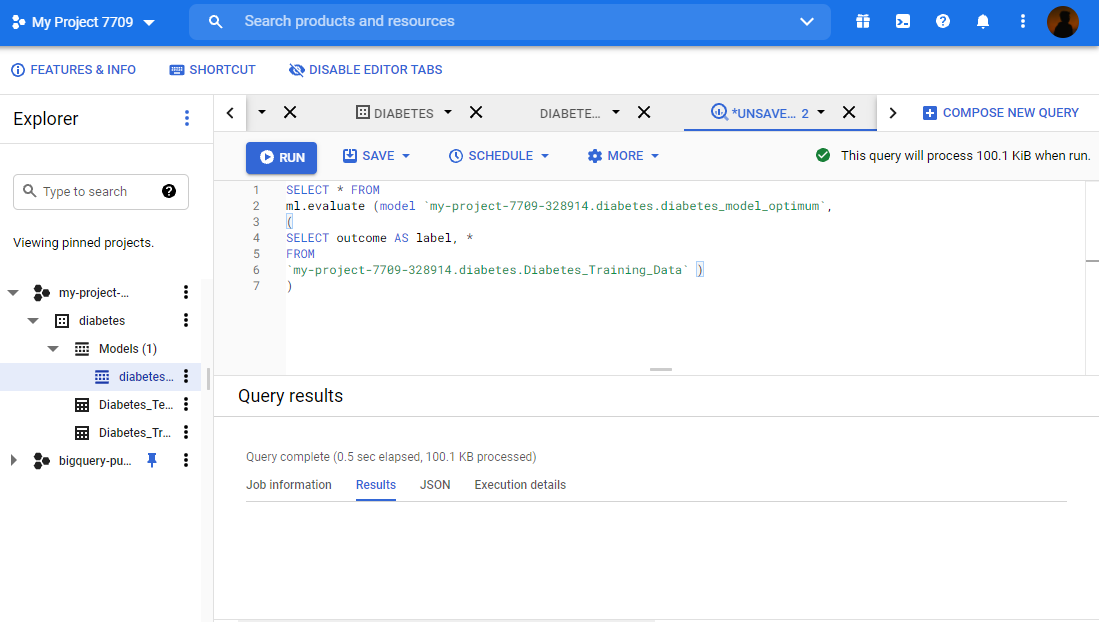
From the above code, we can infer that
-
ml.evaluate() is the function for evaluating the model
-
The outcome is the column we have predicted and so it is the column we want to evaluate
The results after executing the query,
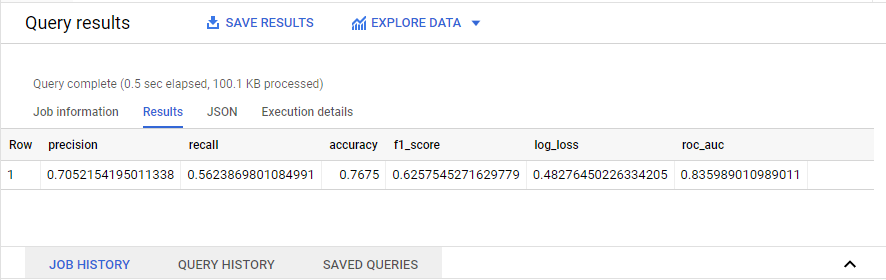
The evaluation metrics for classification algorithms like precision, recall, accuracy, f1 Score, roc AUC score will be calculated automatically and it will be displayed as a result of the query.
Testing the Model
We have trained the model. To predict the outcome for the new data from, the model, BigQuery have a function
ml.predict()
Let us test the model by using SQL in BigQuery.
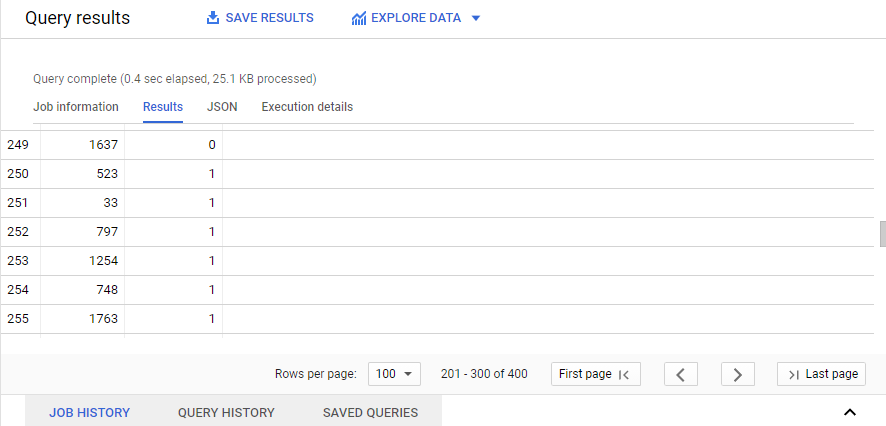
SELECT
Int64_field_0,
Predicted_label
FROM
ml.predict(model ‘my-project-7709-328914.diabetes.diabetes_model_optimum’ ,
(
SELECT
*
FROM
`‘my-project-7709-328914.diabetes.Diabetes_Test_Data`))
For reference see the below screenshot

-
In the above code, based on int64_field_0, the model is predicting the outcome of the test data.
-
my-project-7709-328914.diabetes.diabetes_model_optimum is the place where the model is stored.
Now, we can see the results of the test data.

Now, we have trained and tested the data.
Shutting down the project
After completing the project, always don’t forget to shut down the project. Because cloud services mostly provide a “pay as u go” policy. If we forget to shut down the project, it means that the cloud services and resources are still in use. So, the cloud service providers charge you for this.
In GCP, to shud down the project, follow these steps,
-
Open the navigation tool in the left top corner of the dashboard.
-
Select IAM & Admin and in the drop-down menu, select Manage Resources.

-
Select the project name and click on delete
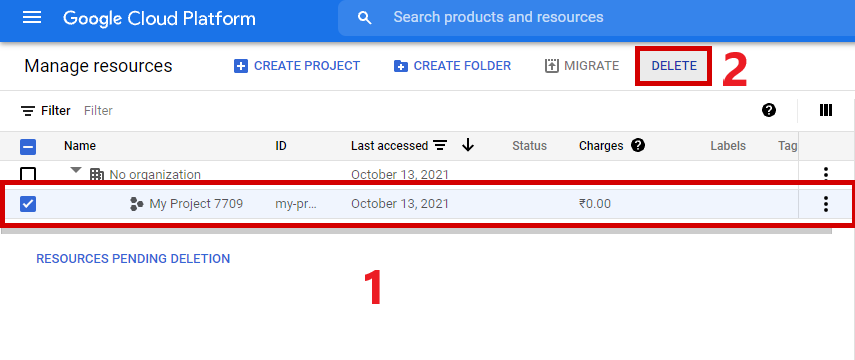
-
For confirmation, type the project name in the text field.
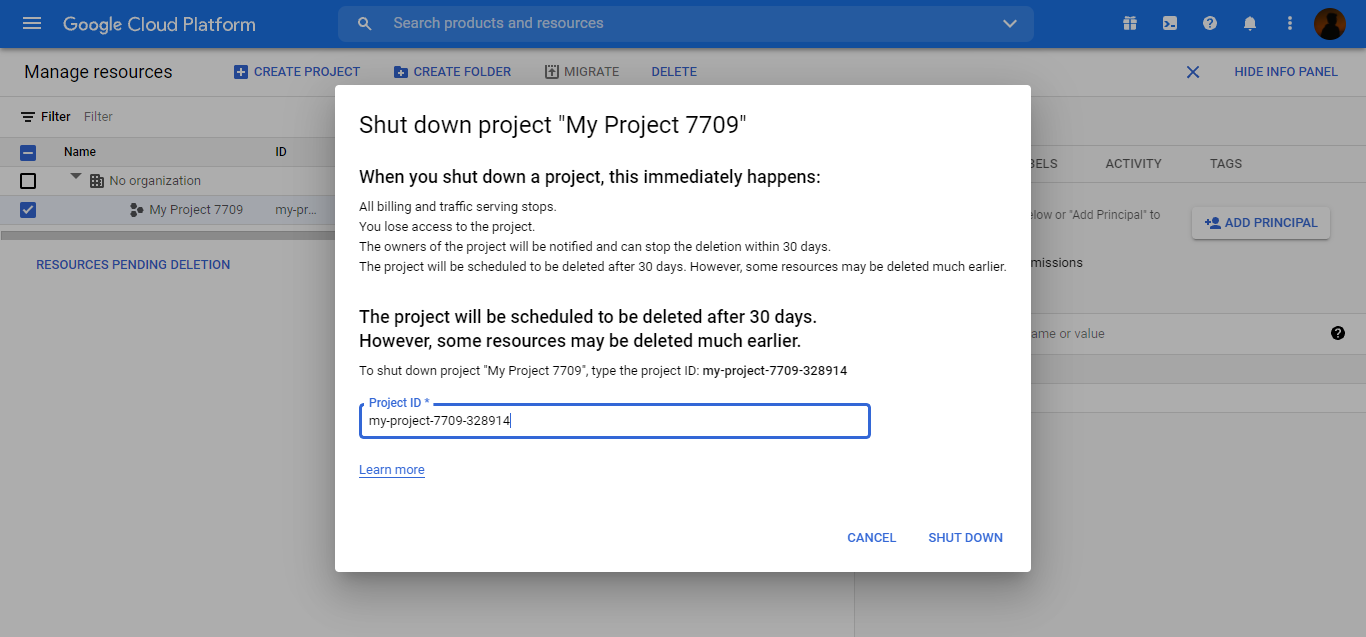
-
Click on SHUT DOWN
The project will be scheduled to be deleted after 30 days.
Summary
We have chosen a diabetes dataset for building an End-to-End machine learning pipeline. First, we preprocessed the data. That is data cleaning and data wrangling. Then we have separated the whole data into training and test sets.
Then we created a project in GCP. Inside the project, we have created the cloud storage bucket and uploaded our training and test data. After that, We have loaded the data into the BigQuery workspace from the cloud storage bucket. Then we have written SQL commands in BigQuery to train the model, evaluate the model, and test the model.
Finally, we got the results for the test data. Thus we have created the End-to-End ML pipeline
End Notes
In this article, we have seen the procedure for building an End-to-End ML pipeline.
If you liked this article and want to know more, go visit my other articles on Data Science and Machine Learning by clicking on the Link
I hope you enjoyed the article and increased your knowledge. Please feel free to contact me at [email protected] Linkedin
Image Sources: The media used in this article is not taken from other sources on the internet. They are screenshots of the experiment taken by the author on cloud.google.com.


Thanks for putting this article together, but I'd appreciate in the future if you checked your syntax more closely. There are several errors in your "Create Model" and one in your "Evaluate" code. Also, you show loading the training data from Cloud Storage, but don't say anything about loading the test data.