GUI calculator using tkinter Python
This article was published as a part of the Data Science Blogathon.
Overview
- What is “GUI” and “GUI calculator using tkinter python”?
- What exactly is a calculator?
- How to make it?
What is “GUI” and “GUI calculator using tkinter python”?
So first of all GUI stands for Graphic user interface.
So let us know a bit about GUI:
GUI is simply a visual and more easy-to-use way to interact with a computer, example: one will easily click a button to know what time it is. But it will be more complex to type “time” to get the current time. And another example can be your Windows or Android device, it can be easily used but on the Linux system, it seems more difficult to use the system. That is why more beginners start with windows devices to know what a computer is.
Now let us know about “GUI calculator using tkinter python”:
As we have above seen what a GUI is, now we other things. So first of all, most of you will know, Python is a high-level programming language and it is very easy to use and its syntax is easy too, the only downside is speed is not as C/C++’s side but it is make-up by its huge community. And it has many libraries to work with. One is tkinter library which basically provides GUI API to work with and manages all the errors in the background.
Now GUI calculator:
GUI calculator is only a calculator but one can use it by clicking buttons, not by typing something like in python print(2+2) , and then will get the result as 4 in the black and white environment. In the GUI calculator, all its operators and numbers are represented graphically and one can click it and use it.
Calculator using tkinter python
What exactly is a calculator?
The calculator is a basic utility to add, subtract, multiply, divide, and do other basic mathematical operations easily. It is simply a simple mathematical operator, one can say.
How to make it?
In order to create this program, first, we have to install a GUI library tkinter on our system.
So the code is
pip install tkinter
Now let’s start programming.
first, we will import the libraries;
import tkinter as tk
from tkinter import *
What we have done above is imported tkinter as tk means we can access it from now as tk and imported * from tkinter means imported everything from tkinter.
Next:
app = tk.Tk()
Now we have called TK() in-app variable, now we will use app instead of Tk()
What we have done above is use class of app or Tk() to set the window size to be 170×230
app.geometry("170x230")
app.title("python-calculator")
app.maxsize(170,230)
app.minsize(170,230)
Then using the title class we have named it as python calculator. Then using max size and a midsize class of window which is the maximum and minimum size of the window to be 170×230. Now what is done here is when a user tries to minimize or maximize the window he will not be able to do it, as we don’t want to adjust the buttons which we will create some after
ent = Entry(app, width=16, borderwidth=3, relief=RIDGE)
ent.grid(pady=10,row=0,sticky="w",padx=15)
Now we have used the Entry widget of tkinter library to create an input box for our calculator which is invariable “ent” and Entry takes arguments as parent container which id “app” here and other options like width which is 16px and border-width which is equal to 3px and to make it look like input box we have used style as RIDGE which creates the box-shadow.
In the next line, we have used grid geometry to create a 2-d table on the window and can be accessed as rows and columns and added arguments like pady which is basically padding in y to 10px and sticky equals to w which means its direction will be west and padx which is padding in x to 15px and added all this configuration to “ent” object.
def delete():
        a = ent.get()
        ent.delete(first=len(a)-1,last="end")
def fresult():
        if ent.get() == "":
                pass
        elif ent.get()[0] == "0":
                ent.delete(0,"end")
        else:
                c_res = ent.get()
                c_res = eval(c_res)
                clearf()
                ent.insert("end",c_res)
def clearf():
        ent.delete(0,"end")
Now we have defined a function delete which will be the last character of the input using delete method like ent.delete(first=len(a)-1, last=”end”) where len() is a built-in python function and a is used to get the value of the input. Now we will define fresult() which is the final result and which will be called when the user asks for it and in the next line we have used is get method to get the value of what is in the “ent” input box and check it as if ent.get() == “” means if it is blank then do nothing as “pass”. In next line elif ent.get()[0] == “0” means else if “ent” first index value is “0” then delete the “ent” input from 0 to end as ent.delete(0,”end”). And in the next line, else we have created “c_res” variable which contains the value of input as ent.get() then updated “c_res” variable to contain eval(c_res) which is the brain of this calculator which is eval() built-in function in python which needs a separate article and it converts python input from string to integer completes all the mathematical operations by itself and then we have called clearf() function which we create jus after and at the end of this function we insert “c_res” value to end in the input box using ent.insert(“end”,c_res).
In the next line, we have defined a function clearf() which is used when a user calls a clear function to clean the input box and in the next line is to delete all the characters from start to end in the input box as ent.delete(0,”end”)
Now we are going to add GUI widgets of numbers and other operators like:
clean = Button(app,text="C",width=2,command=clearf,bg="green",fg="white",relief=RIDGE)
clean.grid(row=0,sticky="w",padx=125)
Char_nine = Button(text="9",width=2,command=lambda : ent.insert("end","9"),borderwidth=3,relief=RIDGE)
Char_nine.grid(row=1,sticky="w",padx=15)
Char_eight = Button(text="8",width=2,command=lambda : ent.insert("end","8"),borderwidth=3,relief=RIDGE)
Char_eight.grid(row=1,sticky="w",padx=45)
Char_seven = Button(app,text="7",width=2,command=lambda : ent.insert("end","7"),borderwidth=3,relief=RIDGE)
Char_seven.grid(row=1,sticky="w",padx=75)
Char_plus = Button(app,text="+",width=2,command=lambda : ent.insert("end","+"),borderwidth=3,relief=RIDGE)
Char_plus.grid(row=1,sticky="e",padx=125)
Char_six = Button(text="6",width=2,command=lambda : ent.insert("end","6"),borderwidth=3,relief=RIDGE)
Char_six.grid(row=2,sticky="w",padx=15,pady=5)
Char_five = Button(text="5",width=2,command=lambda : ent.insert("end","5"),borderwidth=3,relief=RIDGE)
Char_five.grid(row=2,sticky="w",padx=45,pady=5)
Char_four = Button(app,text="4",width=2,command=lambda : ent.insert("end","4"),borderwidth=3,relief=RIDGE)
Char_four.grid(row=2,sticky="w",padx=75,pady=5)
Char_minus = Button(app,text="-",width=2,command=lambda : ent.insert("end","-"),borderwidth=3,relief=RIDGE)
Char_minus.grid(row=2,sticky="e",padx=125,pady=5)
Char_three = Button(text="3",width=2,command=lambda : ent.insert("end","3"),borderwidth=3,relief=RIDGE)
Char_three.grid(row=3,sticky="w",padx=15,pady=5)
Char_two = Button(text="2",width=2,command=lambda : ent.insert("end","2"),borderwidth=3,relief=RIDGE)
Char_two.grid(row=3,sticky="w",padx=45,pady=5)
Char_one = Button(app,text="1",width=2,command=lambda : ent.insert("end","1"),borderwidth=3,relief=RIDGE)
Char_one.grid(row=3,sticky="w",padx=75,pady=5)
Char_multiply = Button(app,text="*",width=2,command=lambda : ent.insert("end","*"),borderwidth=3,relief=RIDGE)
Char_multiply.grid(row=3,sticky="e",padx=125,pady=5)
Char_zero = Button(text="0",width=2,command=lambda : ent.insert("end","0"),borderwidth=3,relief=RIDGE)
Char_zero.grid(row=4,sticky="w",padx=15,pady=5)
Char_double_zero = Button(text="00",width=2,command=lambda : ent.insert("end","00"),borderwidth=3,relief=RIDGE)
Char_double_zero.grid(row=4,sticky="w",padx=45,pady=5)
Char_dot = Button(app,text=".",width=2,command=lambda : ent.insert("end","."),borderwidth=3,relief=RIDGE)
Char_dot.grid(row=4,sticky="w",padx=75,pady=5)
Char_divide = Button(app,text="/",width=2,command=lambda : ent.insert("end","/"),borderwidth=3,relief=RIDGE)
Char_divide.grid(row=4,sticky="e",padx=125,pady=5)
result = Button(app,text="=",width=10,command=fresult,bg="green",fg="white",borderwidth=3,relief=RIDGE)
result.grid(row=5,sticky="w",padx=15,pady=5)
Char_modulus = Button(app,text="%",width=2,command=lambda : ent.insert("end","%"),borderwidth=3,relief=RIDGE)
Char_modulus.grid(row=5,sticky="e",padx=125,pady=5)
delete = Button(app,text="del",width=2,command=delete,borderwidth=3,relief=RIDGE)
delete.grid(row=5,sticky="w",padx=80,pady=5)
Now the main GUI starts as we will create buttons for the calculator. So the first Button is a clean variable that has a parent container app and its text is “c” with a background colour green, and foreground colour to white and relief style as RIDGE and command argument is clearf function that is when user clicks “C” on the calculator it triggers clearf() function.
In the next line, we have used grid geometry of clean button to have row=0 , sticky which is the direction to west or “w” padx or padding in x to 125
Now we have to create all the buttons are 0-9 number and “+,-,*,/,%, =, del”
As all are going to be buttons so many of its arguments are going to be just the same like width=2, borderwidth=3 and relief=RIDGE. Things that will be changed are text as it is new in every button command which will be a new lambda function everywhere.
NOTE: LAMBDA OR ANONYMOUS FUNCTION IS A FUNCTION THAT CAN BE MADE WITHOUT NAMES AND UNLIKE REGULAR PYTHON FUNCTION IT CANNOT BE USED MORE THAN ONCE.
And all the configurations of all the buttons will be changed as every button needs a unique location on the window. So just match it with the above code.
Final statement:
app.mainloop()
Above is the last line of code which is mainloop() class of tkinter library which will handle all the user clicks and background threads.
Conclusion:
This is your GUI calculator using tkinter python.
Now just make it an .exe file
Step1: Install the Pyinstaller Package and make a folder
Code to install :
pip install pyinstaller
Step2: Save the python script to the folder
Step3: Using command prompt or PowerShell create the exe file
Code to do:
pyinstaller yourfilename.py
Step3: As exe file is created, click and run it.
Step4: Use the below code to make it OneFile
Code:
pyinstaller --onefile yourfilename.py
Step5: Move it to desktop to make it easily accessible
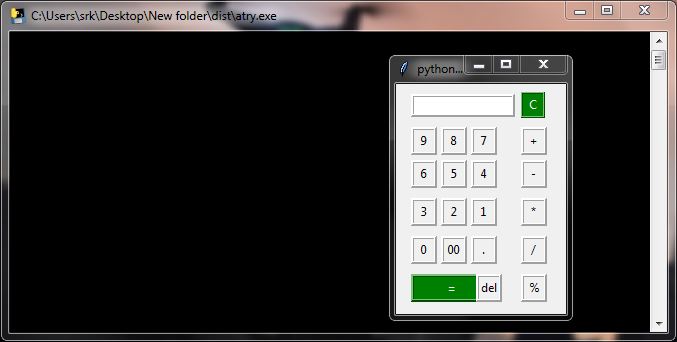
GUI calculator.exe using tkinter python
Voila! You have created your own GUI calculator.
If you face any problem with the program then feel free to ask in the comment section.
About:
I am Atulya Khatri a python geek. I love to learn different programming languages and different libraries and create stuff.
Images:
1st: photo by Shutterbug75 from pixabay.com
2nd: photo from author
Do share this with all your friends who you think need this.


Nice job. My only observation is that it failed to use Reverse Parenthetical Notation (RPN) like HP calculators. This method saves on strokes and is more efficient wrt memory and stack manipulation.
Good day, I'm having issue trying to delete from behind on my calculator. I implemented the piece of code you used but still it did not work. I would very much love if this issue can be resolved. I don't mind sending you a copy of my code. Thanks in advance
Nice job. Good. Bravo.