Virtual Zoom using OpenCV
This article was published as a part of the Data Science Blogathon.
Introduction
Zoom In! Zoom out!
OpenCV has revolutionized the entire image processing world. From image classification to object detection, not only we can do cool stuff with the OpenCV library but also, we can build top-notch applications. Today we are going to implement something interesting and fun, it is a kind of feature in all of our mobile phones or computers that is Image zooming. But here it is going to be virtual zooming of the desired image on the frame in real-time.
Table of Content
1. Requirements
2. Aim
3. Let’s Build
4. Conclusion
Requirements
For this project, we are going to use Virtual Zooming using the OpenCV library along with another library called Cvzone [1].
CVZone
It is a library that is built on top of OpenCV and MediaPipe. It makes things much easier for us. It has some very useful inbuilt functions like hand tracking, facial landmark detection, pose estimation and many more. These all can be done with just a few lines of code.
Let us write a piece of code to see the demo of the hand detector using CVZone. First, install the requirements. You can install it using the below command or you can install it one by one.
– pip install -r requirements.txt
or
– pip install opencv-python==3.4.11.43
– pip install cvzone==1.5.3
Now let us detect the hands.
import cv2
from cvzone.HandTrackingModule import HandDetector
# Input from webcam
frame = cv2.VideoCapture(0)
frame.set(3, 1280)
frame.set(4, 720)

# initialize hand detector module with some confidence
handDetector = HandDetector(detectionCon=0.8)

# loop
while True:
# Read the frames from webcam
res, img = frame.read()

# detect the hands, by default it will detect two hands
hands = handDetector.findHands(img)

# show the output
cv2.imshow("Sample CVZone output", img)
cv2.waitKey(1)
First, let us import the required modules, that is cv2 and from cvzone.HandTrackingModule we will import HandDetector. Then we will take input from the webcam using OpenCV’s Videocapture function. Set the height and width of the window and initialize the hand detector module with some detection confidence.
Then inside the loop read the input frames from the webcam and pass it to the method inside the hand detector module, that is findHands. Display the image.
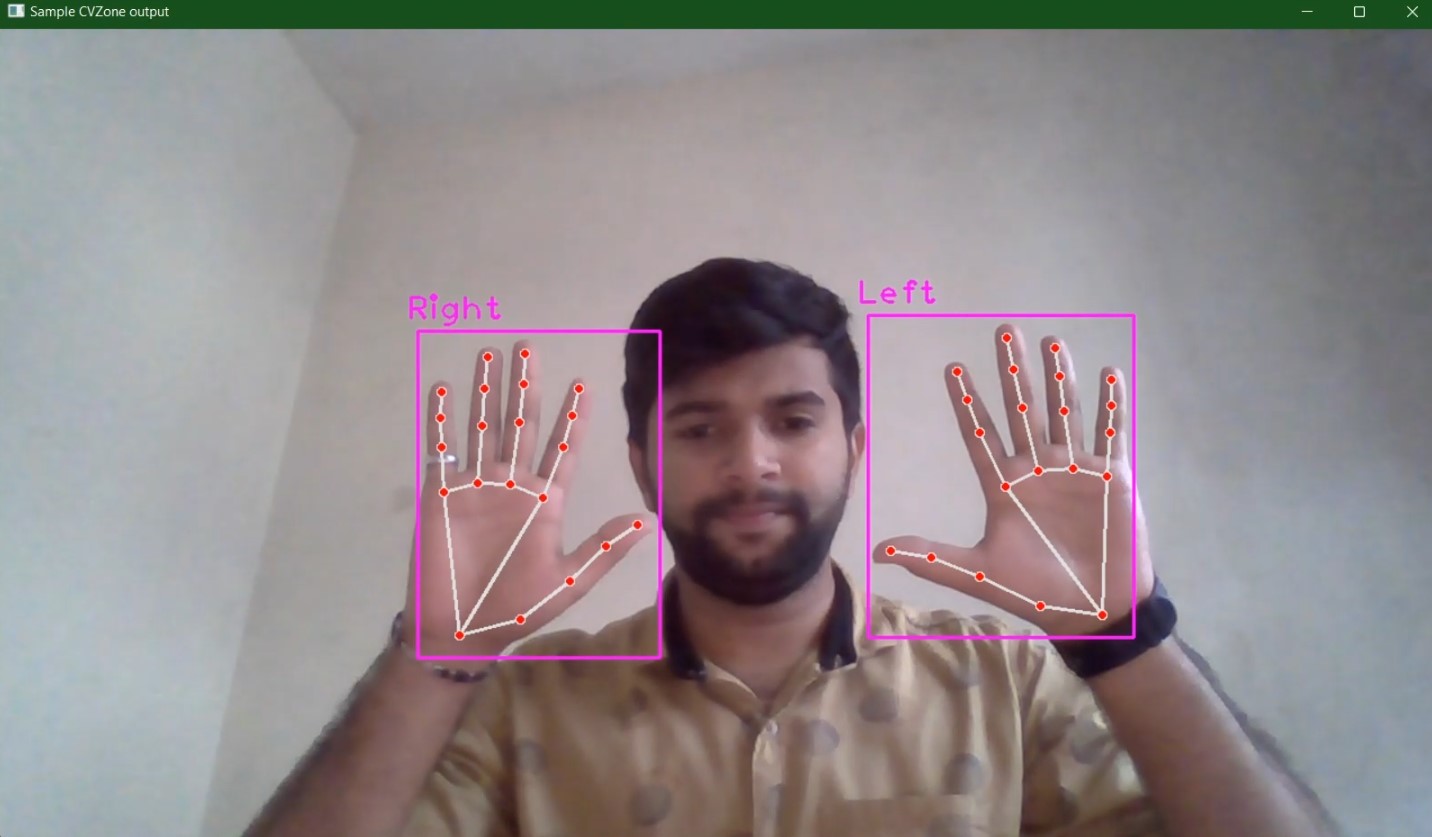
Source: Author
Similar to this we can implement facial landmark detection, pose estimation and so on using CVZone.
Aim
Our goal is to build a project where there is an image on the screen, virtual zooming using OpenCV and by using our hand gesture that is if the index finger and thumb finger of both hands are up and the hands are away from each other then, zoom in and if the index finger and thumb finger of both hands are up and the hands are close from each other then, zoom out that image or object. By keeping this in mind we will draw out some steps.
Procedure
· Initialize the input from the webcam.
· Set the height and width of the output window.
· Initialize hand detector module.
· Declare 4 variables for calculating distance, zoom range, centre X and centre Y respectively.
· Read the input frames.
· Detect the hands.
· Read the image used for zoom operation.
· Check if two hands are detected.
· Check if the index finger and thumb finger is up.
· Calculate the distance between two hands and adjust the image to be at the centre of both hands.
· Calculate new height and width then, resize the image.
· Display the output.
Source: Author
Let’s Build
Install the required libraries as mentioned in the previous section. Now let’s start.
First, import the required modules. Here we need only cv2 and cvzone’s hand detector module. After importing the libraries, take the input from the webcam using cv2.VideoCapture(0) where 0 is the webcam id. Then set the width and height of the output window. Here it is 1280 x 720.
import cv2
from cvzone.HandTrackingModule import HandDetector
# Input from webcam
frame = cv2.VideoCapture(0)
frame.set(3, 1280)
frame.set(4, 720)
Now, we will initialize the hand detector module (handDetector) with detection confidence 0.8 and will be used inside the while loop to detect the hands. Declare 4 variables, one to store the distance initially, it is None, one to zoom range, initially it is 0, and another 2 for capturing the centre X and centre Y for the zooming object and set some random values. Here in the code, the variables are distStart, zoom_range, cx, cy respectively.
# initialize hand detector module
handDetector = HandDetector(detectionCon=0.8)
distStart = None
zoom_range = 0
cx, cy = 500, 500
Start a while loop and, from now on everything should be inside this loop. Read the input from the webcam and, using the initialized hand detector module above, we can call a method findHands passing the frame as input. This method will find the hands in the frame, default it can detect two hands in the frame and returns a list of hands
from which we can access each detected hand (here: hands[0] for one hand and hands[1] for another hand) and also, it returns the image. Then we will read the image to be zoomed on the screen using OpenCV’s imread() function. Preferably the image size should be under (250, 250) if not you can resize it using cv2.resize(img, (250,250)). Here the image size is (225, 225).
while True:
    # Read the input frame
    res, img = frame.read()
    # Detect the hands
    hands, img = handDetector.findHands(img)
    # Image to be zoomed
    new_img = cv2.imread('resized_test.jpg')
Now, we need to check if there are two hands in the frame then, we will check if the index finger and the thumb finger are up, this can be easily done using a method called fingersUp() inside the hand detector module. In the below code after the first if statement, we will use two print statements, print(handDetector.fingersUp(hands[0])) this will print a list of 5 elements if the index and thumb finger is up then, the resulting list will be [1, 1, 0, 0, 0] for one hand and similarly for another hand do print(handDetector.fingersUp(hands[1])). Refer to below image.
# if two hands are detected
if len(hands) == 2:
    print("Start Zoom...")
    print(handDetector.fingersUp(hands[0]))
    print(handDetector.fingersUp(hands[1]))
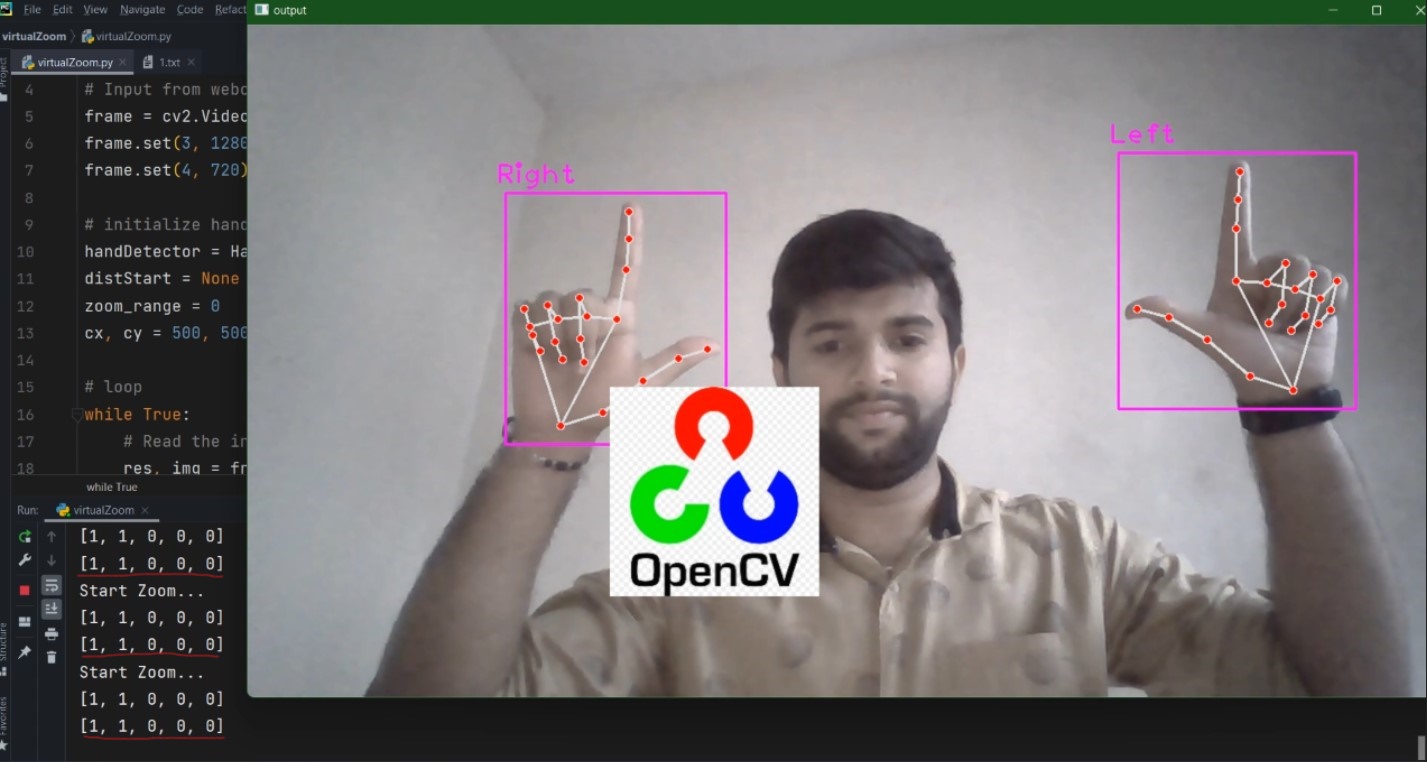
Source: Author
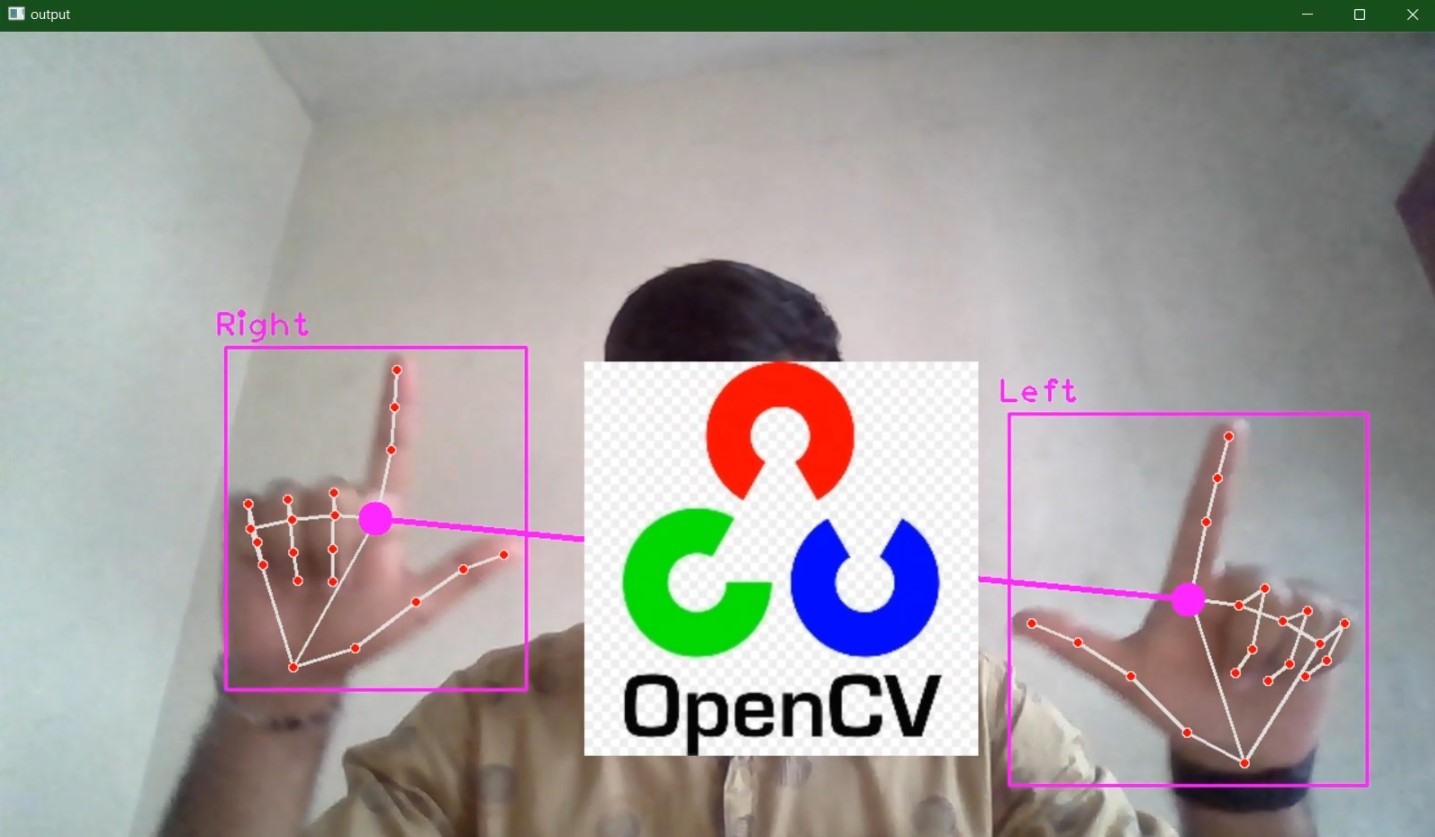
Then comes the important part, now we need to check if the index and thumb fingers of both hands are upwards. Again we will use a if statement (inside the first if statement: if handDetector.fingersUp(hands[0]) == [1, 1, 0, 0, 0] and handDetector.fingersUp(hands[1]) == [1, 1, 0, 0, 0]:) Then find the distance between the two hand, specifically between two point of the index fingers. In the below code, the findDistance() method will find the distance, here we are passing the centre of two hands as parameters along with the frame. The findDistance() method will return three items distance, a tuple containing centre X and centre Y at positions 4 and 5 and the image.
Assign the obtained distance to the distStart variable which we declared earlier the third if the condition is executed only if the distStart is None. Then, calculate the new distance and subtract it from the old distance that is distStart and perform floor division by 2 to obtain the zoom range. Then assign the centre coordinates to the variable cx, cy. Then if there are no two hands in the frame reset the distStart variable to None.
Source: Author
if handDetector.fingersUp(hands[0]) == [1, 1, 0, 0, 0] and handDetector.fingersUp(hands[1]) == [1, 1, 0, 0, 0]:
        # print("Start Zoom...")
        lmList1 = hands[0]['lmList']
        lmList2 = hands[1]['lmList']
        # point 8 is tip of the index finger
        if distStart is None:
            # length, info, img = handDetector.findDistance(lmList1[8], lmList2[8], img)
            # draw the connection points between right hand index and thum finger to left hand
            length, info, img = handDetector.findDistance(hands[0]['center'], hands[1]['center'], img)
            # print(length)
            distStart = length
# length, info, img = handDetector.findDistance(lmList1[8], lmList2[8], img)
length, info, img = handDetector.findDistance(hands[0]['center'], hands[1]['center'], img)
 # info gives center x and center y
# calculate the zoom range
zoom_range = int((length - distStart) // 2)
 # calculate the center point so that we can place the zooming image at the center
cx, cy = info[4:]
 print(zoom_range)

else:
distStart = None
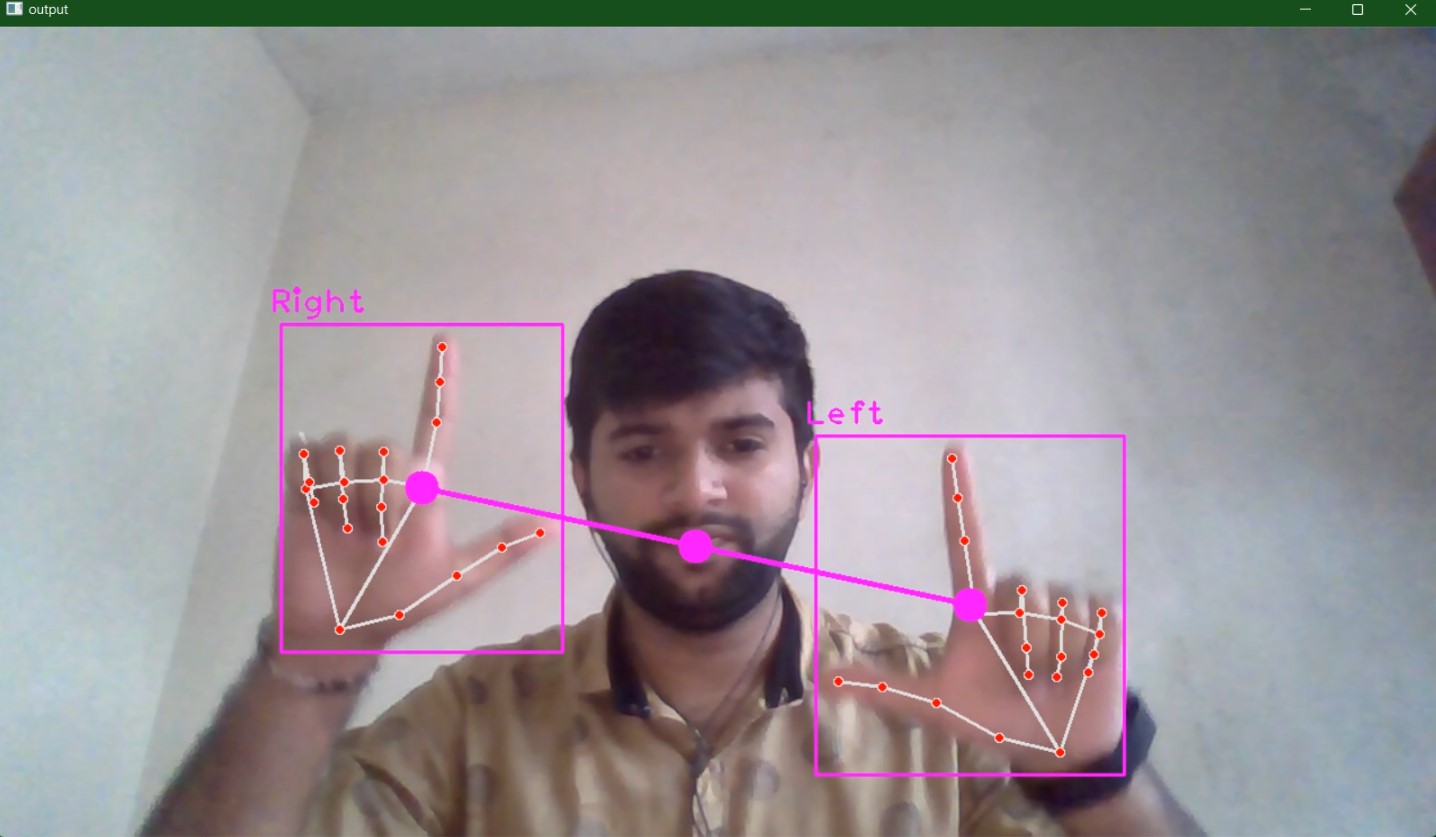
Then get the height and width of the image to be zoomed in and calculate the new height and width for the image. This is kind of tricky, to get the new height and width we need to add the previous height and width of the image to the zoom range and perform floor division followed by multiplication with 2. Then dynamically we can find the position to place the zoomed image (here: img[cy – newH // 2:cy + newH // 2, cx – newW // 2:cx + newW // 2]). But there is one more problem, if the zoomed image gets below the window margin, it will through an error, to resolve this issue we will use try and except. Pretty much that’s it. Then display the output.
try:
    h, w, _ = new_img.shape
# new height and new width
newH, newW = ((h + zoom_range) // 2) * 2, ((w + zoom_range) // 2) * 2
new_img = cv2.resize(new_img, (newW, newH))

 # we want the zooming image to be center and place it approx at the center
img[cy - newH // 2:cy + newH // 2, cx - newW // 2:cx + newW // 2] = new_img

except:
pass

# display output
cv2.imshow('output', img)
cv2.waitKey(1)
Complete code is also available in my GitHub:
https://github.com/BakingBrains/Virtual_Zoom_usinf_OpenCV.git
Conclusion
That’s it for this blog on Virtual Zooming using OpenCV. If you want to improvise this and make it even more interesting, you can keep some number of images on the screen and select one at a time and zoom it or you can create different shapes and use a different hand gesture to make it big or small. This is how we can implement virtual zooming using OpenCV.
Read more articles on OpenCV on our blog.
Thank you for reading my article on Virtual Zooming using OpenCV. Hope you liked it.
References:
[1]. https://github.com/cvzone/cvzone# https://en.wikipedia.org/wiki/OpenCV
The media shown in this article is not owned by Analytics Vidhya and are used at the Author’s discretion.
I am an enthusiastic AI developer, I love playing with different problems and building solutions.


