Building a Food Image Classifier using Fastai
This article was published as a part of the Data Science Blogathon.
Background
Social Media platforms are a common way to share interesting and informative images. Food images, especially related to different cuisines and cultures, are a topic that appears to be frequently trending. Social media platforms like Instagram have a large number of images belonging to different categories. We all might have used the search options on google images or Instagram to browse through yummy-looking cake images for ideas. But to make these images available via search, we need to have some relevant tags for each image.
This makes it possible to search the keyword and match it with the tags. Since it is extremely challenging to label each and every image manually, companies use ML and DL techniques to generate correct labels for images. This can be achieved using an image classifier that identifies and labels the image based on some labelled data.
In this article, let us build an image classifier using fastai and identify a few food images using a library called ‘fastai‘.
Introduction to Fastai
Fastai is an open-source Deep Learning library that offers practitioners high-level components that can produce state-of-the-art results in conventional deep learning domains rapidly and effortlessly. It gives researchers low-level components to mix and combine to create new techniques. It aims to accomplish both without compromising usability, flexibility, or performance.
Because fastai is written in Python and based on PyTorch, knowledge of Python is required to understand this article. We will run this code in Google Colab. In addition to fastai, we will use a graphics processing unit (GPU) to get results as fast as possible.
Building an Image Classifier using Fastai
Let’s start by installing the fastai library with the following command:
!pip install -Uqq fastai
Run the following command if you’re using Anaconda:
conda install -c fastchan fastai anaconda
Let us import the packages we need for the classification task. The library is divided into modules, the most common of which are tabular, text, and vision. Because our task at hand includes vision, let’s import all of the functions we’ll need from the vision library.
from fastai.vision.all import *
A lot of academic datasets are available through the fastai library. One of them is FOOD, which is listed under URLs. FOOD.
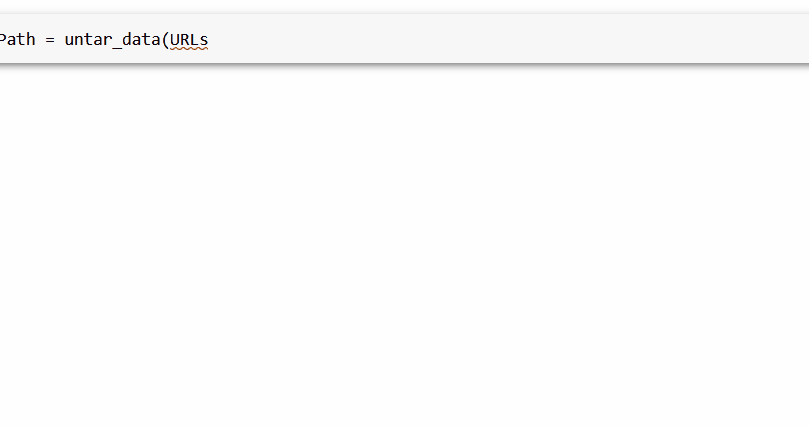
The first step is to obtain and extract the data that we require. We will use the untar_data function, which will automatically download the dataset and untar it.
foodPath = untar_data(URLs.FOOD)
This dataset contains 101,000 images divided into 101 food categories, with 250 test images and 750 training images per class. The images from the training were not cleaned. All images were resized to a maximum of 512 pixels on each side. You can download the dataset from here.
The next command will tell us how many images we have to deal with.
len(get_image_files(foodPath))
Furthermore, using the following command, we will print the contents of the meta-directory of the Food dataset.
print(os.listdir(foodPath))
The meta folder contains eight files, four of which are text files: train.txt, test.txt, classes.txt, and labels.txt. The train.txt and test.txt files include a list of images for the training and test sets, respectively. The classes.txt file, on the other hand, includes a list of all food classes and labels. txt provides a list of all food image labels. The directory also contains a .h5 file with a pre-trained model and an images folder with 101,000 images in JPG format. Finally, the train and test sets are provided in JSON format.
To view all the image categories, we will run the following command:
image_dir_path = foodPath/'images'
image_categories = os.listdir(image_dir_path)
print(image_categories)
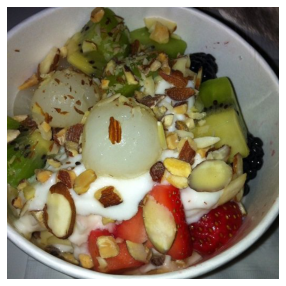
Then, we’ll execute the following command to see a sample image from the collection of 101,000 images.
img = PILImage.create('/root/.fastai/data/food-101/images/frozen_yogurt/1942235.jpg')
img.show();
We will read the train and test files in JSON format using the pandas function. JSON is a data format that stores information in a human-readable form. The following code reads the train.json file from the directory and saves the result in the df_train dataframe.
The header of the dataframe can then be printed using the head() function as shown below.
df_train=pd.read_json('/root/.fastai/data/food-101/train.json')
df_train.head()

Similarly, by using the pandas function, we will read the test.json file and store it in the df_test dataframe.
df_test=pd.read_json('/root/.fastai/data/food-101/test.json')
df_test.head()
We are creating three labels with food names of our choice to classify the food images.
labelA = 'cheesecake'
labelB = 'donuts'
labelC= 'panna_cotta'
Now we will create a for loop which will run through all the images that we have downloaded. With the help of this loop, we are removing the images that don’t have labels A, B, or C. Also, we are renaming the images with their respective labels by using the following function.
for img in get_image_files(foodPath):
  if labelA in str(img):
   img.rename(f"{img.parent}/{labelA}-{img.name}")
  elif labelB in str(img):
    img.rename(f"{img.parent}/{labelB}-{img.name}")
  elif labelC in str(img):
    img.rename(f"{img.parent}/{labelC}-{img.name}")
  else: os.remove(img)
Let’s check the count of images we get after running the loop by using the following command:
len(get_image_files(foodPath))
Let’s try out one sample label among the three chosen food dishes and see if the renaming is done correctly or not.
def GetLabel(fileName):
 return fileName.split('-')[0]
GetLabel("cheesecake-1092082.jpg")
Output:
The following code generates a DataLoaders object, which represents a mix of training and validation data.
dls = ImageDataLoaders.from_name_func(
    foodPath, get_image_files(foodPath), valid_pct=0.2, seed=42,
    label_func=GetLabel, item_tfms=Resize(224))

dls.train.show_batch()
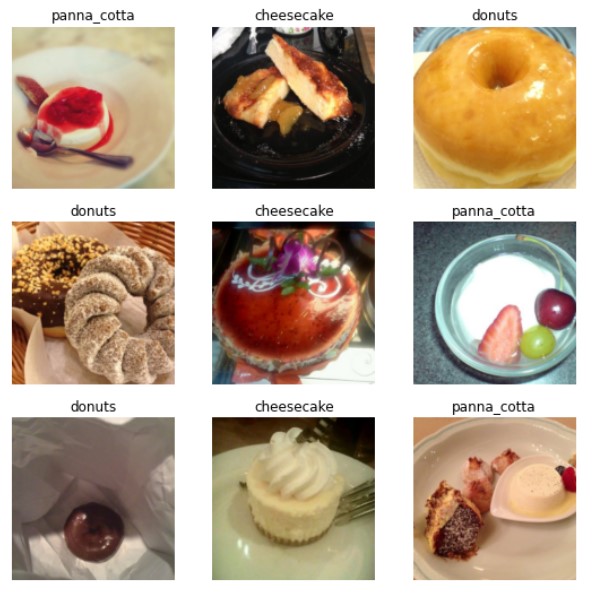
In this case, we will-
- Use the path option to specify the location of the downloaded and extracted data.
- Use the get_image_ files function to collect all file names from the specified location.
- Use an 80–20 split for the dataset.
- Extract labels from file names using the GetLabel function.
- Resize all images to the same size, i.e., 224 pixels.
- Use the show_batch function to generate an output window displaying a grid of training images with assigned labels.
It’s time to put the model through its places. Using the ResNet34 architecture, we will build a convolutional neural network by focusing on a single function call known as vision_learner (). The vision_learner function (also known as cnn_learner) is beneficial for training computer vision models. It includes your original image dataset, the pre-trained model resnet34, and a metric error rate, which determines the proportion of images identified incorrectly on validation data. The 34 in resnet34 refers to the number of layers in this architectural type (other options are 18, 50, 101, and 152). Models that use more layers require longer to train and are more prone to overfitting.
Fastai provides a ‘fine_tune’ function for tuning the pre-trained model to solve our specific problem using the data we’ve chosen. For training the model, we will set the number of epochs to 10.
learn = vision_learner(dls, resnet34, metrics=error_rate, pretrained=True)
learn.fine_tune(epochs=10)
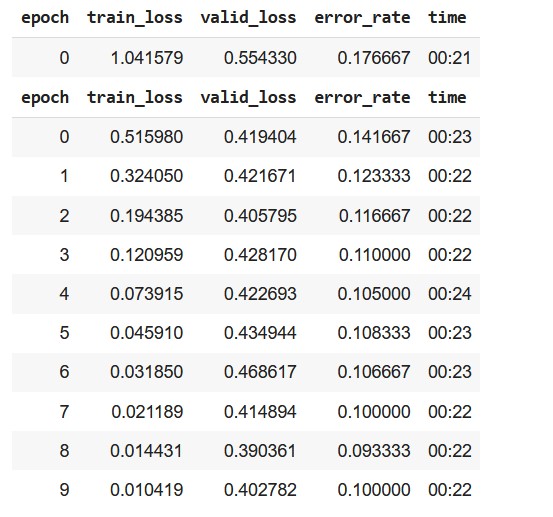
The same model can also be checked for accuracy by replacing the metrics with ‘accuracy.’
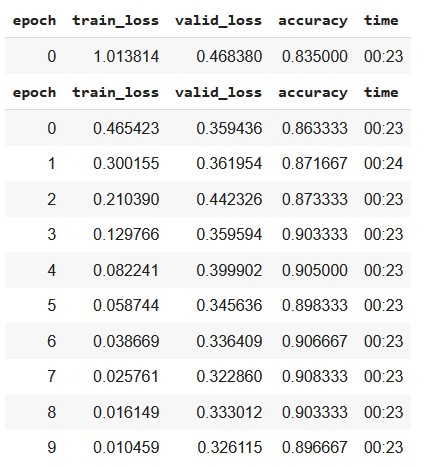
From the above results, we can say that even with just 10 epochs, the pre-trained ResNet34 model shows good accuracy of >85% for a multi-label classification task. If we increase the number of epochs, the model’s accuracy might likely improve.
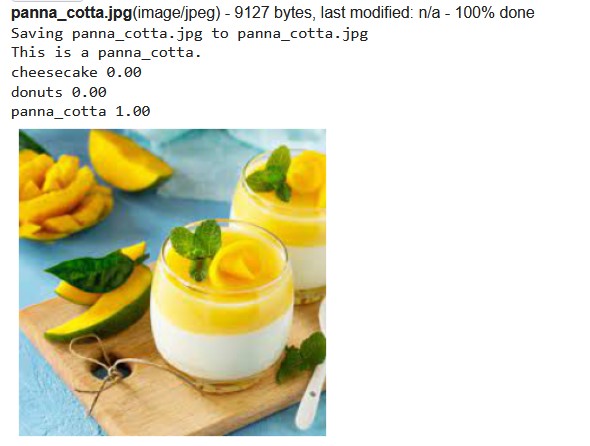
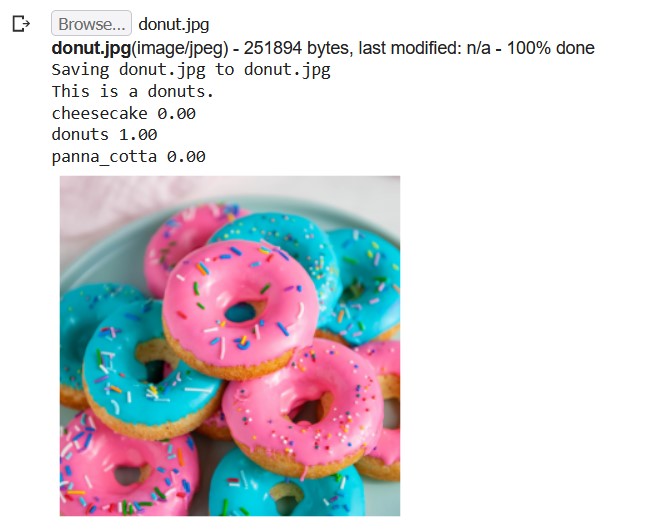
Now, let us test a few sample images to check how our model performs.
Sample image #1
Sample image #2
Sample image #3
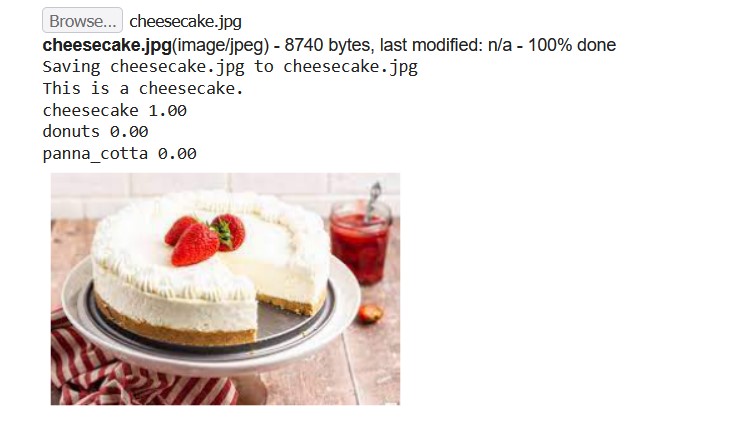
From the above results, we can say that our model was able to correctly identify the sample images.
After training the model, we can deploy it as a web application for others to use. Although fastai is primarily intended for model training, you can quickly export the PyTorch model for use in production using the ‘learn.export’ function. The code for this tutorial is available on my GitHub repository.
Conclusion
In this tutorial, we learned how to build a food image classifier using fastai based on PyTorch. It is possible to deploy this model using a service like Heroku or Netlify to make this model available as a web app.
Here are some key takeaways from this article-
- We can set up deep learning models with minimal code using fastai. Hence, fastai makes it easier to use PyTorch for deep learning tasks.
- Food Classification is a challenging task for computer vision applications as the same food can look considerably different from place to place depending on the way it is garnished and served. Still, by leveraging the power of transfer learning, we can use a pre-trained model to identify a food item and classify it correctly.
- We used a pre-trained model, ResNet34, for this classifier. However, you can use another pre-trained model like VGG, Inception, DenseNet, etc., to build your own model.
Hope you liked my article on image classifier using fastai. Share in the comments below?
The media shown in this article is not owned by Analytics Vidhya and is used at the Author’s discretion.


