Create Gradio Demo for Speaker Verification
This article was published as a part of the Data Science Blogathon.
In this article, we will build an app for Speaker Verification using UniSpeech-SAT and X-Vectors. We will leverage the Gradio Python package for creating a web interface for the model and deploy our app on Hugging Face Spaces.
Introduction on Speaker Verification
Have you ever been in a situation where you felt compelled to do Speaker verification? If you answered yes, and even if you’re just curious about this topic, this post is for you. In this blog post, I’ll show you how to use UniSpeech-SAT and X-Vectors to make a basic Speaker Verification app. To set the records straight, while I cannot promise that this is the finest application for Speaker verification or that it is spoof-proof, here’s my attempt at creating an app that verifies if the two audios are from the same individual. If this is something that piques your interest, please continue reading.
Tools Used
- The UniSpeech-SAT base model for Speaker Verification
- Gradio
- Hugging Face Spaces
Core Idea
Researchers from Harbin Institute of Technology and Microsoft Corporation proposed Universal Speech representation learning with Speaker Aware pre-Training (UniSpeech-SAT). For improving the unsupervised speaker information extraction, two approaches namely the utterance-wise contrastive learning and utterance mixing augmentation were introduced. These approaches are integrated into the HuBERT framework. The former, utterance-wise contrastive learning, is used to improve single-speaker information extraction to improve downstream tasks such as speaker verification and identification. The latter, namely utterance mixing augmentation, is especially useful for multi-speaker tasks eg. speech diarization. The utterance mixing method attempts to simulate multi-speaker speech for self-supervised pertaining when only single-speaker pre-training data is available.
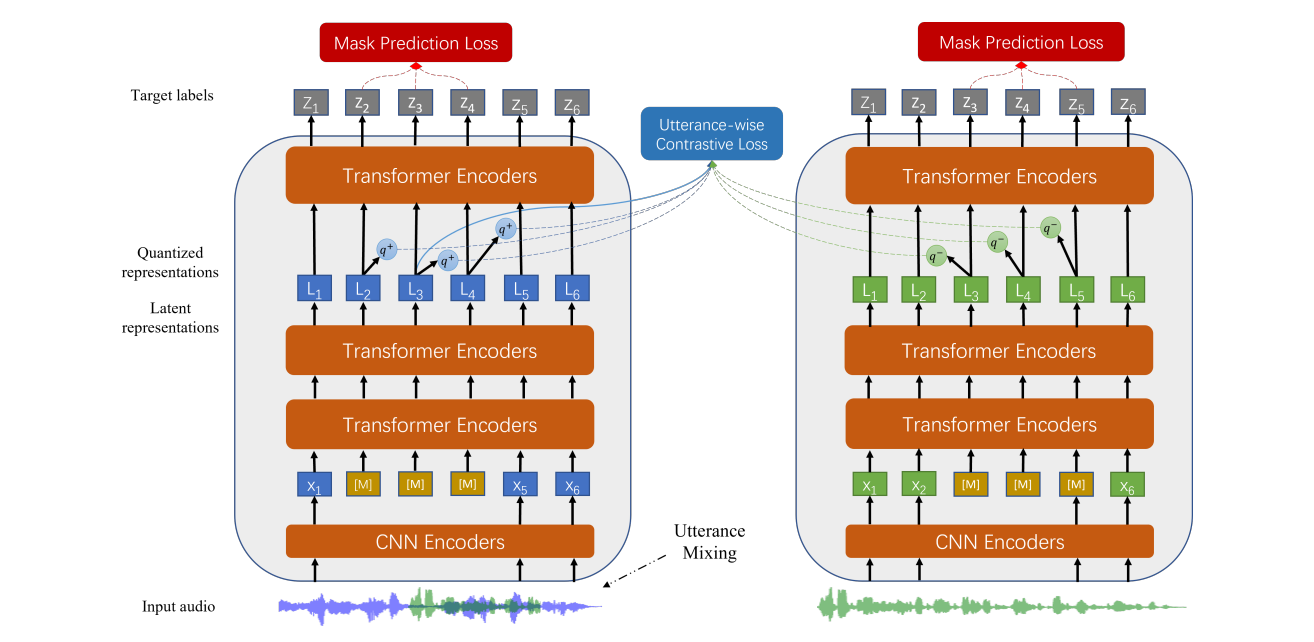
We will be using the UniSpeech-SAT-Base model from the Hugging Face model hub for creating a speaker verification app. The model was pre-trained on 60,000 hours of Libri-Light, 10,000 hours of GigaSpeech, and 24,000 hours of VoxPopuli, wherein the speech audios were sampled at 16 kHz with utterance and speaker contrastive loss. As a result, it’s critical to make sure the speech input is also sampled at 16 kHz. Furthermore, The model is fine-tuned on the VoxCeleb1 dataset using an X-Vector head with an Additive Margin Softmax loss.
Furthermore, we will utilize Gradio‘s Interface class to establish a UI for the machine learning model and deploy our app on Hugging Face Spaces.
The app will take two speech samples as input and apply the sox effects on both audios, then retrieve features from both audios, and finally calculate the cosine similarity. If the cosine similarity score exceeds the threshold value we set, both audios are from the same individual; otherwise, speaker verification/authentication fails.
Step-by-step Implementation
The following is a step-by-step guide to creating a Speaker Verification app using Gradio and Hugging Face Spaces.
Step 1: Creating a Hugging Face Account and Setting up a New Space
If you don’t already have a Hugging Face account, please go visit the website and create one. After you’ve created an account, go to the top-right side of the page and click on the profile icon, and then the ‘New Space’ button. Then you’ll be directed to a new page where you’ll be asked to name the repository you’re going to establish. Give the space a name, and then choose ‘Gradio’ from the SDK options before clicking the ‘create new space’ button. As a result, your app’s repository will be built. You can watch the demo video that has been included below.
Step 2: Creating a Requirements.txt file
Now we will create a requirements.txt file in which we will list the Python packages that our app will need to execute. Those dependencies will be installed through pip install -r requirements.txt in the backend.
Step 3: Creating app.py File
For this segment, I’ve broken down the code into sections for clarity and to make things easier to understand. We’ll go over the code one by one as we go.
1. Import Necessary Libraries
We will start by importing the necessary dependencies. The AutoFeatureExtractor class will help in the extraction of audio features, while the AutoModelForAudioXVector class will load the pre-trained model (“microsoft/unispeech-sat-base-plus-sv”) for audio retrieval via the X-vector head.
#Importing all the necessary libraries
import torch
import gradio as gr
from torchaudio.sox_effects import apply_effects_file    #for applying the sox effects to the audio input files
from transformers import AutoFeatureExtractor, AutoModelForAudioXVector
2. Check if the Cuda is Available or Not
It is a general practice in PyTorch to set up a variable called “device” that will hold the device we’re training on (CPU or GPU). As a default, the tensors are created on the CPU, and the model is also initialized on the CPU. As a result, one has to manually ensure that the actions are performed on the GPU if one wants to leverage GPUs for fast computation.
PyTorch provides an easy-to-use API for transferring tensors created on the CPU to the GPU. The new tensors are formed on the same device as the parent tensor. For the model, the same rationale applies. As a result, the data and model must be transferred to the available device. However, if you do not have a premium subscription plan, you will only be able to use CPU accelerated inference. In that case, the model and the tensors will be directed to the CPU.
device = "cuda" if torch.cuda.is_available() else "cpu"
3. Define the Effect to be Applied to the Audio File(s)
We will now specify the audio effects that will be used. We favor mono-channel audio because it does not produce a stereophonic wide effect, which is why the channels have been merged into one. Also, as previously stated, because our model was pre-trained on speech audios sampled at 16 kHz, we must ensure that the speech input is sampled at 16 kHz as well.
EFFECTS = [
    ['remix', '-'],        # to merge all the channels
    ["channels", "1"],     #channel-->mono
    ["rate", "16000"],     # resample to 16000 Hz
    ["gain", "-1.0"],      #Attenuation -1 dB
    ["silence", "1", "0.1", "0.1%", "-1", "0.1", "0.1%"],
    #['pad', '0', '1.5'],  # for adding 1.5 seconds at the end
    ['trim', '0', '10'],   # get the first 10 seconds
]
4. Load the Model and the corresponding Feature Extractor, and Set a Threshold Value Which Will be Used as Reference to Estimate if two Audios Belong to the Same Speaker or Not
model_name = "microsoft/unispeech-sat-base-plus-sv"
feature_extractor = AutoFeatureExtractor.from_pretrained(model_name)
model = AutoModelForAudioXVector.from_pretrained(model_name).to(device)
#Setting the threshold value
THRESHOLD = 0.85
cosine_similarity = torch.nn.CosineSimilarity(dim=-1)
5. Define a Function that will Evaluate the Cosine Similarity of two Signals
Now we will create a function that takes audio streams from two different file directories. At this stage, the sox effects will be applied to both audios, after which features from both audios will be retrieved, and finally, the cosine similarity will be calculated. I recommend you take a look at this tutorial, which explores Cosine Similarity in detail.
When the cosine similarity score exceeds the threshold value we set, both audios are from the same person; otherwise, speaker verification/authentication fails.
def similarity_fn(path1, path2):
  if not (path1 and path2):
    return 'ERROR: Please record audio for *both* speakers!'
  #Applying the effects to both the audio input files
  wav1, _ = apply_effects_file(path1, EFFECTS)
  wav2, _ = apply_effects_file(path2,EFFECTS)
  #Extracting features
  input1 = feature_extractor(wav1.squeeze(0), return_tensors="pt", sampling_rate=16000).input_values.to(device)
  input2 = feature_extractor(wav2.squeeze(0), return_tensors="pt", sampling_rate=16000).input_values.to(device)
  with torch.no_grad():
    emb1 = model(input1).embeddings
    emb2 = model(input2).embeddings
  emb1 = torch.nn.functional.normalize(emb1, dim=-1).to(device)
  emb2 = torch.nn.functional.normalize(emb2, dim=-1).to(device)
  similarity = cosine_similarity(emb1, emb2).numpy()[0]
  if similarity>= THRESHOLD:
    return f"Similarity score is {similarity :.0%}. Audio belongs to the same person "
  elif similarity< THRESHOLD:
    return f"Similarity score is {similarity:.0%}. Audio doesn't belong to the same person. Authentication failed!"
6. Create a UI For Model Using Gr.Interface
Next, we will utilize Gradio’s Interface class to establish a UI for the machine learning model by providing (1) the function, (2) the desired input components, and (3) the desired output components, which will allow us to quickly prototype and test our model. In our case, the function is similarity_function. We will provide two audio streams since we want to accomplish speaker verification by evaluating the cosine similarity scores of the two audios. For providing the audio input, we will use microphones or two different file paths. Since the intended output is a string we will use output=’gr.outputs’. For displaying the string output, use Textbox(label=”Output Text”). Finally, to launch the demo, call the launch() method. In addition, we will set enable_queue = True to force inference requests to be served in a queue rather than in parallel threads. To avoid timeout, longer inference times (> 1 minute) are required.
⚠️Additionally, if you wish to test the audio files stored locally, make sure that audios have been uploaded and that the path to those files is provided in examples (as shown in the code snippet below). It’s worth noting that the components can be given either as instantiated objects or as string shortcuts.
To upload audio files, go to “Files and versions” –> “Contribute” –> “Upload Files” in the order stated here.
inputs = [
    gr.inputs.Audio(source="microphone", type="filepath", optional=True, label="Speaker #1"),
    gr.inputs.Audio(source="microphone", type="filepath", optional=True, label="Speaker #2"),
]
outputs = gr.outputs.Textbox(label="Output Text")
description = (
    "This app evaluates whether the given audio speech inputs belong to the same individual based on Cosine Similarity score. "
)
interface = gr.Interface(
    fn=similarity_fn,
    inputs=inputs,
    outputs=outputs,
    title="Voice Authentication with UniSpeech-SAT + X-Vectors",
    description=description,
    layout="horizontal",
    theme="grass",
    allow_flagging=False,
    live=False,
    examples=[
        ["cate_blanch.mp3", "cate_blanch_2.mp3"],
        ["cate_blanch.mp3", "denzel_washington.mp3"]
    ]
)
interface.launch(enable_queue=True)
If you run into an error, head straight to the “See log” tab, which is located right next to the spot where Runtime Error is shown.
Once the Space is up and running error-free, it should function as follows:
⚠️Note: Because we set the threshold value to 0.85, our app will prompt “Authentication failed” if the cosine similarity score falls below this value.
Link to the Space: https://huggingface.co/spaces/DrishtiSharma/Speaker-Verification-using-UniSpeech-SAT-and-XVectors
Challenges
- Challenging audio – this could be due to a variety of reasons such as low pitch, audio with low SNR, etc.
- Spoofing attacks via various means, including generative models
- Multiple sources of speech and far-field audio capture
- Distinct phonation styles
- Speech Modality
Solutions
There is a pressing need to develop more robust and intelligent solutions. To meet this need, perhaps speech/audio-based authentication can be combined with textual/visual/touch-based authentication to create a multi-modal authentication system.
Applications
- Access control: Many on-site applications, eg. access management to cars, homes, warehouses, and computer terminals, can benefit from speaker verification.
- Remote applications like telecom networks, databases, websites, e-trade, banking transactions, digital time and attendance logging, and other confidential transactions can gain from this.
- Forensics investigations and personalization.
- Information Retrieval
Conclusion on Speaker Verification
Hence in this blog, we created a Speaker verification app that uses a cosine similarity score to determine if two audios are from the same person. The future scope of the work may include combining speech/audio-based authentication with textual/visual/touch-based authentication to create a multi-modal authentication system.
To sum it up, the key takeaways from this article for all of us are as follows:
- We learned how to create a speaker verification app using UniSpeech-SAT and X-Vectors. We also leveraged Gradio‘s Interface class to establish a UI for the machine learning model and deploy our app on Hugging Face Spaces.
- We looked into challenges encountered in developing robust speaker verification solutions.
- We also learned how a speech verification system could be made more robust.
- Lastly, we explored the potential applications of a Speaker Verification app.
Thanks for reading. If you have any questions or concerns, please post them in the comments section below. Happy Learning!
The media shown in this article is not owned by Analytics Vidhya and is used at the Author’s discretion.


