Fine-tune BERT Model for Named Entity Recognition in Google Colab
This article was published as a part of the Data Science Blogathon.
Introduction
Named Entity Recognition is a major task in Natural Language Processing (NLP) field. It is used to detect the entities in text for further use in the downstream tasks as some text/words are more informative and essential for a given context than others. It is the reason NER is sometimes referred to as Information retrieval, as extracting relevant keywords from the text and classifying them into required classes.
With the help of Named Entity Recognition, we can extract people, places, organizations, etc. in general and for a specific domain also, such as clinical terms, medications, diseases, and many more from medical records for better diagnosis.
Prerequisites
- Working knowledge of Python and training neural networks using Pytorch
- Knowledge about Transformers and BERT architecture
Bidirectional Encoder Representations from Transformers (BERT)
BERT is a general-purpose language pre-trained model on a large dataset, which can be fine-tuned and used for different tasks such as sentimental analysis, question answering system, named entity recognition, and others. BERT is the state-of-the-art method for transfer learning in NLP.
Please check the following source link to understand the BERT Architecture in detail.
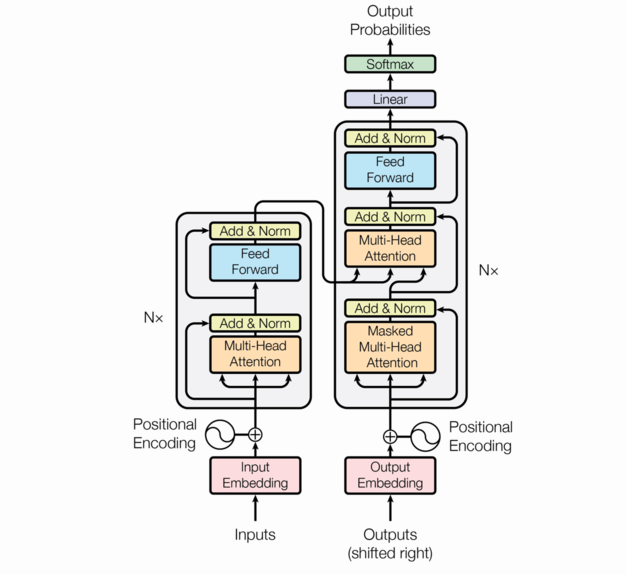
Source: Transformer Architecture(https://arxiv.org/pdf/1706.03762.pdf)
Also, if you want to learn about sentiment analysis using transformers, then check out my previous blog.
Implementation
First, enable the GPU in Google Colab, Edit -> Notebook Settings -> Hardware accelerator -> Set to GPU
We need to install the necessary libraries to work with the HuggingFace transformer
!pip install datasets -q
!pip install tokenizers -q
!pip install transformers -q
!pip install seqeval -q
- datasets library to fetch data
- tokenizers to preprocess the data
- transformers to fine-tune the models
- seqeval to compute model metrics
Dataset
We will be using an English language NER dataset from the HuggingFace datasets module for this article. It follows the BIO (Beginning, Inside, Outside) format for tagging sentence tokens for the Named Entity Recognition task.
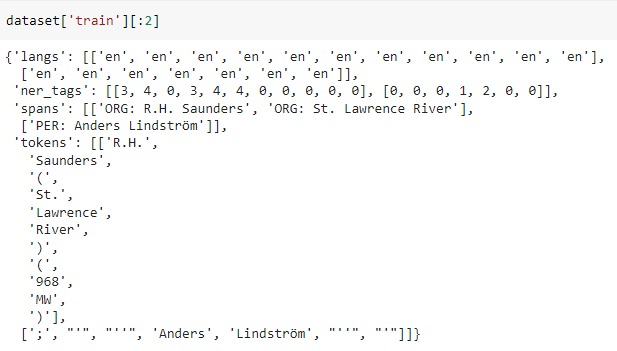
The dataset contains 3 sets of data, train, validation, and test. It consists of tokens, ner_tags, langs, and spans. The ner_tags have ids corresponding to BIO format, I-TYPE, which means the word is inside a phrase of type TYPE. Only if two phrases of the same type immediately follow each other, the first word of the second phrase will have the tag B-TYPE to show that it starts a new phrase. A word with the tag O is not part of a phrase.
There is a total of 4 classes, Person(PER), Organization(ORG), Location(LOC), and others(O).
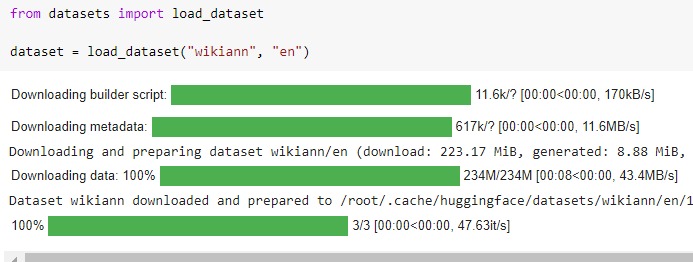

The train set has 20000 samples and the validation and test set have 10000 samples each.
Data Processing
The dataset looks as follows, It has four keys – ‘tokens’, ‘ner_tags’, ‘langs’, ‘spans’
Data needs to be processed in a format required by the transformers model.
- Bert expects input in `input_ids`, `token_type_ids` and `attention_mask` format
- The label also requires adjustment due to subword tokenization used by BERT
We will process the tokens using distilbert-base-uncased pretrained model tokenizer,
from transformers import AutoTokenizer
tokenizer = AutoTokenizer.from_pretrained("distilbert-base-uncased")
Let’s see why we need to adjust the labels according to tokenization output.
def tokenize_function(examples):
    return tokenizer(examples["tokens"], padding="max_length", truncation=True, is_split_into_words=True)
tokenized_datasets_ = dataset.map(tokenize_function, batched=True)
- `padding` is set to max_length, to pad the sequence to max length in the dataset
- `truncation` is set to True, to truncate any sequence which has a length greater than the accepted model maximum length (512 for bert)
- `is_split_into_words` is set to True, as the dataset contains the tokens instead of text
If we check the length of the `input_ids` and `ner_tags` of tokenized_datasets_, it will not match

This is the reason we require to adjust the labels according to the tokenized output.
#Get the values for input_ids, attention_mask, and adjusted labels

def tokenize_adjust_labels(samples):

tokenized_samples = tokenizer.batch_encode_plus(samples["tokens"], is_split_into_words=True, truncation=True)


total_adjusted_labels = []


for k in range(0, len(tokenized_samples["input_ids"])):

prev_wid = -1

word_ids_list = tokenized_samples.word_ids(batch_index=k)

existing_label_ids = samples["ner_tags"][k]

i = -1

adjusted_label_ids = []

for word_idx in word_ids_list:

# Special tokens have a word id that is None. We set the label to -100

# so they are automatically ignored in the loss function.

if(word_idx is None):

adjusted_label_ids.append(-100)

elif(word_idx!=prev_wid):

i = i + 1

adjusted_label_ids.append(existing_label_ids[i])

prev_wid = word_idx

else:

label_name = label_names[existing_label_ids[i]]

adjusted_label_ids.append(existing_label_ids[i])


total_adjusted_labels.append(adjusted_label_ids)


#add adjusted labels to the tokenized samples

tokenized_samples["labels"] = total_adjusted_labels

return tokenized_samples
The `tokenize_adjust_labels` function takes samples(raw dataset object) as input and tokenizes using the tokenizer object. To understand the `word_ids`, consider the following example

Here, we can see that ids 2 and 5 are repeated twice due to sub-word tokenization so we will repeat the label for the sub-words.
We will set the `label` to -100 for special tokens as `word id` is None for them and this will be automatically ignored in the loss function.
We will apply the `tokenize_adjust_labels` to the entire dataset using the `map` function.
tokenized_dataset = dataset.map(tokenize_adjust_labels, batched=True, remove_columns=['tokens', 'ner_tags', 'langs', 'spans'])
We will remove the columns which are not needed using the `remove_columns` parameter.
Below is what our `tokenized_dataset` contains
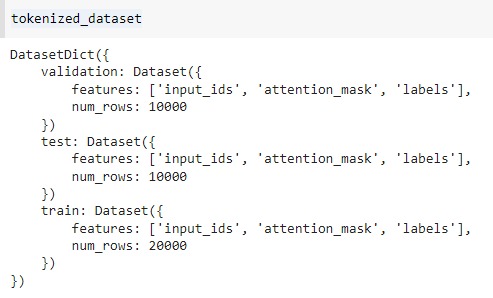
Now, Let’s see some samples from the tokenized_dataset,
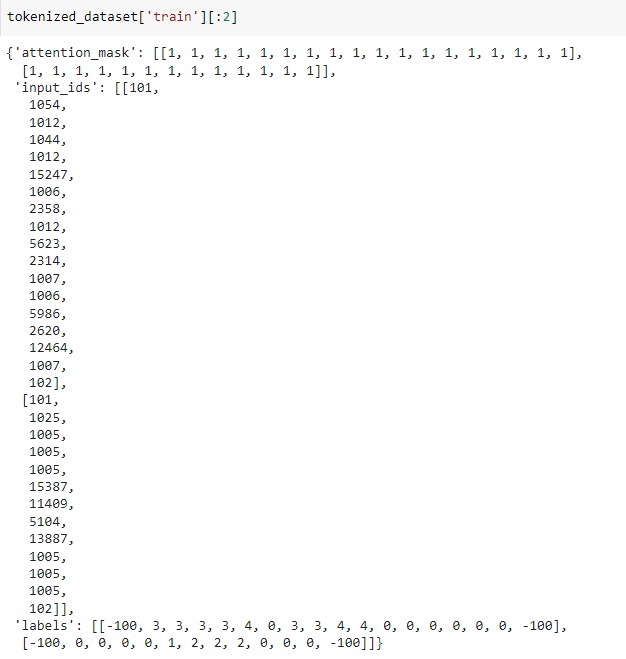
As we can see, different samples have different lengths therefore we need to pad the tokens to have the same length. For this, we will use DataCollatorForTokenClassification, it will pad inputs as well as labels
data_collator = DataCollatorForTokenClassification(tokenizer)
Fine Tuning
- We will use the Distillbert-base-uncased model for fine-tuning
- We need to specify the number of labels present in the dataset
model = AutoModelForTokenClassification.from_pretrained("distilbert-base-uncased", num_labels=len(label_names))
We need to define a function that can process our model predictions and compute required metrics. We will use `seqeval` metrics, commonly used for token classification
import numpy as np
from datasets import load_metric
metric = load_metric("seqeval")
def compute_metrics(p):
    predictions, labels = p
    #select predicted index with maximum logit for each token
    predictions = np.argmax(predictions, axis=2)
    # Remove ignored index (special tokens)
    true_predictions = [
        [label_names[p] for (p, l) in zip(prediction, label) if l != -100]
        for prediction, label in zip(predictions, labels)
    ]
    true_labels = [
        [label_names[l] for (p, l) in zip(prediction, label) if l != -100]
        for prediction, label in zip(predictions, labels)
    ]
    results = metric.compute(predictions=true_predictions, references=true_labels)
    return {
        "precision": results["overall_precision"],
        "recall": results["overall_recall"],
        "f1": results["overall_f1"],
        "accuracy": results["overall_accuracy"],
    }
Input to `compute_metrics’ function is namedtuple containing model predictions and corresponding labels. We will take the maximum logit for each token and ignore the special tokens (-100) as a label that we have set in the pre-processing part. Finally, we will return the dictionary consisting of Precision, Recall, F1-score, and Accuracy metrics.
As our dataset and metrics function is ready, we can fine-tune the model using Trainer API.
from transformers import TrainingArguments, Trainer
batch_size = 16
logging_steps = len(tokenized_dataset['train']) // batch_size
epochs = 2
We will run the training for 2 epochs with batch_size 16, later we can play with these parameters to improve our model performance if needed.
To use Trainer API, we need to define training arguments that contain attributes to customize the training. To understand all the parameters it supports, please refer to the documentation
training_args = TrainingArguments(
output_dir="results",
num_train_epochs=epochs,
per_device_train_batch_size=batch_size,
per_device_eval_batch_size=batch_size,
evaluation_strategy="epoch",
disable_tqdm=False,
logging_steps=logging_steps)
Now, we will instantiate the `Trainer` object and pass model, datasets, training arguments, tokenizer, `compute_metrics` function to compute metrics and the `data _collator` for padding.
trainer = Trainer(
    model=model,
    args=training_args,
    train_dataset=tokenized_dataset["train"],
    eval_dataset=tokenized_dataset["validation"],
    data_collator=data_collator,
    tokenizer=tokenizer,
    compute_metrics=compute_metrics
)
#fine tune using train method
trainer.train()

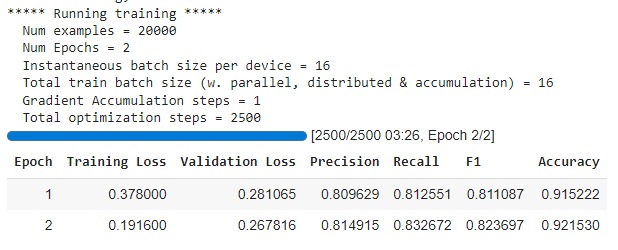
Once our model is trained, we can compute metrics (precision/recall/f1 computed for each category) on the `test` set result from the `predict` method
predictions, labels, _ = trainer.predict(tokenized_dataset["test"])

predictions = np.argmax(predictions, axis=2)

# Remove ignored index (special tokens)

true_predictions = [

[label_names[p] for (p, l) in zip(prediction, label) if l != -100]

for prediction, label in zip(predictions, labels)

]

true_labels = [

[label_names[l] for (p, l) in zip(prediction, label) if l != -100]

for prediction, label in zip(predictions, labels)

]

results = metric.compute(predictions=true_predictions, references=true_labels)

results
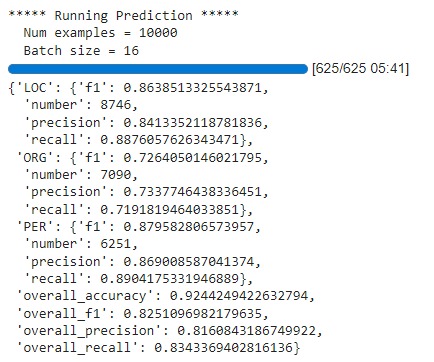
- f1 score for LOC and PER is >85% and ORG has <75%
- Overall f1 score is ~83%
- We can improve the accuracy by training the BERT model for more number of epochs or tuning other parameters such as learning rate, batch size, etc
You can download the notebook from the Github repository and play with it to improve the performance on the dataset or try out for a different language dataset.
Conclusion
- BERT model achieves state-of-the-art accuracy on several tasks as compared to other RNN architectures. However, they require high computational power and it takes a huge time to train a model, thus fine-tuning is the best approach to overcome the challenges
- The HuggingFace Transformer library makes it easy to fine-tune any high-level natural language processing (NLP) tasks, and we can even fine-tune the pre-trained models on the custom datasets using necessary pre-processing steps and picking required models for the task from the library
- Once we have trained our model, it is even easy to share it with the community by uploading it to HuggingFace Hub. Check the following link to learn more about it
Hope you liked my article on BERT Model? Share your feedback and suggestions in the comment below. Connect with me on Linkedin.
The media shown in this article is not owned by Analytics Vidhya and is used at the Author’s discretion.


hello, I have a problem : ImportError: Using the `Trainer` with `PyTorch` requires `accelerate>=0.20.1`: Please run `pip install transformers[torch]` or `pip install accelerate -U` I runned this pip install transformers[torch] and pip install accelerate -U , but that code show error. How to solve that issue