Explaining Writing Dockerfile with Examples
Introduction on Dockerfile
This article contains about Dockerfile that we are commonly using in DevOps Engineering. DevOps is nothing but it is a set of practices that ensures systems development life cycle and provides continuous delivery with high software quality, that combines software development and IT operations. Most companies use DevOps engineering for their continuous deliveries. In this case, there are depending on Docker. To work with Docker we are using Dockerfile. If you are not clear with Dockerfile, don’t worry this article explains the docker file in simple terms. Also, the examples help you to have the best experience. Let’s move into the article.
This article was published as a part of the Data Science Blogathon.
Table of contents
- What is the Dockerfile?
- What is Docker?
- Why Dockerfile?
- How Does it Work?
- Dockerfile Instructions
- Creating Image & Container using Dockerfile : Example 1
- Creating Image & Container Using Dockerfile: Example 2
- Creating Image & Container using Dockerfile : Example 3
- Copy file to Local Machine: Solution 1
- Copy file to local Machine: Solution 2
- Copy file to local Machine: Solution 3 (Recommended)
- Creating Image & Container using Dockerfile: Example 4
- Commands that We Commonly Use
- Conclusion
- Frequently Asked Questions
What is the Dockerfile?
A Dockerfile is a simple text file with instructions to build an image. If we do not have the docker file, to build the image and run the container word by word we used the command line interface according to our requirements. But this docker file helps us to provide the instruction on what needs to be pulled, what arguments need to be run after building the image, and providing some configurations. If you don’t know about docker you might be confused about this. So I would like to give some basic idea about Docker before going into Dockerfile.
What is Docker?

Docker is an open-source platform for building, deploying, and managing containerized applications. This ecosystem around creating and running containers. Docker is software used as a container runtime. Docker ecosystem contains Client, Server, Machine, Images, Hub and Compose.
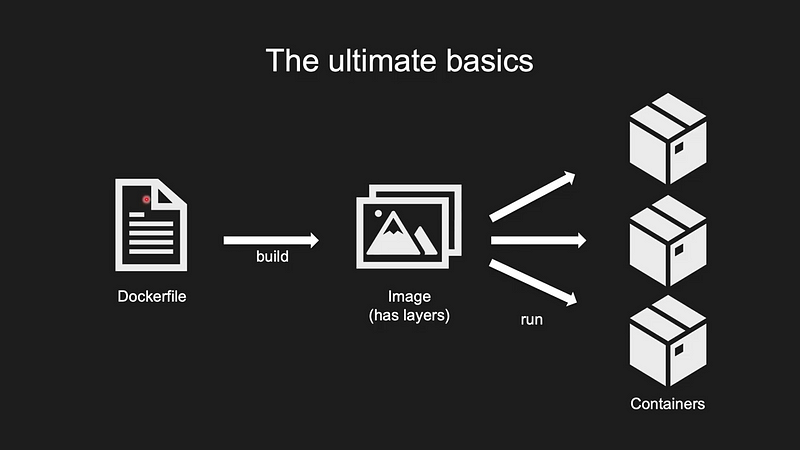
In this image you can see the flow when we run the command in the Command-line Interface.
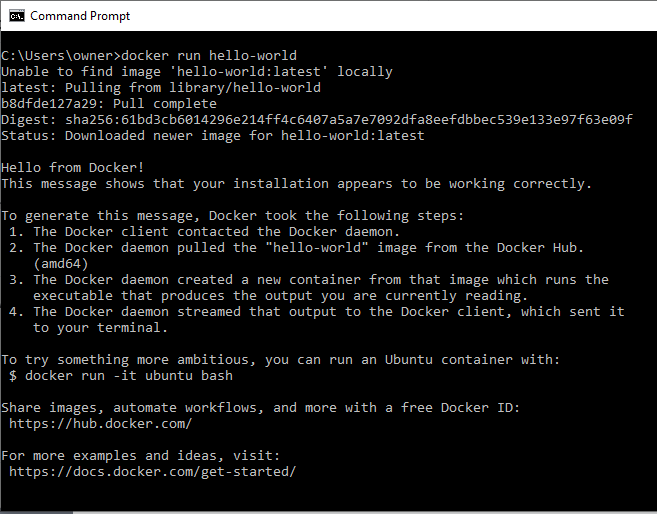
This image shows the command-line interface of the previous flow. Let us think, if we need to do multiple works with images and containers what do we do, we use the commands one by one right? Also in the future, we may have multiple images and multiple containers, So to deal with that we also need to run the commands one by one. Do you think it is a good practice? No, we may waste lots of time, and we may miss some commands and configurations for some images. Also, we have no records of the image of what we are doing. To overcome these issues, We are using Dockerfile.
Why Dockerfile?
Dockerfile is used to create clean images by removing unnecessary content from an image. Used to execute the same steps to create and recreate the images several times.
Note: Recreating the image with the same file will cause some errors, like if we mention in the code in the Dockerfile to download Python’s latest version, if a user runs the Dockerfile and gets the Python 3.1 version, and another user gets Python 3.2 at another time, in this case, there might be a break in the system because of the dependencies. So the best approach is to have small modifications in the Dockerfile from time to time.
How Does it Work?
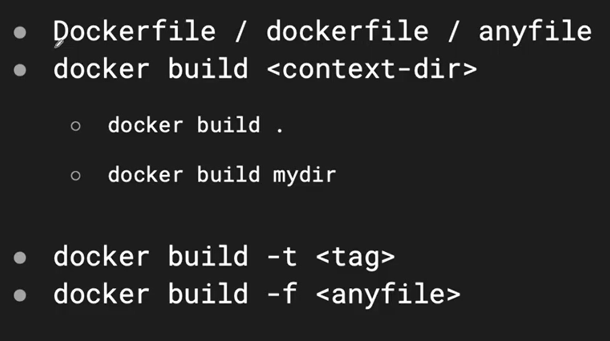
This picture shows the skeleton of the Docker file. We need to create the file Dockerfile or dockerfile so the Docker will understand it is a Docker file. If we need to create a file with a different name (any file), we have to follow the given commands.
Dockerfile Instructions
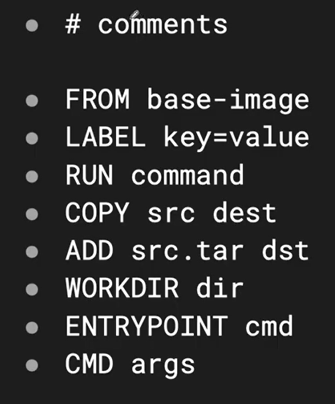
Here I am showing the basic commands inside of the docker file. These commands are frequently used in the docker file.
FROM
Use the FROM instruction to specify the base image for your container. Here’s an example using the official Ubuntu image as the base:
FROM ubuntu:latestLABEL
Add metadata to your image using the LABEL instruction. It’s useful for providing information about the image, such as the maintainer or version:
LABEL maintainer="[email protected]"
LABEL version="1.0"
RUN
Execute shell commands during the image build process. Use RUN to install software or set up the container environment. For example:
RUN apt-get update && apt-get install -y nginxCOPY
Copy files and directories from the host system into the container image. Here’s how you can copy a local HTML file into the container:
COPY index.html /var/www/html/ADD
Similar to COPY, but more versatile. It can download files from URLs and extract compressed archives. For example:
ADD https://example.com/myapp.tar.gz /opt/WORKDIR
Set the working directory for subsequent instructions. Any relative paths specified will be relative to this directory. For instance:
WORKDIR /appENV
Define environment variables within the container image. These variables can be used in subsequent instructions and during container runtime:
ENV DATABASE_URL="postgres://user:password@localhost/db"EXPOSE
Document the ports on which the container listens for incoming connections (for documentation purposes):
EXPOSE 80CMD
Specify the default command to run when a container is started. Override it by providing a command when running the container:
CMD ["nginx", "-g", "daemon off;"]ENTRYPOINT
Define an executable that always runs, making it harder to override. Useful for the primary application process:
ENTRYPOINT ["java", "-jar", "myapp.jar"]VOLUME
Create a mount point for a volume, which persists data outside the container. Useful for storing database files or logs:
VOLUME /dataUSER
Set the user or UID for the instructions that follow, improving container security:
USER appuserHEALTHCHECK
Define a command to check the health of the container, used by orchestration platforms to monitor container health:
HEALTHCHECK --interval=30s CMD curl -f http://localhost/ || exit 1ARG
Define build-time variables that can be passed to the Docker build process:
ARG APP_VERSION=1.0ONBUILD
Specify instructions to execute when another image is built using the current image as its base:
ONBUILD ADD . /app/src
ONBUILD RUN /app/build.sh
STOPSIGNAL
Set the system call signal to be sent to the container when it’s stopped, specifying how it should shut down:
STOPSIGNAL SIGTERMSHELL
Change the default shell used for the shell form of RUN, CMD, and ENTRYPOINT instructions:
SHELL ["/bin/bash", "-c"]Creating Image & Container using Dockerfile : Example 1
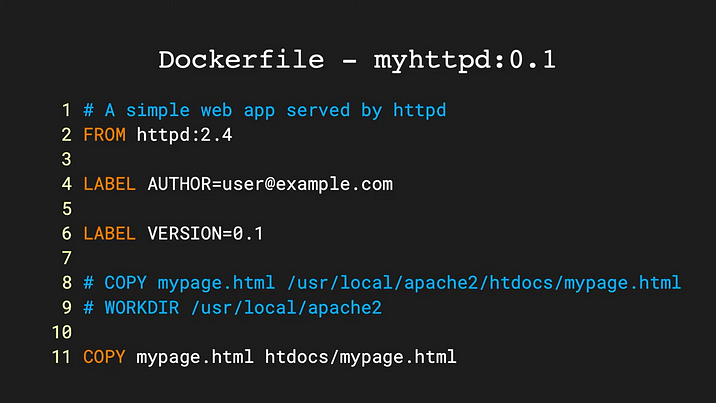
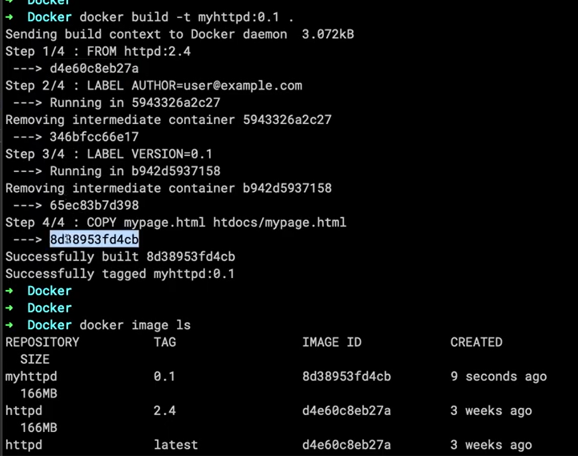
docker build -t myhttpd:0.1List the images after the image was created
docker image lsCreating Image & Container Using Dockerfile: Example 2
Create a file & Config Dockerfile
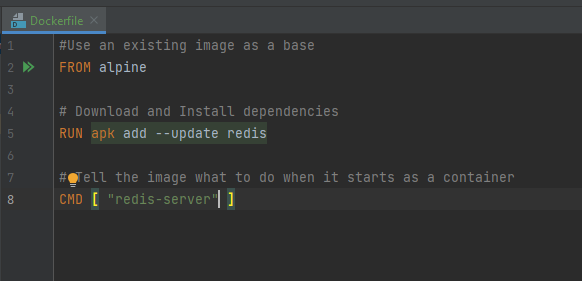
# Use an existing image as a base
FROM alpine

# Download and install dependencies
RUN apk add --update redis

# Tell the image what to do when it start as a container
CMD [ "redis-server" ]
Build File : On the Dockerfile Directory
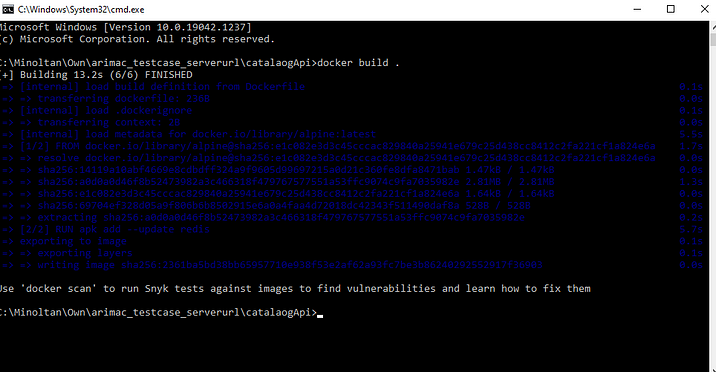
docker build .Run Container — docker run
Creating Image & Container using Dockerfile : Example 3
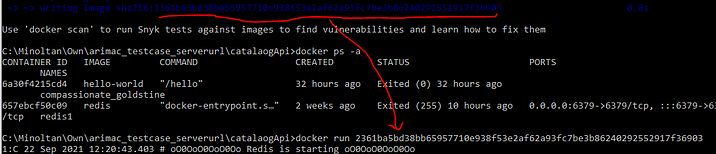
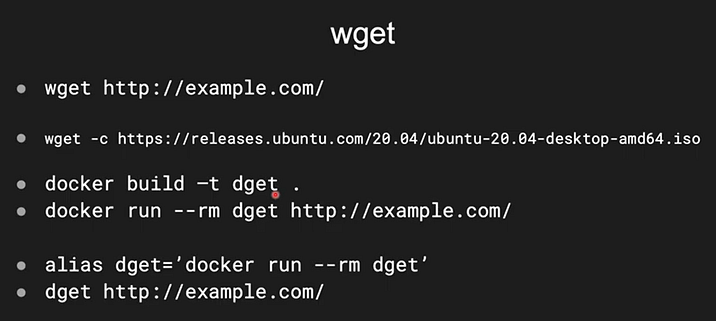
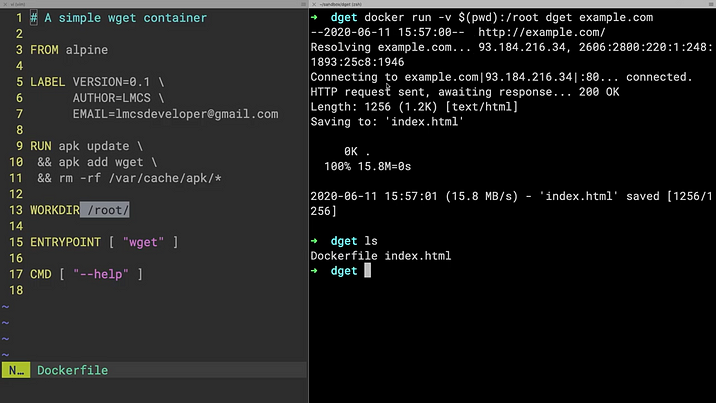
In my third example, I am creating a wget application using Dockerfile. wget is an application that is used to download files. If we give the URL of the webpage, it will download the full web page file. In Linux, it will be the default application. In Windows, we need to install it. Alpine is a lightweight OS without having to have extra applications or packages. Our ultimate plan is to pull an Alpine image and install the wget application, then give the webpage URL and get the download file, and finally kill the wget application.

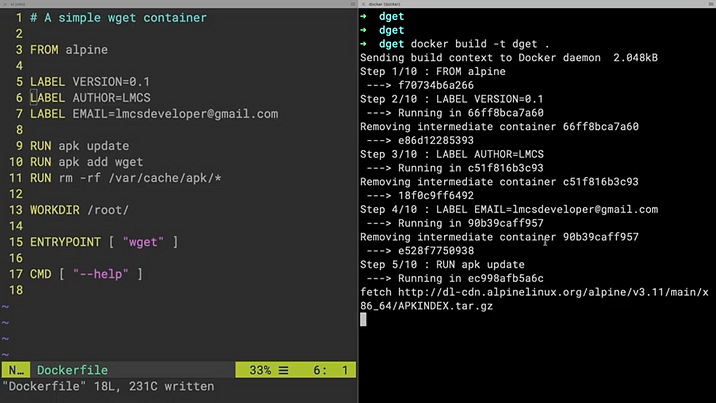
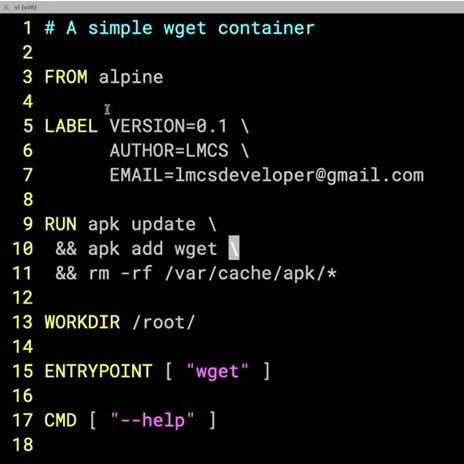
Optimizing the Layers
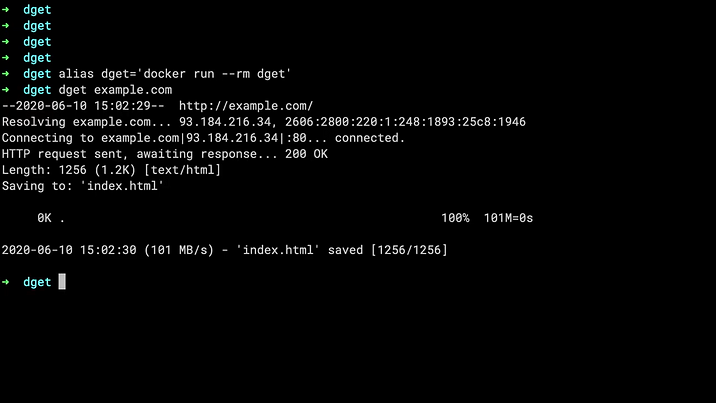
After download, we cannot see our file on the local machine, because we downloaded the file inside of the container when the container deletes that file also deleted.
So we can copy the file to our local machine by using different solutions
Copy file to Local Machine: Solution 1
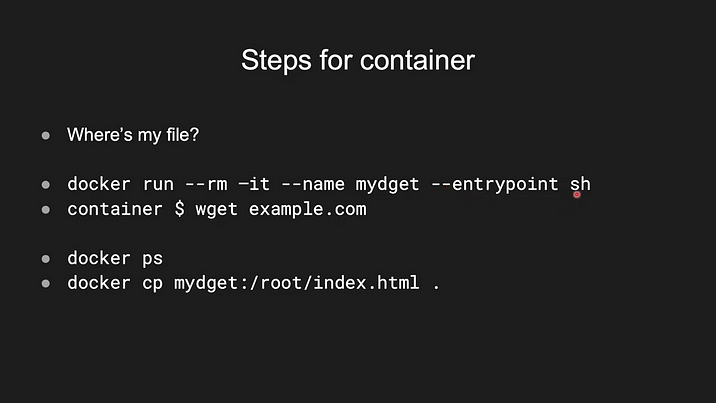
Downside: We are doing unnecessary steps
Copy file to local Machine: Solution 2
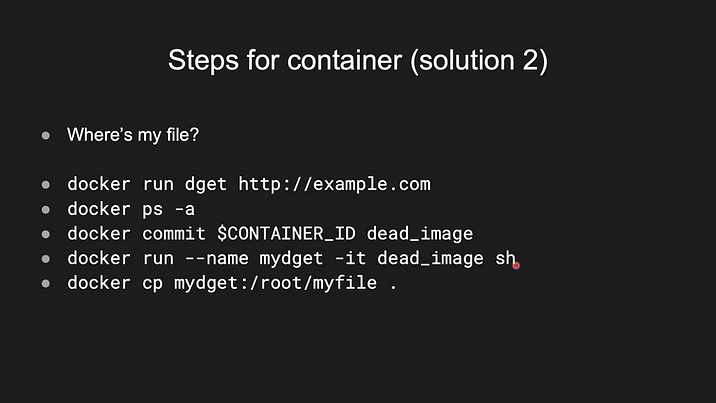
Downside: It is also like Solution1, but it is a technique for the already exited container.
Copy file to local Machine: Solution 3 (Recommended)
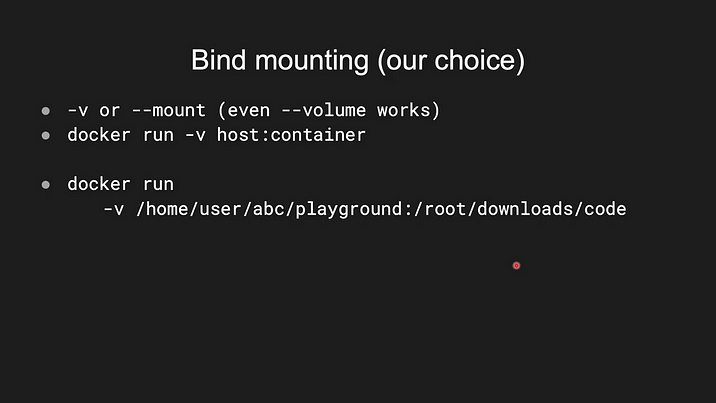
This command looks like ADD or COPY command, but here if we use ADD or COPY command it will take the copy of the host machine files (by using file path) and paste it to the container file (to the destination path), it means the later modification of the file not available in the host or container. So we use the showing command to, make all modifications available between the host & the container
Note: To get the current directory path of the host machine we can use $(pwd)
Creating Image & Container using Dockerfile: Example 4
Create and build spring boot application and Create Dockerfile & build (docker build .) file as shown in previous and run the file (docker run ).
Like :a9e5b36ceeaa8ae997c271e1e135c196ca12753c8e4c3a685b75fb5c23e31a0f
FROM amazoncorretto:11-alpine

ENV ADMIN_SERVER_PORT=8081
    USER_SERVICE_URL=http://localhost:8082
    AWS_END_POINT=https://s3.us-east-2.amazonaws.com
    AWS_ACCESS_KEY=AKIA5FGC3KVJ4AFG56NI
    AWS_SECRET_KEY=/yYBUdR3RvPtae4rghyd3v8hwZBGAGgdQcn8
    AWS_BUCKET_NAME=sample.tech

RUN apk add --no-cache tzdata &&
    cp /usr/share/zoneinfo/Asia/Colombo /etc/localtime &&
    echo "Asia/Colombo" > /etc/timezone &&
     apk del tzdata

ADD target/*.jar admin-service.jar

CMD java -jar admin-service.jar

ENTRYPOINT ["java","-jar","admin-service.jar"]
EXPOSE 8080
Here I used the environment variable, So I added ENV as like this. Also added dummy values.
Note : Options for connecting multiple containers
- Use docker CLI’s Networking Features
- Use Docker Compose
Commands that We Commonly Use
| Command | Description |
|---|---|
| To see images | docker images or docker image ls |
| To create an image | docker create |
| To remove an image | docker rmi |
| To list running containers | docker ps |
| To list all containers | docker ps -a |
| To run a container using an image | docker run -it -d |
| To stop a container | docker stop |
| To kill a container | docker kill |
| To remove a container | docker rm |
| To start a container | docker start |
| To start a container and show output | docker start -a |
| To run a Docker container | docker create followed by docker start |
| To remove all stopped containers | docker system prune |
| To retrieve log outputs from a container | docker logs |
| To interact with a container’s command prompt | docker exec -it sh |
| To set a tag for an image | docker build -t . (at the current folder) |
| To search for Docker images | docker search |
Conclusion
As I mentioned on the top, by looking at these examples, you might have confidence in creating a Dockerfile and configuring the instruction, which can finally be built and run as the image. Also, now you understand that rather than having an application, we can use a lightweight image to do our work. As previously stated, we can use a Dockerfile to create an application multiple times. If you deep dive into the Dockerfile, you can create a big application by configuring the Dockerfile. Thank you for reading this article. Let’s meet in another article.
The key takeaways from what we learned:
- Understand Docker images and Containers.
- The basic flow of Docker
- Dockerfile Writing techniques.
- Create a wget application (Sample Application) and run the images and containers using Dockerfile with the arguments.
- Pull and Push the images to the Docker hub.
- Copy and share the Dockerfile Locally.
Frequently Asked Questions
A. To write a Dockerfile, create a plain text file with instructions for building a Docker container, specifying the base image, adding files, and defining commands.
A. The syntax of a Dockerfile includes keywords like FROM, COPY, RUN, and CMD to define container instructions, with each followed by specific parameters.
A. To run a Dockerfile, use the docker build command to build an image from the Dockerfile, and then use docker run to launch containers based on the built image.
A. Yes, you need a Dockerfile to create customized Docker containers. It defines the container’s configuration and dependencies, allowing you to replicate and share your application environment.
The media shown in this article is not owned by Analytics Vidhya and is used at the Author’s discretion.


