An Overview of Using Azure Data Lake Storage Gen2
This article was published as a part of the Data Science Blogathon.

Before seeing the practical implementation of the use case, let’s briefly introduce Azure Data Lake Storage Gen2 and the Paramiko module.
Introduction to Azure Data Lake Storage Gen2
Azure Data Lake Storage Gen2 is a data storage solution specially designed for big data analytics. It combines the best of Azure Data Lake Gen1 and Azure Blob Storage. As Azure Data Lake Storage Gen2 build on top of Azure Blob Storage, it is cost-effective and has high availability and disaster recovery. Data Lake Gen2 allows the management of a vast amount of data. It supports petabytes of information.
With the use of Azure Data Lake Storage, we can store trillions of files. In this blog, I will discuss how to write a Python script that will download audio files from the remote server to the local path and then upload the audio files to Azure Data Lake Storage in a directory with today’s date.
Prerequisite: You should have a basic understanding of python and an azure subscription. If you don’t have a subscription, click here to learn more about it.
Libraries Used: Azure Data Lake Storage, Paramiko
Key Features of Azure Data Lake Gen2
- Hadoop Compatible access: Data Lake Storage Gen2 enables you to manage and access data in the same way that a Hadoop FileSystem. The new ABFS driver (for data access) is now available in all Apache Hadoop environments. Azure HDInsight, Azure Databricks, and Azure Synapse Analytics are among these environments.
- Management: It’s manageable as we can easily organize the files via directories and sub-directories.
- Performance: Since it stores data in a hierarchical manner(directories and sub-directories), data processing requires less computational power and reduces time and cost.
- Cost-effective: Data Lake Storage Gen2 provides low-cost storage and transactions. Azure Blob Storage lifecycle features, for example, reduce costs as data moves through its lifecycle.
- Optimized driver: The Azure Blob Filesystem driver(ABFS) is part of Apache Hadoop and is used effectively for big data analytics.
- Security: Azure Data Lake Gen2 supports ACLs(Access Control Lists) and POSIX (Portable Operating System Interface) permission.
What is Paramiko?
Paramiko is a Python library that connects to a remote device via SSH. To establish a secure connection between two devices, Paramiko employs SSH2 as a replacement for SSL. It also supports both the client and server models of SFTP.
SSH or Secure Shell is a protocol used for making a secure remote connection. SSH access the remote server to run commands and to download and upload files. We can transfer files from a remote server to the local and vice versa using SFTP(Secure File Transfer Protocol).
Implementation of Paramiko
Step 1: Install the Paramiko library using pip.
pip install paramiko
Step 2: Establish a Connection with a remote server.
import paramiko

ssh = paramiko.SSHClient()

ssh.connect(hostname=host, username=username, password=password)
When we try to run the above code, we will get an exception saying missing_host_key raise SSHException) paramiko.ssh_exception.SSHException To overcome this exception, use set_missing_host_key_policy(policy). By default, paramiko.SSHClient has RejectPolicy. So we will use AutoAddPolicy, which will automatically add a new host key to the local HostKeys object.
import paramiko
ssh = paramiko.SSHClient()
ssh.set_missing_host_key_policy(paramiko.AutoAddPolicy())
ssh.connect(hostname=host, username=username, password=password)
Files can be transferred by using paramiko.SFTPClient. It will open an SFTP session. We can call it by using open_sftp() on an instance of paramiko.SSHClient. For downloading files, we can use the below piece of code.
sftp_client=ssh.open_sftp()
sftp_client.get('remotefilepath','localfilepath')
sftp_client.close()
For uploading files to a remote server from locally we can use the below piece of code.
sftp_client=ssh.open_sftp()
sftp_client.put('remotefileth','localfilepath')
sftp_client.close()
Step 3: Create a directory
We will create a directory to store the files in a directory according to our choice, I have used the Python datetime module for creating a directory. The Below code will create a directory with today’s date.
import os
import time
from datetime import datetime, timedelta
today = datetime.now()
try:
	if not os.path.isdir(today.strftime('%Y%m%d')):
		os.mkdir(today.strftime('%Y%m%d'))
except Exception as e:
    print(e)
Step 4: Download files from the remote server
I have used listdir_attr(path=’.’) attribute of paramiko.SFTPClient to list out all the directories and files along with their timestamp. It will download files based on the time. Change the max_files accordingly to download files.

The below code will download only the .wav file. You can change it according to your requirement.
count = 0
max_files = 10
for f in sorted(sftp.listdir_attr('.'), key=lambda k: (datetime.fromtimestamp(k.st_mtime)>datetime(2022, 12, 7, 10, 59, 43)), reverse=True):
    #print(f.filename)
    count+=1
    if count > max_files:
        break
    if f.filename.endswith('.wav'):
        sftp.get(f.filename,f.filename)
Complete implementation of downloading audio files from the remote server to the local path.
#Import libraries
import paramiko
import time
from datetime import datetime, timedelta
import os
class SftpClient:
    def __init__(self, host, username, password):
        self.host = host
        self.username = username
        self.password = password
        self.create_connection(self.host,self.username, self.password)
        self.create_directory()
    def create_connection(self, host, username, password):
        '''
            Function will establish connection with
            SFTP.
            Parameters:
            --------------
            host: str
                Provide hostname
            username: str
                Provide the user name for sftp connection
            password: str
        '''
        ssh = paramiko.SSHClient()
        ssh.set_missing_host_key_policy(paramiko.AutoAddPolicy())
        ssh.connect(hostname=host, username=username, password=password)
        print("Connected with hostname = ",host, ", username = ", username)
        return ssh
    def create_directory(self):
        '''
            Function will create directory
            with today's date
        '''
        today = datetime.now()
        try:
            if not os.path.isdir(today.strftime('%Y%m%d')):
                os.mkdir(today.strftime('%Y%m%d'))
        except Exception as e:
            print(e)
    def download_files(self, remote_path, max_files=10,date1=datetime(2022, 12, 8, 11, 59, 45)):
        '''
        Function will download files to local,
        in this case it will download files in a
        directory with today's date
        Parameters:
        --------------
        remote_path: str
        max_files: int, default value is 10
            give the value according to no of files you
            want to download
        date1: datetime
        '''
        count = 0
        max_files = max_files
        file_path = datetime.now().strftime('%Y%m%d')+'/'
        sftp = self.create_connection(host, username, password).open_sftp()
        for f in sorted(sftp.listdir_attr(remote_path), key=lambda k: (datetime.fromtimestamp(k.st_mtime)>date1), reverse=True):
            #print(f.filename)
            count+=1
            if count > max_files:
                break
            if f.filename.endswith('.wav'):
                if f.filename not in file_path:
                    sftp.get(f.filename,file_path+f.filename)
if __name__ == '__main__':
    host = 'hostname'
    username = 'username'
    password = 'password'
    remote_path = 'remotepath'
    client = SftpClient(host,username, password)
    client.download_files(remote_path)
Uploading Files to Azure Data Lake Gen2 Using Python
Step 1: Install the Azure Data Lake Storage client library using pip.
pip install azure-storage-file-datalake
#Import libraries
import os, uuid, sys
from azure.storage.filedatalake import DataLakeServiceClient
from azure.core._match_conditions import MatchConditions
from azure.storage.filedatalake._models import ContentSettings
from datetime import datetime
Step 2: Create a connection with the Account
Create a connection with the Account using the Account Key. This is the simplest way to connect to an account. The code snippet below will create a DataLakeServiceClient instance using an account key. We can also use Azure Active Directory(Azure AD) to create a connection.
def initialize_storage_account(storage_account_name, storage_account_key):
    try:
        global service_client
        service_client = DataLakeServiceClient(account_url="{}://{}.dfs.core.windows.net".format(
            "https", storage_account_name), credential=storage_account_key)
        return service_client
    except Exception as e:
        print(e)
- Replace storage_account_name with the name of your storage account.
- Replace storage_account_key with the key of your storage account.
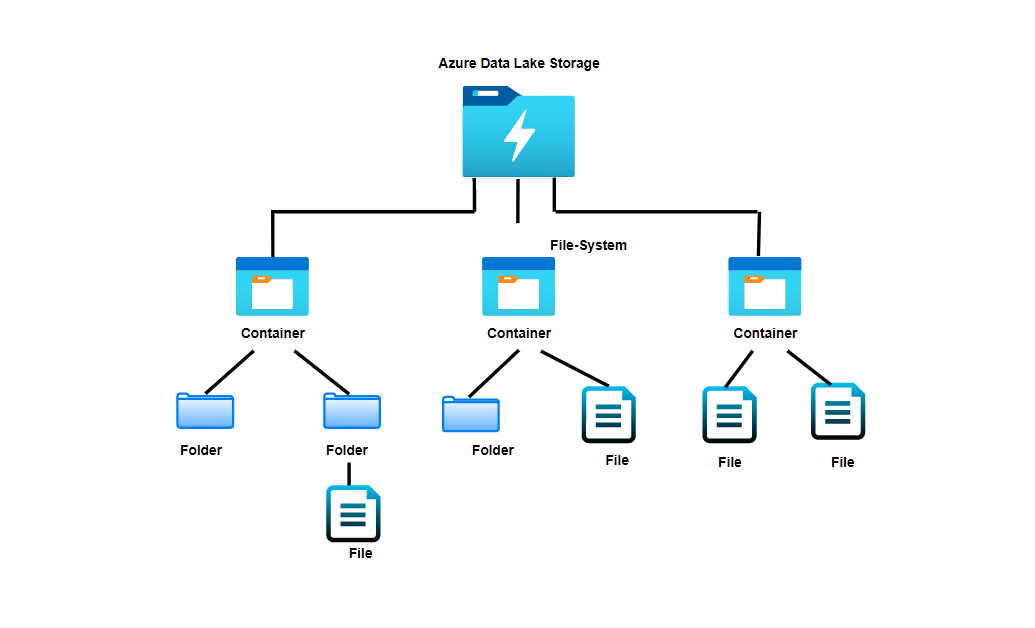
Step 3: Create a Container
A Container will act as a file system for the files. We can create a container by calling FileSystemDataLakeServiceClient.create_file_system method. The below code snippet will create a container named my-container.
def create_file_system():
    try:
        global file_system_client
        file_system_client = service_client.create_file_system(file_system="my-container")
    except Exception as e:
        print(e)
Step 4: Create a directory
Create a directory by using FileSystemClient.create_directory. The below code snippet will create a directory named after today’s date.
def create_directory():
    try:
        file_system_client.create_directory(datetime.now().strftime('%Y%m%d'))
    except Exception as e:
     print(e)
Step 5: Store files in a list
Store all the audio file names you want to upload to the directory in a list, along with the absolute path.
def get_files():
        try:
            file_paths = []
            file_path = './'+datetime.now().strftime('%Y%m%d')
            for folder, subs, files in os.walk(file_path):
                for filename in files:
                    file_paths.append(os.path.abspath(os.path.join(folder, filename)))
            return file_paths
        except Exception as e:
            print(e)
Step 6: Upload files to a directory
Upload all the audio files stored in a list to a directory. DataLakeFileClient.append_data is used to upload a file. DataLakeFileClient.flush_data method is used to ensure the upload is completed. If you want to upload a large file, then instead of using DataLakeClient.append_data, use DataLakeClient.upload_data will upload the entire file in a single call rather than making multiple calls.
def upload_file_to_directory():
        try:
            file_system_client = service_client.get_file_system_client(file_system="my-container/")
            directory_client = file_system_client.get_directory_client(datetime.now().strftime('%Y%m%d'))
            for files in get_files():
                file_client = directory_client.create_file(files.split('\')[-1])
                local_file = open(files,'rb')
                file_contents = local_file.read()
                file_client.append_data(data=file_contents, offset=0, length=len(file_contents))
                file_client.flush_data(len(file_contents))
        except Exception as e:
            print(e)
For complete practical implementation, visit my GitHub. Below is the output of the uploaded audio files.
.PNG)
Conclusion
With growing technological advancements, data is increasing, and managing and storing this data is becoming difficult. The Azure Data Lake Storage can store trillions of files, and file size can be greater than petabytes. With the use of Azure Data Lake Storage, we can focus on our business logic rather than focus on how to manage and store large datasets. For now, I have explained f why I have used Azure Data Lake to upload files using Python.
Some of the key takeaways from the article are:
- If you want to upload a large file, instead of using DataLakeClient.append_data, use DataLakeClient.upload_data.
- In case there are duplicate files, write a separate function to remove those duplicate files before uploading it to Azure Data Lake Gen2.
- You can also use the concept of multi-threading to utilize the CPU.
- Instead of using local, you can use azure functions to deploy the code.
I hope you liked my article on ADLS Gen2 using Python. You can connect with me on Linkedin for further discussion or comment below. Cheers !! Happy Learning
The media shown in this article is not owned by Analytics Vidhya and is used at the Author’s discretion.


