Isolated Python Environments using Docker
Introduction
While working with multiple projects, there are chances of issues with versions of packages in python; for example, a project needs a new version of a package, and another requires a different version. Sometimes the python version itself changes from project to project. Managing these different python versions and different versions of packages is a time taking and hectic process. And if anything is done wrong, the whole application stops working. And it will be a long process to remove and reinstall these versions. One way to manage this is by creating different virtual environments. They are good, but when you want to run the project in a separate system, you have to again create a new virtual environment in the new system to run that application. Another way to solve this is by using Containers. We can create one for each of our applications. These act similarly to isolated python environments, thus not disturbing each other. In this article, we will learn how to create these isolated python environments in Docker. We will look into how we can access the code from the Container through VS Code.
.png)
Learning Objectives
- Understanding Docker Containers
- Learning how to create isolated python environments
- To learn how we can connect these isolated Containers to Visual Studio Code
- To learn how we can access and modify the code in the isolated Python Container in real-time
This article was published as a part of the Data Science Blogathon.
Table of Contents
- Python Containers? How do they work?
- Creating the Flask App
- Creating our First Container
- Running the Container
- Connecting Container to Visual Studio Code
- Conclusion
Isolated Python Environments Run Containers? How do they Work?
Docker is an open-source platform used globally to create Containers. These Containers run isolated from the host environment. That is, the Containers do not interact with the host system that they are running it.
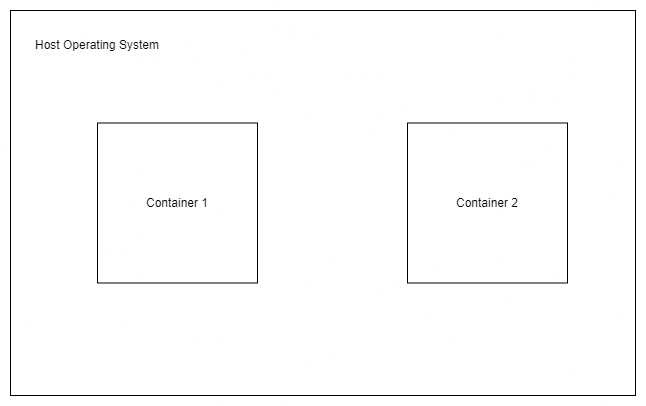
So, for example, if we are working on two applications that are in need of different versions of python, we can create two Python Containers with two different versions of python, and these will run our application. These Containers are not only isolated from the host but are isolated from each other too, i.e., one Container doesn’t interact with another Container (unless we want them to, but that’s in a different scenario).
Creating the Flask App
In this section, we will be creating our first Isolated Python Environments Container. For this demo, I will be developing a web app with Python. There are many Web Frameworks in Python; I have taken Flask for this. Let’s create a simple flask app.py file.
from flask import Flask
app = Flask(__name__)
@app.route('/')
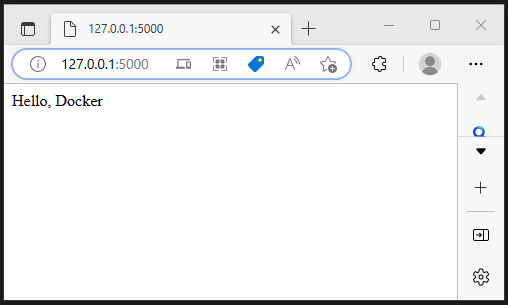
def hello():
return 'Hello, Docker'
if __name__ == "__main__":
app.run(debug=True)
Running this will start the server. The output will display on the localhost server as observed below:
Now we want this flask application to be containerized. For this, first, we need to create a Dockerfile. Before creating a Dockerfile, we need to create a requirements.txt file that lists the python packages we will use in our application. As we are using only Flask, the requirements.txt contains a single line, Flask=2.2.2, where 2.2.2 is the version of Flask I’m using.
Creating our First Container (Isolated Python Environments)
In this section, we will write the Dockerfile for creating our Container. Dockerfile is a text document that contains the necessary commands to build an Image. Let’s see how this is done.
FROM python:3.10-slim
WORKDIR /flask_app
COPY . .
RUN pip install -r requirements.txt
ENV FLASK_DEBUG=1
EXPOSE 5000
CMD ["flask","run","--host=0.0.0.0"]
We will create our Container on top of an existing python image python:3.10-slim, so I used the FROM statement for it, in the Dockerfile. Next, I’m creating a folder in my Container with the name flask_app, and this will be my working directory, which will contain our flask_app.
Next is the COPY source_path destination_path. As I’m creating the Dockerfile in the directory which also contains the flask application (app.py) and requirements.txt, I’m using dot (.) for the source path and as I’m copying these files into flask_app, I kept dot (.) as the destination path. Let me give another example, if I want to copy my flask app to a folder inside flask_app then I will be writing something like COPY source_path ./new_folder.
The first thing we need to do in the Container is to install the dependencies in the requirements.txt using pip, which we accomplish with the RUN command. We also set the flask debugging to true, we will talk more about this later. Then we expose the Port:5000 inside the Container to outside, i.e. to the host. Whenever we run the Container, the flask app needs to be running. So we pass the flask run command to the CMD. Also, here we are changing the host to 0.0.0.0. By default, from the host, we cannot access the server running in the Container. So we change the host to 0.0.0.0, so we can access it.
We have created our Dockerfile. Now we need to build the Image. To achieve this, we will use the docker build command. In the terminal, we need to go to the directory where the Dockerfile is; then, we need to type the following
docker build -t flask_env .
The -t option implies a tag used to name our Image; here, I’m naming the Image as flask_env. The dot (.) indicates the file path where the Dockerfile is. As we are in the directory where the Dockerfile is located, we use dot (.) as the source_path.
Finally, after running this command, our Image will be created with the name flask_env. You can check this image using the docker image ls command. If you have Docker Hub installed, you can check it in the Docker Hub.
Running the Container
Let’s test our flask_env image by running it. Before running it, we need to bind the app.py from our host system to the app.py in the Container. What this does is whenever we make changes in the app.py in the host system, the app.py in the flask_app folder residing in the Container will change too. Now let’s run the Container:
docker run -p 5000:5000 -v C:/Users/Main//Desktop/python_docker_env:/flask_app flask_env
Here, using the -p option, we are directing the Port:5000 of the Container to the Port:5000 of the host, so we can we the server running in the Container. Using -v option, I mounted the folder in my host system, which contains the app.py to the flask_app folder in the Container, which contains app.py.
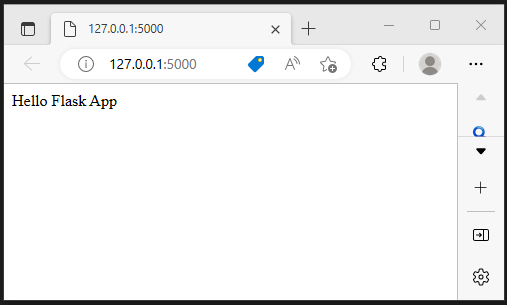
Let’s try changing the app.py in the host operating system, to make sure the app.py in the Container is also being changed and the flask app is restarted to reflect those changes in the server. For this to happen, we need to enable the Debug mode in the Flask. That is the reason, in the Dockerfile, we have set ENV FLASK_DEBUG=1.
Now let’s test this by changing the Hello Docker to Hello Flask App in the app.py in the host. If we reload the page, then we can see the changes. So it is clear that the host flask folder is mounted to the Container flask folder.
Connecting Container to Visual Studio Code
So, finally, we can connect our host app.py to the app.py in the Container and everything seems to be working fine. Now, what if our host system python doesn’t contain the Flask package?, or what if we are running our Container in another system that doesn’t contain the flask package?
This will cause an issue while writing your code. Cause we know that, in VS Code, when we are importing a library in python, the VS Code provides us with the auto-code completion. This auto-code completion only works with the modules that are installed in Python. So if Flask is absent, then we cannot use the VS Code auto-complete feature.
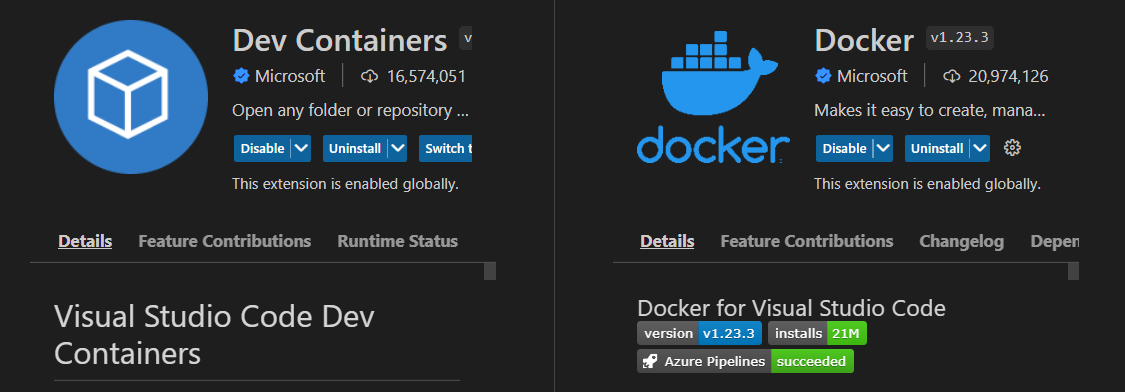
But there is a solution to this. The Visual Studio Code gives us direct access to the app.py in the Container; then we can be able to use the auto-code feature. For this, we need to install the Docker and Dev Container extensions in the VS Code. These extensions allow us to use the Docker Containers as a full-featured development environment.
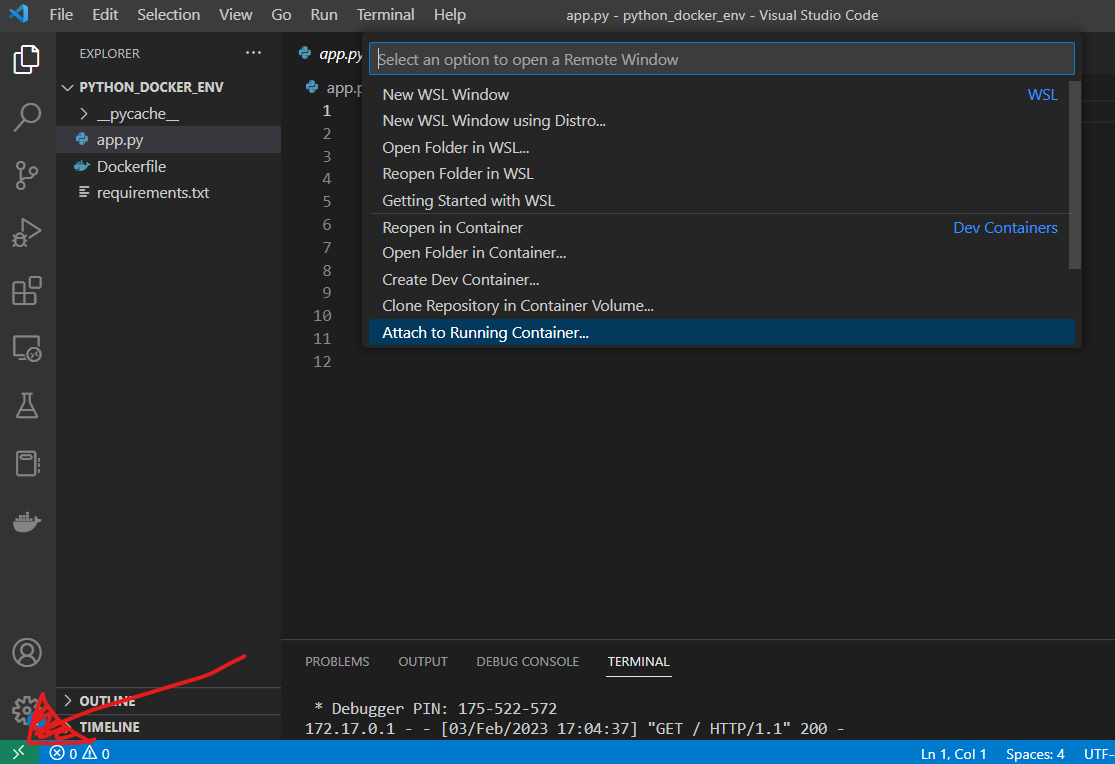
Now on the bottom left, you can find the Open Remote Window icon > Open New Folder. And you will find the flask_app folder and click on it. Now we are finally able to access the app.py that resides in the Container.
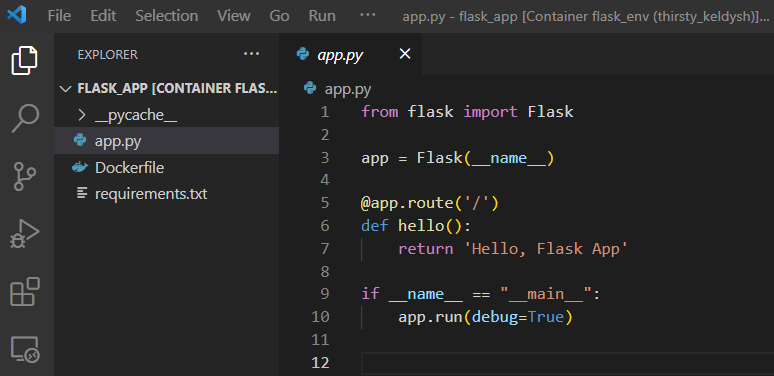
Right away, you cannot use the VS Code auto-complete feature. For this, you need to install the Python extension in the newly opened VS Code workspace. After installing, we will be able to use the auto-code complete feature.
Now our flask app is running in complete isolation from the host system. We could access it through VS Code, make changes to the code, and see the changed results on the server. This way, Containers can be really helpful in creating isolated environments. And we can remove them when not used.
Conclusion
So far, we have seen how we can use docker to create an Isolated Python Environments Container in this article. We have achieved this by creating a Dockerfile and then building an Image. And finally, we have connected this Container to VS Code, so that we can access the files and folders inside them and use VS Code features like auto-code completion.
The following are the key takeaway from this article:
-
Docker, an open-source platform, can be used to create Containers.
- These Containers are isolated and do not interact with the host operating system.
- Containers are also isolated from each other, i.e. they cannot be accessed by each other.
- These Containers can function like Isolated Environments when we are developing applications.
To open the GitHub Repository for the code in this article, click here.
The media shown in this article is not owned by Analytics Vidhya and is used at the Author’s discretion.


