Manual for the First Time Users: Google BERT for Text Classification
This article was published as a part of the Data Science Blogathon

Hey Folks!
In this article, we will understand BERT from absolute zero and we will see BERT in action and its implementation
we will Understand Bert By answering these Questions
1. what is the core idea behind its Working? 2. Why do we need BERT? 3. How does it work? 4. How can we use it? 5. Fine Tuning of BERT Using BERT for Text Classification

Source: OpenSource
the above result shows how BERT Implementation on Google’s Search has improved its search results.
In the past few years, we have started implementing the Deep learning concepts in the field of NLP and we performed many NLP tasks using Deep Learning.
Core Idea of BERT
BERT(Bidirectional Encoder Representation of Transformers)
Bert works on language modelling. Language modelling basically means the understanding of a particular language and this is done by “fill in the blanks” based on context.
for example,
A Boy Went to School and took _____ bag with him.
Since BERT is a Bidirectional Model, it tries to look from both directions left-right + right-left.
to predict a masked word BERT takes both the next token and previous token of the masked word into consideration for prediction.
Why BERT is so powerful?
1. Bert is based on the Transformer model architecture with attention layers.
2. it’s a context-based language representation. it means the meaning of the word will be based on the meaning of the sentence.
Transformer Mechanism
A transformer uses an attention mechanism to learn the relationship between all words in a sentence.
Why do we need BERT?
In NLP our biggest challenge was to create a big enough dataset that can be trained on a model to understand a language.
Training on a Language is not an easy task, and BERT is trained on trillions of wiki pages, which make it super-powerful to understand the context of any sentence.
Bert can be used for free, it can be easily fine-tuned and easily implementable in our use case.
Working of BERT
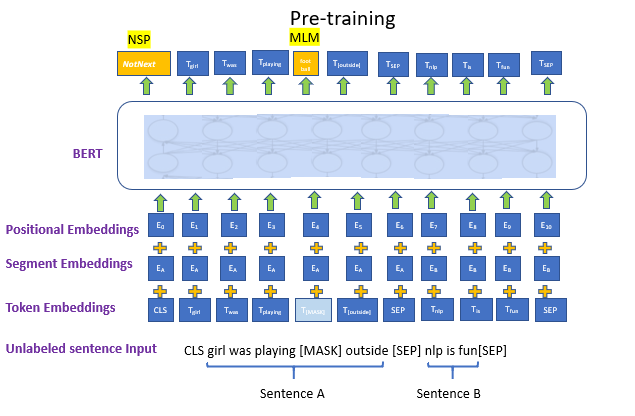
Source: OpenSourceBERT works on Transformer’s attention mechanism that helps BERT to understand the relationships between words in a sentence.
A Basic Transformer contains an encoder part ( reads the input ) and a decoder part (produces prediction). Bert only makes use of the encoder part. The encoder part of Bert takes the tokens sequence as input after converting tokens into some vector form.
The detailed work on Transformers is published in a paper by Google Team.
How to Implement BERT
steps involved
1.Getting the BERT model from the TensorFlow hub 2.Build a Model according to our use case using BERT pre-trained layers. 3.Setting the tokenizer 4.Loading the dataset and preprocessing it 5.Model Evaluation
Getting the Bert
there are multiple ways to get the pre-trained models, either Tensorflow hub or hugging-face’s transformers package.
loading model from the TensorFlow hub.
Tensorflow hub provides a wide range of pre-trained models
accessing Tensorflow-hub
!pip install --upgrade tensorflow_hub
import tensorflow_hub as hub
import numpy as np
Load the BERT model
## loading bert from tensorhub
module_url = "https://tfhub.dev/tensorflow/bert_en_uncased_L-24_H-1024_A-16/1"
bert_layer = hub.KerasLayer(module_url, trainable=False)
trainable = False freezing the pre-trained Bert layers as we don’t want to retrain Bert layers.
BERT Model Versionbert_en_uncased_L-24_H-1024_A-16 model
L=24 hidden layers(Transformer blocks),H=1024Hidden LayersA=16attention heads.
This model is trained on the Wikipedia and BooksCorpus Dataset. en_uncased signifies that the model is pre-trained for the English language and its case insensitive.
Loading the tokenizer
for the training, we need to parse our textual dataset into BERT-supported input format. In order to do this, we first tokenize our dataset and then convert it into features (encoding into some numbers)
Splitting a sentence into its individual words is called tokenization.
Import tokenizer file
!wget --quiet https://raw.githubusercontent.com/tensorflow/models/master/official/nlp/bert/tokenization.py
import tokenization
Setting up the tokenizer
vocab_file = bert_layer.resolved_object.vocab_file.asset_path.numpy()
do_lower_case = bert_layer.resolved_object.do_lower_case.numpy()
tokenizer = tokenization.FullTokenizer(vocab_file, do_lower_case)
vocab_fileit’s a vocabulary file for mapping our dataset into features.do_lower_caselowering the generated tokens
The FullTokenizerclass takes vocab_file as input parameters.
calling tokenizer:
tokenizer.tokenize('Where are * you going ?')
Understanding Input Data Format
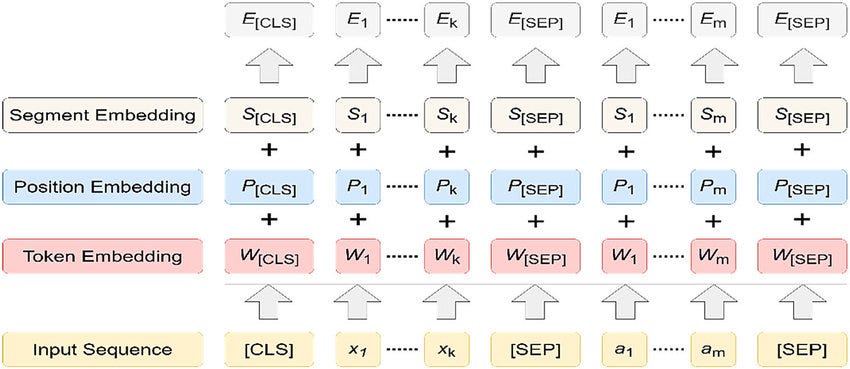
BERT inputs a combination of 3 different data format
Token Embeddings
Token Embedding holds the information of our dataset. it’s a number assigned to each unique words tokens
- [CLS] token is attached at the beginning of every sentence that indicates the starting
- [SEP] token is attached at the end of each and every sentence that indicates the ending of a sentence.
Position Embeddings
It is used to indicate the position of tokens in a sentence.
this helps BERT to capture the sequence or order of information given in a sentence.
Segment Embeddings
The model must know whether a particular token belongs to Sentence 1 or sentence 2.
In BERT. This is done by generating a fixed token, called the segment embedding
Till now we have discussed BERT, its input format, how to load the BERT model.
Loading the dataset
we will be using the Disaster Tweets dataset, download dataset link.
this dataset contains training and testing files.
train = pd.read_csv("../input/nlp-with-disaster-tweets-cleaning-data/train_data_cleaning.csv", usecols=['text','target'])
test = pd.read_csv("../input/nlp-with-disaster-tweets-cleaning-data/test_data_cleaning.csv", usecols = ['text'])
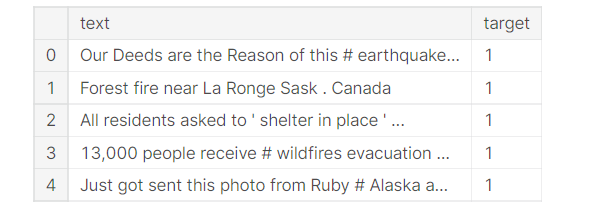
if the target is 1 then Disastrous Tweet otherwise normal tweet
Pre-Processing Dataset into BERT Format
as we know BERT inputs the data for training is a combination of 3 /2 embeddings. so in this step, we will prepare our dataset in BERT input Format.
Required Libraries:
from tensorflow.keras.layers import Dense, Input
from tensorflow.keras.optimizers import Adam
from tensorflow.keras.models import Model
- the function
bert_encodertakes textual data and tokenizer and createstoken_embeddings,positional_embeddings, andsegment_embeddingwhich will be passed in our model for training - Bert supports max length up to 512 only
def bert_encoder(texts, tokenizer, max_len=512):

    # here we need 3 data inputs for bert training and fine tuning
    all_tokens = []
    all_masks = []
    all_segments = []

    for text in texts:
        text = tokenizer.tokenize(text)

        text_sequence = text[:max_len-2] # here we are trimming 2 words if they getting bigger than 512
        input_sequences = ["[CLS]"] + text_sequence + ["[SEP]"]
        pad_len = max_len - len(input_sequences)

        tokens = tokenizer.convert_tokens_to_ids(input_sequences)
        tokens += [0] * pad_len
        pad_masks = [1] * len(input_sequences) + [0] * pad_len
        segment_ids = [0] * max_len

        all_tokens.append(tokens)
        all_masks.append(pad_masks)
        all_segments.append(segment_ids)

    return np.array(all_tokens), np.array(all_masks), np.array(all_segments)
bert_encodertakes tokenizer and text data as input and returns 3 different lists of mask/position embedding, segment embedding, token embedding.convert_tokens_to_idsit maps our unique tokens to the vocab file and assigns unique ids to the unique tokens.max_length = 512, the maximum length of our sentence in the dataset
Note: Token Embedding and Positional Embedding are necessary to pass for BERT Training
Calling the encoding function:
train_input = bert_encoder(train.text.values, tokenizer, max_len=160)
max_len = 160since the length of most tweets is within 150 words.- the
train_inputcontains a list of 3 arrays (all_tokens,all_masks,all_segments)
Building model using BERT layers
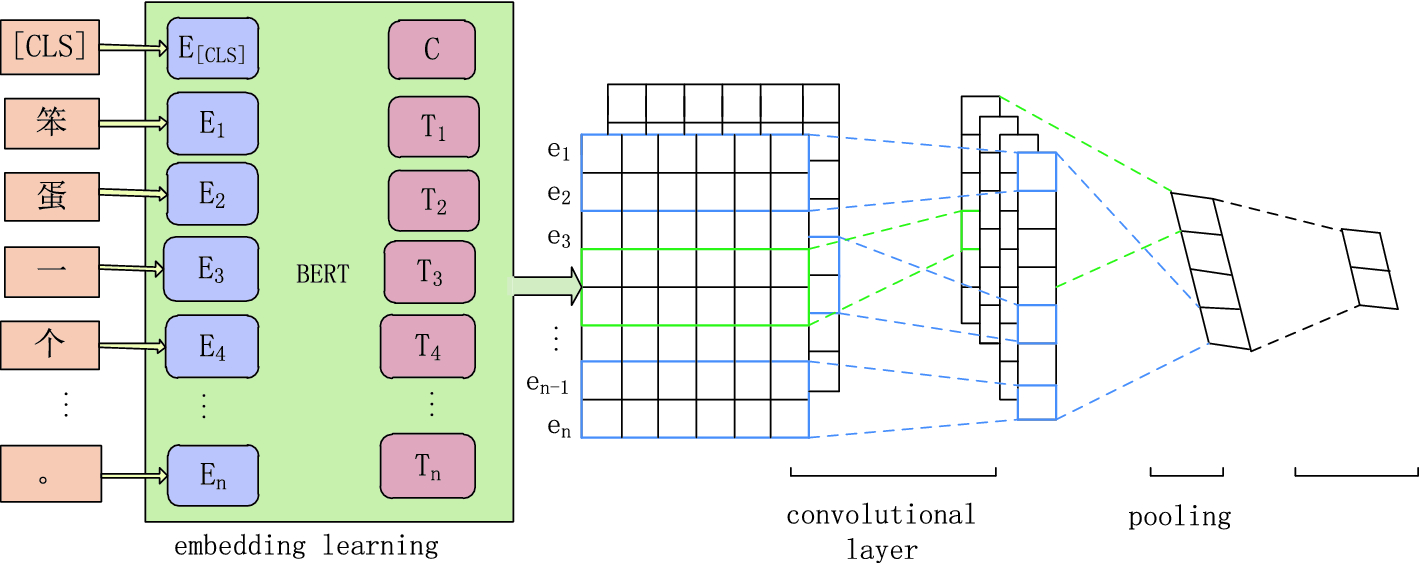
We need to design a model according to our use case using BERT pre-trained model by adding some CNN layers which will give us end prediction.
def build_model(bert_layer, max_len=512, num_class):
    input_word_ids = Input(shape=(max_len,), dtype=tf.int32, name="input_word_ids")
    input_mask = Input(shape=(max_len,), dtype=tf.int32, name="input_mask")
    segment_ids = Input(shape=(max_len,), dtype=tf.int32, name="segment_ids")
_, sequence_output = bert_layer([input_word_ids, input_mask, segment_ids])
clf_output = sequence_output[:, 0, :]
out = Dense(num_class, activation='sigmoid')(clf_output)

model = Model(inputs=[input_word_ids, input_mask, segment_ids], outputs=out)
model.compile(Adam(lr=2e-6), loss='binary_crossentropy', metrics=['accuracy'])

return model
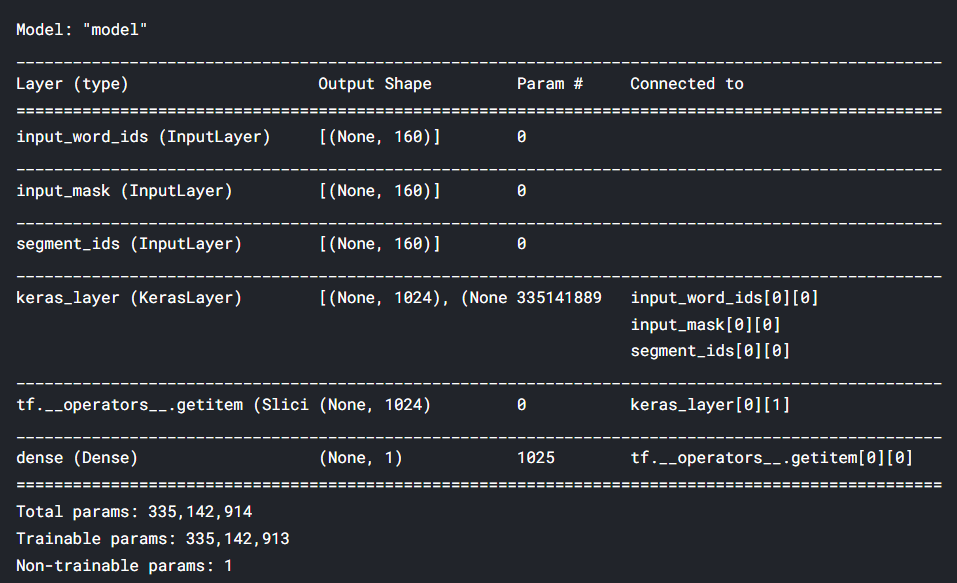
the function build_model takes Bert layer, max_len and num_class as input and returns the final model
- default
max_len = 512. num_class = 1the final dense layer with 1 output will predict the probability of tweets to be disastrous.- BERT layers take an array of 3 /2 embeddings for training
[[input_words_tokens][input_maks][segement_ids]]hence we need to create 3 input layers of the size equal tomax_len. binary_cross_entropyfor binary classificationsequence_output[:, 0, :]intermediate hidden states.
the model_final will be our final model which we will use for training.
model_final = build_model(bert_layer, max_len=160, num_class = 1)
model_final.summary()
Training Step
So far we have built our model and the data embeddings to be passed for training.
It’s time to begin the training.
train_history = final_model.fit(
    train_input, train_labels,
    validation_split=0.2,
    epochs=3,
    batch_size=16
)
final_model.save('model.h5')
validation split = 0.2signifies that 20 % of the training data will be used as validation data.train_labelis the target array

Awesome!!
we just ran 3 epochs and got a validation accuracy of 82%
Testing and validation
for the testing and prediction, the test data must be in the same format as training data.
Calling the bert_encoder function on the test data will convert it into 3 embeddings and that will be passed to the model.predict method.
test_input = bert_encoder(test.text.values, tokenizer, max_len=160)
test_pred = final_model.predict(test_input)
prediction = np.where(test_pred>.5, 1,0)
prediction is an array containing the probability of a tweet to be disastrous. and if the probability is greater than 0.5 we will categorize that as disastrous and label that as 1
test['prediction'] = prediction
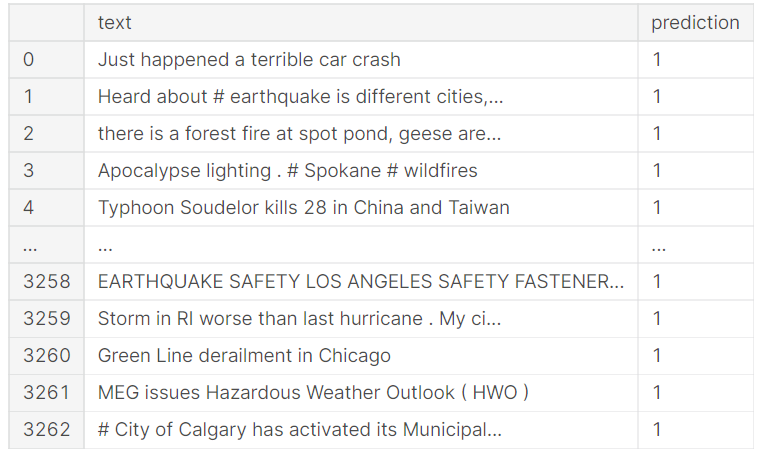
results:
filtering tweets according to our prediction.
test[test.prediction == 1]
Perfect!!
all our tweets predicted to be disastrous reads to be disastrous.
Improving the Result
the pre-trained model gives awesome results in a few epochs. but you can further improve the results by doing some tweaking:
- Use callbacks and dynamic learning rates for efficient training.
- Use a deeper BERT architecture ie.
bert_largehas more layers and it can learn comparatively more information - Use Stacked BERT layers
- Add multiple CNN layers on top of BERT layers
Conclusion
BERT is an advanced and very powerful language representation model that can be implemented for many tasks like question answering, text classification, text summarization, etc.
in this article, we learned how to implement BERT for text classification and saw it working.
Implementing BERT using the transformers package is a lot easier. in the next article, we will discuss implementing NLP models in no time using the transformers package.
Download the Source code using the link.
if you have something to ask me write to me on Linkedin
The media shown in this article is not owned by Analytics Vidhya and are used at the Author’s discretion.


