Introduction
With recent AI advancements such as LangChain, ChatGPT builder, and the prominence of Hugging Face, creating AI and LLM apps has become more accessible. However, many are unsure how to leverage these tools effectively.
In this article, I’ll guide you in building an AI storyteller application that generates stories from random images. Utilizing open-source LLM models and custom prompts with an industry-standard approach, we’ll explore the step-by-step process.
Before we begin, let’s establish expectations for this informative journey.
Learning Objective
- Create your own OpenAI and Hugging Face account and generate API keys.
- Leverage the power of open-source LLM models using API’s.
- Safeguard your project secrets.
- Decompose complex projects into manageable tasks and create project workflow.
- Give custom instructions to LLMs using the Lang-Chain module.
- Create a simple web interface for demonstration purposes.
- Appreciate the level of detail that goes into the development of LLM projects in the industry
Prerequistes
Before moving ahead here are a few pre-requires that’s need to be fulfilled:
- Python – Install Python >=3.8, you may face issues in a few steps.
- Mini Conda – Optional, only select if you prefer to work in an isolated environment
- VS Code – Lightweight IDE with multiple language support.
Take your AI innovations to the next level with GenAI Pinnacle. Fine-tune models like Gemini and unlock endless possibilities in NLP, image generation, and more. Dive in today! Explore Now
So, assuming you have met all the pre-requirements, let’s get started by understanding the project workflow of our AI Storyteller application.
Table of contents
This article was published as a part of the Data Science Blogathon.
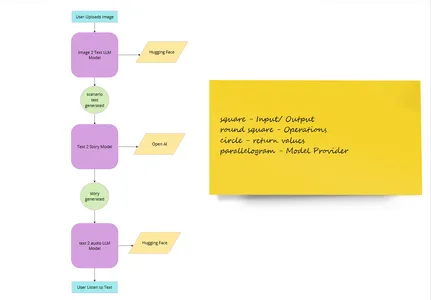
AI Storyteller Application Workflow
Like any software company, let’s start with the development of a project outline.
Here is the table of things we need to do along with the approach & provider
| Section Name | Approach | Provider |
| Image Upload | Image upload web interface | Python Lib |
| Convert image to text | LLM Models (img2text) | Hugging Face |
| Generate a story from text | ChatGPT | Open AI |
| Convert the story to audio | LLM Model (text2speech) | Hugging Face |
| User listens to audio | Audio interface | Python Lib |
| Demonstration | Web Interface | Python Lib |
If you are still unclear here is a high-level user-flow image 👇
So having defined the workflow, let’s start by organizing project files.
Set-up Workforce
Go to command prompt in working directory and enter this command one by one:
mkdir ai-project
cd ai-project
code
Once you run the last command it will open the VS code and create a workspace for you. We will be working in this workspace.
Alternatively, you can create the ai-project folder and open it inside vs code. The choice is yours 😅.
Now inside the .env file create 2 constant variables as:
HUGGINGFACEHUB_API_TOKEN = YOUR HUGGINGFACE API KEY
OPENAI_API_KEY = YOUR OPEN AI API KEY
Now let’s fill in the values.
GET OpenAI API Key
Open AI allows developers to use API keys for interacting with their products, so let’s now grab one for ourselves.
- Go to the open-ai official website and click Login / Signup.
- Next, fill in your credentials and log in/sign up. If you signed up, just redo this step.
- Once you are logged in, you will be greeted with 2 options – ChatGPT or API, select API
- On the next page navigate to the lock 🔒 symbol (might differ at the time of reading) and click it sidebar (refer to open-ai.png).
- A new page will appear on the sidebar (RHS). Now click on Create a new secret key.
- Name your key and hit create a secret key.
- Important! – Note down this text/ value, and keep it safe. Once the popup closes you won’t be able to see it again.
- Now go to the .env file and paste it beside OPEN_AI_API_KEY. Don’t put any quotes (“”).
Now let’s fix the other one!
GET Hugging Face API Key
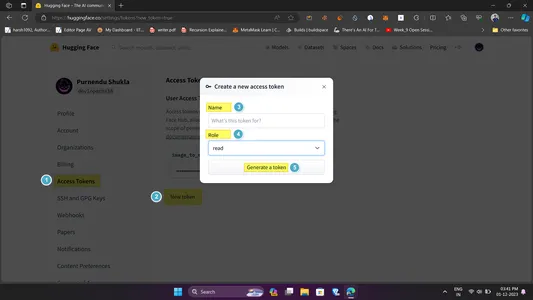
Hugging Face is an AI community that provides open-source models, datasets, tasks, and even computing spaces for a developer’s use case. The only catch is, that you need to use their API to use the models. Here is how to get one (refer to ref.png for reference):
- Head over to the hugging face website and create an account/login.
- Now head to the top left avatar (🧑🦲) and click settings in dropdown
- Inside the settings page click on Access Tokens and then New Token.
- Fill in the token info like name and permission. Keep the name descriptive and permission to read.
- Click on Generate a token and voila you have it. Make sure to copy it.
- Open .env file and paste the copied id beside HUGGINGFACEHUB_API_TOKEN. Follow the guidelines as above.
So why do we require this? This is because as a developer, it’s natural to accidentally reveal secret info on our system. If someone else gets hold of this data it can be disastrous, so it’s a standard practice to separate the env files and later access them in another script.
As of now, we are done with the workspace setup, but there is one optional step.
Create Environment
This step is optional, so you may skip it but it’s preferred not to!
Often one needs to isolate their development space to focus on modules and files needed for the project. This is done through creating a virtual environment.
You can use Mini-Conda to create the v-env due to its ease of use. So, open up a command prompt and type the following commands one after the other:
conda create ai-storyteller
conda activate ai-storyteller
1st command creates a new virtual environment, while 2nd activates that. This approach even helps later at the project deployment stage. Now let’s head to the main project development.
AI Storyteller Application – Backend
As mentioned previously, we will work out each component separately and then merge them all.
Dependencies & Requirements
In the vs-code or current-working-directory, create a new python file main.py. This will serve as the entry point for the project. Now let’s import all the required libraries:
from dotenv import find_dotenv, load_dotenv
from transformers import pipeline
from langchain import PromptTemplate, LLMChain, OpenAI
import requests
import os
import streamlit as st
Don’t get into library details, we will be learning them, as we use go along.
load_dotenv(find_dotenv())
HUGGINGFACE_API_TOKEN = os.getenv("HUGGINGFACEHUB_API_TOKEN")
Here:
- In line 1, we first find the .env file and then load its content. This method is used to load the OpenAI key but discourages its existence. Call a good practice 😅
- In line 2, we load the Hugging face hub api token, stored in .env file using os.getenv() to use later on.
- NOTE: Both the variables are constant, so we kept it capital.
Having loaded all the requirements and dependencies, let’s move to building out the 1st component. Image to text generator.
Image To Text Generator Model
#img-to-text

def img2text(path):
    img_to_text = pipeline(
    "image-to-text", model="Salesforce/blip-image-captioning-base")
    text = img_to_text(path)[0]['generated_text']
    return text
Now let’s dissect the code:
- In line 3 we define the img2text function which takes the image path.
- In line 4 we instantiate the model object as img_to_text using the pipeline constructor from hugging face which takes in task (img_to_text) and model name.
- in line 6 it sends the image path to the model via an api call returns the generated text (key: value) and gets stored in the text variable.
- Finally, we returned the text.
So simple, right?
Next, let’s pass on the text to the story generator.
Text to Story Generator Model
For text-to-story generation, we are going to use ChatGPT but you are free to use any other model you like.
Additionally, we will use Lang-chain to provide a custom prompt template to model to make it safe for every age to use. This can be achieved as:
def story_generator(scenario):
    template = """
    You are an expert kids story teller;
    You can generate short stories based on a simple narrative
    Your story should be more than 50 words.

    CONTEXT: {scenario}
    STORY:
    """
    prompt = PromptTemplate(template=template, input_variables = ["scenario"])
    story_llm = LLMChain(llm = OpenAI(
        model_name= 'gpt-3.5-turbo', temperature = 1), prompt=prompt, verbose=True)

    story = story_llm.predict(scenario=scenario)
    return story
Code Explanation
Let’s understand the code:
- In line 1 we define the story generator function which takes the scenario as an argument. Notice here the scenario refers to the story generated by the model earlier
- From lines 2 to 9 we define our custom instructions under the variable template with context as the scenario. This is the custom instruction mentioned earlier in the section.
- Next, in line 10 we generate a prompt using the hugging face PromptTemplate class. It takes in the template (entire text) and the custom context (here scenario)
- In line 11 we create an instance of the chat-gpt-3.5-turbo model using LLMChain wrapper from lang-chain. The model requires a model name, temperature (randomness in response), prompt (our custom prompt), and verbose (to display logs).
- Now we call the model using the predict method and pass the scenario in line 14. This returns a story based on the context, stored in the story variable
- In the end, we return the story to pass it to the last model.
For those who are curious about the Lang-Chain classes used:
- Prompt Template is used to create a prompt based on the template / the context provided. In this case, it specifies there is extra context -scenario.
- LLM-Chain is used to represent a chain of LLM models. In our case, it represents the OpenAI language model with GPT 3.5 Turbo model. In simple terms, you can chain multiple LLMs together.
To learn more about Lang-chain and its features refer here.
Now we need to convert the generated output to audio. Let’s have a look.
Text To Audio Model
But this time rather than loading the model, we will use hugging-face inference API, to fetch the result. This saves the storage and compute costs. Here is the code:
#text-to-speech (Hugging Face)
def text2speech(msg):
    API_URL = "https://api-inference.huggingface.co/models/espnet/kan-bayashi_ljspeech_vits"
    headers = {"Authorization": f"Bearer {HUGGINGFACE_API_TOKEN}"}
    payloads = {
         "inputs" : msg
    }
    response = requests.post(API_URL, headers=headers, json=payloads)

    with open('audio.flac','wb') as f:
        f.write(response.content)
Code Explanation
Here is the explanation of the above code:
- In line 1 we define a function text2speech whose job is to take in the msg (the story generated from the previous model) and return the audio file.
- Line 2 consists of API_URL, which holds the api end-point to call.
- Next, we provide the authorization and bearer token in the header. This will be provided as a header (authorization data) when we call the model.
- In line 5 we define a payload dictionary (JSON format) that contains the message (msg) we need to convert
- In subsequent line posts request to model is sent along with header and JSON data. The returned response is stored in the response variable.
Note: The format for model inferencing can vary over the model, so please refer to the end of the section.
- Finally, we save the audio files’ content (response.content) in the local system by writing the required response audio.flac. This is done for content safety and optional.
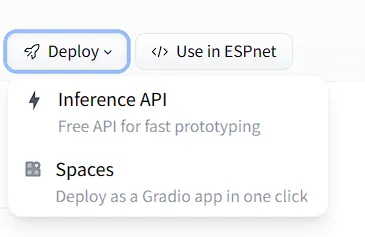
Optional
In case you plan to choose a different text-to-audio model, you can get the inference details by visiting the models page clicking on the drop-down arrow beside deploy, and selecting the inference-API option.
Congrats the backend part is now complete, let’s test the working!
Check Backend Working
Now it’s a good time to test the model. For this, we will pass in the image and call all the model functions. Copy – paste the code below:
scenario = img2text("img.jpeg") #text2image
story = story_generator(scenario) # create a story
text2speech(story) # convert generated text to audio
Here img.jpeg is the image file and is present in the same directory as main.py.
Now go to your terminal and run main.py as:
python main.pyIf everything goes well you will see an audio file in the same directory as:

If you don’t find the audio.flac file, please ensure you have added your api keys, have sufficient tokens, and have all the necessary libraries installed including FFmpeg.
Now that we have done creating the backend, which works, it’s time to create the frontend website. Let’s move.
AI Storyteller Application – Frontend
To make our front end we will use streamlit library which provides easy-to-use reusable components for building webpages from Python scripts, having a dedicated cli too, and hosting. Everything needed to host a small project.
To get started, visit Streamlit and create an account – It’s free!
Now go to your terminal and install the streamlit cli using:
pip install streamlitOnce done, you are good to go.
Now copy-paste the following code:
def main():
    st.set_page_config(page_title = "AI story Teller", page_icon ="🤖")

    st.header("We turn images to story!")
    upload_file = st.file_uploader("Choose an image...", type = 'jpg')  #uploads image

    if upload_file is not None:
        print(upload_file)
        binary_data = upload_file.getvalue()

        # save image
        with open (upload_file.name, 'wb') as f:
            f.write(binary_data)
        st.image(upload_file, caption = "Image Uploaded", use_column_width = True) # display image

        scenario = img2text(upload_file.name) #text2image
        story = story_generator(scenario) # create a story
        text2speech(story) # convert generated text to audio

        # display scenario and story
        with st.expander("scenario"):
            st.write(scenario)
        with st.expander("story"):
            st.write(story)

        # display the audio - people can listen
        st.audio("audio.flac")

# the main
if __name__ == "__main__":
    main()
Code Explanation
- st.set_page_config: Sets the page configuration. Here set the title and icon
- st.header: Sets the page header component.
- st.file_uploader: Add an upload component to the webpage along with the provided text. Here used to take images from the user.
- st.image: Displays the image. As guessed shows user uploaded image.
- st.expander: Add an expander (expand to see) component to the webpage. Here we use it to store the scenario (image caption) and story (caption to story). Once the user clicks on the expander, he/she can see the generated text. Also, it provides good ui-experience.
- st.write: Used for multiple purposes, here to write expander texts.
- st.audio: Adds an audio component to the webpage – user can use this to listen to generated audio
Here is what our function does in a nutshell:
Our main function creates a webpage that allows the user to upload the image, pass that to the model, convert the image to the caption, generate a story based on it, and convert that story to audio that the user can listen to. Apart from that one can also view the generated caption and story and the audio file is stored in the local / hosted system.
Now to run your application, head over to the terminal and run:
streamlit run app.pyIf everything successful, you will get below response:

Now head over to the Local URL and you can test the app.
Here is a video which showcases how to use the app:
Congrats on building your LLM- application powered by Hugging Face, OpenAI, and Lang chain. Now let’s summarize what you have learned in this article.
Conclusion
That’s all, we have learnt how to build frontend and backend of an AI Storyteller application!
We started by laying down the foundation of the project, then leveraged the power of hugging face to use Open Source LLM Models for the task in hand, combined open AI with lang-chain to give custom context and later wrapped the entire application into an interactive web app using streamlit. We also applied security principles guide along the project.
Key Takeaways
- Secure the user info using. env and load the same using the Python dotenv package.
- Break down projects into workable components and set the environment accordingly.
- Combine multiple models as a superscript to get your work done.
- Use Lang chain to provide custom instructions to the model to reduce hallucination and safeguarding response using PromptTemplate.
- Use the Lang-Chain LLMChain class to combine, multiple models.
- Inference to hugging-face models and store the result using the inference API.
- Build webpages using Streamlit’s declarative syntax.
Dive into the future of AI with GenAI Pinnacle. From training bespoke models to tackling real-world challenges like PII masking, empower your projects with cutting-edge capabilities. Start Exploring.
I hope you enjoyed building this AI storyteller application. Now put that into practice, I can’t wait to see what you all come up with. Thanks for sticking to the end. Here are a few resources to get you started.
Resources
- OpenAI: OpenAI Docs
- Hugging Face: Hugging Face Learn
- Lang Chain: Lang Chain Docs
- Contact Me: LinkedIn, Twitter, YouTube
The media shown in this article is not owned by Analytics Vidhya and is used at the Author’s discretion.
A dynamic and enthusiastic individual with a proven track record of delivering high-quality content around Data Science, Machine Learning, Deep Learning, Web 3.0, and Programming in general.
Here are a few of my notable achievements👇
🏆 3X times Analytics Vidhya Blogathon Winner under guides category.
🏆 Stackathon by Winner Under Circle API Usage Category - My Detailed Guide
🏆 Google TensorFlow Developer ( for deep learning) and Contributor to Open Source
🏆 A Part Time Youtuber - Programing Related content coming every week!
Feel free to contact me if you wanna have a conversation on Data Science, AI Ethics & Web 3 / share some opportunities.