Introduction
Breakthroughs in the field of Natural Language Processing (NLP) have seen a sudden rise in recent times. The amount of text data available to us is enormous, and data scientists are coming up with new and innovative solutions to parse through it and analyse patterns. From writing entire novels to decoding ancient texts, we have seen a variety of applications for NLP.
One of the most popular applications is a chatbot. Organizations like Zomato, Starbucks, Lyft, and Spotify are leveraging this technology on their website and mobile apps. As a user, we no longer need to worry about being put on hold – just type your query and the chatbot will instantly analyse the text and give the appropriate response.

Given how popular and useful these chatbots have become, I wanted to showcase how to make one. In this article, we will build a chatbot using Slack, the world’s largest communication app for teams. Then, we will utilize Google’s DialogFlow (previously api.ai) to add intelligence to the bot.
Sounds interesting? Let’s start!
Table of Contents
- What is a Chatbot and why should you care?
- Anatomy of our Chatbot
- A simple rule based Chatbot using Slack
- Understanding Google’s Dialogflow (api.ai) for NLP and Machine Learning
- Bringing the Chatbot to life (Integrating DialogFlow and Slack)
What is a Chatbot and why should you care?
A chatbot provides a way for your users to give complex commands and get complex tasks done using simple language.
For example, assume you want to buy a pair of shoes from an ecommerce site that has it’s own chatbot. You can tell the bot that you are looking to buy some shoes, and it would have a conversation with you to gather more details, like “what brand/colour?”, “what’s your size?” and “what kind of shoes? Sneakers or boots?”. Instead of browsing through the website, you will have a conversation with the bot, mirroring the type of experience you would have when you go to the retail store.
Another example of a use case would be Starbucks’ chatbot:

It’s easy to order coffee while conversing with the bot, and then clicking on a bunch of buttons and searching for the orders manually. For these reasons, chatbots are considered to be one of the best ways to engage with the user. Now that we know what a chatbot is, let’s get into the basics. Below is my definition of a chatbot:
A chatbot is a service, powered by rules and sometimes artificial intelligence, that you interact with via a chat interface. The service could be any number of things, ranging from functional to fun, and it could live in any major chat product (Facebook Messenger, Slack, Telegram, Text Messages, etc.).
In layman terms, a chatbot is a program that interacts with a user on a chat platform. It can be as dumb (fun) as you want it to be and as smart (resourceful) as you require it to be!
Anatomy of our Chatbot
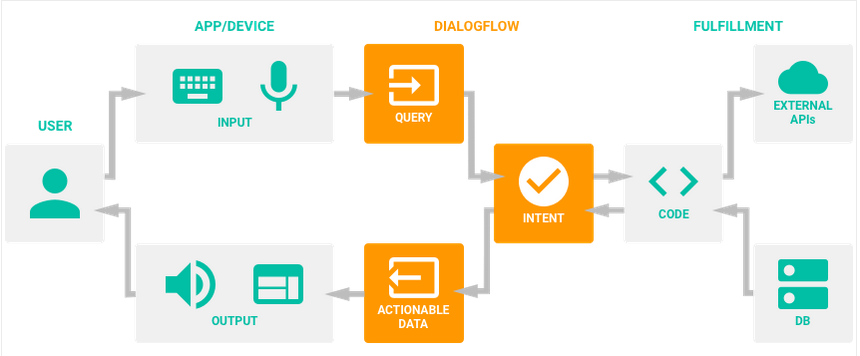
There are various ways of creating a chatbot based on what kind of functionality we want it to have. In this tutorial, we are going to build a basic chatbot. Below is a high level design of it:

We will use Slack’s API to send the messages to DialogFlow (DF). DialogFlow’s NLP engine would understand the intent and semantics behind the user’s messages, and craft an appropriate reply for our chatbot to send to the user. The Slack interface and DialogFlow together make the chatbot. To put this in an analogy, the Slack interface would be the “face” of our bot, and DialogFlow would be the “brain”.
A simple rule based Chatbot using Slack
For this study, Slack is our platform of choice, as it is used widely across the world for organization level communications. It also has very good support for adding bots through its APIs. Before we can do anything with Slack however, we need to get a few things ready:
- A Slack workspace to test our bot
- A Slack application for the bot
Creating a Slack Workspace
A workspace (group) is Slack’s way of organizing teams. If you are a part of Analytics Vidhya’s group on Slack, you are part of a workspace. A workspace’s URL address looks like this:
https://workspace-name.slack.com
You can create your own workspace at this url:
https://slack.com/create#email

Once you enter your email, Slack will send you a 6 digit code on your email id. Follow their given steps to select your name, password, team size. Then, Slack asks you to provide a name for the group:

You can give it any name you like. I’ll name mine something . Once you select the URL address and create your workspace, Slack will recommend sending email invitations. You can just skip this step by clicking on “Skip for Now” and voila! You just created your own workspace on Slack. Try sending some messages!

Creating a Slack Application
Now that you have a workspace to experiment with, you need an application where you can attach your bot. Create the app on the below link:
https://api.slack.com/apps
Click on “Create App” and give a name to the app and select your workspace:

This will redirect you to your app dashboard. From there, you can select the “Bots” option:

Click “Add a Bot User” –> Give a name to your bot. In my case, I have named it “skynet”. Now that we have created a bot for our app, we need to add it to our workspace so we can chat with it! Go back to the above app dashboard and scroll down to find the “Install App to Workspace” option.

Once you do that, Slack will ask you to “authorize” the application. Go ahead and accept the authorization. Now that we have authorized the bot, let’s create a simple rule based chatbot using python.
Using python to create a rule based bot
Before we are able to connect any external program to our Slack bot, we need to ensure that Slack has the right authorization to access the bot. For that, Slack provides an “auth token” that we need to provide when trying to connect with it. Go back to the “app dashboard” and select the “OAuth & Permissions” option:

This will open the permissions settings of the app. Select the “Bot User OAuth Access Token” and save it (I have hidden them for security reasons). This token is instrumental in connecting to our bot.

Now that you have everything set up, let’s write some python code. To make it easy to connect to the Slack API, I have written a small python program. Let’s setup the code environment.
Note: The entire project is in python 2.7.
1.Install slackclient library.
$pip install slackclient
2. Clone my slack repository.
$git clone https://github.com/mohdsanadzakirizvi/Slack-AI-ChatBot.git
3. Set your slack auth token to the value of “Bot User OAuth Access Token” and the name of your bot in the environment variables.
$export SLACK_TOKEN=<your_bot_user_oauth_token_here>
$export BOTNAME=<your_botname_here>
For example, my BOTNAME is “skynet” so I’ll set it like this:
$export BOTNAME=skynet
4. Go to the Slack-AI-ChatBot directory.
$cd Slack-AI-ChatBot
5. Start the python bot.
$python mainbot.py
You should now get the below notification:

Now that everything is set up, you can just go to your Slack workspace and start chatting with your bot. Note that it would reply only when you talk to it by using its mention @chatbotname (just like we normally do in Slack).

These are some of the hard coded rules I have preset in the bot. You can change them or add your own rules. If you open the file mainbot.py, you will find the below function:
def handle_command(slack_api, command, channel):
    """
    Recieves commands directed for the bot, if they are valid perform action
    else resends clarification
    """
    EXAMPLE_COMMAND = 'do'
    if command.lower().startswith(EXAMPLE_COMMAND) or command.lower().startswith('what'):
        slack_api.rtm_send_message(channel, 'Yes, code me further to do that!')
    elif command.lower().startswith('hi') or command.lower().startswith('hey') or command.lower().startswith('hello') or command.lower().startswith('who are you'):
        slack_api.rtm_send_message(channel, 'Hey, I\'m your slack bot, how may I help you?')
    else:
        print 'Invalid Command: Not Understood'
    slack_api.rtm_send_message(channel, 'Invalid Command: Not Understood')
This is where all the magic is happening. Go ahead and try adding your own rules and make the chatbot as customizable as you can! Also, I have added comments throughout the code in the project to make it understandable. Feel free to explore the code here to understand how the process works.
Now that we have got a taste of building a chatbot for Slack using custom rules, let’s see how can we use the power of NLP and ML to make our bot even more intelligent!
Note: Every time you make changes in the code, you will have to restart the program for the changes to take effect.
Understanding Google’s Dialogflow (api.ai) for NLP and Machine Learning
Before we proceed, recall the anatomy of our chatbot we discussed right at the beginning of the article. For your reference, below is that diagram:
The first part, which included setting up Slack, has been completed. Now, it’s time to explore the DialogFlow api.

Setting up DialogFlow
1. Go to https://dialogflow.com/ and signup for free using your Google account
2. You will get access to your console:

Agents
DialogFlow works by creating agents. Agents are best described as NLU (Natural Language Understanding) modules. These can be included in your app, product, or service. They transform natural user requests into actionable data.
This transformation occurs when a user input matches one of the intents inside your agent. Intents are the predefined or developer-defined components of agents that process a user’s request.
For example, you tell the chatbot that you are feeling cold, or you want the fan to be turned off. The agent needs to know what the intent is behind these statements. More specifically, “What does the user wants me to do?”. Once the intent is known, a corresponding action/reply can be generated.
Let’s start by creating our own agent. We’ll take the example of a chatbot for a pizza company.
On the top left of the window, you’ll see an option to “Create Agent”. Click on it and select a name for your agent. I have named mine as “pizzaBot”.

Now that we have the agent ready, we need to define some entities it needs to recognize and some intents it needs to understand.
Understanding intents and entities
a.) Entity
Entities are a group of objects that you need the agent to recognize. For example, if we are creating a pizzaBot, some of our entities would be objects that are usually required with a pizza:
- Breads
- Toppings
- Cheese, etc.
Let’s create our entities.
- Click on the “Entities” button on the left and select “Create Entity”.

- Select a bunch of toppings for your pizza.

- On clicking the “Save” button, you’ll have your toppings entity.
- Let’s add another entity “Cheese” for our agent:

Now that our entities are ready, we need to define some intents that will help our agent understand what to do with these entities.
b.) Intent
In simple words, an intent is a mapping between what the user “says”, and what operation your bot takes on that instruction. If you click on the intent tab, you’ll see that there are two intents already present.
- The default fallback intent when the bot doesn’t understand what the user is saying, and
- the welcome intent which is triggered when the user says something along the lines of “hello” and you want the bot to respond to that with something similar.

Let’s play around with the default intents. Type “pizza please!” in the demo field on the right and see how the agent reacts:
Since we haven’t trained our agent yet, it used the default fall back intent and responded with one of the many responses it has stored for that scenario. Let’s create an intent to cook a pizza and call it “makePizza”. Click on create intent, select a name, and save it. You will see something like this:

The way DialogFlow works is by taking some sample user sentences to start out with. Then, it trains it’s engine to generate an algorithm that best matches these sentences to the correct intents. Let’s add some basic training phrases for our agent:

The idea is to train our agent in as diverse and varied examples as possible to make it more precise. Once you have set up the training phrases, you need to define what action the agent should take if it encounters this intent. You can do that by clicking on the “Add Parameters and Action” option. Add the following actions and parameters:

What do these column names mean?
- Required – Defines whether this parameter is mandatory for the action.
- Entity – Here we map the parameters to the entities we have predefined.
- Value – If we want to re-use this parameter in the response, we can simply use it’s value name and the parameter will be substituted in it’s place.
- Is List – If the parameter value can be a list (for instance, there can be more than one toppings in the order).
- Prompts – What should the agent say while prompting the user for the parameters? We customize that here.
Click on “Define prompts” next to toppings and write “What toppings would you like on your pizza?”

Similarly, add one for cheese. Wow. That was a lot of work. Let’s see what we achieved. Save the intent and get back to the demo area of the agent. Try asking the agent for a pizza. Since we have trained the agent on a few sample phrases, it should be able to immediately recognize any phrase related to ordering a pizza. It should also ask you for the toppings and for the type of cheese you want? Checkout the following video to see what I’m talking about.
Notice how natural the conversation feels. Once you trigger an intent, the agent tries to extract the parameters you have marked as important from the user by having a conversation. Note that you only need to give a few examples for the training phrase; the NLP engine of DialogFlow takes care of the rest.
Also, you can add custom responses for the user in case the intent is successfully acted upon and completed. Click on the “Add Responses” button below the “Action and Parameters”, add the following response, and save it:

Once your pizza is ready, you’ll be greeted by the below message:

What happened behind the scenes? When we used $cheese and $toppings in the response field, they were automatically replaced by the values the parameters extracted from the user’s conversation. Convenient, isn’t it?
Training the agent
Now that everything about the agent is set up , it’s time to train it. Click on the settings icon next to your agent name.

In the settings window, select “ML Settings”.

Here are few important things to note:
- There are two modes to train the model:
- Hybrid mode
- ML only mode
- Hybrid mode is good when you have less training samples. If you have a large set, you should go for the ML mode
- ML Classification Threshold is the minimum confidence score that the model should have. Only then can it take an action on an intent, otherwise it will fall back to the “Default Intent” we discussed earlier.
Click on the “Train” button and once the agent is trained, save it. Now our NLP agent is good to go. Let’s go to the next step and integrate this with our Slack app to make the chatbot complete!
Bringing the Chatbot to life (Integrating DialogFlow and Slack)
DialogFlow (DF) is an excellent choice when it comes to integration with most popular applications. It supports integration with Slack right out of the box. Let’s get our DF agent to work with our Slack bot!
Setting up Slack app credentials with DialogFlow
On the left side of the window, click on the “Integrations” button and you will see a bunch of options. Select the Slack icon and click settings beneath that. The below box will pop up:

On the top right hand side, toggle on the switch to “turn on” the integration with Slack.
Scroll down and you will find fields to enter your Slack app’s credentials:

For that, head back to your Slack app’s console. If you don’t have it opened already, just go to the following URL and select your app:
https://api.slack.com/apps
Scroll down on the page and you’ll find your app’s credentials (I have hidden them for security reasons).

Copy them to the respective fields in the DialogFlow page.
Note: To copy the “Client Secret”, you have to first click on the “Show” option button next to it. After you have copied the credentials, click “Start” on the bottom right of the Slack box in DialogFlow.
Continuing Slack Setup
Now that you’ve set up Slack and Dialogflow, you’ll need to enable OAuth (helps in authentication), Event Requests URLs (provided by Dialogflow), and Event Subscriptions (what kind of events does our bot listen to?).
Add OAuth URL
- Copy the OAuth URL from Dialogflow’s Slack setting p.age
- Go to the Slack Developer Console and click on OAuth & Permissions in the left hand menu.
- Click on the Add a new Redirect URL button and paste the OAuth URL.
- Click Add.

Add Event Request URL
- Copy the Event Request URL from Dialogflow’s Slack setting page.
- Go to the Slack Developer Console and click on Event Subscriptions in the left menu.
- Click on the switch to enable Events, and paste the Event Subscription URL in the Request URL field.
After a few moments you should see a green “Verified” text above the Request URL field.

Enable Event Subscriptions
Event subscription is the most crtitical thing for the chatbot. It basically tells Slack what kind of events our bot will listen to and get triggered. Events can range from someone joining a channel to a new personal message.
- Click on Event Subscriptions in the left menu.
- Click the switch to enable the option.
- Under the Subscribe to Bot Events , click on the Add Bot User Event button.
This will reveal a text field and a list of events. You can enter terms into this field to search for events you want your bot to respond to. Here’s a list of events that I suggest adding:
- Once you’ve added the events, click the Save Changes button at the bottom of the screen.
Add Your Slack Bot to a Team
- In the Slack Developer Console, click on Manage Distribution in the left menu.
- Under the Share Your App with Your Team section, click the Add to Slack button.

- On the next page, click the Authorize button to add the agent.

Once you are done with this step, you can go back to your workspace and start conversing with your bot!
Conversing with the chatbot
Go to your workspace and either personal DM the bot, or mention his name like @botname and it will start responding.
Did you notice?
That apart from answering the normal pizza questions, the bot is also good at replying to generic messages like “hi”, “hello”, and “thank you”? This is possible because of a DialogFlow feature called “SmallTalk”.
Configuring the Small Talk
If you click on the “Small Talk” button on the left pane in DialogFlow, you’ll come across a set of options:

Small Talk let’s you add how your bot should react when it receives generic comments like “Hi, Hello” or general questions like “Who are you?” and “What can you do?”. Go ahead and set it up with details specific to your project.
End Notes
Our chatbot is finally in it’s full shape! Now that you are able to understand how a chatbot works and have implemented both a simple rule based bot and a ML based intelligent bot, you can do a lot more with it by exploring the features both Slack and DialogFlow have to offer.
This has been a great learning experience for me. Using the power of DialogFlow, we were able to avoid a lot of complexity that’d we would have faced if we were implementing NLP and ML models from scratch. I challenge you to go ahead and build some interesting chatbots of your own!
And to wrap it up, here are some resources/links you can check out:
- Check out the DialogFlow documentation for any doubts regarding their API.
- Slack bot-users documentation for doubts regarding their bot platform.
- All the code used in this article is available on GitHub.
Did you find this article useful? Let me know your thoughts and feedback in the comments section below.
[email protected] Sanad
26 Jul, 2020
A computer science graduate, I have previously worked as a Research Assistant at the University of Southern California(USC-ICT) where I employed NLP and ML to make better virtual STEM mentors. My research interests include using AI and its allied fields of NLP and Computer Vision for tackling real-world problems.


What is there in your git repository which you have cloned?
Hey Madhu, In the git repository, I have written basic code for the chat bot to interact with the slack API. It's written in python2.7 . The reason I did it because that basic code for using the slack API is common and we can reuse it! Sanad :)
Great blog,,,!,,, I want more from slak integration or app.
Hey RV, thanks for your feedback! Sanad :D
Hi, Im using MacBook Air 2017 with OS high Sierra. I have downloaded pip but I am not able to run the python code to set my slack auth token to the value of “Bot User OAuth Access Token” and the name of my bot in the environment variables. Please help.
Hey Rachit, You have to manually set up bot user oath access token from your terminal by using the commands, $export SLACK_TOKEN= $export BOTNAME= And then run the python program which only has code for running the bot. Hope this helps, Sanad :)
Hi, I want to build a chatbot for my business's website. Will Dialogflow and slack help me achieving this goal?
Hey Rahul, Slack is a chat application like Facebook Messenger, WhatsApp etc. For your business website, if you want chatbot directly on the website you can use DialogFlow in the backend to help with the intelligence part. If you want to create a chatbot for your business Facebook page then you'd use DialogFLow with the FB Messenger. Hope this helps, Sanad :)
Kindly add me to the slack chat group
Great . Well written.
Hey Mayank, Thanks for the feedback! Sanad :)
This is awesome, thank you! I'm a bit stuck though. I've modified the mainbot.py file and saved it. Then I entered in '$python mainbot.py' again and got 'SLACK_BOT connected and running' as expected, but when I try my new questions in the Slack workspace, I keep getting "Invalid Command: Not Understood". Why isn't it working?
Hey Jennifer, Can you please share your code and any screenshots too? Sanad :)
Hello Sanad, this is so helpful. i am new to Python world and i have python 3. how do we update the main.py code and use the customized bot. Thank you so much for the code.
I have done set up my bot but it responds to all messages in a channel where it's invited. I want it to respond only to messages where we mention the bot but it is now responding to all messages even without mention :( Do you have any idea why it is so? I made sure to follow the exact steps you described above
Hi, I want to manage a chatbot for my business’s website [add questions response ...] . with Dialogflow any seggestion please ,??
This is great... I have been looking for a way to get away from using NLP/AI/ML as just marketing platitudes and instead be able to better understand and make it work for my purposes.
I'n regards to this tutorial, are the simple python bot you wrote and the DialogFlow bot unrelated/independent of each other? I was hoping to have DialogFlow integrated into my Python written bot but when running both you would receive two responses.. e.g User: @botname Hello! Botname: [Python response] Botname: [DialogFlow response]
Yes. Both of them do the same thing. One is a simpler version from scratch using python. The other is using DF as an nlp back-end. Use only one at a time.
Thanks for the write up!
Hi , Nice informative article. I would like to know , can we create user authorization in this framework, like a certain chat user can get informations within a particular scope. Can we grant a chat user, access control privileges on what type of informations he/she can get from the bot. Thanks