- Learn about deploying deep learning models using TensorFlow Serving
- How to handle post-deployment challenges like swapping between different versions of models using TensorFlow Serving
- Work on a popular deep learning dataset, build an image classification model, and then deploy that using TensorFlow Serving
So you’ve built your machine learning or deep learning model. Congrats! That’s a significant step towards getting the model to your client or customer. But that’s NOT the final stage in your project.
That final stage – the crucial cog in your machine learning or deep learning project – is model deployment. You need to be able to get the model to the end user, right? And here’s the irony – the majority of courses, influencers, and even experts – nobody espouses the value of model deployment.

And yet you’ll face a ton of questions about model deployment when you sit for data scientist interviews! What is model deployment? What are the different tools for model deployment? How do you handle a deep learning model written in one language into the production environment that requires a different language?
If you are not sure about these questions – this article is for you. We will talk about what model deployment is and look at the different tools for model deployment. I will introduce you to TensorFlow Serving, a popular model deployment tool that top organizations are using.
We will then work on a popular deep learning dataset and understand how you can use TensorFlow Serving to deploy your deep learning model. There’s a lot to unpack here so let’s get rolling.
Note: I recommend checking out the below resources if you’re new to deep learning:
If you haven’t heard of what model deployment is, this is a MUST-READ section.
In a typical machine learning and deep learning project, we usually start by defining the problem statement followed by data collection and preparation, understanding of the data and model building.
But in the end, we want our model to be available for the end-users so that they can make use of it. Model Deployment is one of the last stages of any machine learning project and can be a little tricky.
Here’s an illustrated version of a typical machine learning and deep learning project pipeline:

Post-Deployment Challenges
There are some post-model deployment challenges you might come across:
So how do you overcome these significant challenges? We’ll answer this question later in the article using TensorFlow Serving.
Here’s a quick summary of the currently available model deployment tools in the market. Of course there are other tools and this list is by no means exhaustive. But these are the most popular model deployment tools you should be aware of:
TensorFlow Serving is a flexible, high-performance model deployment system for putting machine learning and deep learning models to production.
It is easy to deploy models using TensorFlow Serving. If we want to update the deployed model with an updated version, then TensorFlow Serving lets us do that in a much simpler manner as compared to other existing tools. We can also rollback to any previous version(s) without shutting down the server.
TensorFlow Serving has already been tested by more than 1000+ Google projects and handles millions of requests per second in those projects.

After the model is deployed, the client sends a request to the server and some calculations are performed on the server. Now, the object that the client uses to perform calculations, which is deployed on the server, is known as a Servable. The size and granularity of the servable are flexible.
Tensorflow Serving can handle multiple versions of the servable and allows easy swaps between different versions of the Servables.

You can install TensorFlow using the Python-pip package manager:
# download package information from all configured sources.
sudo apt-get update

# Current stable release for CPU and GPU
pip install tensorflow
Add the TensorFlow Serving distribution as a package source:
echo "deb [arch=amd64] http://storage.googleapis.com/tensorflow-serving-apt stable tensorflow-model-server tensorflow-model-server-universal" | sudo tee /etc/apt/sources.list.d/tensorflow-serving.list && \
curl https://storage.googleapis.com/tensorflow-serving-apt/tensorflow-serving.release.pub.gpg | sudo apt-key add -
sudo apt-get install tensorflow-model-server
Fire up your Jupyter notebook (or Colab) and let’s get coding!
In this article, we are going to build and deploy a deep learning model to Identify the Digits. You guessed it – we are going to use the famous MNIST Dataset. This is a widely used dataset in the machine learning and deep learning community. It was developed by Yann LeCun, Corina Cortes and Christopher Burger for evaluating deep learning models on the handwritten digit classification problem.

Let us define a simple Artificial Neural Network model for identifying the digits from an image. Here, I have used 10,000 images to train the model.
In this tutorial, our focus will not be on how to build a robust classification model but to learn how to deploy the model once it is built. If you want to learn more about building image classification models, I highly recommend you go through these articles:


You can save the trained model using just one line of code! Use the model.save method to save the model’s architecture, weights, and training configuration. You just need to pass the path of the directory to store the model.
Make sure that you store the model in the directory with an integer name. This integer act as the version number of your model.
In case you are creating multiple models for the same problem, then store the latest model in a directory with a higher version number. Keep both the model directories in the same parent directory.
Your model’s directory will look something like this:
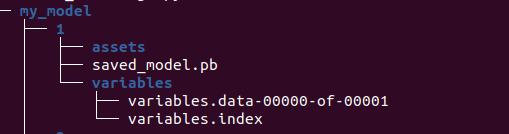
It will contain a saved_model.pb file where pb stands for protobuf. It contains the graph definition as well as the weights of the model. This will create an empty directory named assets (empty in our case).
Usually, the directory contains files used by the TensorFlow graph, for example, text files used to initialize vocabulary tables. The above command will also create a directory name variables that contains standard training checkpoints. Checkpoints are the exact values of all parameters used by a model at a particular stage of the model building process.
The big question! We have saved the trained model and we are going to use that model to predict the digits on unseen data.
First, we will load the model using the load_model method. You just need to pass the model directory – it will automatically find the .pb file and load the model.
Using the predict function will return an array of 10 probabilities (since we have 10 classes). The first element in the array tells us the probability of the digit is 0, and so on. You can use another function predict_classes which will return the class with the highest probability:

![]()
This is the point where we start loading our model and run the TensorFlow server. After this, we would be able to make requests to the server and get the predicted results.
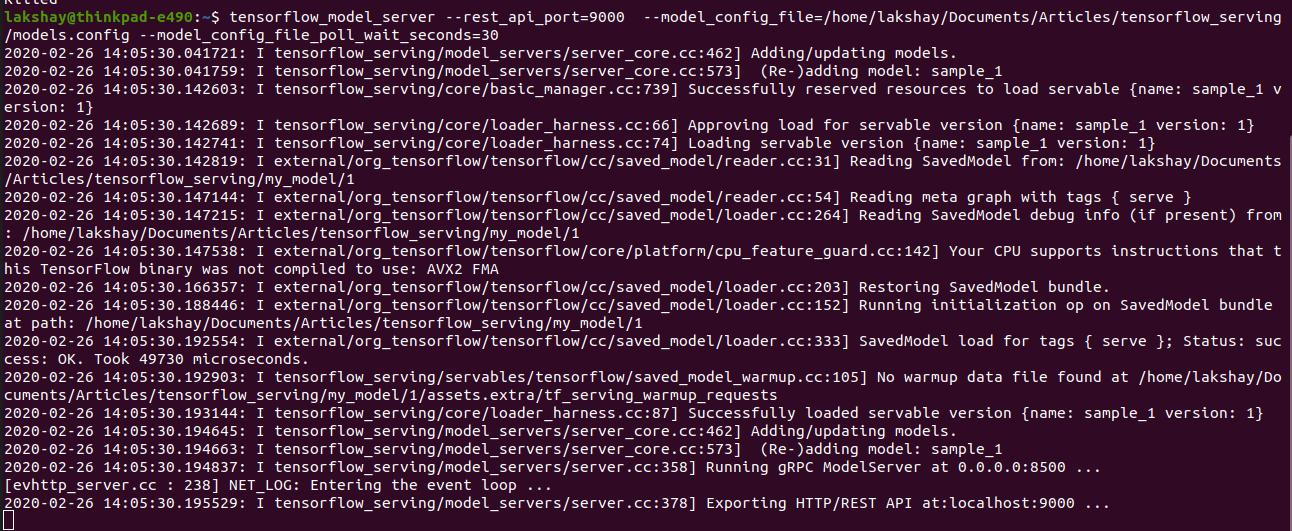
Use the following command to start the server:
tensorflow_model_server --rest_api_port=9000 --model_base_path="path-to-directory/tensorflow_serving/my_model" --model_name=sample

Congrats! You have deployed your deep learning model. Now, let’s see how to send requests to the deployed model and get the results.
First, we will define a function that will display the image and add the label as the title of the image. We will test this function by generating a random index and show the image and label present on that index:

Next, we will create a JSON object and send the first 3 data points in a batch to the server. After this, we will use the requests library to send a POST request to the REST API PORT 9000 that we defined earlier.
Remember we named our model as a sample while deploying it? So here in the URL, we need to provide that name with the model version that you are asking for the results:

We have received an array of probabilities for each data point here. Now, we can easily find the index of the highest probability using the NumPy argmax function.
Let’s see whether we got the predicted results correct or not:

Now, we know that we cannot build a perfect model in one go. We always build multiple models and improve the performance of the model from the previous one. Here, I have trained one more model for the same problem and stored it the directory name 2:

TensorFlow Serving will automatically detect the higher version and replace it automatically to deploy it on the server:

Whatever we have done so far was one of the best ways if we only have to deploy a single model. But what if we need to deploy multiple models? That’s a HUGE challenge and a very relevant one in the industry.
We can provide Tensorflow Serving with a configuration file named models.config that will contain a list called model_config_list which in turn consists of multiple model configurations.
Each model configuration in the list specifies one model to be served, including its name and the path where the model is stored. You can also specify the version of the model to be used. By default, the server will serve the version that has the largest version number.
Let’s see a sample config file to deploy multiple deep learning models.
If you have two models stored in directory my_model_1 and my_model_2 for two different problems, you can define the configuration file as below and deploy both the models simultaneously:

Use the following command to deploy the models using the configuration file:
tensorflow_model_server --rest_api_port=9000 --model_config_file=path-to-model-directory/tensorflow_serving/models.config

Now, what if we want the server to check for the changes in the configuration file and deploy it accordingly? For that, we have another option model_config_file_poll_wait_seconds that will check for the updated configuration after a specified time.
Initially, the model directory has only version 1:

Run the following command and the server will check for the updated configuration file after 30 seconds:
tensorflow_model_server --rest_api_port=9000 --model_config_file=/home/lakshay/Documents/tensorflow_serving/models.config --model_config_file_poll_wait_seconds=30
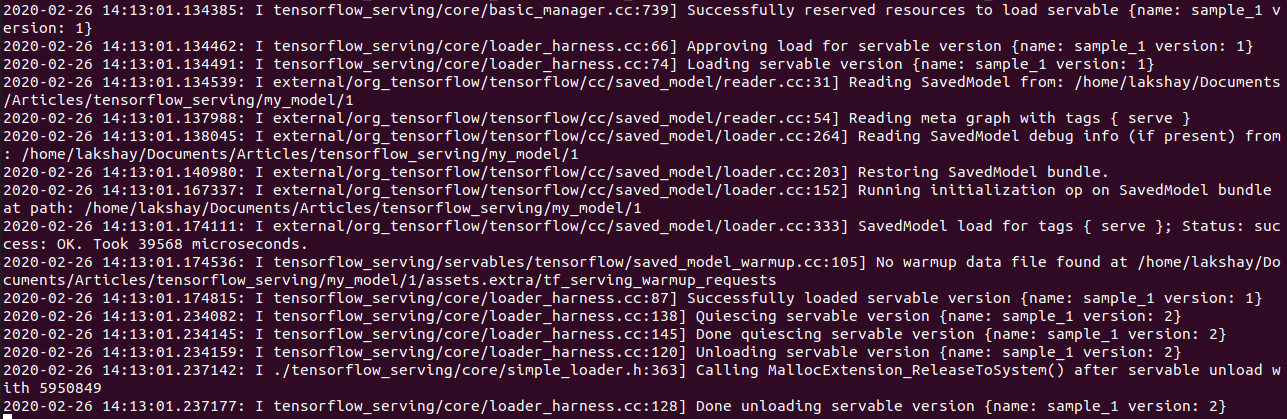
Here, we have trained another model with version 2. Now, we don’t have to shut down the server and restart it with the updated model again.
We just need to update the version in the configuration file and after a specified time, the TensorFlow server will automatically replace the model with the updated version without shutting down the server. Perfect!


What if the performance of the updated model is not as good as the performance of the previous model? Here, we just need to update the version to 1 in the configuration file and the previous stable version will be deployed on the server automatically.
Deploying a deep learning model can appear complex at first. But with this tutorial, you know the nuts and bolts of how to do just that using TensorFlow Serving.
Here’s my suggestion – take up a deep learning (or machine learning) problem from the DataHack platform and try deploying that using the knowledge you gained in this tutorial. That’s one of the best ways to gain practical experience with model deployment – you’ll find that really useful in the industry (and in interviews!).
Lorem ipsum dolor sit amet, consectetur adipiscing elit,


can you please explain in detail, how can i deploy multiple model. I created models.config file with two different models but its giving me an error while predicting the output using json api
Hey can you clarify one thing, in the model_name parameter the name of the model you entered as sample, but I have seen at many other places, that the name of the model, I mean value at the model_name parameter should be same as the name of the model which you have named while saving the model. What is the actual standard, can you clarify?