Create your Own Image Caption Generator using Keras!
Overview
- Understand how image caption generator works using the encoder-decoder
- Know how to create your own image caption generator using Keras
Introduction
Image caption Generator is a popular research area of Artificial Intelligence that deals with image understanding and a language description for that image. Generating well-formed sentences requires both syntactic and semantic understanding of the language. Being able to describe the content of an image using accurately formed sentences is a very challenging task, but it could also have a great impact, by helping visually impaired people better understand the content of images.
This task is significantly harder in comparison to the image classification or object recognition tasks that have been well researched.
The biggest challenge is most definitely being able to create a description that must capture not only the objects contained in an image, but also express how these objects relate to each other.
Consider the following Image from the Flickr8k dataset:-
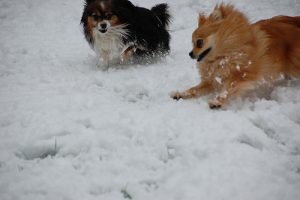
What do you see in the above image?
You can easily say ‘A black dog and a brown dog in the snow’ or ‘The small dogs play in the snow’ or ‘Two Pomeranian dogs playing in the snow’. It seems easy for us as humans to look at an image like that and describe it appropriately.
Let’s see how we can create an Image Caption generator from scratch that is able to form meaningful descriptions for the above image and many more!
Prerequisites before you get started:-
- Python programming
- Keras and its modules
- Convolutional Neural Networks and its implementation
- RNN and LSTM
- Transfer learning
Sound Interesting? Let’s Begin!
Table of Contents
- Approach to the problem statement
- Understanding the Dataset
- Implementing the Image Caption Generator in Keras
- Data loading and Preprocessing
- Glove Embedding
- Model building
- Model training
- Greedy and Beam Search
- Evaluation
- What’s Next?
Approach to the problem statement
We will tackle this problem using an Encoder-Decoder model. Here our encoder model will combine both the encoded form of the image and the encoded form of the text caption and feed to the decoder.
Our model will treat CNN as the ‘image model’ and the RNN/LSTM as the ‘language model’ to encode the text sequences of varying length. The vectors resulting from both the encodings are then merged and processed by a Dense layer to make a final prediction.
We will create a merge architecture in order to keep the image out of the RNN/LSTM and thus be able to train the part of the neural network that handles images and the part that handles language separately, using images and sentences from separate training sets.
In our merge model, a different representation of the image can be combined with the final RNN state before each prediction.
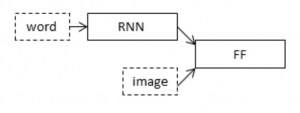
The above diagram is a visual representation of our approach.
The merging of image features with text encodings to a later stage in the architecture is advantageous and can generate better quality captions with smaller layers than the traditional inject architecture (CNN as encoder and RNN as a decoder).
To encode our image features we will make use of transfer learning. There are a lot of models that we can use like VGG-16, InceptionV3, ResNet, etc.
We will make use of the inceptionV3 model which has the least number of training parameters in comparison to the others and also outperforms them.
To encode our text sequence we will map every word to a 200-dimensional vector. For this will use a pre-trained Glove model. This mapping will be done in a separate layer after the input layer called the embedding layer.
To generate the caption we will be using two popular methods which are Greedy Search and Beam Search. These methods will help us in picking the best words to accurately define the image.
I hope this gives you an idea of how we are approaching this problem statement.
Let’s dive into the implementation and creation of an image caption generator!
Understanding the dataset
A number of datasets are used for training, testing, and evaluation of the image captioning methods. The datasets differ in various perspectives such as the number of images, the number of captions per image, format of the captions, and image size. Three datasets: Flickr8k, Flickr30k, and MS COCO Dataset are popularly used.
In the Flickr8k dataset, each image is associated with five different captions that describe the entities and events depicted in the image that were collected. By associating each image with multiple, independently produced sentences, the dataset captures some of the linguistic variety that can be used to describe the same image.
Flickr8k is a good starting dataset as it is small in size and can be trained easily on low-end laptops/desktops using a CPU.
Our dataset structure is as follows:-
- Flick8k/
- Flick8k_Dataset/ :- contains the 8000 images
-
- Flick8k_Text/
- Flickr8k.token.txt:- contains the image id along with the 5 captions
- Flickr8k.trainImages.txt:- contains the training image id’s
- Flickr8k.testImages.txt:- contains the test image id’s
- Flick8k_Text/
Let’s Build our Image Caption Generator!
Step 1:- Import the required libraries
Here we will be making use of the Keras library for creating our model and training it. You can make use of Google Colab or Kaggle notebooks if you want a GPU to train it.
import numpy as np
from numpy import array
import matplotlib.pyplot as plt
%matplotlib inline

import string
import os
import glob
from PIL import Image
from time import time

from keras import Input, layers
from keras import optimizers
from keras.optimizers import Adam
from keras.preprocessing import sequence
from keras.preprocessing import image
from keras.preprocessing.text import Tokenizer
from keras.preprocessing.sequence import pad_sequences
from keras.layers import LSTM, Embedding, Dense, Activation, Flatten, Reshape, Dropout
from keras.layers.wrappers import Bidirectional
from keras.layers.merge import add
from keras.applications.inception_v3 import InceptionV3
from keras.applications.inception_v3 import preprocess_input
from keras.models import Model
from keras.utils import to_categorical
Step 2:- Data loading and Preprocessing
We will define all the paths to the files that we require and save the images id and their captions.
token_path = "../input/flickr8k/Data/Flickr8k_text/Flickr8k.token.txt"
train_images_path = '../input/flickr8k/Data/Flickr8k_text/Flickr_8k.trainImages.txt'
test_images_path = '../input/flickr8k/Data/Flickr8k_text/Flickr_8k.testImages.txt'
images_path = '../input/flickr8k/Data/Flicker8k_Dataset/'
glove_path = '../input/glove6b'

doc = open(token_path,'r').read()
print(doc[:410])
Output:

So we can see the format in which our image id’s and their captions are stored.
Next, we create a dictionary named “descriptions” which contains the name of the image as keys and a list of the 5 captions for the corresponding image as values.
descriptions = dict()
for line in doc.split('\n'):
        tokens = line.split()
        if len(line) > 2:
          image_id = tokens[0].split('.')[0]
          image_desc = ' '.join(tokens[1:])
          if image_id not in descriptions:
              descriptions[image_id] = list()
          descriptions[image_id].append(image_desc)
Now let’s perform some basic text clean to get rid of punctuation and convert our descriptions to lowercase.
table = str.maketrans('', '', string.punctuation)
for key, desc_list in descriptions.items():
    for i in range(len(desc_list)):
        desc = desc_list[i]
        desc = desc.split()
        desc = [word.lower() for word in desc]
        desc = [w.translate(table) for w in desc]
        desc_list[i] =  ' '.join(desc)
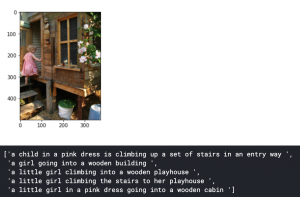
Let’s visualize an example image and its captions:-
pic = '1000268201_693b08cb0e.jpg'
x=plt.imread(images_path+pic)
plt.imshow(x)
plt.show()
descriptions['1000268201_693b08cb0e']
Output:
Next, we create a vocabulary of all the unique words present across all the 8000*5 (i.e. 40000) image captions in the data set. We have 8828 unique words across all the 40000 image captions.
vocabulary = set()
for key in descriptions.keys():
        [vocabulary.update(d.split()) for d in descriptions[key]]
print('Original Vocabulary Size: %d' % len(vocabulary))
Output:![]()
Now let’s save the image id’s and their new cleaned captions in the same format as the token.txt file:-
lines = list()
for key, desc_list in descriptions.items():
    for desc in desc_list:
        lines.append(key + ' ' + desc)
new_descriptions = '\n'.join(lines)
Next, we load all the 6000 training image id’s in a variable train from the ‘Flickr_8k.trainImages.txt’ file:-
doc = open(train_images_path,'r').read()
dataset = list()
for line in doc.split('\n'):
    if len(line) > 1:
      identifier = line.split('.')[0]
      dataset.append(identifier)

train = set(dataset)
Now we save all the training and testing images in train_img and test_img lists respectively:-
img = glob.glob(images_path + '*.jpg')
train_images = set(open(train_images_path, 'r').read().strip().split('\n'))
train_img = []
for i in img:
    if i[len(images_path):] in train_images:
        train_img.append(i)

test_images = set(open(test_images_path, 'r').read().strip().split('\n'))
test_img = []
for i in img:
    if i[len(images_path):] in test_images:
        test_img.append(i)
Now, we load the descriptions of the training images into a dictionary. However, we will add two tokens in every caption, which are ‘startseq’ and ‘endseq’:-
train_descriptions = dict()
for line in new_descriptions.split('\n'):
    tokens = line.split()
    image_id, image_desc = tokens[0], tokens[1:]
    if image_id in train:
        if image_id not in train_descriptions:
            train_descriptions[image_id] = list()
        desc = 'startseq ' + ' '.join(image_desc) + ' endseq'
        train_descriptions[image_id].append(desc)
Create a list of all the training captions:-
all_train_captions = []
for key, val in train_descriptions.items():
    for cap in val:
        all_train_captions.append(cap)
To make our model more robust we will reduce our vocabulary to only those words which occur at least 10 times in the entire corpus.
word_count_threshold = 10
word_counts = {}
nsents = 0
for sent in all_train_captions:
    nsents += 1
    for w in sent.split(' '):
        word_counts[w] = word_counts.get(w, 0) + 1
vocab = [w for w in word_counts if word_counts[w] >= word_count_threshold]

print('Vocabulary = %d' % (len(vocab)))
Output:![]()
Now we create two dictionaries to map words to an index and vice versa. Also, we append 1 to our vocabulary since we append 0’s to make all captions of equal length.
ixtoword = {}
wordtoix = {}
ix = 1
for w in vocab:
    wordtoix[w] = ix
    ixtoword[ix] = w
    ix += 1

vocab_size = len(ixtoword) + 1
Hence now our total vocabulary size is 1660.
We also need to find out what the max length of a caption can be since we cannot have captions of arbitrary length.
all_desc = list()
for key in train_descriptions.keys():
    [all_desc.append(d) for d in train_descriptions[key]]
lines = all_desc
max_length = max(len(d.split()) for d in lines)

print('Description Length: %d' % max_length)
Output:![]()
Step 3:- Glove Embeddings
Word vectors map words to a vector space, where similar words are clustered together and different words are separated. The advantage of using Glove over Word2Vec is that GloVe does not just rely on the local context of words but it incorporates global word co-occurrence to obtain word vectors.
The basic premise behind Glove is that we can derive semantic relationships between words from the co-occurrence matrix. For our model, we will map all the words in our 38-word long caption to a 200-dimension vector using Glove.
embeddings_index = {}
f = open(os.path.join(glove_path, 'glove.6B.200d.txt'), encoding="utf-8")
for line in f:
    values = line.split()
    word = values[0]
    coefs = np.asarray(values[1:], dtype='float32')
    embeddings_index[word] = coefs
Next, we make the matrix of shape (1660,200) consisting of our vocabulary and the 200-d vector.
embedding_dim = 200
embedding_matrix = np.zeros((vocab_size, embedding_dim))
for word, i in wordtoix.items():
    embedding_vector = embeddings_index.get(word)
    if embedding_vector is not None:
        embedding_matrix[i] = embedding_vector
Step 4:- Model Building and Training
As you have seen from our approach we have opted for transfer learning using InceptionV3 network which is pre-trained on the ImageNet dataset.
model = InceptionV3(weights='imagenet')
We must remember that we do not need to classify the images here, we only need to extract an image vector for our images. Hence we remove the softmax layer from the inceptionV3 model.
model_new = Model(model.input, model.layers[-2].output)
Since we are using InceptionV3 we need to pre-process our input before feeding it into the model. Hence we define a preprocess function to reshape the images to (299 x 299) and feed to the preprocess_input() function of Keras.
def preprocess(image_path):
    img = image.load_img(image_path, target_size=(299, 299))
    x = image.img_to_array(img)
    x = np.expand_dims(x, axis=0)
    x = preprocess_input(x)
    return x
Now we can go ahead and encode our training and testing images, i.e extract the images vectors of shape (2048,)
def encode(image):
    image = preprocess(image)
    fea_vec = model_new.predict(image)
    fea_vec = np.reshape(fea_vec, fea_vec.shape[1])
    return fea_vec

encoding_train = {}
for img in train_img:
    encoding_train[img[len(images_path):]] = encode(img)
train_features = encoding_train

encoding_test = {}
for img in test_img:
    encoding_test[img[len(images_path):]] = encode(img)
Now let’s define our model.
We are creating a Merge model where we combine the image vector and the partial caption. Therefore our model will have 3 major steps:
- Processing the sequence from the text
- Extracting the feature vector from the image
- Decoding the output using softmax by concatenating the above two layers
inputs1 = Input(shape=(2048,))
fe1 = Dropout(0.5)(inputs1)
fe2 = Dense(256, activation='relu')(fe1)

inputs2 = Input(shape=(max_length,))
se1 = Embedding(vocab_size, embedding_dim, mask_zero=True)(inputs2)
se2 = Dropout(0.5)(se1)
se3 = LSTM(256)(se2)

decoder1 = add([fe2, se3])
decoder2 = Dense(256, activation='relu')(decoder1)
outputs = Dense(vocab_size, activation='softmax')(decoder2)

model = Model(inputs=[inputs1, inputs2], outputs=outputs)
model.summary()
Output:
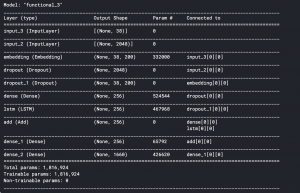
Input_3 is the partial caption of max length 34 which is fed into the embedding layer. This is where the words are mapped to the 200-d Glove embedding. It is followed by a dropout of 0.5 to avoid overfitting. This is then fed into the LSTM for processing the sequence.
Input_2 is the image vector extracted by our InceptionV3 network. It is followed by a dropout of 0.5 to avoid overfitting and then fed into a Fully Connected layer.
Both the Image model and the Language model are then concatenated by adding and fed into another Fully Connected layer. The layer is a softmax layer that provides probabilities to our 1660 word vocabulary.
Step 5:- Model Training
Before training the model we need to keep in mind that we do not want to retrain the weights in our embedding layer (pre-trained Glove vectors).
model.layers[2].set_weights([embedding_matrix])
model.layers[2].trainable = False
Next, compile the model using Categorical_Crossentropy as the Loss function and Adam as the optimizer.
model.compile(loss='categorical_crossentropy', optimizer='adam')
Since our dataset has 6000 images and 40000 captions we will create a function that can train the data in batches.
def data_generator(descriptions, photos, wordtoix, max_length, num_photos_per_batch):
    X1, X2, y = list(), list(), list()
    n=0
    # loop for ever over images
    while 1:
        for key, desc_list in descriptions.items():
            n+=1
            # retrieve the photo feature
            photo = photos[key+'.jpg']
            for desc in desc_list:
                # encode the sequence
                seq = [wordtoix[word] for word in desc.split(' ') if word in wordtoix]
                # split one sequence into multiple X, y pairs
                for i in range(1, len(seq)):
                    # split into input and output pair
                    in_seq, out_seq = seq[:i], seq[i]
                    # pad input sequence
                    in_seq = pad_sequences([in_seq], maxlen=max_length)[0]
                    # encode output sequence
                    out_seq = to_categorical([out_seq], num_classes=vocab_size)[0]
                    # store
                    X1.append(photo)
                    X2.append(in_seq)
                    y.append(out_seq)

            if n==num_photos_per_batch:
                yield ([array(X1), array(X2)], array(y))
                X1, X2, y = list(), list(), list()
                n=0
Next, let’s train our model for 30 epochs with batch size of 3 and 2000 steps per epoch. The complete training of the model took 1 hour and 40 minutes on the Kaggle GPU.
epochs = 30
batch_size = 3
steps = len(train_descriptions)//batch_size

generator = data_generator(train_descriptions, train_features, wordtoix, max_length, batch_size)
model.fit(generator, epochs=epochs, steps_per_epoch=steps, verbose=1)
Step 6:- Greedy and Beam Search
As the model generates a 1660 long vector with a probability distribution across all the words in the vocabulary we greedily pick the word with the highest probability to get the next word prediction. This method is called Greedy Search.
def greedySearch(photo):
    in_text = 'startseq'
    for i in range(max_length):
        sequence = [wordtoix[w] for w in in_text.split() if w in wordtoix]
        sequence = pad_sequences([sequence], maxlen=max_length)
        yhat = model.predict([photo,sequence], verbose=0)
        yhat = np.argmax(yhat)
        word = ixtoword[yhat]
        in_text += ' ' + word
        if word == 'endseq':
            break

    final = in_text.split()
    final = final[1:-1]
    final = ' '.join(final)
    return final
Beam Search is where we take top k predictions, feed them again in the model and then sort them using the probabilities returned by the model. So, the list will always contain the top k predictions and we take the one with the highest probability and go through it till we encounter ‘endseq’ or reach the maximum caption length.
def beam_search_predictions(image, beam_index = 3):
    start = [wordtoix["startseq"]]
    start_word = [[start, 0.0]]
    while len(start_word[0][0]) < max_length:
        temp = []
        for s in start_word:
            par_caps = sequence.pad_sequences([s[0]], maxlen=max_length, padding='post')
            preds = model.predict([image,par_caps], verbose=0)
            word_preds = np.argsort(preds[0])[-beam_index:]
            # Getting the top <beam_index>(n) predictions and creating a
            # new list so as to put them via the model again
            for w in word_preds:
                next_cap, prob = s[0][:], s[1]
                next_cap.append(w)
                prob += preds[0][w]
                temp.append([next_cap, prob])

        start_word = temp
        # Sorting according to the probabilities
        start_word = sorted(start_word, reverse=False, key=lambda l: l[1])
        # Getting the top words
        start_word = start_word[-beam_index:]

    start_word = start_word[-1][0]
    intermediate_caption = [ixtoword[i] for i in start_word]
    final_caption = []

    for i in intermediate_caption:
        if i != 'endseq':
            final_caption.append(i)
        else:
            break

    final_caption = ' '.join(final_caption[1:])
    return final_caption
Step 7:- Evaluation
Let’s now test our model on different images and see what captions it generates. We will also look at the different captions generated by Greedy search and Beam search with different k values.
First, we will take a look at the example image we saw at the start of the article. We saw that the caption for the image was ‘A black dog and a brown dog in the snow’. Let’s see how our model compares.
pic = '2398605966_1d0c9e6a20.jpg'
image = encoding_test[pic].reshape((1,2048))
x=plt.imread(images_path+pic)
plt.imshow(x)
plt.show()

print("Greedy Search:",greedySearch(image))
print("Beam Search, K = 3:",beam_search_predictions(image, beam_index = 3))
print("Beam Search, K = 5:",beam_search_predictions(image, beam_index = 5))
print("Beam Search, K = 7:",beam_search_predictions(image, beam_index = 7))
print("Beam Search, K = 10:",beam_search_predictions(image, beam_index = 10))
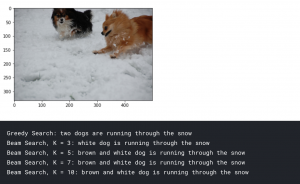
You can see that our model was able to identify two dogs in the snow. But at the same time, it misclassified the black dog as a white dog. Nevertheless, it was able to form a proper sentence to describe the image as a human would.
Let’s also look at some more examples:
pic = list(encoding_test.keys())[1]
image = encoding_test[pic].reshape((1,2048))
x=plt.imread(images_path+pic)
plt.imshow(x)
plt.show()

print("Greedy:",greedySearch(image))
print("Beam Search, K = 3:",beam_search_predictions(image, beam_index = 3))
print("Beam Search, K = 5:",beam_search_predictions(image, beam_index = 5))
print("Beam Search, K = 7:",beam_search_predictions(image, beam_index = 7))
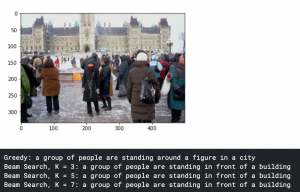
Here we can see that we accurately described what was happening in the image. You will also notice the captions generated are much better using Beam Search than Greedy Search.
Let’s also take a look at a wrong caption generated by our model:-
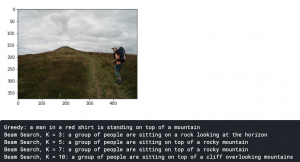
We can see the model has clearly misclassified the number of people in the image in beam search, but our Greedy Search was able to identify the man.
Voila! We have successfully created our very own Image Caption generator!
What’s Next?
What we have developed today is just the start. There has been a lot of research on this topic and you can make much better Image caption generators.
Things you can implement to improve your model:-
- Make use of the larger datasets, especially the MS COCO dataset or the Stock3M dataset which is 26 times larger than MS COCO.
- Making use of an evaluation metric to measure the quality of machine-generated text like BLEU (Bilingual evaluation understudy).
- Implementing an Attention Based model:- Attention-based mechanisms are becoming increasingly popular in deep learning because they can dynamically focus on the various parts of the input image while the output sequences are being produced.
- Image-based factual descriptions are not enough to generate high-quality captions. We can add external knowledge in order to generate attractive image captions. Therefore working on Open-domain datasets can be an interesting prospect.
End Notes
Congratulations! You have learned how to make an Image Caption Generator from scratch. While doing this you also learned how to incorporate the field of Computer Vision and Natural Language Processing together and implement a method like Beam Search that is able to generate better descriptions than the standard.
There is still a lot to improve right from the datasets used to the methodologies implemented. Make sure to try some of the suggestions to improve the performance of our generator and share your results with me!
Did you find this article helpful? Do share your valuable feedback in the comments section below. Feel free to share your complete code notebooks as well which will be helpful to our community members.


Hello Editor, Thanks for such a great tutorial. It works fluently on Tensorflow-CPU. But it took 4 hours to train. I have RTX2060 GPU in my system. So, how could I convert this code for TF-GPU based training?
Hi, TensorFlow code, and tf.keras models will transparently run on a single GPU with no code changes required. You could also read this guide to get you started:- https://kegui.medium.com/how-do-i-know-i-am-running-keras-model-on-gpu-a9cdcc24f986
hi bro,i have one doubt.....we can give our own images for getting caption or we need to include those in the dataset
Hi, You can give your own images also. Just make sure the image you provide is similar to the images the model has trained on otherwise you will not get good captions.
I want to ask that do i have to run the whole model training process for every pic i want to caption.
Thank you for the great tutorial! I'm enjoying a success now. One fix I found necessary was in the keras utils library. Strangely, colab could not find keras.utils.to_categorical, so I had to change the line to this: from tensorflow.python.keras.utils.np_utils import to_categorical
Hi, I have a doubt. I can understand that glove is similar to word2vector, but can you tell me what am I suppose to mention after the glove_path =. Thank you
There's an issue with the code block for train_img and test_img. It can be solved using a simple loop. There's also an indexing issue in the code block corresponding to train_features and test_features, which will give an error while fitting the model.
what will be the accuracy