This article was published as an entry for the Data Science Blogathon.
Machine Learning is an iterative process and the Model building is an art. Machine Learning models are subject to the No Free Lunch Theorem, meaning no one model fits well for all the problems. So there is a need to try,
Pywedge aims to provide an easy interactive widget-based user interface to seamlessly navigate the above steps and let the users focus on understanding & exploiting the hidden patterns in the data.
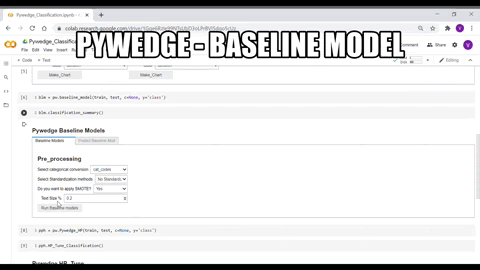
In this article, we are going to look into the interactive hyperparameter tuning module of Pywedge. But before reaching the stage of tuning hyperparameters, we need to complete a basic EDA, pre-processing & baseline models (to benchmark hyperparameter tuned model metrics). So, let’s quickly walk through the EDA, pre-processing & baseline model.
A typical machine learning task starts with an Exploratory data analysis. Performing an EDA is a very nice way to let the data speak for itself. Pywedge makes 8 different types of interactive charts, which users can navigate to understand the hidden patterns in the data & can make informed selections in the downstream machine learning tasks.
The data needs to be processed before passing into the ML models. Like missing value imputation, categorical data conversion, handling imbalanced data, etc., Pywedge provides a baseline_model class & each method for classification or regression tasks. The data can be interactively pre-processed and the baseline_model class returns various baseline model metrics, which we can use as benchmark metrics in the further downstream ML tasks like hyperparameter tuning.
Why do we need to do hyperparameter tuning? What are hyperparameters? And how are they different from model parameters? Well, let’s address these questions…
When we call an estimator class from Scikit Learn, for example, Logistic Regression,
from sklearn.linear_model import LogisticRegression
model = LogisticRegression()
We implicitly set the default hyperparameter. What does that mean? When we simply call LogisticRegression(), the sklearn library internally sets the following default values for the parameters of LogisticRegression,
LogisticRegression(penalty=’l2', dual=False, tol=0.0001, C=1.0, fit_intercept=True, intercept_scaling=1, class_weight=None, random_state=None, solver=’lbfgs’, max_iter=100, multi_class=’auto’, verbose=0, warm_start=False, n_jobs=None, l1_ratio=None)
These parameters which are set into the model before fitting the data are called hyperparameters. In the above case, when we just called LogisticRegression(), we fed default hyperparameters into the model.
Ok, what are model parameters?
When we fit the data into the model, the model produces certain outputs. In our above LogisticRegression case, the model produces the outputs such as coefficients & intercept. These outputs are called model parameters.
Hyperparameters are fed into the model, model parameters are the outputs from the model!
So, why do we need to tune the hyperparameters?
The default parameters of Sklearn, XGBoost, Catboost, or any Python library is set for the generic data. But no two datasets/business cases are the same and how can we apply default hyperparameters for all the datasets? Remember the No free lunch theorem! So to build an efficient model, we must understand the data & select/tune the appropriate hyperparameters.
Ok, having now gone through the default Logistic Regression parameters, we want to change one of the default parameters, say, solver. The options available for the solver parameter are, ‘newton-cg’, ‘lbfgs’, ‘liblinear’, ‘sag’ & ‘saga’. The default solver is ‘lbfgs’, but assuming our dataset is small in size, we want to try ‘liblinear’, and change the default value of parameter ‘C’ from 1.0 to say 0.50. We can instantiate the estimator with our above-desired set of parameters as,
model = LogisticRegression(C=0.5, solver=’liblinear’)
# which will set the model hyperparameters as below, notice the changes on highlighted
LogisticRegression(C=0.5, class_weight=None, dual=False, fit_intercept=True,intercept_scaling=1, l1_ratio=None, max_iter=100, multi_class=’auto’, n_jobs=None, penalty=’l2', random_state=None, solver=’liblinear’, tol=0.0001, verbose=0, warm_start=False)
Here, we set the values of parameters individually. As Machine Learning is an iterative process, our requirements can be growing in search of the best performing model, such as we may want to try another solver ‘sag’, different parameters for ‘C’ & ‘tol’. In such a case, changing the hyperparameters separately & running the model each time could be time-consuming.
Hyperparameter tuning is an iterative process of finding the best parameters from the set range of hyperparameters (hyperparameter search space).
Sklearn provides Grid Search CV & Randomized Search CV classes to find the best hyperparameters from the hyperparameter search space. Below is the typical hyperparameter search workflow using sklearn,
Above is a simple Logistic regression Gridsearch CV code, the codes can get bigger when setting hyperparameter space for Random Forest of any algorithm which has a large number of parameters.
And if we want to try multiple base estimator’s hyperparameter searches, the codebase can quickly run into multiple lines of code. Also when we need to write the codes for the Grid Search CV, we usually browse & open the estimator’s document page, to understand the various parameter options available, input format of a certain parameter, like whether it’s an integer or float or string, the exact spelling of the parameter, as a minor typo can throw an error, for eg, if we typed max-iter instead of max_iter, we will get an error!
Here comes the idea of a package, Pywedge introduces HP_Tune modules (an interactive widget-based hyperparameter search option), with an idea to simplify the hyperparameter search workspace for the user and to enable the user to spend more quality time on the selection of the best hyperparameter, without need to worry about lengthy code intricacies and tracking the hyperparameters.
Pywedge_HP is an interactive widget base hyperparameter tuning module, which has two methods HP_Tune_Classification() & HP_Tune_Regression() for classification & Regression cases hyperparameter tuning respectively.
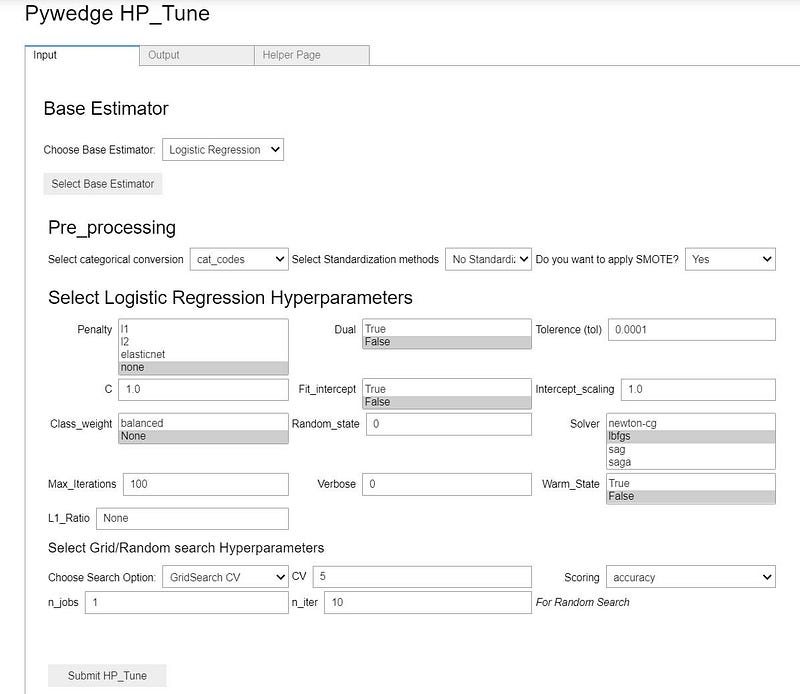
Using the Pywedge hyperparameter tuning widget, users can seamlessly set the values for different hyperparameters & Grid/Random search CV can be done with a click of a button, by which users can spend quality time in understanding the data & exploring which hyperparameter fits well for the given set of data.
The widget tab provides an output tab, where the Grid/Random search CV results will be populated once the search is completed. Also, there is a Helper page tab, where the selected estimator’s web page will be populated for users’ quick reference.
Moreover, tracking the hyperparameters for multiple search runs is quite a breeze in Pywedge. Pywedge internally uses MLFLow to track the hyperparameters, and users can track hyperparameters of various search runs among one or different estimators seamlessly.
Install Pywedge
Pip install pywedge
Import pywedge as pw
Instantiate Pywedge_HP Class for interactive hyperparameter tuning
pph = pw.Pywedge_HP(train, test, c=None, y=’class’, tracking=True)
train = train dataframetest = test dataframec = any redundant column to be removed (like ID column etc., at present supports a single column removal, the subsequent version will provision multiple column removal requirements)y = target column name as a stringtracking = True/False(Default) # set to True to enable mlflow hyperparameter trackingCall HP_Tune_Classification for classification hyperparameter tuning tasks
pph.HP_Tune_Classification()
In just 2 lines of code, an interactive widget is presented for tuning hyperparameters.

As observed in the above GIF, it’s very easy to interactively select hyperparameters & logging the experiments, letting the user focus on the choice of hyperparameters, without worrying much about code intricacies!
As the data is unique, the model needs to be unique, the default hyperparameters are not for every dataset/business case. Sometimes the best model maybe even a slight tweak away from the default parameters or sometimes it may take an exhaustive search.
The objective of Pywedge is to simplify the machine learning environment so that the user can spend quality time analyzing & interpreting the data.
Explore hyperparameter tuning directly or using Pywedge and come up with the best performing model. Thanks for your time reading till the end 🙂
Venkatesh is a qualified finance professional and Microsoft Certified: Azure Data Scientist Associate. I am available on LinkedIn & Twitter. Helping management to make informed decisions & mitigate price risk through data analysis & hedging. Passion for reading current trends in finance, stock/commodities market, python & machine learning. Happy exploring DS to extract business insights from the vast data.
Lorem ipsum dolor sit amet, consectetur adipiscing elit,


Wow! Very educative article. Thanks for sharing!