This article was published as a part of the Data Science Blogathon
There have been a series of breakthroughs in the field of Deep Learning and Computer Vision. Especially with the introduction of very deep Convolutional neural networks, these models helped achieve state-of-the-art results on problems such as image recognition and image classification.
So, over the years, the deep learning architectures became deeper and deeper (adding more layers) to solve more and more complex tasks which also helped in improving the performance of classification and recognition tasks and also making them robust.
But when we go on adding more layers to the neural network, it becomes very much difficult to train and the accuracy of the model starts saturating and then degrades also. Here comes the ResNet to rescue us from that scenario, and helps to resolve this problem.
Residual Network (ResNet) is one of the famous deep learning models that was introduced by Shaoqing Ren, Kaiming He, Jian Sun, and Xiangyu Zhang in their paper. The paper was named “Deep Residual Learning for Image Recognition” [1] in 2015. The ResNet model is one of the popular and most successful deep learning models so far.
The problem of training very deep networks has been relieved with the introduction of these Residual blocks and the ResNet model is made up of these blocks.
The problem of training very deep networks has been relieved with the introduction of these Residual blocks and the ResNet model is made up of these blocks.
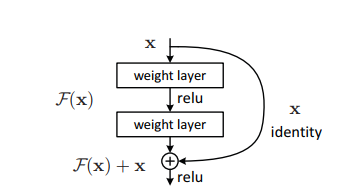
In the above figure, the very first thing we can notice is that there is a direct connection that skips some layers of the model. This connection is called ’skip connection’ and is the heart of residual blocks. The output is not the same due to this skip connection. Without the skip connection, input ‘X gets multiplied by the weights of the layer followed by adding a bias term.
Then comes the activation function, f() and we get the output as H(x).
H(x)=f( wx + b ) or H(x)=f(x)
Now with the introduction of a new skip connection technique, the output is H(x) is changed to
H(x)=f(x)+x
But the dimension of the input may be varying from that of the output which might happen with a convolutional layer or pooling layers. Hence, this problem can be handled with these two approaches:
· Zero is padded with the skip connection to increase its dimensions.
· 1×1 convolutional layers are added to the input to match the dimensions. In such a case, the output is:
H(x)=f(x)+w1.x
Here an additional parameter w1 is added whereas no additional parameter is added when using the first approach.
These skip connections technique in ResNet solves the problem of vanishing gradient in deep CNNs by allowing alternate shortcut path for the gradient to flow through. Also, the skip connection helps if any layer hurts the performance of architecture, then it will be skipped by regularization.
There is a 34-layer plain network in the architecture that is inspired by VGG-19 in which the shortcut connection or the skip connections are added. These skip connections or the residual blocks then convert the architecture into the residual network as shown in the figure below.
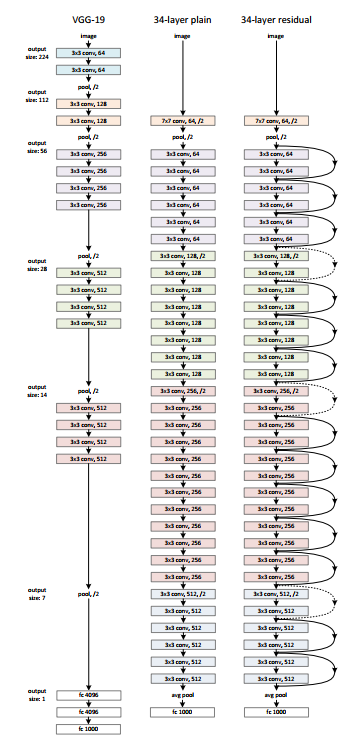
Source: ‘Deep Residual Learning for Image Recognition‘ paper
Keras is an open-source deep-learning library capable of running on top of TensorFlow. Keras Applications provides the following ResNet versions.
– ResNet50
– ResNet50V2
– ResNet101
– ResNet101V2
– ResNet152
– ResNet152V2
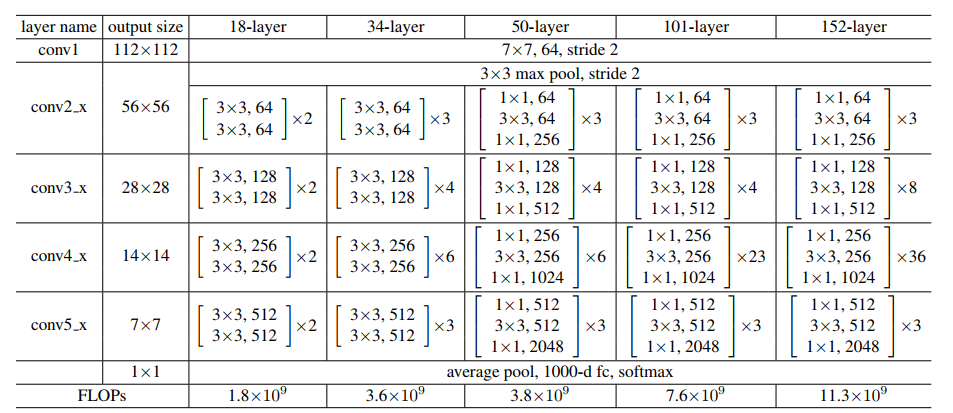
Source: ‘Deep Residual Learning for Image Recognition‘ paper
Let us keep the above image as a reference and start building the network.
ResNet architecture uses the CNN blocks multiple times, so let us create a class for CNN block, which takes input channels and output channels. There is a batchnorm2d after each conv layer.
import torch
import torch.nn as nn
class block(nn.Module):
def __init__(
self, in_channels, intermediate_channels, identity_downsample=None, stride=1
):
super(block, self).__init__()
self.expansion = 4
self.conv1 = nn.Conv2d(
in_channels, intermediate_channels, kernel_size=1, stride=1, padding=0, bias=False
)
self.bn1 = nn.BatchNorm2d(intermediate_channels)
self.conv2 = nn.Conv2d(
intermediate_channels,
intermediate_channels,
kernel_size=3,
stride=stride,
padding=1,
bias=False
)
self.bn2 = nn.BatchNorm2d(intermediate_channels)
self.conv3 = nn.Conv2d(
intermediate_channels,
intermediate_channels * self.expansion,
kernel_size=1,
stride=1,
padding=0,
bias=False
)
self.bn3 = nn.BatchNorm2d(intermediate_channels * self.expansion)
self.relu = nn.ReLU()
self.identity_downsample = identity_downsample
self.stride = stride
def forward(self, x):
identity = x.clone()
x = self.conv1(x)
x = self.bn1(x)
x = self.relu(x)
x = self.conv2(x)
x = self.bn2(x)
x = self.relu(x)
x = self.conv3(x)
x = self.bn3(x)
if self.identity_downsample is not None:
identity = self.identity_downsample(identity)
x += identity
x = self.relu(x)
return xThen create a ResNet class that takes the input of a number of blocks, layers, image channels, and the number of classes.
In the below code the function ‘_make_layer’
creates the ResNet layers, which takes the input of blocks, number of residual
blocks, out channel, and strides.
class ResNet(nn.Module):
    def __init__(self, block, layers, image_channels, num_classes):
        super(ResNet, self).__init__()
        self.in_channels = 64
        self.conv1 = nn.Conv2d(image_channels, 64, kernel_size=7, stride=2, padding=3, bias=False)
        self.bn1 = nn.BatchNorm2d(64)
        self.relu = nn.ReLU()
        self.maxpool = nn.MaxPool2d(kernel_size=3, stride=2, padding=1)
# Essentially the entire ResNet architecture are in these 4 lines below
self.layer1 = self._make_layer(
block, layers[0], intermediate_channels=64, stride=1
)
self.layer2 = self._make_layer(
block, layers[1], intermediate_channels=128, stride=2
)
self.layer3 = self._make_layer(
block, layers[2], intermediate_channels=256, stride=2
)
self.layer4 = self._make_layer(
block, layers[3], intermediate_channels=512, stride=2
)
self.avgpool = nn.AdaptiveAvgPool2d((1, 1))
self.fc = nn.Linear(512 * 4, num_classes)
def forward(self, x):
x = self.conv1(x)
x = self.bn1(x)
x = self.relu(x)
x = self.maxpool(x)
x = self.layer1(x)
x = self.layer2(x)
x = self.layer3(x)
x = self.layer4(x)
x = self.avgpool(x)
x = x.reshape(x.shape[0], -1)
x = self.fc(x)
return x
def _make_layer(self, block, num_residual_blocks, intermediate_channels, stride):
identity_downsample = None
layers = []
# Either if we half the input space for ex, 56x56 -> 28x28 (stride=2), or channels changes
# we need to adapt the Identity (skip connection) so it will be able to be added
# to the layer that's ahead
if stride != 1 or self.in_channels != intermediate_channels * 4:
identity_downsample = nn.Sequential(
nn.Conv2d(
self.in_channels,
intermediate_channels * 4,
kernel_size=1,
stride=stride,
bias=False
),
nn.BatchNorm2d(intermediate_channels * 4),
)
layers.append(
block(self.in_channels, intermediate_channels, identity_downsample, stride)
)
# The expansion size is always 4 for ResNet 50,101,152
self.in_channels = intermediate_channels * 4
# For example for first resnet layer: 256 will be mapped to 64 as intermediate layer,
# then finally back to 256. Hence no identity downsample is needed, since stride = 1,
# and also same amount of channels.
for i in range(num_residual_blocks - 1):
layers.append(block(self.in_channels, intermediate_channels))return nn.Sequential(*layers)
Then define different versions of ResNet
– For ResNet50 the layer sequence is [3, 4, 6, 3].
– For ResNet101 the layer sequence is [3, 4, 23, 3].
– For ResNet152 the layer sequence is [3, 8, 36, 3]. (refer the ‘Deep Residual Learning for Image Recognition‘ paper)
def ResNet50(img_channel=3, num_classes=1000):
    return ResNet(block, [3, 4, 6, 3], img_channel, num_classes)
def ResNet101(img_channel=3, num_classes=1000):
return ResNet(block, [3, 4, 23, 3], img_channel, num_classes)
def ResNet152(img_channel=3, num_classes=1000):
return ResNet(block, [3, 8, 36, 3], img_channel, num_classes)Then write a small test code to check whether the model is working fine.
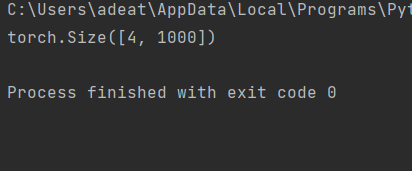
def test():
    net = ResNet101(img_channel=3, num_classes=1000)
    device = "cuda" if torch.cuda.is_available() else "cpu"
    y = net(torch.randn(4, 3, 224, 224)).to(device)
    print(y.size())
test()
For the above test case the output should be:
The entire code can be accessed here:
In summary, ResNet, or Residual Networks, is a powerful tool in deep learning. They tackle challenges through clever residual blocks, enhancing model performance. The architecture is robust, and building ResNet from scratch using Python and Keras offers an insightful, hands-on experience, unlocking the potential of this impactful neural network
ResNet blocks are the building blocks of ResNet architectures. Each block contains convolutional layers, batch normalization, activation functions, and skip connections. Skip connections allow information to flow directly from earlier layers to later layers, preventing vanishing gradients and improving network performance. The number of residual blocks and their configurations determine the depth and complexity of the ResNet model.
ResNet introduces skip connections to deep neural networks, allowing information to flow directly between layers, thereby mitigating the vanishing gradient problem and improving training efficiency. This results in enhanced performance across various machine-learning tasks.
ResNet architectures typically comprise four or five stages, each containing multiple residual blocks for feature extraction and refinement. The number of residual blocks per stage increases as the network deepens, enabling the learning of more intricate feature representations.
Thank you.
Your suggestions and doubts are welcomed here in the comment section. Thank you for reading my article!
I am an enthusiastic AI developer, I love playing with different problems and building solutions.
Lorem ipsum dolor sit amet, consectetur adipiscing elit,


