A Comprehensive Guide on Kubernetes
This article was published as a part of the Data Science Blogathon.

Introduction
Today, In this guide, we will dive in to learn about Kubernetes and use it to deploy and manage containers at scale.
Container and microservice architecture had used more to create modern apps. Kubernetes is open-source software that allows you to deploy and manage containers at scale. It divides containers into logical parts to make your application’s management, discovery, and scaling easier.
The main goal of this guide is to provide a complete overview of the Kubernetes ecosystem while keeping it basic and straightforward. It covers Kubernetes’ core ideas before applying them to a real-world scenario.
Even if you have no prior experience with Kubernetes, this article will serve as an excellent starting point for your journey.
So, without further ado, let’s get this learning started.
Why Kubernetes?
Before we go into the technical ideas, let us start with why a developer should use Kubernetes in the first place. Here are a few reasons why developers should use Kubernetes in their projects.
Portability
When using Kubernetes, moving containerized applications from development to production appears to be an easy process. Kubernetes enables developers to orchestrate containers in various environments, including on-premises infrastructure, public and hybrid clouds.
Scalability
Kubernetes simplifies the process of defining complex containerized applications and deploying them globally across multiple clusters of servers by reducing resources based on your desired state. Kubernetes automatically checks and maintains container health when horizontally scaling applications.
Extensibility
Kubernetes has a vast and ever-expanding collection of extensions and plugins created by developers and businesses that make it simple to add unique capabilities to your clusters such as security, monitoring, or management.
Concepts
Using Kubernetes necessitates an understanding of the various abstractions it employs to represent the state of the system. That is the focus of this section. We get acquainted with the essential concepts and provide you with a clearer picture of the overall architecture.
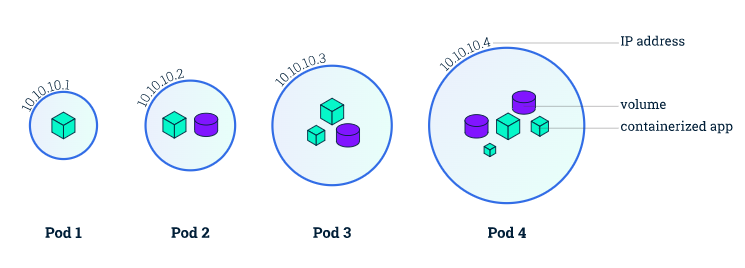
Pods
A Pod is a collection of multiple containers of application that share storage, a unique cluster IP address, and instructions for running them (e.g. ports, restart, container image, and failure policies).
They are the foundation of the Kubernetes platform. While creating a service or a deployment, Kubernetes creates a Pod with the container inside.
Each pod runs on the node where it is scheduled and remains there until it is terminated or deleted. If the node fails or stops, Kubernetes will automatically schedule identical Pods on the cluster’s other available Nodes.
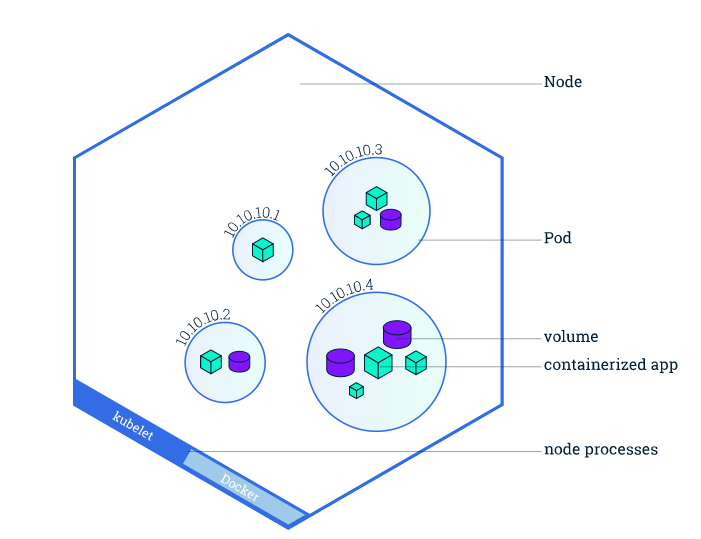
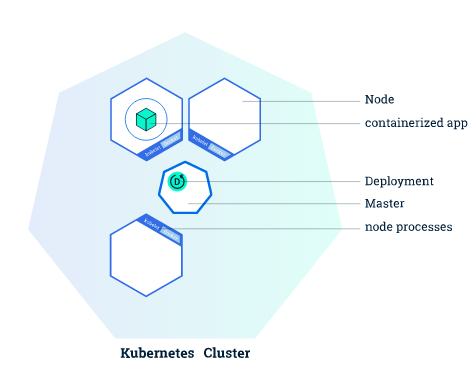
Node
A node is a worker machine in a Kubernetes cluster that can be virtual or physical depending on the cluster type. The master is in charge of each node. The master involuntary schedules pods across all nodes in the cluster, based on their available resources and current configuration.
Each node is required to run at least two services:
- Kubelet is a process that communicates between the Kubernetes master and the node.
- A container runtime is in charge of downloading and running a container image (Eg: Docker)
Services
A Service is an abstraction that describes a logical set of Pods and the policies for accessing them. Services allow for the loose coupling of dependent Pods.
Even though each pod has a distinct IP-Address, those addresses are not visible to the outside world. As a result, a service enables your deployment to receive traffic from external sources.
We can expose services in a variety of ways:
- ClusterIP (standard) – Only expose the port to the cluster’s internals.
- NodePort – Use NAT to reveal the service on the same port on every node in the cluster
- Loadbalancer – Create an external load balancer to export the service to a specified IP Address.
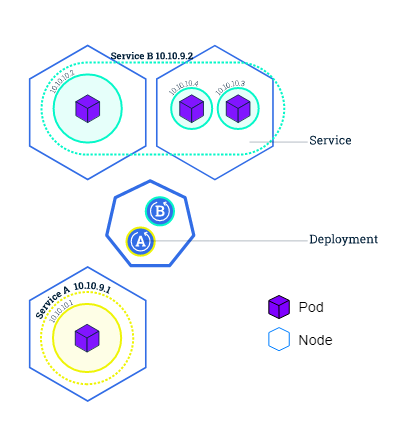
Deployments
Deployments include a description of your application’s desired state. The deployment controller will process to ensure that the application’s current state matches that description.
A deployment automatically runs many replicates of your program and replaces any instances that fail or become unresponsive. Deployments help to know that your program is ready to serve user requests in this fashion.
Installation
Before we dive into building our cluster, we must first install Kubernetes on our local workstation.
Docker Desktop
If you’re using Docker desktop on Windows or Mac, you may install Kubernetes directly from the user interface’s settings pane.
Others
If you are not using the Docker desktop, I recommend that you follow the official installation procedure for Kubectl and Minikube.
Basics
Now that we’ve covered the fundamental ideas. Let’s move on to the practical side of Kubernetes. This chapter will walk you through the fundamentals required to deploy apps in a cluster.
When you launch Minikube, it immediately forms a cluster.
After installation, the Docker desktop should also automatically construct a cluster. You may use the following commands to see if your cluster is up and running:
# Get information about the cluster
kubectl cluster-info

# Get all nodes of the cluster
kubectl get nodes
Deploying an application:
Now that we’ve completed the installation and established our first cluster, we’re ready to deploy an application to Kubernetes.
kubectl create deployment nginx --image=nginx:latestWe use the create deployment command, passing inputs as the deployment name and the container image. This example deploys Nginx with one container and one replica.
Using the get deployments command, you may view your active deployments.
kubectl get deploymentsInformation about deployments
Here are a few commands you may use to learn more about your Kubernetes deployments and pods.
Obtaining all of the pods
Using the kubectl get pods command, you can get a list of all running pods:
kubectl get podsDetail description of a pod
Use describe command to get more detailed information about a pod.
kubectl describe podsLogs of a pod
The data that your application would transmit to STDOUT becomes container logs. The following command will provide you access to those logs.
kubectl logs $POD_NAMENote: You may find out the name of your pod by using the get pods or describe pods commands.
Execute command in Container
The kubectl exec command, which takes the pod name and the term to run as arguments, allows us to perform commands directly in our container.
kubectl exec $POD_NAME commandLet’s look at an example where we start a bash terminal in the container to see what I mean.
kubectl exec -it $POD_NAME bashExposing app publicly
A service, as previously said, establishes a policy by which the deployment can be accessible. We’ll look at how this is achieved in this section and other alternatives you have when exposing your services to the public.
Developing a service:
We can build a service with the create-service command, which takes the port we wish to expose and the kind of port as parameters.
kubectl create service nodeport nginx --tcp=80:80It will generate service for our Nginx deployment and expose our container’s port 80 to a port on our host computer.
On the host system, use the kubectl get services command to obtain the port:

As you can see, port 80 of the container had routed to port 31041 of my host machine. When you have the port, you may test your deployment by accessing your localhost on that port.
Deleting a service
The delete service command can also be used to remove existing services.
kubectl delete service nginxScale up the app
Scaling your application up and down is a breeze with Kubernetes. By using this command, you may alter the number of replicas, and Kubernetes will generate and maintain everything for you.
kubectl scale deployments/nginx --replicas=5This command will replicate our Nginx service to a maximum of five replicas.
This way of application deployment works well for tiny one-container apps but lacks the overview and reusability required for larger applications. YAML files are helpful in this situation.
YAML files allow you to specify your deployment, services, and pods using a markup language, making them more reusable and scaleable. The following chapters will go over Yaml files in detail.
Kubernetes object in YAML
Every object in Kubernetes had expressed as a declarative YAML object that specifies what and how it should run. These files had used frequently to promote the reusability of resource configurations such as deployments, services, and volumes, among others.
This section will walk you through the fundamentals of YAML and how to acquire a list of all available parameters and characteristics for a Kubernetes object. We glance through the deployment and service files to understand the syntax and how it had deployed.
Parameters of different objects
There are numerous Kubernetes objects, and it is difficult to remember every setting. That’s where the explain command comes in.
You can also acquire documentation for a specific field by using the syntax:
kubectl explain deployment.spec.replicasDeployment file
For ease of reusability and changeability, more sophisticated deployments are typically written in YAML.
The basic file structure is as follows:
apiVersion: apps/v1
kind: Deployment
metadata:
  # The name and label of your deployment
  name: mongodb-deployment
  labels:
    app: mongo
spec:
  # How many copies of each pod do you want
  replicas: 3
  # Which pods are managed by this deployment
  selector:
    matchLabels:
      app: mongo
  # Regular pod configuration / Defines containers, volumes and environment variable
  template:
    metadata:
      # label the pod
      labels:
        app: mongo
    spec:
      containers:
      - name: mongo
        image: mongo:4.2
        ports:
        - containerPort: 27017
There are several crucial sections in the YAML file:
- apiVersion – Specifies the API version.
- kind – The Kubernetes object type defined in the file (e.g. deployment, service, persistent volume, …)
- metadata – A description of your YAML component that includes the component’s name, labels, and other information.
- spec – Specifies the attributes of your deployment, such as replicas and resource constraints.
- template – The deployment file’s pod configuration.
Now that you understand the basic format, you can use the apply command to deploy the file.
Service file
Service files are structured similarly to deployments, with slight variations in the parameters.
apiVersion: v1
kind: Service
metadata:
  name: mongo
spec:
  selector:
    app: mongo
  ports:
    - port: 27017
      targetPort: 27017
  type: LoadBalancer
Storage
When the container restarts or pod deletion, its entire file system gets deleted. It is a good sign since it keeps your stateless application from getting clogged up with unnecessary data. In other circumstances, persisting your file system’s data is critical for your application.
There are several types of storage available:
- The container file system stores the data of a single container till its existence.
- Volumes allow you to save data and share it between containers as long as the pod is active.
- Data had saved even if the pod gets erased or restarted using persistent volumes. They’re your Kubernetes cluster’s long-term storage.
Volumes
Volumes allow you to save, exchange, and preserve data amongst numerous containers throughout the pod. It is helpful if you have pods with many containers that communicate data.
In Kubernetes, there are two phases to using a volume:
- The volume had defined by the pod.
- The container use volume mounts to add the volume to a given filesystem path.
You can add a volume to your pod by using the syntax:
apiVersion: v1
kind: Pod
metadata:
  name: nginx
spec:
  containers:
  - name: nginx
    image: nginx
    volumeMounts:
    - name: nginx-storage
      mountPath: /etc/nginx
  volumes:
  - name: nginx-storage
    emptyDir: {}
Here volumes tag is used to provide a volume mounted to a particular directory of the container filesystem (in this case, /etc/nginx).
Persistent Volumes
These are nearly identical to conventional volumes, with unique difference data had preserved even if the pod gets erased. That is why they are employed for long-term data storing needs, such as a database.
A Persistent Volume Claim (PVC) object, which connects to backend storage volumes via a series of abstractions, is the most typical way to define a persistent volume.
Example of YAML Configuration file.
apiVersion: v1
kind: PersistentVolumeClaim
metadata:
  name: pv-claim
  labels:
    app: sampleAppName
spec:
  accessModes:
    - ReadWriteOnce
  resources:
    requests:
      storage: 20Gi
There are more options to save your data in Kubernetes, and you may automate as much of the process as feasible. Here’s a list of a few interesting subjects to look into.
Compute Resources
In consideration of container orchestration, managing computes resources for your containers and applications is critical.
When your containers have a set number of resources, the scheduler can make wise decisions about which node to place the pod. You will also have fewer resource contention issues with diverse deployments.
In the following two parts, we will go through two types of resource definitions in depth.
Requests
Requests tell Kubernetes what the pod needs and that it should only put the pod on nodes that meet those needs. Requests are defined in your container’s resources tag.
Limits
Resource limitations are used to limit a pod’s memory and CPU utilization and set the maximum amount of resources that it can never surpass.
Secrets
Secrets in Kubernetes allow you to securely store and manage sensitive data such as passwords, API tokens, and SSH keys.
To use a secret in your pod, you must first refer to it. It can happen in many different ways:
- Using an environment variable and as a file on a drive mounted to a container.
- When kubelet pulls a picture from a private registry.
Creating a secret
Secrets had created using either the kubelet command tool or by declaring a secret Kubernetes object in YAML.
Using the kubelet
Kubelet allows you to create secrets with a create command that requires only the data and the secret name. The data gets entered using a file or a literal.
kubectl create secret generic admin-credentials --from-literal=user=poweruser --from-literal=password='test123'Using a file, the same functionality would look like this.
echo -n 'poweruser' > ./username.txt
echo -n 'test123' > ./password.txt
kubectl create secret generic admin-credentials--from-file=./username.txt --from-file=./password.txt
Making use of definition files
Secrets, like other Kubernetes objects, can be declared in a YAML file.
apiVersion: v1
kind: Secret
metadata:
  name: secret-apikey
data:
  apikey: YWRtaW4=
Your sensitive information is stored in the secret as a key-value pair, with apiKey as the key and YWRtaW4= as the base decoded value.
Using the apply command, you can now generate the secret.
kubectl apply -f secret.yamlUse the stringData attribute instead if you wish to give plain data and let Kubernetes handle the encoding.
apiVersion: v1
kind: Secret
metadata:
  name: plaintext-secret
stringData:
  password: test
ImagePullSecrets
If you’re pulling an image from a private registry, you may need to authenticate first. When all of your nodes need to pull a specific picture, an ImagePullSecrets file maintains the authentication info and makes it available to them.
apiVersion: v1
kind: Pod
metadata:
  name: private-image
spec:
  containers:
    - name: privateapp
      image: gabrieltanner/graphqltesting
  imagePullSecrets:
    - name: authentification-secret
Namespaces
Namespaces are virtual clusters had used to manage large projects and allocate cluster resources to many users. They offer a variety of names and can be nested within one another.
Managing and using namespaces with kubectl is simple. This section will walk you through the most common namespace actions and commands.
Look at the existing Namespaces
You can use the kubectl get namespaces command to see all of your cluster’s presently accessible namespaces.
kubectl get namespaces

# Output
NAME                   STATUS   AGE
default                Active   32d
docker                 Active   32d
kube-public            Active   32d
kube-system            Active   32d
Creating Namespace
Namespaces can be created with the kubectl CLI or by using YAML to create a Kubernetes object.
kubectl create namespace testnamespace

# Output
namespace/testnamespace created
The same functionality may be achieved with a YAML file.
apiVersion: v1
kind: Namespace
metadata:
  name: testnamespace
The kubectl apply command can then be used to apply the configuration file.
kubectl apply -f testNamespace.yamlNamespace Filtering
When a new object had created in Kubernetes without a custom namespace property, it adds to the default namespace.
You can do this if you want to construct your item in a different workspace.
kubectl create deployment --image=nginx nginx --namespace=testnamespaceYou may now use the get command to filter for your deployment.
kubectl get deployment --namespace=testnamespaceChange Namespace
You’ve now learned how to construct objects in a namespace other than the default. However, adding the namespace to each command you want to run takes time and returns an error.
As a result, you can use the set-context command to change the default context to which instructions had applied.
kubectl config set-context $(kubectl config current-context) --namespace=testnamespaceThe get-context command can be used to validate the modifications.
kubectl config get-contexts

# Output
CURRENT   NAME      CLUSTER   AUTHINFO   NAMESPACE
*         Default   Default   Default    testnamespace
Kubernetes with Docker Compose
For individuals coming from the Docker community, writing Docker Compose files rather than Kubernetes objects may be simple. Kompose comes into play in this situation. It uses a simple CLI to convert or deploy your docker-compose file to Kubernetes (command-line interface).
How to Install Kompose
It is easy and quickly deployed on all three mature operating systems.
To install Kompose on Linux or Mac, curl the binaries.
# Linux
curl -L https://github.com/kubernetes/kompose/releases/download/v1.21.0/kompose-linux-amd64 -o kompose

# macOS
curl -L https://github.com/kubernetes/kompose/releases/download/v1.21.0/kompose-darwin-amd64 -o kompose

chmod +x kompose
sudo mv ./kompose /usr/local/bin/kompose
Deploying using Kompose
Kompose deploys Docker Compose files on Kubernetes using existing Docker Compose files. Consider the following compose file as an example.
version: "2"
services:
  redis-master:
    image: k8s.gcr.io/redis:e2e
    ports:
      - "6379"
  redis-slave:
    image: gcr.io/google_samples/gb-redisslave:v1
    ports:
      - "6379"
    environment:
      - GET_HOSTS_FROM=dns
  frontend:
    image: gcr.io/google-samples/gb-frontend:v4
    ports:
      - "80:80"
    environment:
      - GET_HOSTS_FROM=dns
    labels:
      kompose.service.type: LoadBalancer
Kompose, like Docker Compose, lets us deploy our setup with a single command.
kompose up
You should now be able to see the resources that had produced.
kubectl get deployment,svc,pods,pvcConverting Kompose
Kompose can also turn your existing Docker Compose file into the Kubernetes object you need.
kompose convertThe apply command had used to deploy your application.
kubectl apply -f filenamesApplication Deployment
Now that you’ve mastered the theory and all of Kubernetes’ core ideas, it’s time to put what you’ve learned into practice. This chapter will show you how to use Kubernetes to deploy a backend application.
This tutorial’s specific application is a GraphQL boilerplate for the Nest.js backend framework.
First, let’s clone the repository.
git clone https://github.com/[user name]/nestjs-graphql-boilerplate.gitImages to a Registry
We must first push the images to a publicly accessible Image Registry before starting the construction of Kubernetes objects. It can be a public registry like DockerHub or a private registry of your own.
Visit this post for additional information on creating your own private Docker Image.
To push the image, include the image tag in your Compose file along with the registry you want to move.
version: '3'

services:
  nodejs:
    build:
      context: ./
      dockerfile: Dockerfile
    image: gabrieltanner.dev/nestgraphql
    restart: always
    environment:
      - DATABASE_HOST=mongo
      - PORT=3000
    ports:
      - '3000:3000'
    depends_on: [mongo]
  mongo:
    image: mongo
    ports:
      - '27017:27017'
    volumes:
      - mongo_data:/data/db

volumes:
  mongo_data: {}
I used a private registry that I had previously set up, but DockerHub would work just as well.
Creating Kubernetes objects
Now that you’ve published your image to a registry, we’ll write our Kubernetes objects.
To begin, create a new directory in which to save the deployments.
mkdir deployments
cd deployments

touch mongo.yaml
touch nestjs.yaml
It is how the MongoDB service and deployment will look.
apiVersion: v1
kind: Service
metadata:
  name: mongo
spec:
  selector:
    app: mongo
  ports:
    - port: 27017
      targetPort: 27017
---
apiVersion: apps/v1
kind: Deployment
metadata:
  name: mongo
spec:
  selector:
    matchLabels:
      app: mongo
  template:
    metadata:
      labels:
        app: mongo
    spec:
      containers:
        - name: mongo
          image: mongo
          ports:
            - containerPort: 27017
A deployment object with a single MongoDB container called mongo had included in the file. It also comes with a service that allows the Kubernetes network to use port 27017.
Because the container requires some additional settings, such as environment variables and imagePullSecrets, the Nest.js Kubernetes object is a little more complicated.
A load balancer helps the service that makes the port available on the host machine.
Deploy the application
Now that the Kubernetes object files are ready. Let us use kubectl to deploy them.
kubectl apply -f mongo.yaml
kubectl apply -f nestjs.yaml
On localhost/graphql, you should now view the GraphQL playground.
Congratulations, you’ve just deployed your first Kubernetes application.

Conclusion
You persevered to the end! I hope this guide has given you a better understanding of Kubernetes and the way to use it to improve your developer process, with better production-grade solutions.
Kubernetes was created using Google’s ten years of expertise running containerized apps at scale. It has already been adopted by the top public cloud suppliers and technology providers and is now being adopted by the majority of software manufacturers and companies. It even resulted in the formation of the Cloud Native Computing Foundation (CNCF) in 2015, which was the first project to graduate under CNCF and began streamlining the container ecosystem alongside other container-related projects like CNI, Containers, Envoy, Fluentd, gRPC, Jagger, Linkerd, and Prometheus. Its immaculate design, cooperation with industry leaders, making it open source, and always being open to ideas and contributions may be the main reasons for its popularity and endorsement at such a high level.
Share this with other developers, if you find it useful.
To know more about Kubernetes, Check out the links below
Learn basic tenets from our blog.
References
Image-1 – Photo by Ian Taylor On Unsplash
Image-2,3,4,5 – https://kubernetes.io/docs/tutorials/kubernetes-basics/
Image-6 – Photo by Xan Griffin On Unsplash
The media shown in this article is not owned by Analytics Vidhya and are used at the Author’s discretion.
Myself Pavan Kalyan with 2 years of experience in developing, deploying scalable Machine Learning models and interested to explore data, discover useful insights. I like to participate in the Machine Hack and Kaggle competitions.


