Let’s Learn Face Detection Using Computer Vision
This article was published as a part of the Data Science Blogathon.
Overview
In this article, we will be making a face detection application it will detect a single face in the image and detect multiple faces at the same time (if found), hence, the entire article will focus on Face detection using computer vision. Here for detection, we will be using the HAAR cascade classifiers; for detection purposes we will learn all the techniques and processes involved to detect the faces in the image.
Application of Face Detection
- Face recognition: Face recognition is like a carry forward step, i.e., after face detection, we used to perform face recognition.
- Filters: Nowadays, we are living in the social media world, and we can see that there is a variety of filters and fun applications in the global market; to make such applications, also we need first to detect the faces then apply the filter.
- Face unlock application: We have often used this feature in our phones but do we know the building block is also to detect the face first.
So let’s get started!
Loading the Necessary Libraries
# Import the necessary libraries
import numpy as np
import cv2
import matplotlib.pyplot as plt
%matplotlib inline
Loading Images
#  Loading the image to be tested
test_image = cv2.imread('data/baby1.png')
# Here we are converting the colored image into gray image
if(test_image is not None):
    test_image_gray = cv2.cvtColor(test_image, cv2.COLOR_BGR2GRAY)
test_image_gray
# Displaying grayscale image
plt.imshow(test_image_gray, cmap='gray')
Output:
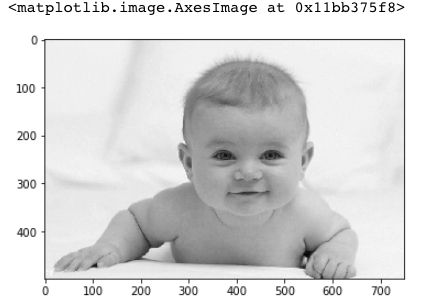
As we are well aware of the fact that the detector function of OpenCV by default reads the existing image in the BGR format, but the BGR format is not usually considered for the end-user; hence we need to convert the BGR format image to RGB format i.e. colored image which has all the 3 channels (R-Red, G-Green, B-Blue) that are responsible for creating a colored image.
Hence we will be creating a clear-cut function to convert the coming BGR images to RGB images.
def convertToRGB(image):
    return cv2.cvtColor(image, cv2.COLOR_BGR2RGB)
HAAR Cascade Files
HAAR cascade is a well-coined term in the world of computer vision; when we talk about HAAR cascade classifiers, it’s not only about the face pre-trained classifiers we can get the classifiers that are trained to detect smiles, cars, buses, and these cascades files are always in the format of XML files usually we use the existing cascade files, but for a fact we can also create them here for simplicity, we will use the HAAR cascade frontal face classifier to detect the font position of the face in the image.
Loading the Classifier for Frontal Face
haar_cascade_face = cv2.CascadeClassifier('data/haarcascades/haarcascade_frontalface_alt2.xml')
Face Detection
For face detection, we need to have the coordinates of the faces from coordinate I mean the X, Y coordinate and also the height and width of the face then only we can plot or draw a rectangle over the image following the given coordinates for that we have the detectMultiScale function which will provide us all the needed coordinates to plan the rectangle.
face_coordinate = haar_cascade_face.detectMultiScale(test_image_gray, scaleFactor = 1.2, minNeighbors = 5);
# Let us print the no. of faces found
print('Faces found: ', len(face_coordinate))
Output:
Faces found: 1
So previously, while using the detectMultiScale function, we acquired the x coordinate and y coordinate of the image along with the height and width, so now we will be using these points to loop through each point of the image and draw the rectangle over the face with the thickness of 2 pixels.
for (x_face,y_face,w_face,h_face) in face_coordinate:
     cv2.rectangle(test_image, (x_face, y_face), (x_face+w_face, y_face+h_face), (0, 255, 0), 2)
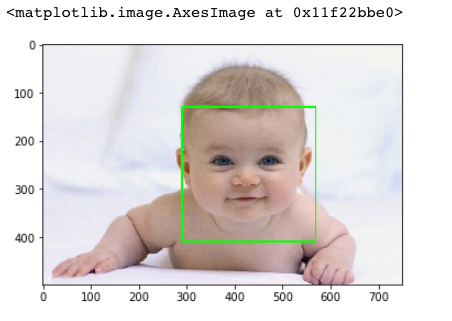
As the complete process is done so now, it’s time to check that all the steps that we have performed by far are worth it or not, so with the help of the show function of Matplotlib, we will see the processed image and see if it can detect the face in the image or not.
#convert image to RGB and show image
plt.imshow(convertToRGB(test_image))
Output:
Function to Automate the Face Detection Process
def detect_faces(cascade, test_image, scaleFactor = 1.1):
    # Here with the help of copy() function we will hold the copy of the original image
    image_copy = test_image.copy()
    # Here with the help of cvtColor function we are converting the image from BGR format to gray image
    gray_image = cv2.cvtColor(image_copy, cv2.COLOR_BGR2GRAY)
    # Finally we are using the haar cascade function with detectMultiscale to get the coordiates of the faces in the given image
    faces_rect = cascade.detectMultiScale(gray_image, scaleFactor=scaleFactor, minNeighbors=1)
    for (x_face, y_face, w_face, h_face) in faces_rect:
        cv2.rectangle(image_copy, (x_face, y_face), (x_face+w_face, y_face+h_face), (0, 255, 0), 2)
    return image_copy
Code-breakdown: Here, we build the function to detect the faces; let’s see what is going in here:
- Firstly we are using the copy function to store the original image so that any unwanted changes shouldn’t be there in the original one
- Then we are converting the BGR format image to a gray image as cv2 reads the image in gray format only for better readability.
- Then, with the help of the detectMultiScale function, this is already mentioned in the comments.
- At last, we will plot the rectangle around the face with 2-pixel thickness and of green colour with the help of coordinates that we got from the detectMultiScale function
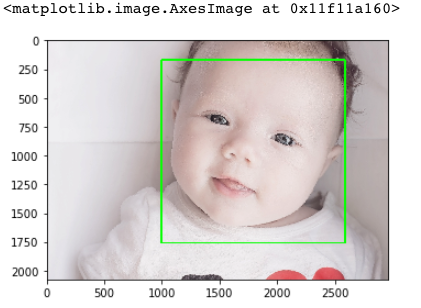
Testing the Function on a New Image
#loading image
test_image2 = cv2.imread('data/baby2.png')
#call the function to detect faces
faces = detect_faces(haar_cascade_face, test_image2)
#convert to RGB and display image
plt.imshow(convertToRGB(faces))
Output:
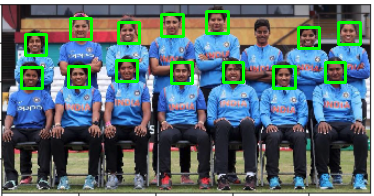
Testing the Function on a Group to Detect Multiple Faces
#loading image
test_image2 = cv2.imread('data/group.png')
#call the function to detect faces
faces = detect_faces(haar_cascade_face, test_image2)
#convert to RGB and display image
plt.imshow(convertToRGB(faces))
Output:
Saving the Image
cv2.imwrite('image1.png',faces)
Output:
True
Conclusion
- So firstly while working on Face detection using computer vision, we started with importing necessary libraries and loading the images on which we needed to perform face detection.
- Then we learned about the HAAR cascade files and frontal face classifiers. Along with that learned the use of the detectMultiScale function.
- As we realized that the whole detection process is time-consuming, we tried to build a function that will automate this process.
- Then with the use of function, we detected the faces not only for group images.
- At last, we saved the image with the detected faces.
So, the above are the steps that have to be followed while preparing an application for Face detection using computer vision
EndNotes
Here’s the repo link to this article. I hope you liked my article on Heart disease detection using ML. If you have any opinions or questions, then comment below.
Read more articles on our blog about Computer Vision.
About the Author
Greeting to everyone, I’m currently working in TCS and previously, I worked as a Data Science Analyst in Zorba Consulting India. Along with full-time work, I’ve got an immense interest in the same field, i.e. Data Science, along with its other subsets of Artificial Intelligence such as Computer Vision, Machine Learning, and Deep learning; feel free to collaborate with me on any project on the domains mentioned above (LinkedIn).
The media shown in this article is not owned by Analytics Vidhya and are used at the Author’s discretion.


