Automatic Speech Recognition Using Wav2Vec2
This article was published as a part of the Data Science Blogathon.
In this article, we will create an app for Automatic Speech Recognition using Wav2Vec2. We will leverage the Gradio Python package for creating a web interface for the model and deploy our app on Hugging Face Spaces.
Introduction
Automatic voice recognition is a technique that processes human speech into readable text. ASR systems are also known as speech-to-text or transcription systems. If you’ve used virtual assistants like Apple’s Siri or Amazon’s Alexa, you’re already familiar with ASR systems. This field has grown exponentially over the past decade, the ASR systems are used in a wide range of applications extending from finance to healthcare. As the ASR quickly approaches human accuracy levels, there will be an explosion of applications incorporating ASR technology into their products. Given the popularity and demand of this technology, here is an attempt to create an app for ASR.
In this article, we will briefly go through Facebook’s Wav2Vec2 framework and build an ASR app by leveraging the Wav2Vec2-Base-960h model from the Hugging Face model hub to convert Speech to Text.
Overview
Wav2Vec 2.0 is a speech model for self-supervised learning of speech representations that masks the speech input in the latent space and solves a contrastive task defined over a quantization of the jointly learned latent representations. It takes a float array corresponding to the raw waveform of the speech signal. And since it was trained using connectionist temporal classification (CTC) so the model output has to be decoded using the Wav2Vec2CTCTokenizer. It also attains 4.8/8.2 WER by pre-training the model on 53k hours of unlabelled data and fine-tuning on only ten minutes of labeled data. This shows that speech recognition can work with limited labeled data. Which can play a key role in devising ASR solutions for indigenous languages and dialects for which it’s a little onerous to gather data.
Furthermore, we will use the Wav2Vec2-Base-960h model from the Hugging Face model hub, create a UI with Gradio, and launch our app on Hugging Face Spaces.
Brief Summary of working of Wav2Vec2
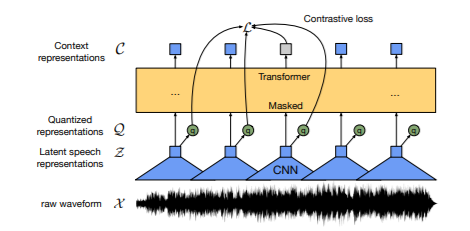
Figure 1: Illustration of Wav2Vec 2.0 framework that learns both contextualized speech representations and a set of discretized speech representations.
Wav2Vec 2.0 consists of a multi-layer convolutional feature encoder f: X → Z that accepts raw audio input (X) and produces latent speech representations (z1, . . . , zT) for T time-steps. They’re subsequently passed into a Transformer g: Z → C, which creates representations (c1, . . . , cT) that capture data from the full sequence. In comparison to VQ-Wav2Vec, Wav2Vec 2.0 builds context representations over continuous speech representations and self-attention captures dependencies over the entire sequence of latent representations end-to-end.
Step-by-step Implementation
The following is a step-by-step guide to creating a Speaker Verification app using Gradio and Hugging Face Spaces. In case you are having trouble deploying the Gradio app on Hugging Face Spaces, please check out this excellent tutorial by 1LittleCoder for detailed instructions.
Step 1: Creating a Hugging Face account and Setting up a New Space
If you don’t already have a Hugging Face account, go visit the website and create one. After you’ve created a Hugging Face account, go to the top-right side of the page and click on the profile icon, and then the ‘New Space’ button. Then you’ll be directed to a new page where you’ll be asked to name the repository you want to create. Give the space a name, and then choose ‘Gradio’ from the SDK options before clicking the ‘create new space’ button. As a result, the repository for your app will be created. You can watch the demo video that has been included below for reference.

Step 2: Creating a Requirements.txt File
Now we will create a requirements.txt file in which we will list the Python packages for our app to run successfully. Those dependencies will be installed with the help of pip install -r requirements.txt.
We will need to add nltk, transformers, torch, and librosa.
Step 3: Creating app.py File
For this, I’ve broken down the code into sections for clarity and to make things easier to understand. We will go over each section of code one by one.
1. Importing necessary libraries
#Importing all the necessary packages
import nltk
import librosa
import torch
import gradio as gr
from transformers import Wav2Vec2Tokenizer, Wav2Vec2ForCTC
nltk.download("punkt")
2. Loading the pre-trained model and the corresponding tokenizer
#Loading the pre-trained model and the tokenizer
model_name = "facebook/wav2vec2-base-960h"
tokenizer = Wav2Vec2Tokenizer.from_pretrained(model_name)
model = Wav2Vec2ForCTC.from_pretrained(model_name)
Since the Wav2Vec2-Base-960h model has been pre-trained and fine-tuned using 960 hours of Librispeech on 16kHz sampled speech audio, so the speech input must be also sampled at 16KHz. For this, we will write a function that makes sure that the speech input has a sampling rate of 16 kHz.
3. Creating a function that makes sure that the speech input has a sampling rate of 16 kHz
def load_data(input_file):

  #reading the file
  speech, sample_rate = librosa.load(input_file)
  #make it 1-D
  if len(speech.shape) > 1:
      speech = speech[:,0] + speech[:,1]
  #Resampling the audio at 16KHz
  if sample_rate !=16000:
    speech = librosa.resample(speech, sample_rate,16000)
  return speech
4. Creating a function for correcting the letter casing in a sentence
This will be needed in order to make necessary changes to the obtained transcript.
def correct_casing(input_sentence):

  sentences = nltk.sent_tokenize(input_sentence)
  return (' '.join([s.replace(s[0],s[0].capitalize(),1) for s in sentences]))
5. Defining a function for getting a transcript of the audio input
def asr_transcript(input_file):

  speech = load_data(input_file)
  #Tokenize
  input_values = tokenizer(speech, return_tensors="pt").input_values
  #Take logits
  logits = model(input_values).logits
  #Take argmax
  predicted_ids = torch.argmax(logits, dim=-1)
  #Get the words from predicted word ids
  transcription = tokenizer.decode(predicted_ids[0])
  #Correcting the letter casing
  transcription = correct_casing(transcription.lower())
  return transcription
6. Creating a UI to the model using gr.Interface
Then, using Gradio’s Interface class, we’ll create a UI for the machine learning model by specifying (1) the function, (2) the desired input components, and (3) the desired output components, allowing us to quickly prototype and test our model. The function in our case is asr_transcript. We’ll use microphones or drop an audio file via a file directory to provide audio input. In this case, we’ll use the following code: gr.inputs = inputs For giving input, use: inputs = gr.inputs.Audio(source=”microphone”, type=”filepath”, optional=True, label=”Speaker”). We’ll use outputs = gr.outputs.Textbox(label=”Output Text”) because the intended output is a string. Finally, use the launch() method to start the demo.
⚠️If you wish to test audio files stored locally, ensure sure they’ve been uploaded and the location to them is listed in the examples (as shown in the code snippet below). It’s worth mentioning that the components can be specified as either instantiated objects or string shortcuts.
To upload audio files, click on the following tabs in the order listed here: “Files and versions” –> “Contribute” –> “Upload Files”
gr.Interface(asr_transcript,
             inputs = gr.inputs.Audio(source="microphone", type="filepath", optional=True, label="Speaker"),
             outputs = gr.outputs.Textbox(label="Output Text"),
             title="ASR using Wav2Vec 2.0",
             description = "This application displays transcribed text for given audio input",
             examples = [["Test_File1.wav"], ["Test_File2.wav"], ["Test_File3.wav"]], theme="grass").launch()
If you get an error, go to the “See log” tab, which is right next to the spot where Runtime Error is shown, take a cue from the error log and fix the error.
Once the Space is up and running without any errors, it should work like this:
Challenges
- Data protection – consent, security, and privacy
- Challenging audio – this could be due to a variety of reasons such as low pitch, audio with low SNR, etc.
- Different phonation styles and dialects
- Speech Modality
- Demographic bias
Solutions
There is a dire need for more robust and intelligent solutions. When ASR solutions are exposed to contexts and dialects that differ from the data used to train the model, they perform badly. As a result, the key to making a robust ASR system is to train the model on data that closely resembles the auditory environment/language/dialect in which the app/solution will be used/tested. In short, more diversified data should be used to train the model so that it can perform effectively in various situations.
Applications
ASR is used in a wide range of applications, including:
- Gaming
- Air Traffic Control
- Telephone IVR
- Electronic devices
- Media monitoring
- Home Automation
- In-car voice command system
- Virtual assistants and Customer self-service
- Social Media apps like Instagram, Facebook, Youtube, TikTok, Zoom, etc.
Conclusion
Wav2Vec 2.0 shows great potential when it comes to creating speech recognition models for settings where there is very little labeled training data. It can play a key role in devising ASR solutions for indigenous languages and domains with very limited annotated data.
To sum it up, the key learnings from this article are as follows:
1. We briefly explored the Wav2Vec2 framework.
2. We learned how to create an Automatic Speech Recognition app for the English language. We leverage Gradio’s Interface class to create a UI for the machine learning model (Wav2Vec2-Base-960h) and then deployed our app to Hugging Face Spaces.
3. We looked into challenges encountered in developing robust ASR solutions.
4. We also learned how an Automatic Speech Recognition system could be made more robust.
5. Lastly, we explored the potential applications of Automatic Speech Recognition (ASR).
Thank you for taking the time to read this. Please post any questions or concerns you have in the comments section below. Happy Learning!
The media shown in this article is not owned by Analytics Vidhya and is used at the Author’s discretion.


