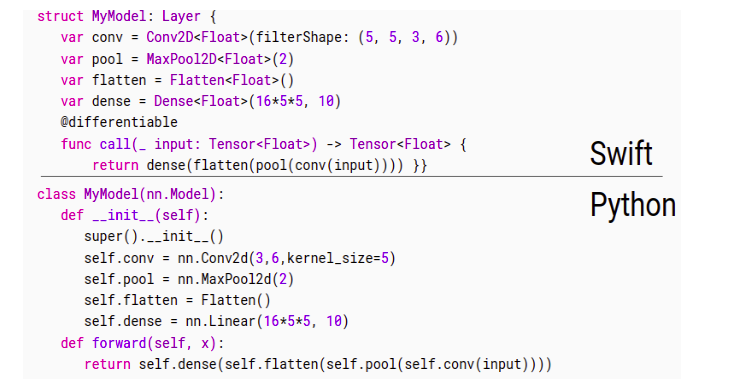
Learn Swift for Data Science with Particle Example
This article was published as a part of the Data Science Blogathon.
Introduction on Swift
Python is widely considered the best and most effective language for data science. Most of the polls and surveys that I’ve come across in recent years peg Python as the market leader in this space.
But here’s the thing data science is a vast and ever-evolving field. The languages we use to build our data science models have to evolve with it. Remember when R was the go-to language? That was swiftly overtaken by Python. Julia also came up last year for data science and now there’s another language that is blossoming.
Yes, we are talking about Swift for data science.

“I always hope that when I start looking at a new language, there will be some mind-opening new ideas to find, and Swift definitely doesn’t disappoint. Swift tries to be expressive, flexible, concise, safe, easy to use, and fast. Most languages compromise significantly in at least one of these areas.”
When Jeremy Howard endorses a language and starts using it for his daily data science work, you need to drop everything and listen.
In this article, we will learn about Swift as a programming language and how it fits into the data science space. If you’re a Python user, you’ll notice the subtle differences and the incredible similarities between the two. There’s a lot of code here as well so let’s get started!
Why Swift?
“PyTorch was created to overcome the gaps in Tensorflow. FastAI was built to fill gaps in tooling for PyTorch. But now we’re hitting the limits of Python, and Swift has the potential to bridge this gap”.
There has been a lot of excitement and attention recently towards Swift as a language for data science. Everyone is talking about it. . Here are a few reasons why you should learn Swift:
- Swift is fast, like legit fast. It’s as close to C as possible
- At the same time, it has a very simple and readable syntax which is very similar to Python
- Swift is a more efficient, stable, and secure programming language compared to Python
- It is also a good language to build for mobile. In fact, it’s the official language for developing iOS applications for the iPhone
- It has strong integrated support for automatic differentiation which makes it one of the few elite languages for numerical computing
- It has the support of Google, Apple, and FastAI behind it!
Here is Jeremy Howard articulating how good Swift is
Swift Basics for Data Analysis
Before we start with the nitty-gritty details of performing data science using Swift, let’s get a brief introduction to the basics of the Swift programming language.
The Swift Ecosystem
The current state of Swift for Data Science is primarily made up of two ecosystems:
- The Open-source ecosystem
- The Apple ecosystem
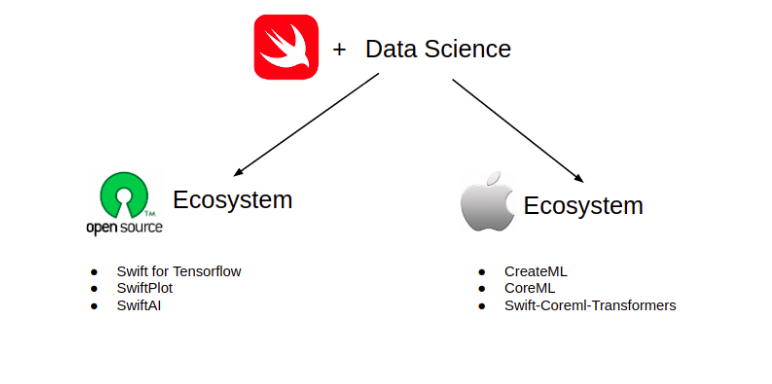
The open-source ecosystem is one where we can download and run Swift on any operating system or machine. We can build machine learning applications using really cool Swift libraries, like Swift for TensorFlow, SwiftAI, and SwiftPlot.
Swift also lets us seamlessly import mature data science libraries from Python like NumPy, pandas, matplotlib and scikit-learn. So if you had any hesitation about switching over to Swift from Python, you’re well covered!
The Apple ecosystem, on the other hand, is impressive in its own right. There are useful libraries that let us train large models in Python and directly import them into Swift for inferencing. Additionally, it also comes with a plethora of pre-trained state-of-the-art models that we can now use to build iOS/macOS applications.
There are other interesting libraries like Swift CoreML-Transformers that let us run state-of-the-art text generation models like the GPT-2, BERT, etc on the iPhone.
And there are multiple other libraries that give a good level of functionality when you need to build machine learning-based applications for Apple devices.
There are multiple differences between the two ecosystems. But the most important one is that in order to use the Apple ecosystem, you need to have an Apple machine to work on and you can only build for Apple devices like iOS, macOS, etc.
Now that you have an overview of Swift as a language for data science, let’s get into the code!
Setting up the Environment
Swift is available to use on Google Colab with both GPU and TPU versions. We will be using that so that you can quickly get up to speed with it without spending much time on the installation process.

You can follow the below steps to open a Colab notebook that is Swift enabled:
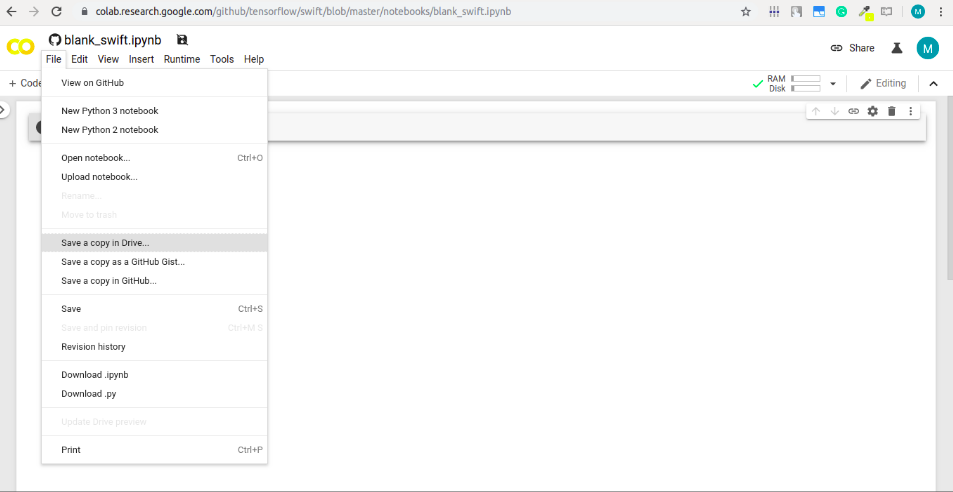
1. Open a blank swift notebook
2. Click on “File” and then select “Save a copy in Drive”, this will save a fresh Swift notebook in your own Google Drive!
3. We are all set to start working with Swift! You can write your first line of code:
Sweet! If you want to work with Swift locally on your own system then here a few links that you can follow:
- If you want to install Swift on your local system then you can follow the installation
- For installing with Jupyter Notebook on Ubuntu,
- On Ubuntu, you can also install swift for docker
Now, let’s quickly cover some basic Swift functions before jumping into the data science aspect of using it.
Basic swift programming I
Now, let’s quickly cover some basic Swift programming concepts before jumping into the data science aspect of using it.
The print function
We’re sure you’ve already used this before. It works the very same way as it does in Python. Simply call print() with whatever you want to print inside the parenthesis:

Variables in Swift
Swift provides two useful options to create variables: let and var. let is used to create a “constant” ” which is a variable whose value cannot change anywhere further in the program. Var is very similar to the variables that we see in Python you can change the value stored in it anytime further in the program.
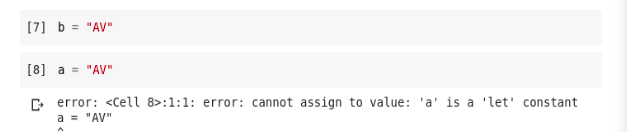
Let’s look at an example to see the difference. Create two variables a and b:
let a = "Analytics"
var b = "Vidhya"
Now, try changing the value of both a and b:
b = "AV"
a = "AV"
You will notice that b was able to update its value without any issue while a gives an error:
This ability to create constant variables is very useful and helps us prevent unseen bugs in our code. You will see further in the article that we will use let to create variables that store important information which we do not want to over-write even by mistake in our code.
- Here’s a pro-tip: use var for temporary variables or variables you want to use for some intermediate calculations.
- Similarly, use for things like storing the training data, results, etc. – basically the values that you do not want to change or mess up.
Also, there is this cool feature of Swift where you can even use emojis as variable names!

This is because Swift supports Unicode very well so we can create variables with Greek letters:
var pi = 3.1415925
Swift’s Datatypes
Swift supports all the common data types, like Integer, String, Float and Double. We can assign any variable with a value, and its type will automatically be detected by Swift:
let marks = 63
let percentage= 70.0
var name = "Sushil"
You can also explicitly mention data type while creating a variable. This helps prevent errors in the program because Swift will throw an error if the types do not match:
let weight: Double = 72.8
Let’s have a quick quiz. Create a constant with an explicit type of `Float` and a value of 4 and post the solution in the comments below!
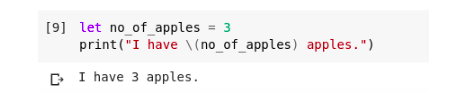
There’s a simple way to include values in strings – write the value in parentheses, and write a backslash () before the parentheses. For example:
You can use three double quotation marks ( ” ” “) for strings that take up multiple lines.
Writing Comments in Code
Writing comments is one of the most important aspects of good code. This is true across any industry and role you work in. This is the most important programming aspect you should learn!
Use comments to include text in your code, as a note or reminder to yourself. Comments are ignored by Swift.
Single-line comments begin with two forward slashes (/ /):
// This is a comment.
Multiline comments start with a forward slash followed by an asterisk (/*) ) and end with an asterisk followed by a forward slash (*/):
/* This is also a comment
but is written over multiple lines. */
Lists and Dictionaries
Swift supports both list and dictionary data structures just like Python (there’s that comparison again!). Though the advantage here is that, unlike Python, we do not need separate syntax like “{}” for a dictionary and “[]” for a list.
Let’s create a list and a dictionary in Swift:
var shoppingList = ["catfish", "water", "tulips", "blue paint"]
shoppingList[1] = "bottle of water"

var occupationsDict = [
    "Malcolm": "Captain",
    "Kaylee": "Mechanic",
]
We can access the elements of a List or a Dictionary by writing the index/key inside the “[]” brackets (similar to Python):
occupationsDict["Jayne"] = "Public Relations"
print(occupationsDict)
The above code will add the key-value pair of “Jayne” and “Public Relations” to the dictionary. This will be the output if you print the above dictionary:

// List and Dictionaries in Swift
// List
var shoppingList = ["catfish", "water", "tulips", "blue paint"]
shoppingList[1] = "bottle of water"
print("List : ",shoppingList)
// Dictionaries
var occupationsDict = [
"Malcolm": "Captain",
"Kaylee": "Mechanic",
]
occupationsDict["Jayne"] = "Public Relations"
print("Dictionary : " , occupationsDict)
Basics of Swift programming – II
Working with Loops
Looping is one of the most important features of any programming language and Swift doesn’t disappoint here. It not only supports all the conventional looping mechanisms (for, while, etc.) but also implements some variations of its own.
for..in the loop
Very similar to Python, you can use the

The three dots in the first example are used to denote “range” in Swift. If we want to do something in the range of a to b, we will use the syntax a……b.
Similarly, if we want to exclude the last number, we can just change the three dots to “..<” like a…b. Try playing around with this and see how many times you get it right!
Another important point to note here is that, unlike Python, Swift doesn’t use the concept of indentation but uses curly brackets “{}” to denote code hierarchy.
You can use the while and other types of loops in a similar fashion in Swift.
Conditionals (If-else..)
Swift supports conditional statements like if, if-else, if-else-if, nested if, and even the switch statement (that Python doesn’t support). The syntax for an if statement is quite simple:
if boolean_expression {
   /* statement(s) will execute if the boolean expression is true */
}
The boolean_expression can be any comparison and the statements that you write inside the block will only be executed if the result of the comparison or the expression evaluates to true. You can read about other conditionals here.
Functions
A Swift function looks syntactically very similar to a function in Python. The major difference here is that we use the “func” keyword instead of def and we explicitly mention the data types of the arguments and the return type of the function.
Here is how you can write a basic function in Swift:
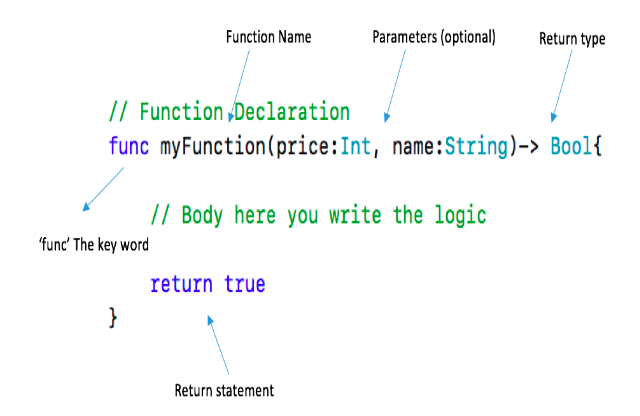
And just like conditionals, we use curly brackets “{}” to denote the code block that belongs to this function.
Now that you are familiar with the basics of Swift, let’s learn about an interesting feature – using Python libraries in Swift itself!
Python with Swift
Swift supports interoperability with Python. What this means is you can import useful Python libraries from Swift, call their functions, and convert values between Swift and Python seamlessly.
Using Python Libraries in Swift
This gives incredible power to Swift’s data science ecosystem. This ecosystem is still pretty young and is still developing and you can already use mature libraries like Numpy, Pandas, and Matplotlib from Python for filling the gaps in existing Swift offerings.
In order to use Python’s modules in Swift, you can just import Python right away and load whatever library you want to use!
import Python

// Load numpy from Python
let np = Python.import("numpy")

// Create an array of zeros
var zeros = np.ones([2, 3])
print(zeros)
This is quite similar to the way you’d use NumPy in Python, isn’t it? You can do the same for other packages like matplotlib:
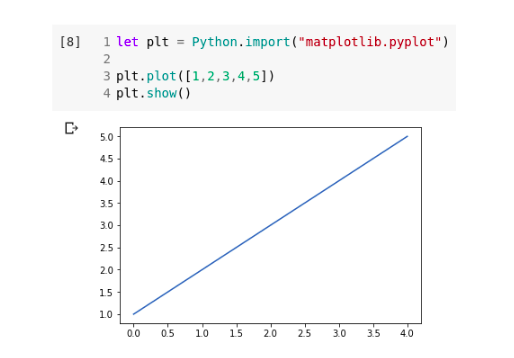
You have learned quite a bit about Swift already. It’s now time to build your first model!
Machine Learning with Swift and TensorFlow
The Swift4Tensorflow Library
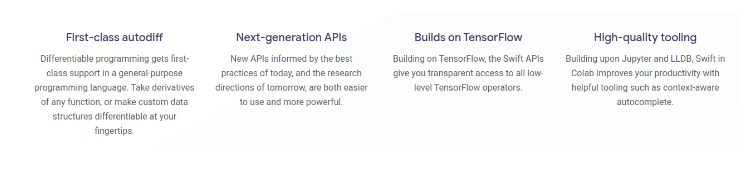
Swift4Tensorflow is one of the most mature libraries in the open-source ecosystem of Swift. We can quickly build machine learning and deep learning models using a very simple Keras-like syntax in native Swift.
It gets even more interesting! Swift4Tensorflow isn’t just a Swift wrapper around TensorFlow but it’s being developed as a feature of the language itself. It is widely expected to become a core part of the language in the near future.
What this means is that the amazing set of Engineers from Apple’s Swift team and Google’s Tensorflow team will make sure that you are able to do high-performance machine learning in Swift.
The library also adds many useful features to Swift like native support for automatic differentiation (which would remind you of Autograd in PyTorch) to make it even more compatible with numeric computing use-cases.
About the Dataset and Setup
Let’s understand the problem statement we’ll be working within this section. You might be familiar with it if you’ve touched the deep learning field before.
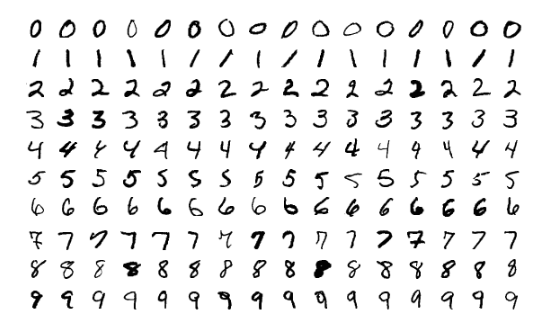
We will be building a convolutional neural network (CNN) model to classify images into digits using the MNIST dataset. This dataset contains 60,000 training images and 10,000 testing images of handwritten digits that we can use for training image classification models:
This dataset is a fairly common dataset for working with Computer Vision problems so we won’t describe it in great detail. If you want to know more about it,
Setup Project
Before we can start building the model, we need to download the dataset and pre-process it. For your convenience, we have already created a GitHub repository with the pre-processing code and the data.
Let’s download the setup code, download the dataset and import the necessary libraries:
%include "EnableIPythonDisplay.swift"
IPythonDisplay.shell.enable_matplotlib("inline")
import Foundation
import Python
let os = Python.import("os")
let plt = Python.import("matplotlib.pyplot")
os.system("git clone https://github.com/mohdsanadzakirizvi/swift-datascience.git")
os.chdir("/content/swift-datascience")
Implementation of MNIST Image Classification
Loading DataSet
%include "/content/swift-datascience/MNIST.swift"
// Load dataset
let dataset = MNIST(batchSize: 128)
// Get first 5 images
let imgs = dataset.trainingImages.minibatch(at: 0, batchSize: 5).makeNumpyArray()
print(imgs.shape)
Exploring the MNIST digits
We will plot some images from the dataset to get an idea about what we’re working with:
# Display first 5 images
for img in imgs{
  plt.imshow(img.reshape(28,28))
  plt.show()
}
This is what our images look like:
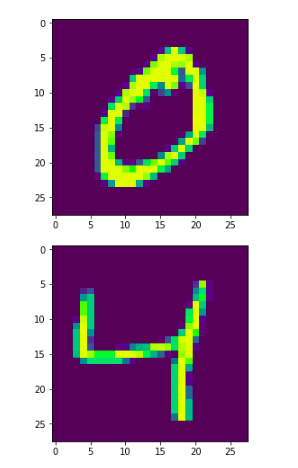
It seems pretty intuitive, right? The first digit is a handwritten 0 and the second one is a 4.
Defining the Structure of our Model
Let’s now define the architecture of the model. We are using the LeNet-5 architecture which is a fairly basic CNN model using 2 convolution layers with average pooling and 3 dense layers.
The last dense layer has a shape of 10 because we have 10 target classes, one for each digit from 0 to 9:
import TensorFlow
let epochCount = 100
let batchSize = 128
// The LeNet-5 model
var classifier = Sequential {
    Conv2D<Float>(filterShape: (5, 5, 1, 6), padding: .same, activation: relu)
    AvgPool2D<Float>(poolSize: (2, 2), strides: (2, 2))
    Conv2D<Float>(filterShape: (5, 5, 6, 16), activation: relu)
    AvgPool2D<Float>(poolSize: (2, 2), strides: (2, 2))
    Flatten<Float>()
    Dense<Float>(inputSize: 400, outputSize: 120, activation: relu)
    Dense<Float>(inputSize: 120, outputSize: 84, activation: relu)
    Dense<Float>(inputSize: 84, outputSize: 10, activation: softmax)
}
You would have noticed that the code looks very familiar to how you write code to create models in Python frameworks like Keras, PyTorch, or TensorFlow.
The simplicity of writing code is one of the biggest selling points of Swift.
Swift4Tensorflow supports multiple layer types right out of the box.
Choosing Gradient Descent as the Optimizer
Similarly, we need an optimizer function to train our model. We are going to use stochastic gradient descent (SGD) which is available in Swift4Tensorflow.
// Using Gradient Descent as the optimizer
let optimizer = SGD(for: classifier, learningRate: 0.1)
Swift4Tensorflow supports many additional optimizers. You can choose your pick based on your project:
- AMSGrad
- AdaDelta
- AdaGrad
- AdaMax
- Adam
- Parameter
- RMSProp
- SGD
Model Training
Now that everything is set up, let’s train the model!
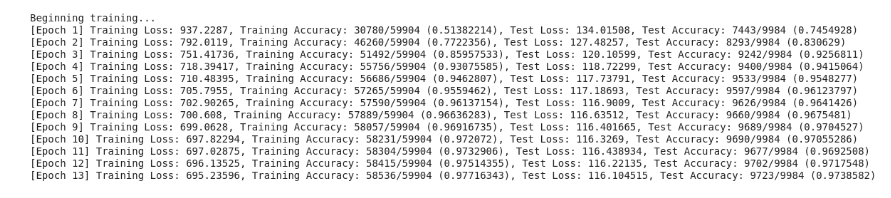
print("Beginning training...")

struct Statistics {
    var correctGuessCount: Int = 0
    var totalGuessCount: Int = 0
    var totalLoss: Float = 0
}

// Store accuracy results during training
var trainAccuracyResults: [Float] = []
var testAccuracyResults: [Float] = []

// The training loop.
for epoch in 1...epochCount {
    var trainStats = Statistics()
    var testStats = Statistics()

    // Set context to training
    Context.local.learningPhase = .training

    for i in 0 .. Tensor in
            let ŷ = classifier(x)
            let correctPredictions = ŷ.argmax(squeezingAxis: 1) .== y

            trainStats.correctGuessCount += Int(Tensor(correctPredictions).sum().scalarized())
            trainStats.totalGuessCount += batchSize

            let loss = softmaxCrossEntropy(logits: ŷ, labels: y)
            trainStats.totalLoss += loss.scalarized()

            return loss
        }

        // Update the model's differentiable variables along the gradient vector.
        optimizer.update(&classifier, along: 𝛁model)
    }

    // Set context to inference
    Context.local.learningPhase = .inference

    for i in 0 ..< dataset.testSize / batchSize {
        let x = dataset.testImages.minibatch(at: i, batchSize: batchSize)
        let y = dataset.testLabels.minibatch(at: i, batchSize: batchSize)

        // Compute loss on test set
        let ŷ = classifier(x)
        let correctPredictions = ŷ.argmax(squeezingAxis: 1) .== y

        testStats.correctGuessCount += Int(Tensor(correctPredictions).sum().scalarized())
        testStats.totalGuessCount += batchSize

        let loss = softmaxCrossEntropy(logits: ŷ, labels: y)

        testStats.totalLoss += loss.scalarized()
    }

    let trainAccuracy = Float(trainStats.correctGuessCount) / Float(trainStats.totalGuessCount)
    let testAccuracy = Float(testStats.correctGuessCount) / Float(testStats.totalGuessCount)

    // Save train and test accuracy
    trainAccuracyResults.append(trainAccuracy)
    testAccuracyResults.append(testAccuracy)

    print("""
          [Epoch (epoch)]
          Training Loss: (trainStats.totalLoss),
          Training Accuracy: (trainStats.correctGuessCount)/(trainStats.totalGuessCount)
          ((trainAccuracy)),
          Test Loss: (testStats.totalLoss),
          Test Accuracy: (testStats.correctGuessCount)/(testStats.totalGuessCount)
          ((testAccuracy))
          """)
}
The above code runs a training loop that feeds the dataset examples into the model to help it make better predictions. Here are the training steps that we follow:
- We Iterate for each epoch . An epoch is one pass through the entire dataset.
- Within an epoch, we iterate over each example in the training Dataset grabbing its features (x) and label(y ) this is very important for the next step.
- Using the example’s features, we make a prediction and compare it with the ground truth label. This gives us the inaccuracy of the prediction and that is used to calculate the model’s loss and gradients.
- That’s when gradient descent comes into the picture, to update the model’s variables.
- Keep track of some training stats for visualizing them later.
- Repeat steps 1 to 5 for each epoch.
The epoch count variable is the number of times to loop over the dataset collection. Go ahead and give it a try!
How many epochs did it take for you to achieve a 90%+ accuracy on the test set?
I was able to get 97%+ accuracy in both train and test sets in just 12 epochs.
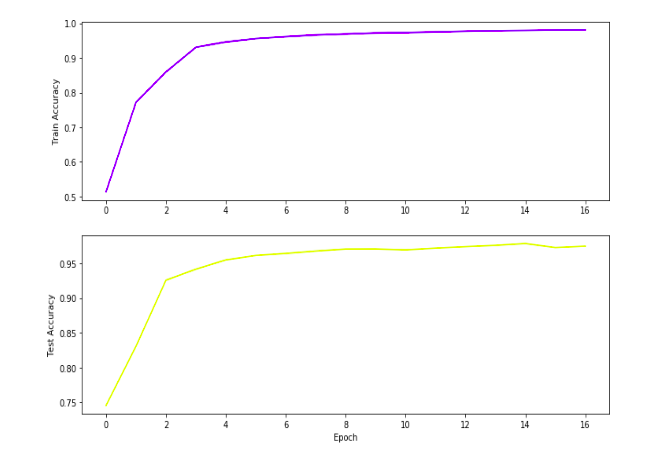
Visualizing the training and test stats
Though it’s helpful to print out the model’s training progress, it is often more helpful to see this progress.
Let’s visualize the train and test stats that we captured during the training of the model.
plt.figure(figsize: [12, 8])
let accuracyAxes = plt.subplot(2, 1, 1)
accuracyAxes.set_ylabel("Train Accuracy")
accuracyAxes.plot(trainAccuracyResults, color: "blue")
let lossAxes = plt.subplot(2, 1, 2)
lossAxes.set_ylabel("Test Accuracy")
lossAxes.set_xlabel("Epoch")
lossAxes.plot(testAccuracyResults, color: "yellow")
plt.show()
This is how the train and test accuracies evolved during the training process:
Conclusion
The way industry experts are reacting to Swift is mind-boggling, it feels like a language that has the potential to not only become one of the mainstream languages for data science but also a language that is going to be used for building applications based on machine learning for the real world.
Currently, it is in infancy and the libraries around data science and numeric computing are still developing. Yet, it has a strong industry backing behind it and I look forward to a future where it will have a rich ecosystem of tools and libraries- maybe even better than what Python has today.
The media shown in this article is not owned by Analytics Vidhya and is used at the Author’s discretion.


Very detailed article thanks for your hard work.