Fast API, Docker and AWS ECS to Deploy ML Model
This article was published as a part of the Data Science Blogathon.
Introduction
Deploying is perhaps the second most crucial step in the complete product development life cycle. Deploying models let other members of your organization consume what you have created. For starters, it could appear daunting, but with the right tools, things can be smooth.
In this article, we will create a spam classifier model with pandas, and Scikit learns and serve it with Fast API. Next up, we will containerize our web API with Docker. And finally, deploy it using AWS ECS.
If you are not already familiar with Fast API, then go through this article for a basic understanding of Fast API components such as path parameters, query parameters, etc.
Here’s what we will cover in this article,
- Create spam classifier
- Create a Fast API app to wrap the classification model
- Dockerize the API
- Push docker image to Docker hub
- Deploy it on AWS ECS (Elastic Container Service)
In between these topics, we will also cover the fundamentals of each process so as not to make you feel overwhelmed.
So, let’s get started.
Build Spam Classifier Model
The spam classification model classifies different SMS as spam or ham. As you can see, it is a binary classification problem for which you can use any classification model. We will keep the model simple without getting into NLP.
First, create a python virtual environment by typing the following commands in shell.
python -m venv spam_ham_apiWe named the virtual environment spam_ham_api.
Install necessary libraries. For this project, we will only need Pandas, Sklearn, Uvicorn, Fastapi, and Joblib.
pip install pandas sklearn uvicorn fastapi joblib
Now, create a python file for model creation.
Import dataset to python environment.
import pandas as pd
#load dataset
df = pd.read_csv('path/spam.csv')
df.drop(['Unnamed: 2', 'Unnamed: 3', 'Unnamed: 4'], axis=1, inplace=True)
The next step is to clean the data of unnecessary characters, punctuations, and stop-words.
import regex as re
from sklearn.feature_extraction.text import ENGLISH_STOP_WORDS
def cleanText(text):
    text = re.sub(r"[W_]",' ',text.lower()).replace('-','')
    words = [word for word in text.split() if word not in ENGLISH_STOP_WORDS]
    new_text = " ".join(words)
    return new_text
We will now import all the libraries and methods we will be using.
from sklearn.pipeline import Pipeline
from sklearn.feature_extraction.text import TfidfVectorizer
from xgboost import XGBRFClassifier
from sklearn.linear_model import LogisticRegression
from sklearn.tree import DecisionTreeClassifier
from sklearn.ensemble import RandomForestClassifier
from sklearn.metrics import accuracy_score
from sklearn.preprocessing import LabelEncoder
from sklearn.model_selection import train_test_split
Create TF-IDF vectorizer and Label encoder instances.
tfidf = TfidfVectorizer()
encode = LabelEncoder()
df['v1'] = encode.fit_transform(df['v1'])
Clean texts
X = df['v2'].apply(cleanText)
y = df['v1']
Split train and test data
X_train, X_test, y_train, y_test = train_test_split(X, y, test_size=0.2, random_state=39)
If you wish to use multiple models to find the best model, you can do this by using GridsearchCV and Pipeline methods. But first, you will have to create a switcher class.
#switcher class for different estimators
class my_classifier(BaseEstimator,):
    def __init__(self, estimator=None):
        self.estimator = estimator
    def fit(self, X, y=None):
        self.estimator.fit(X,y)
        return self
    def predict(self, X, y=None):
        return self.estimator.predict(X,y)
    def predict_proba(self, X):
        return self.estimator.predict_proba(X)
    def score(self, X, y):
        return self.estimator.score(X, y)
Specify the parameters you wish to pass for each model.
parameters = [
              {'clf':[LogisticRegression(max_iter=1000)],
               },
             {'clf':[RandomForestClassifier()],
             },
             {
               'clf':[DecisionTreeClassifier()],
             },
             {
              'clf':[XGBRFClassifier()]
             },
          ]
Here, we haven’t specified any other parameters for tuning models. But you can do this by passing clf__paramName in each dictionary above. Visit this article for implementations.
Now create a pipeline,
make_pipeline = Pipeline([('tfidf', tfidf), ('clf', my_classifier())])
Fit model
grid = GridSearchCV(make_pipeline, parameters, cv=5)
grid.fit(X_train,y_train)
Predict and accuracy score
y_pred = grid.predict(X_test)
accuracy = accuracy_score(y_test, y_pred)
Print outcome
print(f'Accuracy score is {accuracy*100}')
Now, the only thing left is to save the model. So, we will not be executing the process again and again. There are two ways one can do this, either by using pickle or Joblib. We will use joblib.
filename = 'spam_model'
from joblib import dump
dump(grid, filename)
It will save the model in the same directory as this Python file.
Full code for the model.py
So, the model creation is complete. We shall move on to API creation.
Build Fast API
Alright, we are all set to build an API for our model.
Create another python file in the same directory. Import libraries you will use.
from fastapi import FastAPI
from joblib import load
import regex as re
from sklearn.feature_extraction.text import ENGLISH_STOP_WORDS
Initiate the app
app = FastAPI()
Load the model you saved earlier
filename = 'spam_model'
model = load(filename)
Define a function for cleaning text
def cleanText(text):
    text = re.sub(r"[W_]",' ',text.lower()).replace('-','')
    words = [word for word in text.split() if word not in ENGLISH_STOP_WORDS]
    new_text = " ".join(words)
    return new_text
Define a function for classification
def classify(model,text):
    text = cleanText(text)
    prediction = model.predict([text])[0]
    res = 'Ham' if prediction == 0 else 'spam'
    spam_prob = model.predict_proba([text])[0][1]
    return {'label': res, 'spam_probability': float(spam_prob)}
Path operation
@app.get('/')
def get_root():
    return {'message': 'Welcome to the SMS spam detection API'}
Whenever you run the API, you will receive this dictionary.
 @app.get('/spam_detection_path/{message}')
async def detect_spam_path(message: str):
    return classify(model, message)
The API will return the label (spam or ham) with spam probability in percentages when you input a message.
Let’s check if the API is working or not.
uvicorn model_API:app --reload
By default, the API will be available on your localhost:8000 port.
Head over to localhost:8000/docs for interactive Sagger GUI.
Complete code for our API
We have finished our API creation. Next, we will see how we can create containers from the docker file for our API.
Container Creation with Docker
So, what is Docker? It is one of those words you must have heard from almost anyone in software development. So, Docker is an open-source tool that lets us run software independently. It packages the software into a standardized unit called containers. These containers have everything libraries, code, and system tools necessary for running. It is one of the crucial tools for microservices architecture. Docker can significantly lower the time to scale and upgrade software. It also ensures the software will run similarly on every device.
So, to create a container, we need a Dockerfile. A docker file is a text document that specifies the command line commands to create a docker image.
Note: An image is a file system representing a packaged application with all the dependencies to run separately.
Now, let’s create a docker file for our API.
Assuming you are still in a virtual environment, type
pip freeze > requirements.txt
It will create a requirements text file in the current directory with all the packages you have installed in your virtual environment with their versions.
Now create a text file without a .txt extension and name it Dockerfile. Paste the below commands in your Dockerfile.
FROM python:3.9
#
WORKDIR /code
#
COPY ./requirements.txt /code/requirements.txt
#
RUN pip install --no-cache-dir --upgrade -r /code/requirements.txt
#
COPY ./model_API.py /code/model_API.py
#
COPY ./app/spam_model /code/spam_model
#
COPY ./spamClassify.py /code/spamClassify.py
#
CMD ["uvicorn", "model_API:app", "--host", "0.0.0.0"]
Let’s break apart each line.
- FROM: It tells us what image to base this on. Here, it is referencing python:3.9 which is also an image to automate the build process. It helps build a python environment for us.
- WORKDIR: This tells us the working directory of the image. As an image is a filesystem, it needs directories to store different files. Here, /code is our working directory.
- COPY: This command copies the files in the first argument to the /code directory as model_API.py.
- RUN: Specifies the commands to create the image. Here, the command is a pip command that installs everything in the requirements.txt file. Here, –no-cache-dir creates an internal cache for every event that has occurred until now. So, every time the code is updated, we will not need to install and copy everything from scratch. But changing anything in the requirements file or before will force Docker to build the image again from scratch.
- CMD: It specifies the commands to run after the image has been built.
Now run
docker build -t imageName
The building process will start, and it might take a few moments, depending on internet connections.
Now, run the following commands to create a container
docker run -d --name conatinerName -p 8000:8080 imageName
- Here, -d stands for detached mode. The container will run in the background.
- -p forwards host port(8000) to container port(8080).
To view your running containers,
docker container ls
To view all of them,
docker container ls -a
It will show you all the container’s names, IDs, port mappings etc.
For debugging your container, always check its logs.
docker logs containerName
So, here you can see our API is running at 0.0.0.0:8000. Visit the address or run the following code to see if it is running.
curl -v 0.0.0.0:8000
It should return the message of our API.
Push to Docker Hub
The Docker hub is a registry for storing container images. The best thing about it is it’s free of cost for casual users. Though for private repositories, you have to shell out a few bucks. There are several alternatives for the docker registry, like AWS ECR, Azure Container Registry, etc. If your entire operation is on AWS or Azure, you may opt for their respective registries, but we will use Docker Hub for this article.
In this section, we will learn how to push container images to Docker Hub from the command line.
First, go to Docker Hub’s official site, create an account, and create a repository to store your images. Then get back to the command line interface.
Now, we need to give a tag to the image we just created. Remember the tag you will
docker tag imageName dockerHubName/repository Name:tag
Check if your image is listed or not.
docker images
Alternatively, you can also build images with the appropriate names and tags.
docker build -t dockerhubname/repositoryname:tag
Log in to your Docker Hub account.
docker login
Type in your username and passwords, and you are now good to go.
Push your image to the hub
docker push dockerhubname/repositoryname:tag
Wait for some time. Depending on the image size and internet connection, it might take a while.
Deploy on AWS ECS
The next step is to deploy our spam detection app on AWS ECS from the docker hub registry.
First, log in to your AWS account.
Search ECS and click on “get started.”
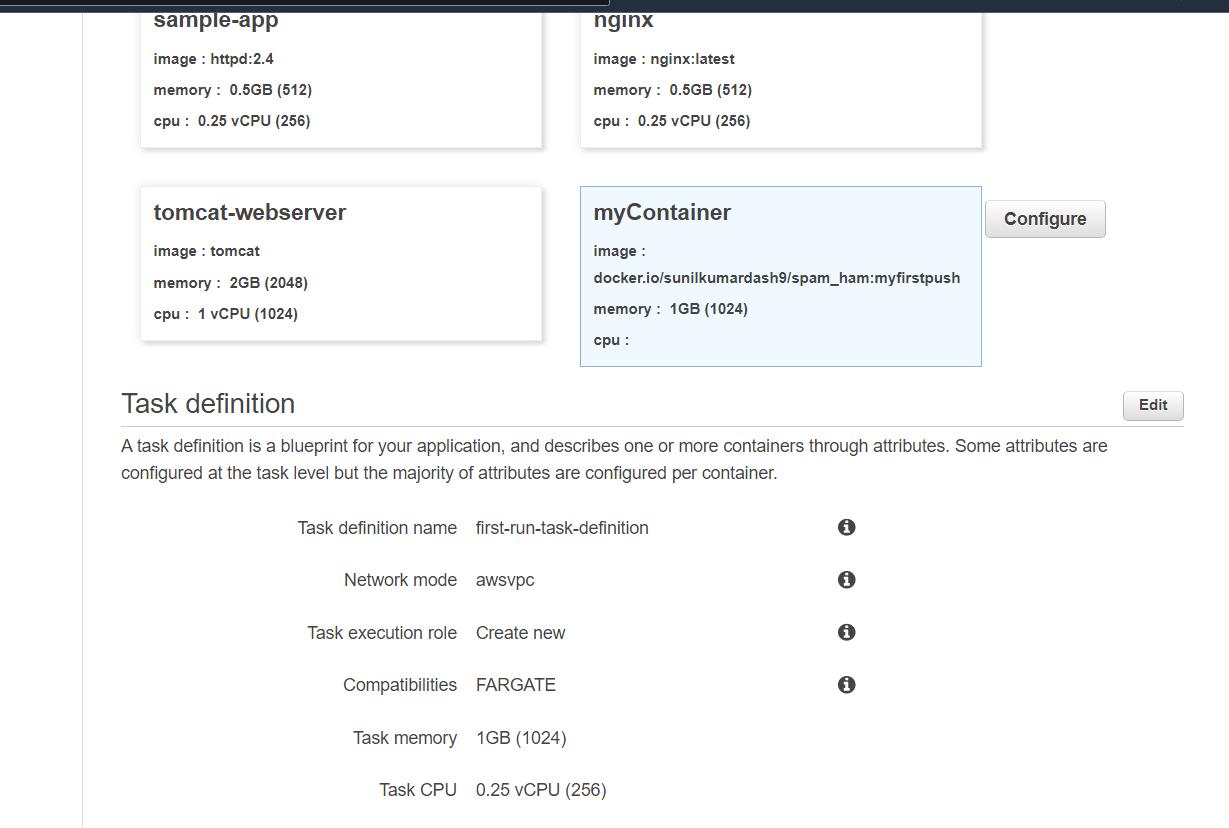
Configure the docker container
- give any name to your container
- In image URL type docker.io/{docker image name}:{tag}
- For me, it is docker.io/sunilkumardash9/spam-ham:myfirstpush
- Add a soft limit of 1024 Mb and CPU 0.25 VPCs
- In ports type 8000 or any port you wish
- then next
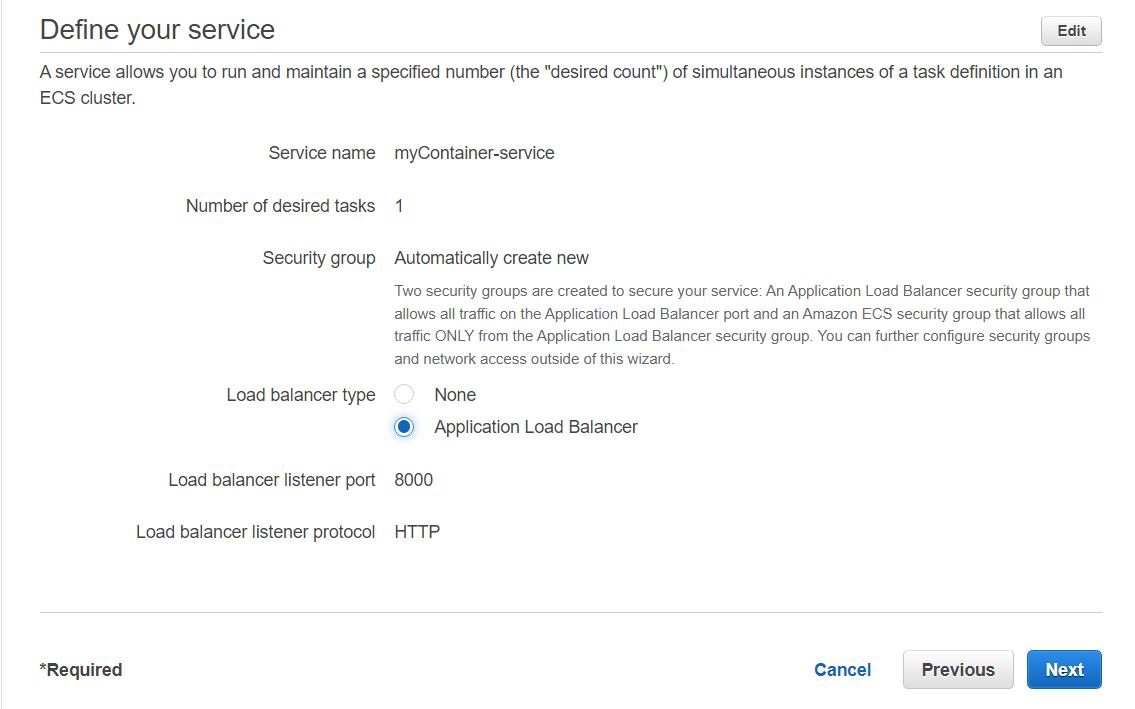
In the next step, change the name and add an application load balancer. And click Next.
In this step, name the cluster and leave everything as it is. Then next, review your changes and click on create.
Wait for a few minutes until the launch status is complete.
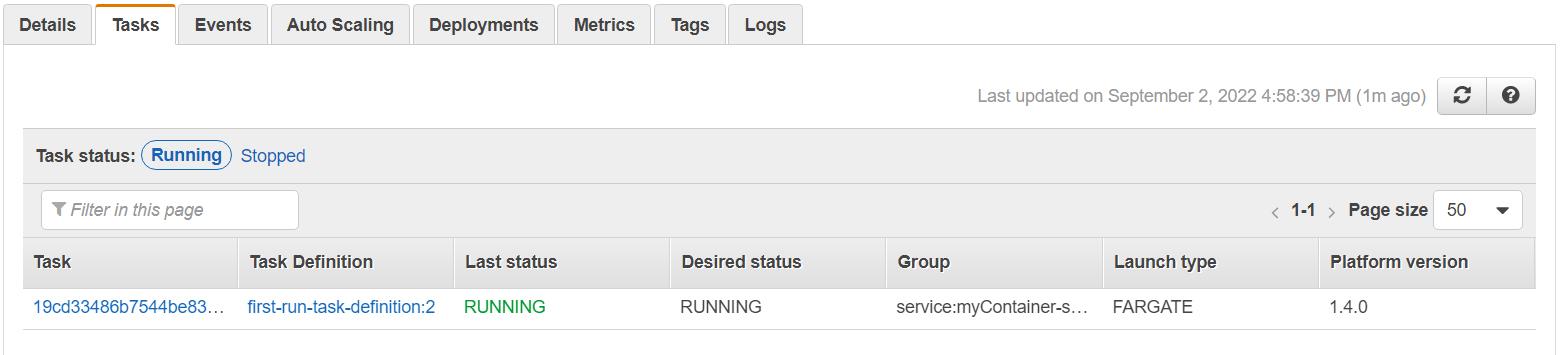
Go to clusters -> tasks, wait for a few minutes “PENDING” status will turn to “RUNNING.” This implies your app is up and running.
To get the IP address of your app, click on the task link, and you will see the public IP under the network section. Copy and paste it into the browser and plug your port at the end.
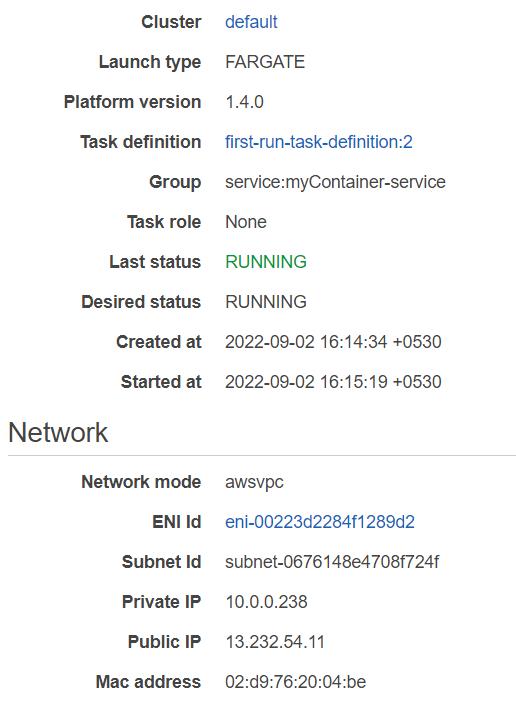
For me, it was http://13.232.54.11:8000/. It should show our API message.

Plug /docs at the end of the link to go to Swagger Ui and see if our app is running.
Make sure after completing all the tasks, you delete the resources as it will incur charges, and you would not want that.
Conclusion
Deploying is important, and ECS makes it easier to run containerized applications. In this article, we went from creating a Machine Learning app with Fast API to deploying it on AWS ECS.
Here are some key takeaways from the article.
- Fast API is the fastest python web framework suitable for building production-ready web services.
- Docker makes it easier to containerize applications to deploy them on any server.
- Containerized applications are highly portable. No need to worry if your code will work or not on a different machine.
- AWS ECS is one of the best tools to easily deploy containerized applications that run on AWS resources (Fargate/EC2).
So, this was it. I hope you liked the article.
The media shown in this article is not owned by Analytics Vidhya and is used at the Author’s discretion.


