Build Accurate Job Resume Matching Algorithm using Doc2Vec
Introduction to the Problem
Hiring is one of the most challenging market segments to capture due to multiple reasons. One of the challenges faced during the hiring stage is shortlisting the relevant profiles for a particular job description. This is one of the key steps in the hiring process. Companies generally receive a large volume of profiles due to the high demand for a job. Processing the resumes manually with limited resources is a very tough task. An automated system is required to shortlist the relevant profiles based on the job description without any manual intervention. In this article, we will discuss different approaches to solving the job and resume matching problem and implement an accurate solution using NLP techniques.
Understanding Different Approaches to Solving the Problem
One of the simplest ways to solve the problem is to directly compare the job description’s skill set and the resume. For example, if the skills mentioned in the job description are “Support Vector Machine, Python and AWS,” and the resume has the following skillset “Support Vector Machine, Python and AWS.” It’s a perfect match between the resume and job description. Let’s consider another resume with the skillset “Decision Tree, Python, and AWS”; this approach will fail to return this profile as relevant since SVM is not matched with Decision Tree. This profile is relevant since SVM and Decision Trees come under Machine Learning. Hence, a naive intersection between the resume’s skills and the job description skills would not give us appropriate results.
To tackle this problem, an NLP-based technique is proposed. We will discuss this in detail now.
Embedding Techniques as a Solution
Word embedding is a primary step in most NLP-based solutions. Word embeddings are the numerical representation of the text. They capture both the semantic and syntactic meaning of the word. I would recommend you go through the below articles for a depth understanding of the word embeddings.
- An Intuitive Understanding of Word Embeddings: From Count Vectors to Word2Vec
- Word2Vec For Word Embeddings -A Beginner’s Guide
Word2Vec and Doc2Vec are the popular embedding algorithms for text. The difference between both of them is that in the case of word2vec, embedding is derived for a word, whereas, in the case of doc2vec, embedding is derived for the document. We will solve the problem discussed using both of the embedding techniques. Wondering how these embeddings will solve the problem? We will explore it now.
In the case of Word2Vec,
- Word embeddings are derived for each skill from the job description
- Word embeddings are derived for each unique word in the resume
- For each word and skill in the resume, cosine similarity is derived
- If similarity > threshold, skill is found.
In the case of Doc2Vec, a single embedding is obtained for the resume and job description, then the cosine similarity is calculated between both embeddings. If it is greater than some threshold, then the resume is relevant to a job description.
In the next sections, we will understand the working of the Doc2Vec algorithm and implement the skill-matching algorithm using Doc2Vec.
Understanding the Working of Doc2Vec
Doc2Vec, as the name itself suggests, is to obtain the embeddings of a paragraph/document. The learning of word vectors inspires the concept of learning document vectors. Some of the basic tasks that can be performed using the Doc2Vec model are Text Classification tasks like Sentiment Analysis, Information Retrieval, Document Similarity, and so on.
Two different architectures are using which the paragraph vectors can be learned.
- PV-DM(Paragraph Vector – Distributed Memory) model
- PV-DBOW(Paragraph Vector – Distributed Bag of Words) model
We will explore it now.
PV-DM(Paragraph Vector – Distributed Memory) model
The PV-DM model is similar to Word2Vec’s Continuous Bag of Words(CBOW) model. Figure 1 depicts the basic architecture of the Distributed Memory model.
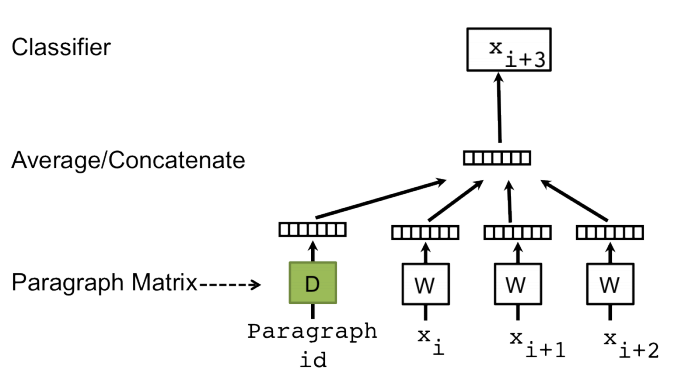
To better understand the working of the PV-DM model, consider Figure 1; if input words xi, xi+1, and xi+2 are “the,” “cat,” and “sat,” respectively, then concatenating the word vectors and the paragraph vector (randomly initialized), the output xi+3 will be “on.” A way of predicting the next word helps us learn the paragraph vector id through backpropagation. This way, the paragraph vectors are learned in the paragraph vector distributed memory architecture.
PV-DBOW(Paragraph Vector – Distributed Bag of Words) Model
The PV-DBOW model works similarly to that of Word2Vec’s Skip-Gram model. Figure 2 is the architecture of the PV-DBOW Model. Similar to how Skipgram learns vector representations present in the training corpus by predicting a set of context words given the target word, the PV-DBOW Model takes in the paragraph vector as an input and gives a set of words that can be present in the paragraph which as an indirect result learns vector representations of words and paragraphs.

Implement Job Resume Matching Algorithm using Doc2Vec
Having understood the working and the architecture of Doc2Vec, let’s now get into how Doc2Vec is implemented in the Resume-Job Description matching problem. The Doc2Vec model is available in the Gensim library, and the implementation is the same as the Word2Vec model.
Importing Libraries:
from gensim.models.doc2vec import Doc2Vec, TaggedDocument
from nltk.tokenize import word_tokenize
from bs4 import BeautifulSoup
import pandas as pd
import numpy as np
import requests
import PyPDF2
import re
The idea is to train the Doc2vec model on a large corpus of blog data. The dataset is loaded using the pandas library to achieve the task. Click here to access a sample corpus. The model can be trained on any corpus based on the context of the problem.
articles = pd.read_csv('/content/data.csv')
print(articles.head())
Output: 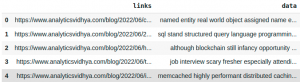
Then the data is tagged using the TaggedDocument module available in the Gensim library.
data = list(articles['data'])
tagged_data = [TaggedDocument(words = word_tokenize(_d.lower()), tags = [str(i)]) for i, _d in enumerate(data)]
Now the data is in the required format, it’s time to initialize the model, build the vocabulary and train the model.
Model Initialization:
The Doc2vec model is initialized as follows.
model = Doc2Vec(vector_size = 50,
min_count = 10,
epochs = 50
)
The parameters involved are vector_size, min_count, epochs, min_alpha, alpha, and so on. Let’s get to know about the parameters in detail.
- vector_size – Dimensionality of the feature vectors.
- min_count – Ignores all words with a total frequency lower than this.
- epochs – Number of iterations (epochs) over the corpus. Defaults to 10 for Doc2Vec.
- alpha – The initial learning rate.
- min_alpha – The learning rate will linearly drop to min_alpha as training progresses.
- window – The window refers to the basic context window size.
- dm – Defines the training algorithm. If dm = 1, the Distributed Memory (PV-DM) model is used; else, Distributed Bag of Words (PV-DBOW) model is used.
- hs – If hs = 1, the hierarchical softmax activation function will be used.
Vocabulary Building:
After the model is initialized, the vocabulary, which is a list of all unique words extracted from the training corpus, is built as follows.
model.build_vocab(tagged_data)
k = model.wv.vocab.keys()
print(len(k))
Output: 15422
In our case, the size of our vocabulary is 15422. Running the above script would give the appropriate results.
Model Training:
The Doc2Vec model is trained with the following parameters: tagged_data, which is basically a list of tokens, total_examples is the count of documents, and the epochs is the number of iterations over the training corpus.
model.train(tagged_data,
total_examples = model.corpus_count,
epochs = model.epochs)
model.save('doc2vec.model')
print("Model saved")
Output: Model saved
Matching the JD and the Resume:
To evaluate the model, the data required are the resume and the job description. The data from the resume in PDF format is extracted using the PyPDF2 library. Click here to access a sample of resumes and change the resume_path accordingly.
resume_path = 'resume.pdf'
resume = ''
pdfReader = PyPDF2.PdfFileReader(resume_path)
for i in range(pdfReader.numPages):
  pageObj = pdfReader.getPage(i)
  resume += pageObj.extractText()
Few preprocessing tasks, like lowering the case and removing the punctuations and digits, are done using the regex library.
resume = resume.lower()
resume = re.sub('[^a-z]', ' ', resume)
The next step is to load the job description and preprocess it. To obtain the job description data. One of the job description links from the Analytics Vidhya website is chosen, and the data is scraped using the extract_data function.
def extract_data(url):
  list1 = []
  count = 0
  resp = requests.get(url)
  if resp.status_code == 200:
      soup = BeautifulSoup(resp.text,'html.parser')
      l = soup.find(class_ = 'av-company-description-page mb-2')
      web = ''.join([i.text for i in l.find_all(['p', 'li'])])
      list1.append(web)
      return web
  else:
      print("Error")
jd_links = ['https://datahack.analyticsvidhya.com/jobathon/clix-capital/senior-manager-growthrisk-analytics-2',
'https://datahack.analyticsvidhya.com/jobathon/clix-capital/manager-growth-analytics-2',
'https://datahack.analyticsvidhya.com/jobathon/clix-capital/manager-risk-analytics-2',
'https://datahack.analyticsvidhya.com/jobathon/cropin/data-scientist-85']

jd_df = pd.DataFrame(columns = ['links', 'data'])
jd_df['links'] = jd_links

Extracting the JD data from the links:
for i in range(len(jd_df)):
  jd_df['data'][i] = extract_data(jd_df['links'][i])
Preprocessing the JD data:
#Converting the text into lower case
jd_df.loc[:,"data"] = jd_df.data.apply(lambda x : str.lower(x))

#Removing the punctuations from the text
jd_df.loc[:,"data"] = jd_df.data.apply(lambda x : " ".join(re.findall('[\w]+',x))
)
#Removing the numerics present in the text
jd_df.loc[:,"data"] = jd_df.data.apply(lambda x : re.sub(r'\d+','',x))
Model Evaluation:
So, the resume and the job description are loaded and preprocessed. Let’s now calculate the similarity between the resume and the job description. The trained doc2vec model is first loaded, and then a list of tokens is sent as a parameter to the infer_vector() function, which gives us the vectors of the object passed. v1 is the vector of the resume, and v2 is the vector of the job description. Having the vectors, the cosine similarity is calculated using the formula cos(a, b) = a.b/||a|| ||b||
model = Doc2Vec.load('doc2vec.model')
v1 = model.infer_vector(resume.split())
v2 = model.infer_vector(jd['data'][0].split())
cosine_similarity = (np.dot(np.array(v1), np.array(v2))) / (norm(np.array(v1)) * norm(np.array(v2)))
print(round(cosine_similarity, 3))
Output: 0.398
Conclusion
In this blog, we discussed the different approaches to job skill matching algorithms, i.e., Direct Comparision between skill sets and NLP techniques. We discussed in detail the working of doc2vec and how it can be used to build the job resume matching algorithm.
Hope you found the article helpful. Do let me know your thoughts in the comments section below. Happy Learning 🙂


