Introduction
Google has become the center of attention since the announcement of its new Generative AI family of models called the Gemini. As Google has stated, Google’s Gemini family of Large Language Models outperforms the existing State of The Art(SoTA) GPT model from OpenAI in more than 30+ benchmark tests. Not only in textual generations but Google with the Gemini Pro Vision model’s capabilities has proven that it has an upper edge on even the visual tasks compared to the GPT 4 Vision which recently went public from OpenAI. A few days ago, Google made two of its foundational models (Gemini-pro and Gemini-pro-vision) available to the public. In this article, we will create a multimodal chatbot with Gemini and Gradio.
Learning Objectives
- Understand the concept of multimodal chatbots.
- Gain familiarity with the powerful AI models Gemini Pro and Gemini Pro Vision.
- Learn how to implement these models within the interactive platform Gradio.
- Build your own multimodal chatbot, capable of responding to both text and image prompts.
Dive into the future of AI with GenAI Pinnacle. From training bespoke models to tackling real-world challenges like PII masking, empower your projects with cutting-edge capabilities. Start Exploring.
Table of contents
This article was published as a part of the Data Science Blogathon.
Gemini Pro and Gemini Pro Vision
Google during the release of the Gemini family of models, has announced three foundational models (Gemini Nano, Gemini Pro, and Gemini Ultra)related to text generation. Along with the text models, Google has even released a multi-model Gemini Pro Vision that is capable of understanding text and images. Currently, these two models are available to the public through the freely available Google API Key from Google AI Studio.
The Gemini Pro model is capable of handling text generation and multi-turn chat conversations. Just like any other Large Language Model, the Gemini Pro can do in-context learning and can handle zero-shot, one-shot, and few-shot prompting techniques. According to the official documentation, the input token limit for the Gemini Pro LLM is 30,720 tokens and the output limit is 2048 tokens. And for the free API, Google allows up to 60 requests per minute.
The Gemini Pro Vision is a multimodal built to work on tasks that require Large Language Models to understand Images. The model takes both the Image and Text as input and generates text as output. The Gemini Pro Vision can take up to 12,288 tokens through the input and can output up to a maximum of 4096 tokens. Like the Gemini Pro, this model can even handle different prompt strategies like zero-shot, one-shot, and few-shot.
Both the models have tight safety regulations automatically applied to avoid generating harmful content. The output of both of these models can be altered through parameters like temperature, top p, top k, max output tokens, and many more.
Now, we will start with building our multimodal Chatbot with Gemini.
Building the Skeleton
In this section, we will build the skeleton part of our application. That will first build the application without the models and then include them later.
Installing Libraries
We will start by first installing the following libraries.
pip install -U google-generativeai gradio Pillow- Google-generativeai: This Python library is for working with Google’s Gemini models. It provides functions to call the models like the gemini-pro and gemini-pro-vision
- Gradio: This is a Python library that eases the process of creating interactive UIs within Python itself without needing to write any HTML, CSS, or JavaScript
- Pillow: This is a Python library for handling images. This library will be needed because it will help us load images to the gemini-pro-vision model.
Building Helper Functions
Now, lets build some helper functions and then move on to the UI. As our chat conversations include images, we need to show these Images in the chat. We cannot just directly display images in chat as it is. Hence one method is by providing the chat with an encoded base64 string. Hence we will write a function that takes in the image path encodes it to base64 and returns a base64-encoded string.
import base64


def image_to_base64(image_path):
    with open(image_path, 'rb') as img:
        encoded_string = base64.b64encode(img.read())
    return encoded_string.decode('utf-8')
- Here we import the base64 library for encoding. Then we create a function called image_to_base64() that takes an image_path as input.
- Then we open the image with the provided path in read bytes mode. Then we work with the b64encode() method from the base64 library to encode the content of the image to base 64.
- The encoded data is in the form of bytes, so we need to convert it to Unicode format so we can pass this Image along with the user query.
- Hence we work with the decode() method that takes in the base64 encoded bytes and returns a Unicode string by decoding the base64 bytes with UTF-8 encoding.
- Finally, the base64 encoded string is returned by the function, which can be embedded with text to display images in the chat.
- This might sound confusing, but on a high note, what we are doing is converting the image to “base 64 encoded bytes” and “base 64 encoded bytes” to “base 64 encoded string”.
Testing UI and Image Inputs
Now let’s create the UI and test it with image inputs. So the code to create the UI will be as follows
import gradio as gr
import base64
# Image to Base 64 Converter
def image_to_base64(image_path):
with open(image_path, 'rb') as img:
encoded_string = base64.b64encode(img.read())
return encoded_string.decode('utf-8')
# Function that takes User Inputs and displays it on ChatUI
def query_message(history,txt,img):
if not img:
history += [(txt,None)]
return history
base64 = image_to_base64(img)
data_url = f"data:image/jpeg;base64,{base64}"
history += [(f"{txt} ", None)]
# UI Code
with gr.Blocks() as app:
with gr.Row():
image_box = gr.Image(type="filepath")
chatbot = gr.Chatbot(
scale = 2,
height=750
)
text_box = gr.Textbox(
placeholder="Enter text and press enter, or upload an image",
container=False,
)
btn = gr.Button("Submit")
clicked = btn.click(query_message,
[chatbot,text_box,image_box],
chatbot
)
app.queue()
app.launch(debug=True)
The with gr.Blocks() as app: statement creates a root block container for the GUI. Inside this block:
- gr.Row(): creates a row container, indicating that the elements inside will be arranged horizontally. Under this, we will arrange the Image Block and Chatbot
- gr.Image(type=”filepath”): creates an image box on the UI, where users can upload an image by specifying a file path.
- gr.Chatbot(…): creates a chatbot widget with a specified scale and height. The chatbot takes input from a list of tuples, where each tuple contains a human message and a bot message. It is of the form [(human_message,bot_message),(human_message,bot_message)]. This message history is stored within the chatbot itself
- gr.Textbox(…): creates a textbox for users to enter text, with a placeholder text. The container=False will remove the containing, i.e. the borders around the Textbox(). This is not mandatory, you may choose to include it
- gr.Button(“Submit”): creates a submit button labeled “Submit.”. This submit button has a function called click(), which tells what happens when a button is clicked. So to this click() function, we pass a callback function, then a list of inputs to that callback function, and the list of outputs in which the return values of the callback function are stored
Passing Inputs
Here our callback function is query_message(). To this function we pass a list of inputs, the first is the chatbot, which contains the history of the chat, the second is the value that the user has typed in the text box and the third variable is the image, if any user has uploaded. The query_message() function then adds the text and images and then returns the updated chat history and we give this updated history to the chatbot so it can display on the UI.
So let’s understand in steps how the query_message() function works:
- The function first checks if the input image is not provided
- If an image is not provided, then a tuple containing only the human message text i.e. (human_message, None) is added to the current history as a list and is returned so the chatbot can display the text typed by the user
- If the user has provided an image, then convert it to a base64-encoded string using the function image_to_base64()
- Then create a data URL for a JPEG image with the base64-encoded content. This is necessary for the image to be displayed in the Chat UI
- Finally, add a tuple to the history list, containing a formatted string with the original text from the user and an embedded image using the data URL
Returning History
Finally, return the history. The reason we are specifying the second element in the tuple as None is that we want the query_message() function to display only the human message, we will then later use another function to display the large language model message. Let’s run the code and check the functionality by giving it images and text as input
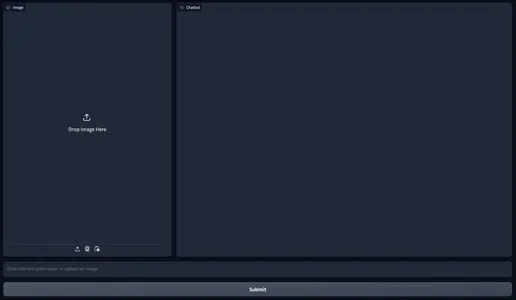
In the first pic, we see the plain UI we have developed. On the left side, we have an Image upload section, on the right side, we have the Chatbot Interface and at the bottom, we have the text box interface.
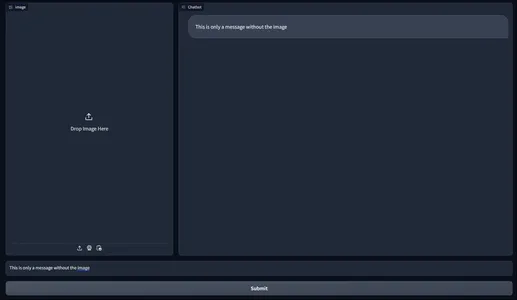
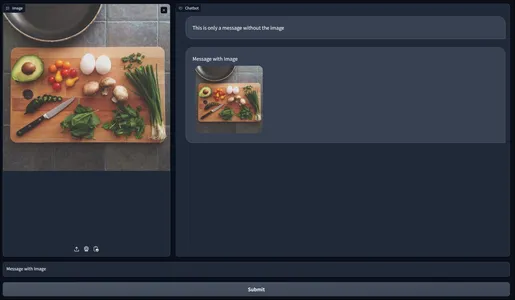
In the second pic, we can see that we have typed a message on the text box and then clicked on the submit button, which then displays it on the Chatbot UI. In the third pic, along with the user text, we have also uploaded an image. Clicking on the submit button will display both the Image and the Text on the Chatbot.
In the next section, we will do the integration of Gemini in our multimodal Chatbot.
Integrating the Gemini Large Language Model
The query_message(), takes in text and image inputs. Both of these are user inputs, i.e. human messages, hence displayed in grey color. We will now define another function that will take the human message and image, generate the response, and then add this response as the bot/assistant message onto the Chat UI.
Defining the Models
First, let’s define our models.
import os
import google.generativeai as genai


# Set Google API key
os.environ['GOOGLE_API_KEY'] = "Your API Key"
genai.configure(api_key = os.environ['GOOGLE_API_KEY'])


# Create the Model
txt_model = genai.GenerativeModel('gemini-pro')
vis_model = genai.GenerativeModel('gemini-pro-vision')
- We import the generativeai library from Google, which will let us work with the Gemini Large Language Models.
- We start by first storing the Google API Key in an environment variable. To get an API Key, you can go through this blog and sign up for Google AI Studio.
- Then we pass this environment variable containing the API Key to the configure() function which will validate it, thus allowing us to work with the models.
- Then we define our two models. For the text generation, we work with the gemini-pro model, and for the multimodal (text and image inputs) we work with the gemini-pro-vision model.
Defining Function
Now both of our models are initialized. We will go forward with defining a function that takes image and text input and then generates a response and returns the updated history to display it in the Chat UI.
def llm_response(history,text,img):
    if not img:
        response = txt_model.generate_content(text)
        history += [(None,response.text)]
        return history
    else:
        img = PIL.Image.open(img)
        response = vis_model.generate_content([text,img])
        history += [(None,response.text)]
        return history
- We first check if an image is provided by the user.
- If the image is not provided, we work with the gemini-pro model to generate a response based on the provided user input. The generated text in the response returned by the Gemini is stored in response.text.
- Hence we add the response.text to a tuple (None, response.text) to the history list, representing a bot response without an associated user message.
- We provide None for the human message because we have already displayed the human message in the chat when we have called the query_message() function.
- If an image is provided, then we open the image using the Python Imaging Library (PIL) and generate a response using the multimodal gemini-pro-vision by providing both the input text and the opened image.
- The generated response.text is then added to a tuple (None, response.text) and appended to the history list, representing a bot response without an associated user message.
- Finally, we return the history
Show Bot Message on the UI
Now to show the bot message on the UI, we have to make the following changes to the submit button:
clicked = btn.click(query_message,
                        [chatbot,text_box,image_box],
                        chatbot
                        ).then(llm_response,
                                [chatbot,text_box,image_box],
                                chatbot
                                )
Here, after the .click() function on the button, we are calling another function called the .then(). This .then() function is very similar to the click function that we have discussed. The only difference is that the .then() function activates after the .click() function.
So when a user clicks on the submit button, first the .click() function is called, and the callable function within it is the query_message() is called with respective inputs and outputs. This will display the input user message on the Chat UI.
After this, the .then() function is called, which then calls the callable function llm_response() with the same inputs and outputs. The llm_function() will take the user text, and image, then produce an output history that contains the bot message and adds it to the chatbot. After this, the bot response will appear on the UI.
The entire code will now be:
import PIL.Image
import gradio as gr
import base64
import time
import os
import google.generativeai as genai
# Set Google API key
os.environ['GOOGLE_API_KEY'] = "Your API Key"
genai.configure(api_key = os.environ['GOOGLE_API_KEY'])
# Create the Model
txt_model = genai.GenerativeModel('gemini-pro')
vis_model = genai.GenerativeModel('gemini-pro-vision')
# Image to Base 64 Converter
def image_to_base64(image_path):
with open(image_path, 'rb') as img:
encoded_string = base64.b64encode(img.read())
return encoded_string.decode('utf-8')
# Function that takes User Inputs and displays it on ChatUI
def query_message(history,txt,img):
if not img:
history += [(txt,None)]
return history
base64 = image_to_base64(img)
data_url = f"data:image/jpeg;base64,{base64}"
history += [(f"{txt} ", None)]
return history
# Function that takes User Inputs, generates Response and displays on Chat UI
def llm_response(history,text,img):
if not img:
response = txt_model.generate_content(text)
history += [(None,response.text)]
return history
else:
img = PIL.Image.open(img)
response = vis_model.generate_content([text,img])
history += [(None,response.text)]
return history
# Interface Code
with gr.Blocks() as app:
with gr.Row():
image_box = gr.Image(type="filepath")
chatbot = gr.Chatbot(
scale = 2,
height=750
)
text_box = gr.Textbox(
placeholder="Enter text and press enter, or upload an image",
container=False,
)
btn = gr.Button("Submit")
clicked = btn.click(query_message,
[chatbot,text_box,image_box],
chatbot
).then(llm_response,
[chatbot,text_box,image_box],
chatbot
)
app.queue()
app.launch(debug=True)Testing the App
Everything is ready. Now let’s run our app and test it!
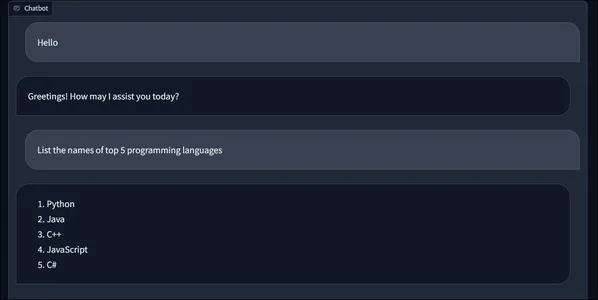
Here is an example conversation. First, we typed the message Hello and then clicked on the submit button and got the following response from the chatbot. Then we typed in another message “List the names of top 5 programming languages” and we can see the response generated by the Gemini Large Language Model above. Now these are only the text inputs. Let’s try inputting images and text. We will input the below image
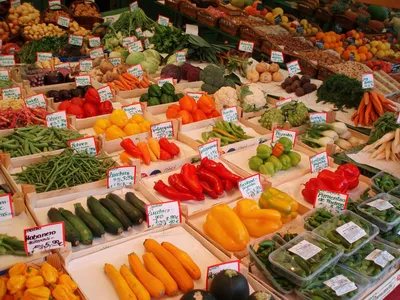
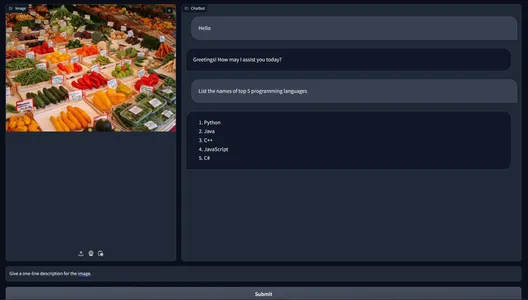
Here we have uploaded the Image and typed “Give a one-line description for the image.” in the text box. Now let’s click on the submit button and observe the output:
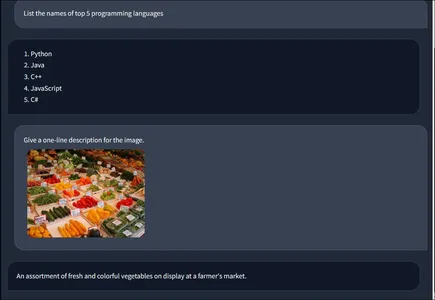
Here we can see the uploaded image and the user message in chat. Along with that, we even see a message generated by the gemini-pro-vision model. It was taken the image and text as input, analyzed the image, and came up with the response “An assortment of fresh and colorful vegetables on display at a farmer’s market.” This way, we can leverage Gemini models and web frameworks to create a fully working multi-modal chatbot using the completely free Google API
Conclusion
In this article, we have built a multimodal chatbot with Gemini API and Gradio. Through this journey, we have come across the two different Gemini models provided by Google. We learned how to encode image information inside text by encoding the image to a base64 string. Then we build a chatbot UI with Gradio which can even take an optional input image. Overall we have built a successfully running multimodal chat very similar to ChatGPT Pro but for free with Google’s free public API
Key Takeaways
- The gemini-pro and gemini-pro-vision are the two freely available APIs from the Gemini family of models
- The gemini-pro-vision is a multimodal capable of understanding images and generating text based on provided text and images
- Gradio allows us to display the messages as a stream of characters by adding individual characters to the history of the chatbot element
- In Gradio, we can directly upload the image or use the webcam to capture an image and send it inside the Python code
Take your AI innovations to the next level with GenAI Pinnacle. Fine-tune models like Gemini and unlock endless possibilities in NLP, image generation, and more. Dive in today! Explore Now
References
Below is the list of references for Gradio and Gemini documentation
- https://www.gradio.app/docs/chatbot
- https://ai.google.dev/tutorials/python_quickstart
Frequently Asked Questions
Q1. What are the token size limits for the gemini-pro model?
A. The gemini-pro LLM can accept up to a maximum of 30,720 tokens. And coming to the output, the max output token limit is 2048 tokens, keeping in mind that these are the values for the Free Public API.
Q2. What is Gradio?
A. Gradio is a library very similar to Streamlit for building fast ready-to-use UIs completely in Python. This framework is widely worked with for creating UIs for Machine Learning and Large Language Model Applications.
Q3. Is there a limit to the number of messages we can send to Gemini?
A. The limit is only set to the minute level, that is at most one can send only up to 60 requests per minute to the Gemini API. Again this restriction applies only to the Free API.
Q4. Is there a possibility for the gemini-pro or the gemini-pro-vision to generate harmful content?
A. No. Google has by default put up several safety measures and safety settings for the LLM generation to deal with such scenarios. The safety measure takes care of checking for questionable prompts that might lead to harmful content.
Q5. What are the token limits for the gemini-pro-vision model?
A. The gemini-pro-vision model accepts both image and text as input. The maximum number of tokens it can accept is 12,288 tokens and the max output tokens is set to 4096.
Q6. Does one-shot and few-shot prompting work with the Gemini family of models?
A. Yes. According to the official Gemini Documentation, all models from the Gemini family can perform in-context learning and can understand the one-shot and few-shot prompting examples.
The media shown in this article is not owned by Analytics Vidhya and is used at the Author’s discretion.
I work as a Developer in the field of Data Science. I constantly spend time learning new things be it related to AI, DataSceine, and CyberSecurity. Deep learning and machine learning are two topics that I find particularly fascinating, and Python is my preferred language for programming. Cyber Security is another field that I'm touching upon recently. I have experience with large-scale data analysis, and I have a solid grasp of a variety of deep learning and machine learning approaches, including neural networks, regression models, and natural language processing. I'm eager to take on new challenges and make a meaningful contribution to the industry, so I'm constantly seeking for ways to enlarge and deepen my knowledge and skills in the subject.