Introduction
In a world where presentations rely more on appealing graphics than extensive text, using a multimodal approach makes summarizing or preparing presentation notes simple. Consider a tool that not only understands the complexities of photos, charts, and visual features but also can provide a succinct and instructive summary for your audience. Enter Google’s Gemini Pro, a breakthrough multimodal model that comes to your rescue. With Gemini Pro, you no longer have to struggle to distill complicated graphics into meaningful statements. It elegantly incorporates the power of AI to reveal the story behind each image and chart, making your presentations not only visually stunning but also easily understandable. This article will focus on building a simple PPT Summarizer using the Gemini Pro LLM multimodal model and the StreamLit framework.
Learning Objectives
- Learn to build PPT slides, a note generator, and a summarizer using the Streamlit framework.
- Know how to use the Gemini API for building a PPT summarizer.
- Learn how to build the Streamlit app in Colab itself and run it with the help of supporting libraries.
- Understand the fundamentals of the Gemini Series Model.
This article was published as a part of the Data Science Blogathon.
Table of contents
Gemini Model Series
Gemini, a groundbreaking multimodal model series crafted by Google, has a prominent role in the realm of AI progress. It has made breakthroughs in natural language understanding, code interpretation, image analysis, audio processing, and video analysis. With precision in design to push the limits of AI capabilities, Gemini strives for cutting-edge performance across diverse benchmarks.
Gemini Models
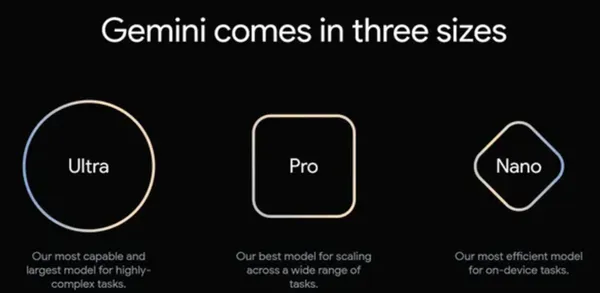
Gemini is available in 3 distinct model sizes. They are:
1. Gemini Nano: It is a compact version of the model that can be run on an edge device. Currently, this model is being used by Google on its Pixel Phone. You can read more about it here. Competent in various tasks, including natural language understanding, code interpretation, and image and audio analysis.
2. Gemini Pro: This is the model version that has been made available to the public by Google. It is a medium-scale model similar to the text-based PaLM model but with several enhanced capabilities.
The Gemini Pro model comes currently in two variants – one for text input (models/Gemini-Pro) and
other for image-based input along with text (models/Gemini-pro-vision).
3. Gemini Ultra: It is the largest model in the Gemini series with a large-scale architecture. It can handle complex video and audio processing tasks and rate highly on human expert performance.
Building Power Point Summarizer
We will now go in detail about how we can create a simple PPT summarizer. Our Chabot will have following features:
1. Allow users to upload the power point file which user wants to summarize
2. Convert the slides to the images from PPT
3. Generate summary for each slide
4. Display the whole summary
Step 1: Install Required Libraries
We will install the required libraries which are google-generativeai,streamlit localtunnel, Spire.Presentation.
We will need localtunnel to host the streamlit app from colab notebook directly.
Localtunnel – This will assign you a unique publicly accessible url that will proxy all requests to your locally running webserver. Basically it will allow us to access our streamlit app running in our colab local environment
Spire.Presentation – This is used to load PPT and also to convert PPT into Images.
!pip install -q -U google-generativeai
!pip install -q streamlit
!npm install localtunnel # for hosting the streamlit app from colab
!pip install Spire.Presentation
Step 2: Create Utility Python File
We will now create a utility python file. If you are using Colab for this you can create new file and name it was “utility.py” which will create python file as we have named it with .py extension as shown in below pic.

The utility file will contain all the supporting utility functions for the app so that we can define the main app, which will contain the UI elements separately. We will now define all functions in the utility file one by one.
Step 3: Import Libraries & Define Initialize Function
We will import all the required libraries and define the initialize function which basically does the following :
Here we will define the initializing function we will understand each part within it one by one:
Firstly we need to configure our Google API Key which can be done by logging into our Google account and then navigating to this website.
Then we create our instance of Gemini vision model using genai.GenerativeModel(‘Gemini-pro-vision’)
Finally we return the instance of our model created
import streamlit as st
##
#from google.colab import userdata
import os
import shutil
import numpy as np
##
import google.generativeai as genai
from PIL import Image
import base64
from pathlib import Path
import time
from spire.presentation.common import *
from spire.presentation import *


def initialize():
  # configure api key and initialise model
  if "GOOGLE_API_KEY" not in os.environ:
      os.environ["GOOGLE_API_KEY"] = 'YOUR API KEY'

  genai.configure(api_key=os.environ['GOOGLE_API_KEY'])

  # Create the Model
  #txt_model = genai.GenerativeModel('gemini-pro')
  vision_model = genai.GenerativeModel('gemini-pro-vision')
  return vision_model
Step 4: Define Save File Function
This function will save the uploaded streamlit file into our local folder structure. Whenever we upload any file on streamlit it is stored in-memory in order to obtain and use its path we need to save it locally.
# save uploaded file to local
def save_file(uploaded_file):
  # Save uploaded file to  folder.
  save_folder = '/content'
  save_path = Path(save_folder, uploaded_file.name)
  with open(save_path, mode='wb') as w:
      w.write(uploaded_file.getvalue())

  if save_path.exists():
      st.sidebar.success(f'File {uploaded_file.name} is successfully saved!')
  return str(save_path)
Step 5: Convert The PPT Slides To Images
Now we have to convert our PPT slides to images so that we can send each slide in the form of an image to the vision model. For this, we used the Spires library we had downloaded. This function will take the filepath (PPT file location) as input and return the number of slides in the PPT as output. We will use this to load our summary sequentially from the starting to the ending slide and not create a hapazard summary, as images are not stored sequentially under the folder.
def ppt_to_img(filepath):
# Create a Presentation object
presentation = Presentation()
# Load a PPT or PPTX file
presentation.LoadFromFile(filepath)
save_folder = '/content/output'
save_path = Path(save_folder)
#if folder already exists then remove it so that we can overwrite
if save_path.exists():
shutil.rmtree(save_path,ignore_errors=True)
#save_path.rmdir()
save_path.mkdir() #make directory
# Loop through the slides in the presentation
for i, slide in enumerate(presentation.Slides):
# Specify the output file name
fileName =save_folder+"/ToImage_" + str(i) + ".png"
# Save each slide as a PNG image
image = slide.SaveAsImage()
image.Save(fileName)
image.Dispose()
ppt_len = presentation.Slides.Length
presentation.Dispose()
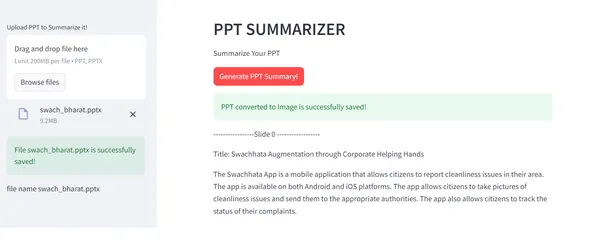
st.success(f'PPT converted to Image is successfully saved!')
return ppt_len
Step 6: Generate Summary Function
We will now define the generate summary function, which will pass each image, which is a slide, to the model and generate the summary. Here, an important thing is to give appropriate prompts. This is where we might have to employ a little bit of prompt engineering. After trying various prompts, the below prompt gave better results. For input, we take the model, length of the PPT, and path name of the saved images. Also note we have to include a delay as Gemini API has a rate limit of 6 requests per minute so we include a delay of 10 sec after each request.
Prompt Engineering
“You are a power point ppt assistant . You should generate a cohesive summary of maximum 5 lines for the input slide image with appropriate title. Information should be related to slide image content. Also if there are any charts graph include relevant numbers explaining the charts!”
Here we use Persona pattern of prompt engineering where we ask model to behave as a PPT assistant as well as specific information pattern where in we specify that charts and graphs needs to be explained in terms of numbers.
def generate_summary(model, ppt_len, path_name):
  from PIL import Image

  for i in range(0,ppt_len):
    image = Image.open(path_name+str(i)+".png")
    response = model.generate_content(["You are a power point ppt assistant . You should generate a cohesive summary of maximum 5 lines for the input slide image with appropriate title. Information should be related to slide image content. Also if there are any charts graph include relevant numbers explaining the charts!",image]);
    st.write(f"-----------------Slide {i} ------------------")
    st.markdown(response.text)
    time.sleep(10)
Step 7: The Whole Utility File
Below is the whole utility.py file how it will look like.
import streamlit as st
##
#from google.colab import userdata
import os
import shutil
import numpy as np
##
import google.generativeai as genai
from PIL import Image
import base64
from pathlib import Path
import time
from spire.presentation.common import *
from spire.presentation import *

def initialize():
  # configure api key and initialise model
  if "GOOGLE_API_KEY" not in os.environ:
      os.environ["GOOGLE_API_KEY"] = 'AIzaSyBM8fTMMEQvUU_FrJdUVTD9TMVhYfNip98'

  genai.configure(api_key=os.environ['GOOGLE_API_KEY'])

  # Create the Model
  #txt_model = genai.GenerativeModel('gemini-pro')
  vision_model = genai.GenerativeModel('gemini-pro-vision')
  return vision_model

# save uploaded file to local
def save_file(uploaded_file):
  # Save uploaded file to  folder.
  save_folder = '/content'
  save_path = Path(save_folder, uploaded_file.name)
  with open(save_path, mode='wb') as w:
      w.write(uploaded_file.getvalue())

  if save_path.exists():
      st.sidebar.success(f'File {uploaded_file.name} is successfully saved!')
  return str(save_path)


def ppt_to_img(filepath):

  # Create a Presentation object
  presentation = Presentation()

  # Load a PPT or PPTX file
  presentation.LoadFromFile(filepath)

  save_folder = '/content/output'
  save_path = Path(save_folder)
  #if folder already exists then remove it so that we can overwrite
  if save_path.exists():
    shutil.rmtree(save_path,ignore_errors=True)
    #save_path.rmdir()

  save_path.mkdir() #make directory

  # Loop through the slides in the presentation
  for i, slide in enumerate(presentation.Slides):

      # Specify the output file name
      fileName =save_folder+"/ToImage_" + str(i) + ".png"
      # Save each slide as a PNG image
      image = slide.SaveAsImage()
      image.Save(fileName)
      image.Dispose()

  ppt_len = presentation.Slides.Length
  presentation.Dispose()

  st.success(f'PPT converted to Image is successfully saved!')
  return ppt_len


def generate_summary(model, ppt_len, path_name):
  from PIL import Image

  for i in range(0,ppt_len):
    image = Image.open(path_name+str(i)+".png")
    response = model.generate_content(["You are a power point ppt assistant . You should generate a cohesive summary of maximum 5 lines for the input slide image with appropriate title. Information should be related to slide image content. Also if there are any charts graph include relevant numbers explaining the charts!",image]);
    st.write(f"-----------------Slide {i} ------------------")
    st.markdown(response.text)
    time.sleep(10)
Step 8: Defining The Main App File
We now will define the main app which will contain the UI elements. Now we will use our streamlit framework to define our app :
st.set_page_config – this is used to define the webpage tab name and icon
st.header – We use this function to define our web page header which will be displayed
st.write– We use this function to give a subtitle to our header describing the app
We call the initialize function from our utility module and instantiate the model. Within main function we create a sidebar component which will allow user to upload the PPT file. Once the file is uploaded then only “Generate PPT Summary” button will be enabled. Once we click generate summary PPT is converted to image and then generate summary function is called which prints the summary of each slide one by one on screen.
%%writefile app.py
import streamlit as st
##
import utility


st.set_page_config(page_title="PPT", page_icon=":sunglasses:")
st.header('PPT SUMMARIZER')
st.write('Summarize Your PPT')


model = utility.initialize()


def main():

  uploaded_img=""
  ppt_len=0
  # Sidebar Components
  with st.sidebar:
    uploaded_img = st.file_uploader("Upload PPT to Summarize it!", accept_multiple_files=False, type=['ppt','pptx'])
    if uploaded_img is not None:
      #encoded_img = image_to_base64(uploaded_img)
      save_path = utility.save_file(uploaded_img)

      st.write("file name",uploaded_img.name)

 # Main Page
  butn_summary = st.button("Generate PPT Summary!", disabled = not bool(uploaded_img), type="primary")
  if butn_summary:
    ppt_len = utility.ppt_to_img(save_path)
  if ppt_len>0:
    utility.generate_summary(model,ppt_len,"/content/output/ToImage_")


if __name__ == "__main__":
  main()
Step 9: How To Define The Whole Code In Colab
In Colab, we need to define all the code within one code cell. Along with the command %%writefile app.py This command basically means that it will generate a Python file with the whole code in a cell. We need the py file to run our streamlit app.
Step 10: How To Run The App
Once above app.py file is written use the below commands to run the app. We will use the streamlit command to run the streamlit app and its logs will be stored in logs.txt.
!streamlit run /content/app.py &>/content/logs.txt &Then after this command we will run the localtunnel command to host our streamlit app on external ip address with help of localtunnel.
!npx localtunnel --port 8501Local tunnel will generate a url we need to click on it

Open the logs.txt file which is generated and copy the Host address of external url as show below.
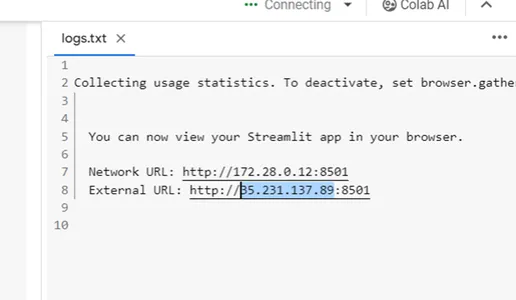
Paste this to the url page which is displayed when you click on the local tunnel url generated .
App Demo
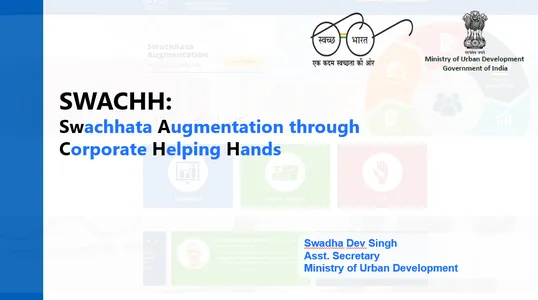
For demo we use this PPT on Swach Bharat by government here. Below is the glimpse of PPT along with its corresponding Summary.

Summary
Title: Swachhata Augmentation through Corporate Helping Hands
The Swachhata Augmentation through Corporate Helping Hands is a program that encourages corporations to contribute to the cleanliness of urban areas. The program has been successful in engaging corporations in various activities such as waste management, sanitation, and awareness generation. As of March 2023, the program has engaged over 100 corporations and resulted in the collection of over 1000 metric tons of waste. The program has also helped in creating awareness about the importance of cleanliness and sanitation among the general public. The program is a good example of how the government and the private sector can work together to achieve common goals.
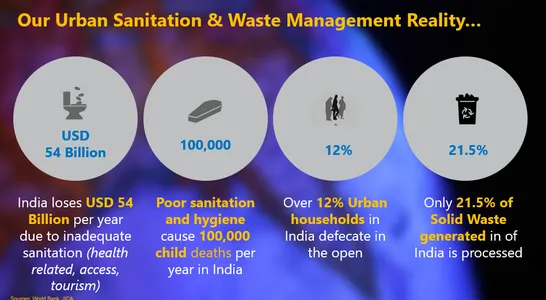
Summary
Our Urban Sanitation and Waste Management Reality
India loses 54 billion USD per year due to inadequate sanitation. Poor sanitation and hygiene cause 100,000 child deaths per year in India. Over 12% of urban households in India defecate in the open. Only 21.5% of the solid waste generated in India is processed.
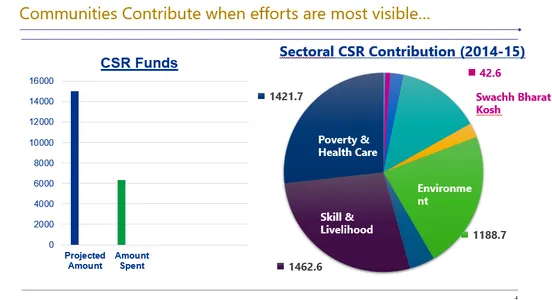
Summary
Title: Communities contribute when efforts are most visible.
Total CSR funds spent in 2014–15 were INR 14626 crore. The majority of the funds were spent on poverty and healthcare (INR 14217 crore), followed by skill development and livelihood (INR 1462.6 crore).
The funds were spent on various sectors such as poverty and healthcare, skill development and livelihood, environment, and Swachh Bharat Kosh.
The amount spent on the environment was INR 1188.7 crore. The amount spent on Swachh Bharat Kosh was INR 42.6 crore.
Observation
As we can observe in slide 3 there was only graphs and the model was accurately able to extract the numbers and generate coherent information.
Conclusion
The Gemini series stands as a powerful tool for revolutionizing the realm of AI. Its versatility across natural language understanding, code interpretation, image analysis, audio processing, and video comprehension sets it apart, promising cutting-edge performance. The article not only introduces Gemini Pro but also takes us through the practical application of building a PowerPoint summarizer using the Streamlit framework and Gemini API. With this combination, the process becomes streamlined, making presentations not just visually appealing but also effortlessly comprehensible.
Key Takeaways
- Explored the three variants – Nano, Pro, and Ultra – showcasing Google’s versatile multimodal models covering natural language, code, image, audio, and video processing.
- Demonstrated the practical application of Gemini Pro and the Streamlit framework to create a PowerPoint summarizer, allowing for visually appealing and easily comprehensible presentations.
- Covered the initialization of Gemini Pro, saving and converting PPT slides to images, and generating coherent summaries using prompt engineering.
Frequently Asked Questions
Q1. Are the Gemini API free to use?
A. Currently they are free to use and they released it on 13th Dec for developer access and in future it might be charged. View pricing details here.
Q2. Is Gemini available in GCP Vertex AI?
A. Yes Gemini is available in their Vertex AI offering in Google Cloud Platform sample tutorials and notebooks available here
Q3. Is there any API rate limits for Gemini Pro?
A. Yes, API request is currently limited to 60 requests per minute
Q4. Is LLM chains for Gemini Available in Langchain?
A. Currently Lang Chain’s separate package offering for Google Gemini integration does not support any LLM Chains.
Q5. Can we use multimodal Gemini for other sizes apart from Pro?
A. No, currently only Gemini Pro variant of model is available for public access.
The media shown in this article is not owned by Analytics Vidhya and is used at the Author’s discretion.
I am a professional working as data scientist after finishing my MBA in Business Analytics and Finance. A keen learner who loves to explore and understand and simplify stuff! I am currently learning about advanced ML and NLP techniques and reading up on various topics related to it including research papers .


