Neural networks are a different breed of models compared to the supervised machine learning algorithms. Why do I say so? There are multiple reasons for that, but the most prominent is the cost of running algorithms on the hardware.
In today’s world, RAM on a machine is cheap and is available in plenty. You need hundreds of GBs of RAM to run a super complex supervised machine learning problem – it can be yours for a little investment / rent. On the other hand, access to GPUs is not that cheap. You need access to hundred GB VRAM on GPUs – it won’t be straight forward and would involve significant costs.
Now, that may change in future. But for now, it means that we have to be smarter about the way we use our resources in solving Deep Learning problems. Especially so, when we try to solve complex real life problems on areas like image and voice recognition. Once you have a few hidden layers in your model, adding another layer of hidden layer would need immense resources.
Thankfully, there is something called “Transfer Learning” which enables us to use pre-trained models from other people by making small changes. In this article, I am going to tell how we can use pre-trained models to accelerate our solutions.
Note – This article assumes basic familiarity with Neural networks and deep learning. If you are new to deep learning, I would strongly recommend that you read the following articles first:
Let us start with developing an intuition for transfer learning. Let us understand from a simple teacher – student analogy.
A teacher has years of experience in the particular topic he/she teaches. With all this accumulated information, the lectures that students get is a concise and brief overview of the topic. So it can be seen as a “transfer” of information from the learned to a novice.
Keeping in mind this analogy, we compare this to neural network. A neural network is trained on a data. This network gains knowledge from this data, which is compiled as “weights” of the network. These weights can be extracted and then transferred to any other neural network. Instead of training the other neural network from scratch, we “transfer” the learned features.
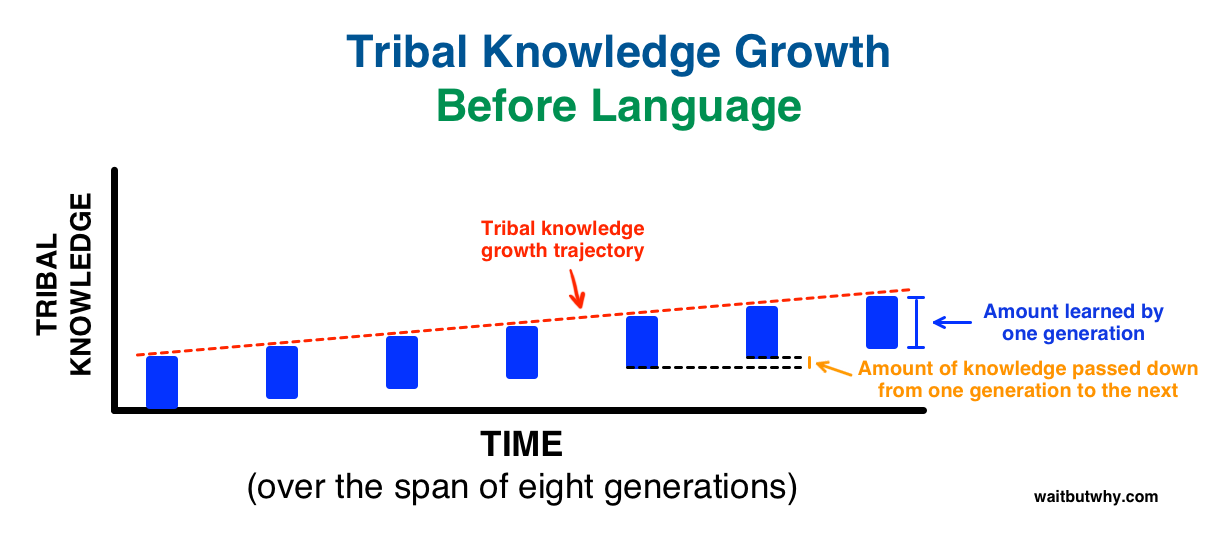
Now, let us reflect on the importance of transfer learning by relating to our evolution. And what better way than to use transfer learning for this! So I am picking on a concept touched on by Tim Urban from one of his recent articles on waitbutwhy.com
Tim explains that before language was invented, every generation of humans had to re-invent the knowledge for themselves and this is how knowledge growth was happening from one generation to other:
Then, we invented language! A way to transfer learning from one generation to another and this is what happened over same time frame:
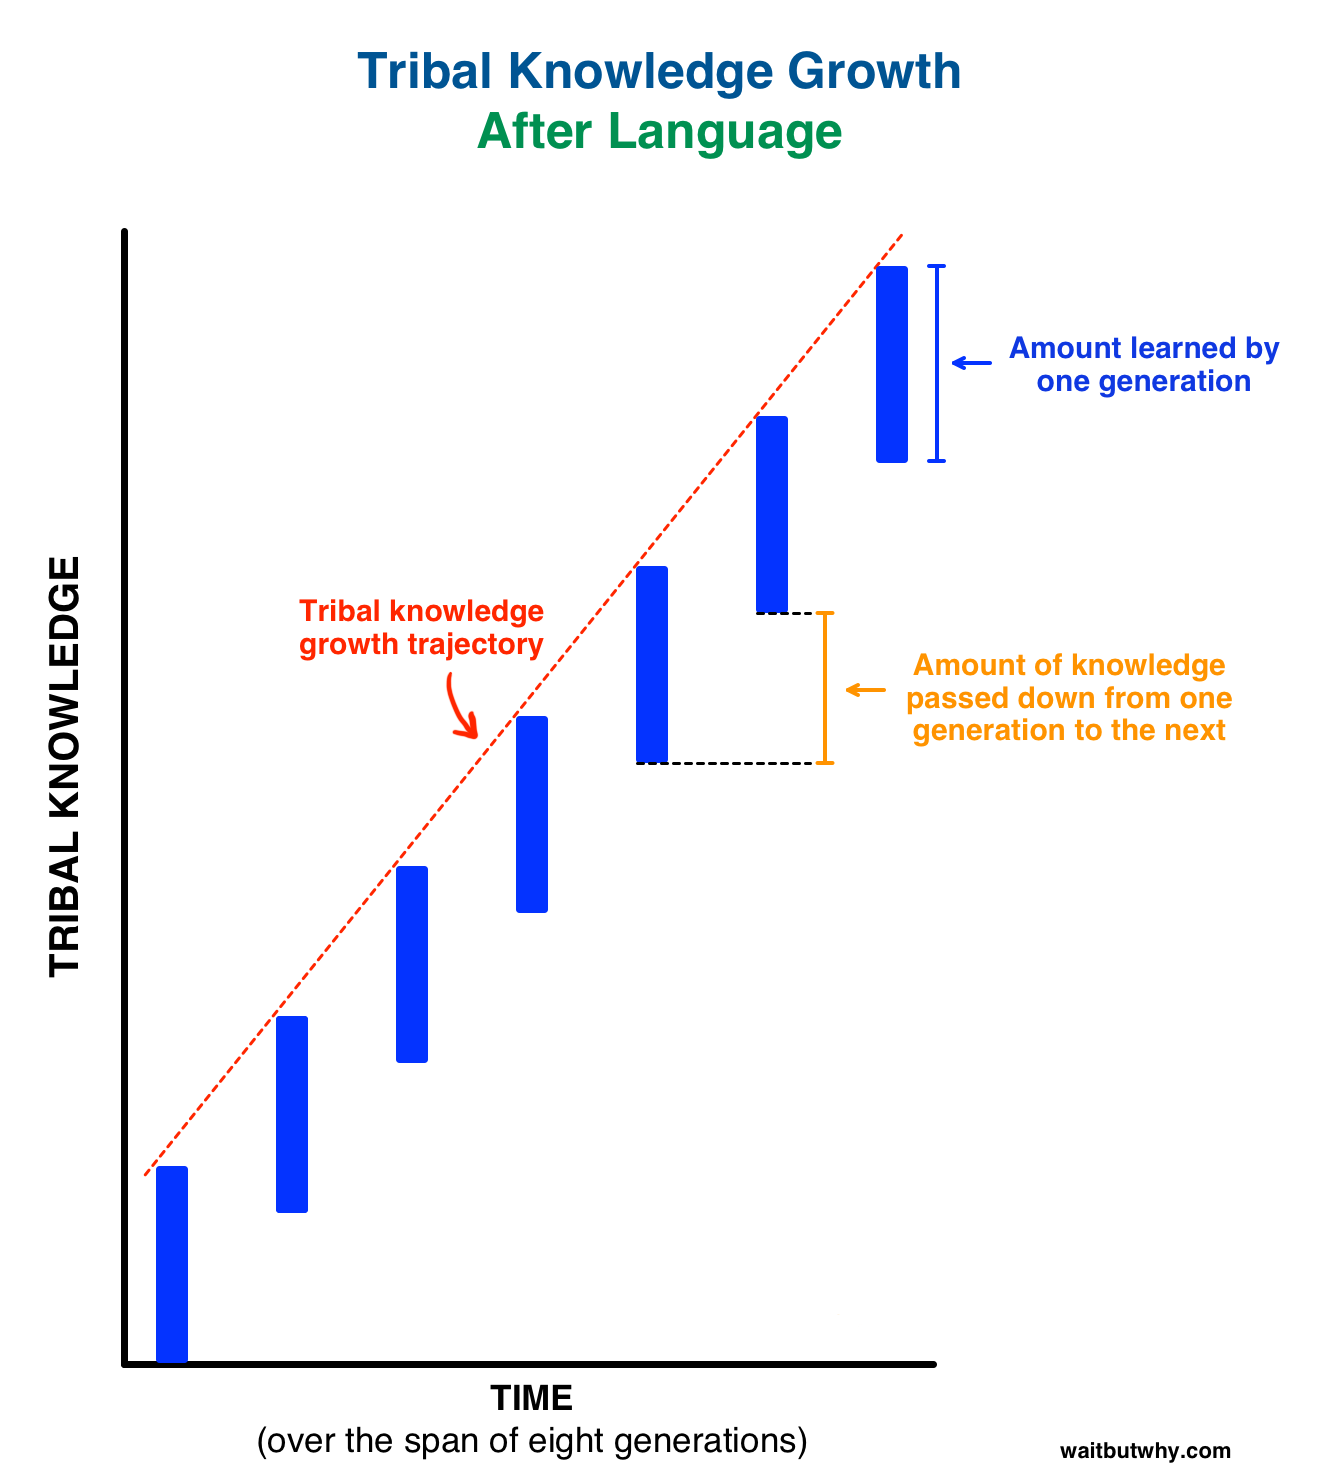
Isn’t it phenomenal and super empowering? So, transfer learning by passing on weights is equivalent of language used to disseminate knowledge over generations in human evolution.
Simply put, a pre-trained model is a model created by some one else to solve a similar problem. Instead of building a model from scratch to solve a similar problem, you use the model trained on other problem as a starting point.
For example, if you want to build a self learning car. You can spend years to build a decent image recognition algorithm from scratch or you can take inception model (a pre-trained model) from Google which was built on ImageNet data to identify images in those pictures.
A pre-trained model may not be 100% accurate in your application, but it saves huge efforts required to re-invent the wheel. Let me show this to you with a recent example.
I spent my last week working on a problem at CrowdAnalytix platform – Identifying themes from mobile case images. This was an image classification problem where we were given 4591 images in the training dataset and 1200 images in the test dataset. The objective was to classify the images into one of the 16 categories. After the basic pre-processing steps, I started off with a simple MLP model with the following architecture –
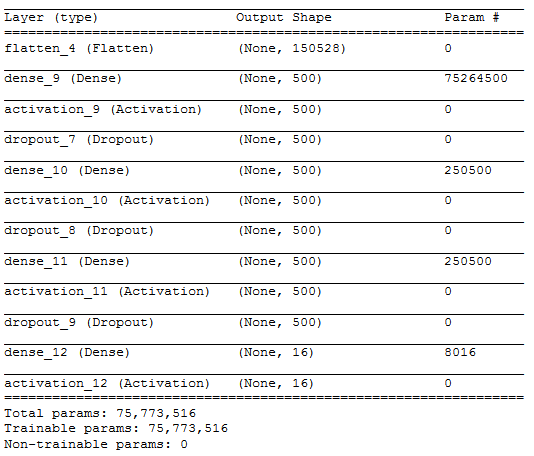
To simplify the above architecture after flattening the input image [224 X 224 X 3] into [150528], I used three hidden layers with 500, 500 and 500 neurons respectively. The output layer had 16 neurons which correspond to the number of categories in which we need to classify the input image.
I barely managed a training accuracy of 6.8 % which turned out to be very bad. Even experimenting with hidden layers, number of neurons in hidden layers and drop out rates. I could not manage to substantially increase my training accuracy. Increasing the hidden layers and the number of neurons, caused 20 seconds to run a single epoch on my Titan X GPU with 12 GB VRAM.
Below is an output of the training using the MLP model with the above architecture.
Epoch 10/10
50/50 [==============================] – 21s – loss: 15.0100 – acc: 0.0688
As, you can see MLP was not going to give me any better results without exponentially increasing my training time. So I switched to Convolutional Neural Network to see how they perform on this dataset and whether I would be able to increase my training accuracy.
The CNN had the below architecture –
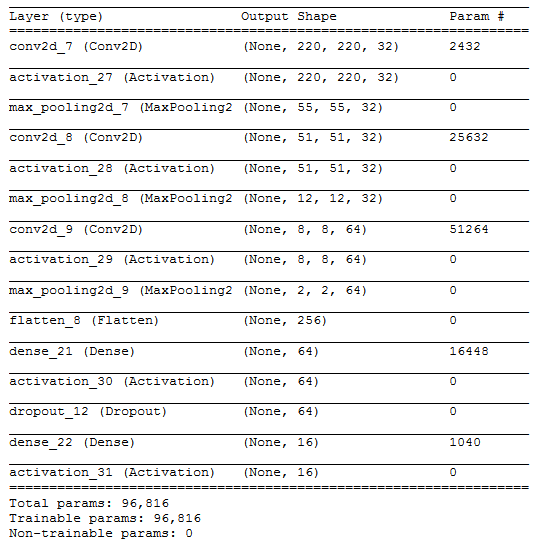
I used 3 convolutional blocks with each block following the below architecture-
The result obtained after the final convolutional block was flattened into a size [256] and passed into a single hidden layer of with 64 neurons. The output of the hidden layer was passed onto the output layer after a drop out rate of 0.5.
The result obtained with the above architecture is summarized below-
Epoch 10/10
50/50 [==============================] – 21s – loss: 13.5733 – acc: 0.1575
Though my accuracy increased in comparison to the MLP output, it also increased the time taken to run a single epoch – 21 seconds.
But the major point to note was that the majority class in the dataset was around 17.6%. So, even if we had predicted the class of every image in the train dataset to be the majority class, we would have performed better than MLP and CNN respectively. Addition of more convolutional blocks substantially increased my training time. This led me to switch onto using pre-trained models where I would not have to train my entire architecture but only a few layers.
So, I used VGG16 model which is pre-trained on the ImageNet dataset and provided in the keras library for use. Below is the architecture of the VGG16 model which I used.
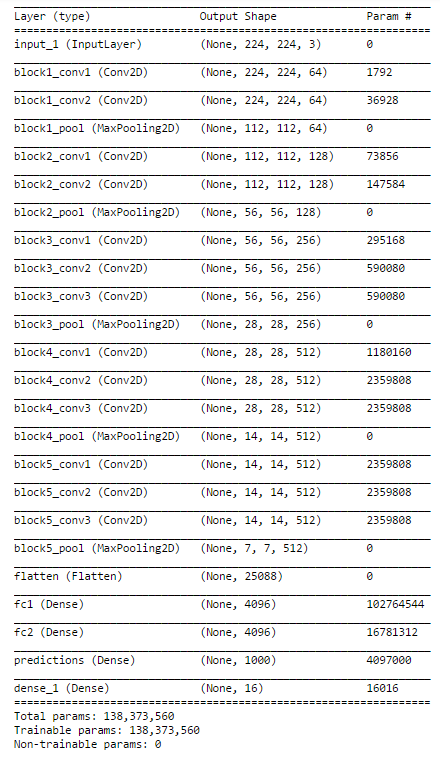
The only change that I made to the VGG16 existing architecture is changing the softmax layer with 1000 outputs to 16 categories suitable for our problem and re-training the dense layer.
This architecture gave me an accuracy of 70% much better than MLP and CNN. Also, the biggest benefit of using the VGG16 pre-trained model was almost negligible time to train the dense layer with greater accuracy.
So, I moved forward with this approach of using a pre-trained model and the next step was to fine tune my VGG16 model to suit this problem.
What is our objective when we train a neural network? We wish to identify the correct weights for the network by multiple forward and backward iterations. By using pre-trained models which have been previously trained on large datasets, we can directly use the weights and architecture obtained and apply the learning on our problem statement. This is known as transfer learning. We “transfer the learning” of the pre-trained model to our specific problem statement.
You should be very careful while choosing what pre-trained model you should use in your case. If the problem statement we have at hand is very different from the one on which the pre-trained model was trained – the prediction we would get would be very inaccurate. For example, a model previously trained for speech recognition would work horribly if we try to use it to identify objects using it.
We are lucky that many pre-trained architectures are directly available for us in the Keras library. Imagenet data set has been widely used to build various architectures since it is large enough (1.2M images) to create a generalized model. The problem statement is to train a model that can correctly classify the images into 1,000 separate object categories. These 1,000 image categories represent object classes that we come across in our day-to-day lives, such as species of dogs, cats, various household objects, vehicle types etc.
These pre-trained networks demonstrate a strong ability to generalize to images outside the ImageNet dataset via transfer learning. We make modifications in the pre-existing model by fine-tuning the model. Since we assume that the pre-trained network has been trained quite well, we would not want to modify the weights too soon and too much. While modifying we generally use a learning rate smaller than the one used for initially training the model.
The below diagram should help you decide on how to proceed on using the pre trained model in your case –
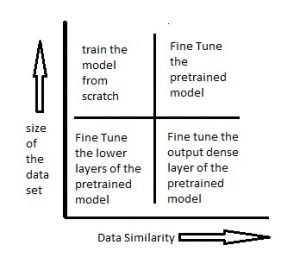
In this case, since the data similarity is very high, we do not need to retrain the model. All we need to do is to customize and modify the output layers according to our problem statement. We use the pretrained model as a feature extractor. Suppose we decide to use models trained on Imagenet to identify if the new set of images have cats or dogs. Here the images we need to identify would be similar to imagenet, however we just need two categories as my output – cats or dogs. In this case all we do is just modify the dense layers and the final softmax layer to output 2 categories instead of a 1000.
In this case we can freeze the initial (let’s say k) layers of the pretrained model and train just the remaining(n-k) layers again. The top layers would then be customized to the new data set. Since the new data set has low similarity it is significant to retrain and customize the higher layers according to the new dataset. The small size of the data set is compensated by the fact that the initial layers are kept pretrained(which have been trained on a large dataset previously) and the weights for those layers are frozen.
In this case, since we have a large dataset, our neural network training would be effective. However, since the data we have is very different as compared to the data used for training our pretrained models. The predictions made using pretrained models would not be effective. Hence, its best to train the neural network from scratch according to your data.
This is the ideal situation. In this case the pretrained model should be most effective. The best way to use the model is to retain the architecture of the model and the initial weights of the model. Then we can retrain this model using the weights as initialized in the pre-trained model.
Let’s now try to use a pretrained model for a simple problem. There are various architectures that have been trained on the imageNet data set. You can go through various architectures here. I have used vgg16 as pretrained model architecture and have tried to identify handwritten digits using it. Let’s see in which of the above scenarios would this problem fall into. We have around 60,000 training images of handwritten digits. This data set is definitely small. So the situation would either fall into scenario 1 or scenario 2. We shall try to solve the problem using both these scenarios. The data set can be downloaded from here.
# importing required libraries from keras.models import Sequential from scipy.misc import imread get_ipython().magic('matplotlib inline') import matplotlib.pyplot as plt import numpy as np import keras from keras.layers
import Dense import pandas as pd from keras.applications.vgg16
import VGG16 from keras.preprocessing
import image from keras.applications.vgg16
import preprocess_input import numpy as np from keras.applications.vgg16
import decode_predictions t
rain=pd.read_csv("R/Data/Train/train.csv") test=pd.read_csv("R/Data/test.csv") train_path="R/Data/Train/Images/train/" test_path="R/Data/Train/Images/test/" from scipy.misc import imresize # preparing the train dataset train_img=[] for i in range(len(train)):    temp_img=image.load_img(train_path+train['filename'][i],target_size=(224,224))    temp_img=image.img_to_array(temp_img)     train_img.append(temp_img) #converting train images to array and applying mean subtraction processing
train_img=np.array(train_img)  train_img=preprocess_input(train_img) # applying the same procedure with the test dataset test_img=[] for i in range(len(test)):    temp_img=image.load_img(test_path+test['filename'][i],target_size=(224,224))  temp_img=image.img_to_array(temp_img)
test_img.append(temp_img) test_img=np.array(test_img)  test_img=preprocess_input(test_img) # loading VGG16 model weights model = VGG16(weights='imagenet', include_top=False) # Extracting features from the train dataset using the VGG16 pre-trained model features_train=model.predict(train_img) # Extracting features from the train dataset using the VGG16 pre-trained model features_test=model.predict(test_img) # flattening the layers to conform to MLP input train_x=features_train.reshape(49000,25088) # converting target variable to array train_y=np.asarray(train['label']) # performing one-hot encoding for the target variable train_y=pd.get_dummies(train_y) train_y=np.array(train_y) # creating training and validation set from sklearn.model_selection import train_test_split X_train, X_valid, Y_train, Y_valid=train_test_split(train_x,train_y,test_size=0.3, random_state=42) # creating a mlp model from keras.layers import Dense, Activation model=Sequential() model.add(Dense(1000, input_dim=25088, activation='relu',kernel_initializer='uniform')) keras.layers.core.Dropout(0.3, noise_shape=None, seed=None) model.add(Dense(500,input_dim=1000,activation='sigmoid')) keras.layers.core.Dropout(0.4, noise_shape=None, seed=None) model.add(Dense(150,input_dim=500,activation='sigmoid')) keras.layers.core.Dropout(0.2, noise_shape=None, seed=None)
model.add(Dense(units=10)) model.add(Activation('softmax')) model.compile(loss='categorical_crossentropy', optimizer="adam", metrics=['accuracy']) # fitting the model  model.fit(X_train, Y_train, epochs=20, batch_size=128,validation_data=(X_valid,Y_valid))
2. Freeze the weights of first few layers – Here what we do is we freeze the weights of the first 8 layers of the vgg16 network, while we retrain the subsequent layers. This is because the first few layers capture universal features like curves and edges that are also relevant to our new problem. We want to keep those weights intact and we will get the network to focus on learning dataset-specific features in the subsequent layers.
Code for freezing the weights of first few layers.
from keras.models import Sequential from scipy.misc import imread get_ipython().magic('matplotlib inline') import matplotlib.pyplot as plt import numpy as np import keras
from keras.layers import Dense import pandas as pd from keras.applications.vgg16 import VGG16 from keras.preprocessing import image from keras.applications.vgg16 import preprocess_input import numpy as np from keras.applications.vgg16
import decode_predictions from keras.utils.np_utils import to_categorical from sklearn.preprocessing import LabelEncoder from keras.models import Sequential from keras.optimizers import SGD from keras.layers
import Input, Dense, Convolution2D, MaxPooling2D, AveragePooling2D, ZeroPadding2D, Dropout, Flatten, merge, Reshape, Activation from sklearn.metrics import log_loss
train=pd.read_csv("R/Data/Train/train.csv") test=pd.read_csv("R/Data/test.csv") train_path="R/Data/Train/Images/train/" test_path="R/Data/Train/Images/test/" from scipy.misc import imresize train_img=[] for i in range(len(train)):
temp_img=image.load_img(train_path+train['filename'][i],target_size=(224,224))   temp_img=image.img_to_array(temp_img)  train_img.append(temp_img) train_img=np.array(train_img)  train_img=preprocess_input(train_img) test_img=[] for i in range(len(test)): temp_img=image.load_img(test_path+test['filename'][i],target_size=(224,224))
temp_img=image.img_to_array(temp_img)   test_img.append(temp_img) test_img=np.array(test_img)  test_img=preprocess_input(test_img)
from keras.models
import Model def vgg16_model(img_rows, img_cols, channel=1, num_classes=None): model = VGG16(weights='imagenet', include_top=True)
model.layers.pop()
model.outputs = [model.layers[-1].output] model.layers[-1].outbound_nodes = []      x=Dense(num_classes, activation='softmax')(model.output)
model=Model(model.input,x) #To set the first 8 layers to non-trainable (weights will not be updated)
for layer in model.layers[:8]:
layer.trainable = False # Learning rate is changed to 0.001 sgd = SGD(lr=1e-3, decay=1e-6, momentum=0.9, nesterov=True) model.compile(optimizer=sgd, loss='categorical_crossentropy', metrics=['accuracy']) return model train_y=np.asarray(train['label']) le = LabelEncoder() train_y = le.fit_transform(train_y) train_y=to_categorical(train_y) train_y=np.array(train_y) from sklearn.model_selection import train_test_split X_train, X_valid, Y_train, Y_valid=train_test_split(train_img,train_y,test_size=0.2, random_state=42) # Example to fine-tune on 3000 samples from Cifar10 img_rows, img_cols = 224, 224 # Resolution of inputs channel = 3 num_classes = 10 batch_size = 16 nb_epoch = 10 # Load our model model = vgg16_model(img_rows, img_cols, channel, num_classes) model.summary() # Start Fine-tuning model.fit(X_train, Y_train,batch_size=batch_size,epochs=nb_epoch,shuffle=True,verbose=1,validation_data=(X_valid, Y_valid)) # Make predictions predictions_valid = model.predict(X_valid, batch_size=batch_size, verbose=1) # Cross-entropy loss score score = log_loss(Y_valid, predictions_valid)Now, its time to take the plunge and actually play with some other real datasets. So are you ready to take on the challenge? Accelerate your deep learning journey with the following Practice Problems:
If you’re an enthusiast who is looking forward to unravel the world of Generative AI. Then, please register for our upcoming event, DataHack Summit 2023.
I hope that you would now be able to apply pre-trained models to your problem statements. Be sure that the pre-trained model you have selected has been trained on a similar data set as the one that you wish to use it on. There are various architectures people have tried on different types of data sets and I strongly encourage you to go through these architectures and apply them on your own problem statements. Please feel free to discuss your doubts and concerns in the comments section.
To learn more about pre-trained models and transfer learning and their specific use cases, you can check out the following articles:
No, CNN is not a pretrained model on its own. But models like VGG or ResNet, based on CNN, are pretrained on large datasets.
Pretrained models are already trained for a specific task, while transfer learning adapts pretrained models to new tasks.
Like CNN, LSTM isn’t pretrained by default. However, pretrained LSTM models might exist for certain tasks.
You can find pretrained models in repositories, research papers, or specialized libraries like TensorFlow Hub or Hugging Face’s Transformers.
Lorem ipsum dolor sit amet, consectetur adipiscing elit,


Hey! You havent given folder structure and format in which training data is stored. People wishing to try out this example may not be having idea where to download training data from and where to place it. It would elucidate them if you update the same.
I have added the link for the download of MNIST data.
perfect
Same here, what does the CSV files contain? please explain why the train and test data was loaded twice esp. why it is required to load while freezing the weights? appreciate your response..
So I have added the link of MNIST data. The csv file for train consists the name of images and the corresponding digits for them. The test and train files have been loaded just because I wanted to keep the two codes exclusive.
Thanks for your sharing. Quick question: 1. Can we substract the data from the mean of our data for each channel instead of from the mean of vgg16 data? What is the difference for this two preprocess? 2. What if I want to train by grayscale image?
Hi! Should we apply the same preprocess function from the network we transfer on our data? i.e. substract training data from the mean of our data or the mean of transfer network's data?
Hi Kai, So the preprocess function is subtracting the mean of your own dataset rather than the data of the pretrained. It doesn't mean much to actually subtract the mean of the network's data since it might be very different than your own.
Dear Dishashree. When trying to apply this to my own dataset, the program throws the error ValueError: cannot reshape array of size 5143040 into shape (49000,25088). I guess this is because of the size difference in the datasets. Can you explain what the numbers 49000 and 25088 mean? Best regards
Hi Rico, the numbers 49000 and 25088 are the dimensions of your data set. So you would have 49000 records with each record having 25088 features. You should check your reshaping function. Since the error lies there !
Hi, I would like to know what should I enter in ("R/Data/Train/train.csv"), ['filename'] and ['label']? And my image size is 850*600. Where should I mention the size and what other specifications should I consider to accord with my image size? train=pd.read_csv("R/Data/Train/train.csv") test=pd.read_csv("R/Data/test.csv") train_path="R/Data/Train/Images/train/" test_path="R/Data/Train/Images/test/" temp_img=image.load_img(train_path+train['filename'][i],target_size=(224,224)) train_y=np.asarray(train['label'])
Hello, Thank you for posting this. I have though some problems in implementing your algorithm: 1) what is train['filename'][i] ? where is defined in the code? I just downloaded the csv files from your ink. Did I missed something? 2) why target_size=(224,224) when the images are 28x28? Could you help me with this? Thank you!
awesome explanation
This is a very informative article. I also agree with your post title and your really well explain your point of view. I am very happy to see this post. Thanks for share with us. Keep it up and share the more most related post. quiz online Programming test
Ma'am can you help me to solve the Identifying themes from mobile case images problem. This problem has been assigned to me as project. my [email protected]
Thank you for this amazing blog, In the link of the MNSIT data. I did not find train.csv. Could you provide us with some explanation for this?
I wanna use the pre-trained model from ENET architecture for semantic segmentation using LUA Torch, Please help to execute the pre-trained model
Hi, I have a question, I have trained a model for detecting pedestrian on a domain. now I want to use that model for the target domain. which methods of transfer learning can be used? model based? or someting else. I found an article that uses the source model in the target and with an iterative alg makes target domain. now this question howers in my mind, is there another way for using that trained model(source model) for transfer learning? I appreciate any help.
Good stuff! Thanks. Could you provide some paper references which speak about the relation between data size and data similarity?
I rarely leave any comment, but this post is fantastic! Exactly what I was looking for at least. Appreciated it!
Thanks for your sharing and it is very valuable But Please, Could you provide Matlab code ? Or abbreviate explanation for each step
we are working on generative chat bot we would like to apply transfer learning to my code is there any code for that TIA
I need to fine tune an SSD multibox pretrained model with VGG16 as base network for person detection. Where I get the SSD model with VGG16 as base model?
Hey Dishashree, Great analogy to explain transfer learning. Very well written article. Thanks, Tavish
Great article! Very well detailed. If I may add something, I like to replace the last layers with a different classifier, like support vector machines for instance. I find it somehow more easy to implement and in my experience, it leads to better results. If you're interested, I've written a post here http://www.ml-hack.com/neural-networks-specialization/ on how to perform transfer learning using support vector classifiers to replace the last layers.
Thanks for sharing Pierre
Do you have code in GitHub?
Hi, The code is added in the article itself.
Hi, When i tried to use this, I couldnt remove the top layer. Please help me in finding the reason.
Thanks for sharing! I wanna know that the Pretrained Model is based on Theano or tensorflow? Because the image rank will be different.
@Dishashree26 Gupta Hi. Coud you sent me files in csv format, I haven`t time to decoded information from MNSIT data. Your example its the best, whitch I can find. I must do my own CNN, but I cantrun your example