If you are an active member of the Machine Learning community, you must be aware of Boosting Machines and their capabilities. The development of Boosting Machines started from AdaBoost to today’s favorite XGBOOST. XGBOOST has become a de-facto algorithm for winning competitions at Analytics Vidhya and Kaggle, simply because it is extremely powerful. But given lots and lots of data, even XGBOOST takes a long time to train.
Enter…. Light GBM.
Many of you might not be familiar with the Light Gradient Boosting, but you will be after reading this article. The most natural question that will come to your mind is – Why another boosting machine algorithm? Is it superior to XGBOOST?
Well, you very well must have guessed the answer otherwise why would a topic deserve its own article :p
P.S. This article assumes knowledge about Light GBM and XGBoost. If you don’t know them, you should first look at these articles.
These algorithms are a type of ensemble technique. To learn more about ensemble learning and other such techniques in a comprehensive manner, you can enrol in this free course: Ensemble Learning and Ensemble Learning Techniques
Light GBM is a fast, distributed, high-performance gradient boosting framework based on decision tree algorithm, used for ranking, classification and many other machine learning tasks.
Since it is based on decision tree algorithms, it splits the tree leaf wise with the best fit whereas other boosting algorithms split the tree depth wise or level wise rather than leaf-wise. So when growing on the same leaf in Light GBM, the leaf-wise algorithm can reduce more loss than the level-wise algorithm and hence results in much better accuracy which can rarely be achieved by any of the existing boosting algorithms. Also, it is surprisingly very fast, hence the word ‘Light’.
Before is a diagrammatic representation by the makers of the Light GBM to explain the difference clearly.
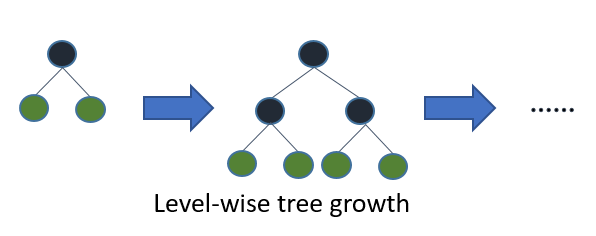
Level-wise tree growth in XGBOOST.
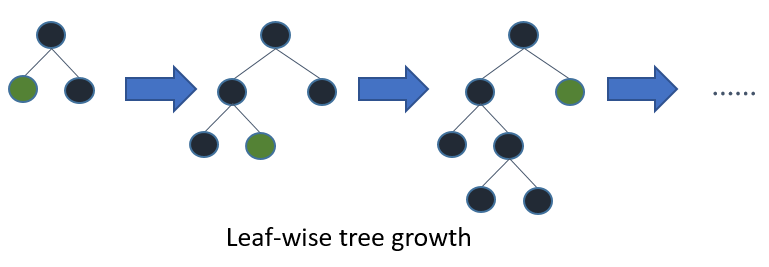
Leaf wise tree growth in Light GBM.
Leaf wise splits lead to increase in complexity and may lead to overfitting and it can be overcome by specifying another parameter max-depth which specifies the depth to which splitting will occur.
Below, we will see the steps to install Light GBM and run a model using it. We will be comparing the results with XGBOOST results to prove that you should take Light GBM in a ‘LIGHT MANNER’.
Let us look at some of the advantages of Light GBM.
I guess you must have got excited about the advantages of Light GBM. Let us now proceed to install the library into our system.
Using Visual Studio (Or MSBuild)
-Install git for windows, cmake and MS Build (Not need the MSbuild if you already install Visual Studio).
-Run following command:
git clone --recursive https://github.com/Microsoft/LightGBM cd LightGBM mkdir build cd build cmake -DCMAKE_GENERATOR_PLATFORM=x64 .. cmake --build . --target ALL_BUILD --config Release
The exe and dll will be in LightGBM/Release folder.
Using MinGW64
-Install git for windows, cmake and MinGW64.
-Run following command:
git clone --recursive https://github.com/Microsoft/LightGBM cd LightGBM mkdir build cd build cmake -G "MinGW Makefiles" .. mingw32-make.exe -j4
The exe and dll will be in LightGBM/ folder.
Light GBM uses cmake to build. Run following:
git clone --recursive https://github.com/Microsoft/LightGBM cd LightGBM mkdir build cd build cmake .. make -j4
LightGBM depends on OpenMP for compiling, which isn’t supported by Apple Clang.Please use gcc/g++ instead.
-Run following:
brew install cmake
brew install gcc --without-multilib
git clone --recursive https://github.com/Microsoft/LightGBM
cd LightGBM
mkdir build
cd build
cmake ..
make -j4
Now before we dive head first into building our first Light GBM model, let us look into some of the parameters of Light GBM to have an understanding of its underlying procedures.
Also, go through this article explaining parameter tuning in XGBOOST in detail.
So now let’s compare LightGBM with XGBoost ensemble learning techniques by applying both the algorithms to a dataset and then comparing the performance.
Here we are using dataset that contains the information about individuals from various countries. Our target is to predict whether a person makes <=50k or >50k annually on basis of the other information available. Dataset consists of 32561 observations and 14 features describing individuals.
Here is the link to the dataset: http://archive.ics.uci.edu/ml/datasets/Adult.
Go through the dataset to have a proper intuition about predictor variables and so that you could understand the code below properly.
Before we get to the code for this dataset, did you know that you can now code your own model in this very window? That’s right! Here’s a live coding window to play around with the code and see the results in real-time:
#importing standard libraries
import numpy as np
import pandas as pd
from pandas import Series, DataFrame

#import lightgbm and xgboost
import lightgbm as lgb
import xgboost as xgb

#loading our training dataset 'adult.csv' with name 'data' using pandas
data=pd.read_csv('adult.csv',header=None)

#Assigning names to the columns
data.columns=['age','workclass','fnlwgt','education','education-num','marital_Status','occupation','relationship','race','sex','capital_gain','capital_loss','hours_per_week','native_country','Income']

#glimpse of the dataset
data.head()

# Label Encoding our target variable
from sklearn.preprocessing import LabelEncoder,OneHotEncoder
l=LabelEncoder()
l.fit(data.Income)

l.classes_
data.Income=Series(l.transform(data.Income))  #label encoding our target variable
data.Income.value_counts()


#One Hot Encoding of the Categorical features
one_hot_workclass=pd.get_dummies(data.workclass)
one_hot_education=pd.get_dummies(data.education)
one_hot_marital_Status=pd.get_dummies(data.marital_Status)
one_hot_occupation=pd.get_dummies(data.occupation)
one_hot_relationship=pd.get_dummies(data.relationship)
one_hot_race=pd.get_dummies(data.race)
one_hot_sex=pd.get_dummies(data.sex)
one_hot_native_country=pd.get_dummies(data.native_country)

#removing categorical features
data.drop(['workclass','education','marital_Status','occupation','relationship','race','sex','native_country'],axis=1,inplace=True)


#Merging one hot encoded features with our dataset 'data'
data=pd.concat([data,one_hot_workclass,one_hot_education,one_hot_marital_Status,one_hot_occupation,one_hot_relationship,one_hot_race,one_hot_sex,one_hot_native_country],axis=1)

#removing dulpicate columns
 _, i = np.unique(data.columns, return_index=True)
data=data.iloc[:, i]

#Here our target variable is 'Income' with values as 1 or 0.
#Separating our data into features dataset x and our target dataset y
x=data.drop('Income',axis=1)
y=data.Income


#Imputing missing values in our target variable
y.fillna(y.mode()[0],inplace=True)

#Now splitting our dataset into test and train
from sklearn.model_selection import train_test_split
x_train,x_test,y_train,y_test=train_test_split(x,y,test_size=.3)
#The data is stored in a DMatrix object
#label is used to define our outcome variable
dtrain=xgb.DMatrix(x_train,label=y_train)
dtest=xgb.DMatrix(x_test)
#setting parameters for xgboost
parameters={'max_depth':7, 'eta':1, 'silent':1,'objective':'binary:logistic','eval_metric':'auc','learning_rate':.05}
#training our model
num_round=50
from datetime import datetime
start = datetime.now()
xg=xgb.train(parameters,dtrain,num_round)
stop = datetime.now()
#Execution time of the model
execution_time_xgb = stop-start
execution_time_xgb
#datetime.timedelta( , , ) representation => (days , seconds , microseconds)
#now predicting our model on test set
ypred=xg.predict(dtest)
ypred
#Converting probabilities into 1 or 0
for i in range(0,9769):
    if ypred[i]>=.5:       # setting threshold to .5
       ypred[i]=1
    else:
       ypred[i]=0
#calculating accuracy of our model
from sklearn.metrics import accuracy_score
accuracy_xgb = accuracy_score(y_test,ypred)
accuracy_xgb
train_data=lgb.Dataset(x_train,label=y_train)
#setting parameters for lightgbm
param = {'num_leaves':150, 'objective':'binary','max_depth':7,'learning_rate':.05,'max_bin':200}
param['metric'] = ['auc', 'binary_logloss']
#Here we have set max_depth in xgb and LightGBM to 7 to have a fair comparison between the two.
#training our model using light gbm
num_round=50
start=datetime.now()
lgbm=lgb.train(param,train_data,num_round)
stop=datetime.now()
#Execution time of the model
execution_time_lgbm = stop-start
execution_time_lgbm
#predicting on test set
ypred2=lgbm.predict(x_test)
ypred2[0:5]  # showing first 5 predictions
#converting probabilities into 0 or 1
for i in range(0,9769):
    if ypred2[i]>=.5:       # setting threshold to .5
       ypred2[i]=1
    else:
       ypred2[i]=0
#calculating accuracy
accuracy_lgbm = accuracy_score(ypred2,y_test)
accuracy_lgbm
y_test.value_counts()
from sklearn.metrics import roc_auc_score
#calculating roc_auc_score for xgboost
auc_xgb =  roc_auc_score(y_test,ypred)
auc_xgb
#calculating roc_auc_score for light gbm.
auc_lgbm = roc_auc_score(y_test,ypred2)
auc_lgbm comparison_dict = {'accuracy score':(accuracy_lgbm,accuracy_xgb),'auc score':(auc_lgbm,auc_xgb),'execution time':(execution_time_lgbm,execution_time_xgb)}
#Creating a dataframe ‘comparison_df’ for comparing the performance of Lightgbm and xgb.
comparison_df = DataFrame(comparison_dict)
comparison_df.index= ['LightGBM','xgboost']
comparison_df
Performance comparison

There has been only a slight increase in accuracy and auc score by applying Light GBM over XGBOOST but there is a significant difference in the execution time for the training procedure. Light GBM is almost 7 times faster than XGBOOST and is a much better approach when dealing with large datasets.
This turns out to be a huge advantage when you are working on large datasets in limited time competitions.
Light GBM uses leaf wise splitting over depth-wise splitting which enables it to converge much faster but also leads to overfitting. So here is a quick guide to tune the parameters in Light GBM.
A. Determining whether LightGBM is better than XGBoost depends on the specific use case and data characteristics. LightGBM is generally faster and more memory-efficient, making it suitable for large datasets. XGBoost may perform better with smaller datasets or when interpretability is crucial. Both libraries offer similar functionality and performance, so it’s recommended to experiment with both and choose based on individual requirements.
A. GBM (Gradient Boosting Machine) is a general term for a class of machine learning algorithms that use gradient boosting. XGBoost (Extreme Gradient Boosting) is a specific implementation of GBM that introduces additional enhancements, such as regularization techniques and parallel processing. While XGBoost is a type of GBM, the terms are not interchangeable as GBM refers to a broader concept encompassing various gradient boosting algorithms.
In this blog, I’ve tried to give an intuitive idea of Light GBM. One of the disadvantages of using this algorithm currently is its narrow user base – but that is changing fast. This algorithm apart from being more accurate and time-saving than XGBOOST has been limited in usage due to less documentation available.
However, this algorithm has shown far better results and has outperformed existing boosting algorithms. I’ll strongly recommend you to implement Light GBM over the other boosting algorithms and see the difference yourself.
It might be still early days to crown LightGBM – but it has clearly challenged XGBoost. A word of caution – like all other ML algorithms, make sure you properly tune the parameters before training the model!
Do let us know your thoughts and opinions in the comment section below.
Lorem ipsum dolor sit amet, consectetur adipiscing elit,


Hey Pranjal Great article ! But i would like to add this : "Decision tree models can handle categorical variables WITHOUT one-hot encoding them" I would request you to re-run it without one-hot encoding and see whether it improves the accuracy or not. Also, please come-up with more of LightGBM vs XGBoost examples (with a focus on tuning parameters). It would make an outstanding article. Thanks :)
Thanks for your suggestion. Surely I'll be coming up with article on parameter tuning shortly.
Thanks for the article :)
Thanks saurabh!
XGBoost also has a leave wise algorithm: use 'hist' as the value for 'tree_method' parameter. Execution speed is then comparable to that of lightgbm. My personal experience is that xgboost accuracy is slightly better than lightgbm in general.
On linux, I cant get the code to work with python. The import fails. Any experience with this? OSError: /home/anaconda3/lib/python3.6/site-packages/lightgbm-0.2-py3.6.egg/lightgbm/lib_lightgbm.so: symbol clCreateCommandQueueWithProperties, version OPENCL_2.0 not defined in file libOpenCL.so.1 with link time reference
Looks like you have enabled GPU as one of the devices & your machine you have AMD (OpenCL) instead of Nvidia (CUDA), which is probably the reason for the error. Can you remove GPU from your code and see if that works fine?
Try using the following commands after you have successfully cloned the lightgbm package: cd LightGBM/python-package python setup.py install
Thanks for the Article Why Visual studio is needed to run the Light GBM . Dont we have package / Git source to install in R studio ..?
Thanks for the Article Why Visual studio is needed to run the Light GBM for windows . Dont we have package / Git source to install in R studio ..?
after following path Installing Light GBM For Windows how to proceed to import the lightGBM in anaconda
Try "import lightgbm as lgbm"
Tremendous explanation. Very informative.
Hi, I tried installing LightGBM on my Windows 64 bit. The steps were fine till Cmake but after that when I execued the last command : mingw32-make.exe -j the machine hang and I had to reboot my machine. It happened twice. I have 4 GB RAM. Please can anyone help me understand the issue. Regards, PMitra
Excellent article, got me excited about LightGBM! :) Does anyone have a compiled lgbm binary ? I was having issues trying to make the .exe file. If yes could you please host it on git and share the link?
Excellent article. Though I have one question: On small data set (less than 1500 observations), which technique works better? If none of these techniques works on small data, which one would you recommend me? Thanks Mabel
I would like to cite this article in my MSc Thesis, what kind of reference should I use?
it is an interesting article, how ever in LightGBM we noticed a consistent increase in precition output, with initial @16% and grown now to 28% and still growing any thoughts ?
it is an interesting article, how ever in LightGBM we noticed a consistent increase in prediction output, with initial @16% and grown now to 28% and still growing any thoughts ?
Excellent article, thank you. And thank you to Microsoft for open sourcing this, it's very fast indeed, even compared to XGBoost !
is there a pre bit cross validation framework for lightgbm like xgb.cv
Informative article. Thanks Pranjal.
Hi, you gotta update your MacOS instructions for light gbm installation. I encountered this issue (https://github.com/Microsoft/LightGBM/issues/118), I have commented a solution in the end of this thread. I think the readers of your blog should know about this little tweak. Happy to help! And really appreciate your content.
Hi Akshit, Thank you for your feedback. We will look into it.
Hi I am based out USA , I subscribed to you and paying monthly premium , most of the time I cannot able to join your Data Hours session since is happening my midnight and India day time, when I want to watch the completed data hour videos I am not able to see any of those videos, the only option is to join during live data hour that is really challenge for me since I am in USA. Do you have any other option to watch completed data hour videos?
Hey Balasubramaniam, Thanks for Reaching out. Kindly go through the below link, This is Complete Playlist of "DataHour" https://www.youtube.com/playlist?list=PLdKd-j64gDcDv3qhAveXqBQQKbDktkfRX
Hi,in a professional way you summed up the topic.Step lights are a brilliant addition to any home’s outdoor landscape. Step lights not only enhance safety by providing subtle illumination,but also create an inviting ambiance for evening strolls or gatherings.