Introduction
Which algorithm do you use for object detection tasks? I have tried quite a few in my quest to build the most precise model in the least amount of time. This journey, spanning multiple hackathons and real-world datasets, has always led me to the R-CNN family of algorithms.
It has been an incredibly useful framework for me, and that’s why I decided to pen down my learnings in the form of a series of articles. The aim of this series is to showcase how useful the different types of R-CNN algorithms are. The first part received an overwhelmingly positive response from our community, and I’m thrilled to present part two!

In this article, we will first briefly summarize what we learned in part 1, and then deep dive into the implementation of the fastest member of the R-CNN family – Faster R-CNN. I highly recommend going through this article if you need to refresh your object detection concepts first: A Step-by-Step Introduction to the Basic Object Detection Algorithms (Part 1).
Part 3 of this series is published now and you can check it out here: A Practical Guide to Object Detection using the Popular YOLO Framework – Part III (with Python codes)
We will work on a very interesting dataset here, so let’s dive right in!
Table of contents
A Brief Overview of the Different R-CNN Algorithms for Object Detection
Let’s quickly summarize the different algorithms in the R-CNN family (R-CNN, Fast R-CNN, and Faster R-CNN) that we saw in the first article. This will help lay the ground for our implementation part later when we will predict the bounding boxes present in previously unseen images (new data).
R-CNN extracts a bunch of regions from the given image using selective search, and then checks if any of these boxes contains an object. We first extract these regions, and for each region, CNN is used to extract specific features. Finally, these features are then used to detect objects. Unfortunately, R-CNN becomes rather slow due to these multiple steps involved in the process.
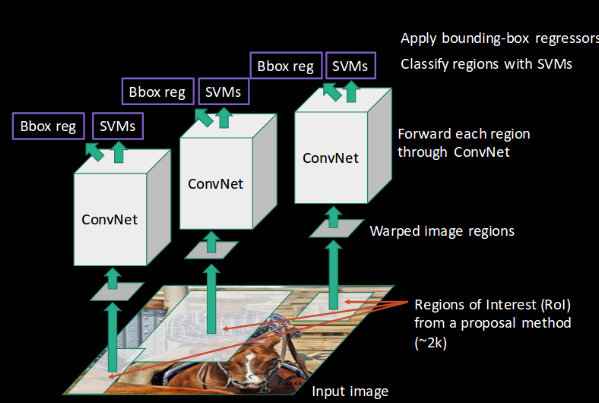
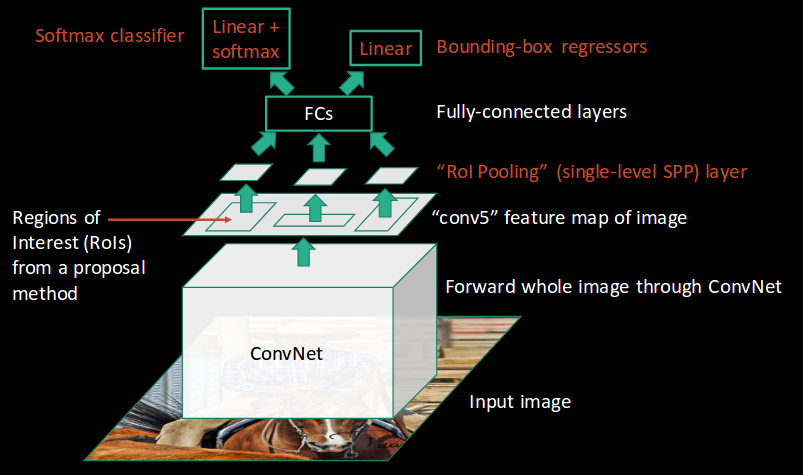
Fast R-CNN, on the other hand, passes the entire image to ConvNet which generates regions of interest (instead of passing the extracted regions from the image). Also, instead of using three different models (as we saw in R-CNN), it uses a single model which extracts features from the regions, classifies them into different classes, and returns the bounding boxes.
All these steps are done simultaneously, thus making it execute faster as compared to R-CNN. Fast R-CNN is, however, not fast enough when applied on a large dataset as it also uses selective search for extracting the regions.
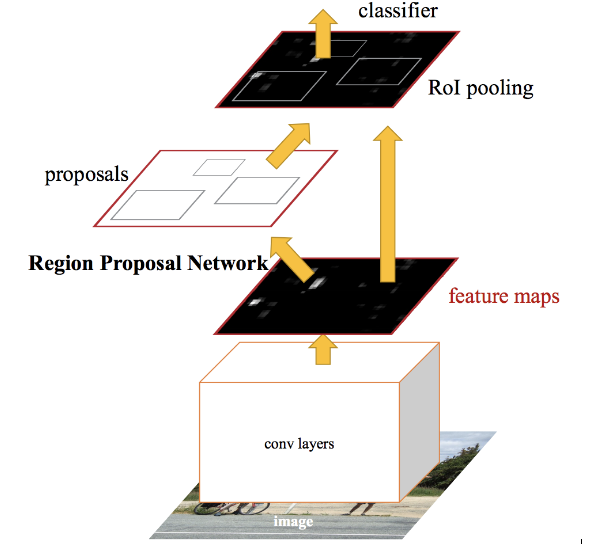
Faster R-CNN fixes the problem of selective search by replacing it with Region Proposal Network (RPN). We first extract feature maps from the input image using ConvNet and then pass those maps through a RPN which returns object proposals. Finally, these maps are classified and the bounding boxes are predicted.
I have summarized below the steps followed by a Faster R-CNN algorithm to detect objects in an image:
- Take an input image and pass it to the ConvNet which returns feature maps for the image
- Apply Region Proposal Network (RPN) on these feature maps and get object proposals
- Apply ROI pooling layer to bring down all the proposals to the same size
- Finally, pass these proposals to a fully connected layer in order to classify any predict the bounding boxes for the image
CNN vs R-CNN vs Fast R-CNN vs Faster R-CNN
What better way to compare these different algorithms than in a tabular format? So here you go!
| Algorithm | Features | Prediction time / image | Limitations |
| CNN | Divides the image into multiple regions and then classifies each region into various classes. | – | Needs a lot of regions to predict accurately and hence high computation time. |
| R-CNN | Uses selective search to generate regions. Extracts around 2000 regions from each image. | 40-50 seconds | High computation time as each region is passed to the CNN separately. Also, it uses three different models for making predictions. |
| Fast R-CNN | Each image is passed only once to the CNN and feature maps are extracted. Selective search is used on these maps to generate predictions. Combines all the three models used in R-CNN together. | 2 seconds | Selective search is slow and hence computation time is still high. |
| Faster R-CNN | Replaces the selective search method with region proposal network (RPN) which makes the algorithm much faster. | 0.2 seconds | Object proposal takes time and as there are different systems working one after the other, the performance of systems depends on how the previous system has performed. |
Now that we have a grasp on this topic, it’s time to jump from the theory into the practical part of our article. Let’s implement Faster R-CNN using a really cool (and rather useful) dataset with potential real-life applications!
Understanding the Problem Statement
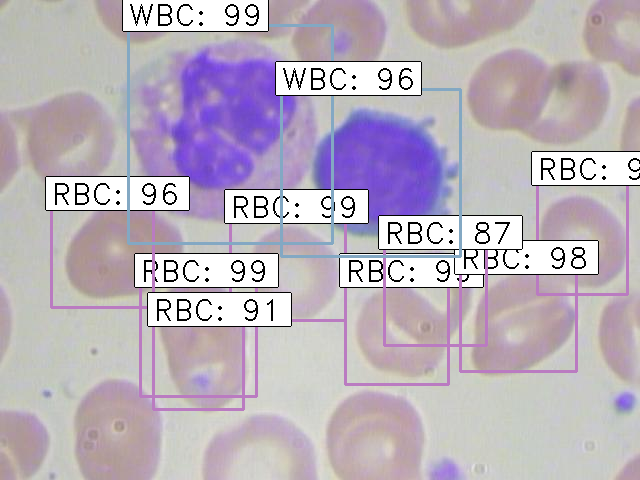
We will be working on a healthcare related dataset and the aim here is to solve a Blood Cell Detection problem. Our task is to detect all the Red Blood Cells (RBCs), White Blood Cells (WBCs), and Platelets in each image taken via microscopic image readings. Below is a sample of what our final predictions should look like:

The reason for choosing this dataset is that the density of RBCs, WBCs and Platelets in our blood stream provides a lot of information about the immune system and hemoglobin. This can help us potentially identify whether a person is healthy or not, and if any discrepancy is found in their blood, actions can be taken quickly to diagnose that.
Manually looking at the sample via a microscope is a tedious process. And this is where Deep Learning models play such a vital role. They can classify and detect the blood cells from microscopic images with impressive precision.
The full blood cell detection dataset for our challenge can be downloaded from here. I have modified the data a tiny bit for the scope of this article:
- The bounding boxes have been converted from the given .xml format to a .csv format
- I have also created the training and test set split on the entire dataset by randomly picking images for the split
Note that we will be using the popular Keras framework with a TensorFlow backend in Python to train and build our model.
Setting up the System
Before we actually get into the model building phase, we need to ensure that the right libraries and frameworks have been installed. The below libraries are required to run this project:
- pandas
- matplotlib
- tensorflow
- keras – 2.0.3
- numpy
- opencv-python
- sklearn
- h5py
Most of the above mentioned libraries will already be present on your machine if you have Anaconda and Jupyter Notebooks installed. Additionally, I recommend downloading the requirement.txt file from this link and use that to install the remaining libraries. Type the following command in the terminal to do this:
pip install -r requirement.txt
Alright, our system is now set and we can move on to working with the data!
Data Exploration
It’s always a good idea (and frankly, a mandatory step) to first explore the data we have. This helps us not only unearth hidden patterns, but gain a valuable overall insight into what we are working with. The three files I have created out of the entire dataset are:
- train_images: Images that we will be using to train the model. We have the classes and the actual bounding boxes for each class in this folder.
- test_images: Images in this folder will be used to make predictions using the trained model. This set is missing the classes and the bounding boxes for these classes.
- train.csv: Contains the name, class and bounding box coordinates for each image. There can be multiple rows for one image as a single image can have more than one object.
Let’s read the .csv file (you can create your own .csv file from the original dataset if you feel like experimenting) and print out the first few rows. We’ll need to first import the below libraries for this:
Code
# importing required libraries
import pandas as pd
import matplotlib.pyplot as plt
%matplotlib inline
from matplotlib import patches
# read the csv file using read_csv function of pandas
train = pd.read_csv(‘train.csv’)
train.head()

There are 6 columns in the train file. Let’s understand what each column represents:
- image_names: contains the name of the image
- cell_type: denotes the type of the cell
- xmin: x-coordinate of the bottom left part of the image
- xmax: x-coordinate of the top right part of the image
- ymin: y-coordinate of the bottom left part of the image
- ymax: y-coordinate of the top right part of the image
Let’s now print an image to visualize what we’re working with:
# reading single image using imread function of matplotlib
image = plt.imread('images/1.jpg')
plt.imshow(image)

This is what a blood cell image looks like. Here, the blue part represents the WBCs, and the slightly red parts represent the RBCs. Let’s look at how many images, and the different type of classes, there are in our training set.
# Number of unique training images
train['image_names'].nunique()
So, we have 254 training images.
# Number of classes
train['cell_type'].value_counts()

We have three different classes of cells, i.e., RBC, WBC and Platelets. Finally, let’s look at how an image with detected objects will look like:
fig = plt.figure()

#add axes to the image
ax = fig.add_axes([0,0,1,1])

# read and plot the image
image = plt.imread('images/1.jpg')
plt.imshow(image)

# iterating over the image for different objects
for _,row in train[train.image_names == "1.jpg"].iterrows():
    xmin = row.xmin
    xmax = row.xmax
    ymin = row.ymin
    ymax = row.ymax

    width = xmax - xmin
    height = ymax - ymin

    # assign different color to different classes of objects
    if row.cell_type == 'RBC':
        edgecolor = 'r'
        ax.annotate('RBC', xy=(xmax-40,ymin+20))
    elif row.cell_type == 'WBC':
        edgecolor = 'b'
        ax.annotate('WBC', xy=(xmax-40,ymin+20))
    elif row.cell_type == 'Platelets':
        edgecolor = 'g'
        ax.annotate('Platelets', xy=(xmax-40,ymin+20))

    # add bounding boxes to the image
    rect = patches.Rectangle((xmin,ymin), width, height, edgecolor = edgecolor, facecolor = 'none')

    ax.add_patch(rect)

This is what a training example looks like. We have the different classes and their corresponding bounding boxes. Let’s now train our model on these images. We will be using the keras_frcnn library to train our model as well as to get predictions on the test images.
Implementing Faster R-CNN
For implementing the Faster R-CNN algorithm, we will be following the steps mentioned in this Github repository. So as the first step, make sure you clone this repository. Open a new terminal window and type the following to do this:
git clone https://github.com/kbardool/keras-frcnn.git
Move the train_images and test_images folder, as well as the train.csv file, to the cloned repository. In order to train the model on a new dataset, the format of the input should be:
filepath,x1,y1,x2,y2,class_name
where,
- filepath is the path of the training image
- x1 is the xmin coordinate for bounding box
- y1 is the ymin coordinate for bounding box
- x2 is the xmax coordinate for bounding box
- y2 is the ymax coordinate for bounding box
- class_name is the name of the class in that bounding box
We need to convert the .csv format into a .txt file which will have the same format as described above. Make a new dataframe, fill all the values as per the format into that dataframe, and then save it as a .txt file.
Code
data = pd.DataFrame()
data['format'] = train['image_names']

# as the images are in train_images folder, add train_images before the image name
for i in range(data.shape[0]):
    data['format'][i] = 'train_images/' + data['format'][i]

# add xmin, ymin, xmax, ymax and class as per the format required
for i in range(data.shape[0]):
    data['format'][i] = data['format'][i] + ',' + str(train['xmin'][i]) + ',' + str(train['ymin'][i]) + ',' + str(train['xmax'][i]) + ',' + str(train['ymax'][i]) + ',' + train['cell_type'][i]

data.to_csv('annotate.txt', header=None, index=None, sep=' ')
What’s next?
Training Model
Train our model! We will be using the train_frcnn.py file to train the model.
cd keras-frcnn
python train_frcnn.py -o simple -p annotate.txt

It will take a while to train the model due to the size of the data. If possible, you can use a GPU to make the training phase faster. You can also try to reduce the number of epochs as an alternate option. To change the number of epochs, go to the train_frcnn.py file in the cloned repository and change the num_epochs parameter accordingly.
Every time the model sees an improvement, the weights of that particular epoch will be saved in the same directory as “model_frcnn.hdf5”. These weights will be used when we make predictions on the test set.
It might take a lot of time to train the model and get the weights, depending on the configuration of your machine. I suggest using the weights I’ve got after training the model for around 500 epochs. You can download these weights from here. Ensure you save these weights in the cloned repository.
So our model has been trained and the weights are set. It’s prediction time! Keras_frcnn makes the predictions for the new images and saves them in a new folder. We just have to make two changes in the test_frcnn.py file to save the images:
- Remove the comment from the last line of this file:
cv2.imwrite(‘./results_imgs/{}.png’.format(idx),img) - Add comments on the second last and third last line of this file:
# cv2.imshow(‘img’, img)
# cv2.waitKey(0)
Let’s make the predictions for the new images:
python test_frcnn.py -p test_images
Finally, the images with the detected objects will be saved in the “results_imgs” folder. Below are a few examples of the predictions I got after implementing Faster R-CNN:
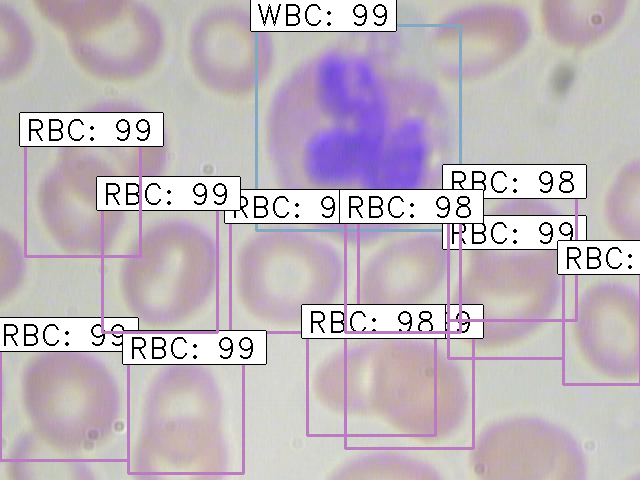
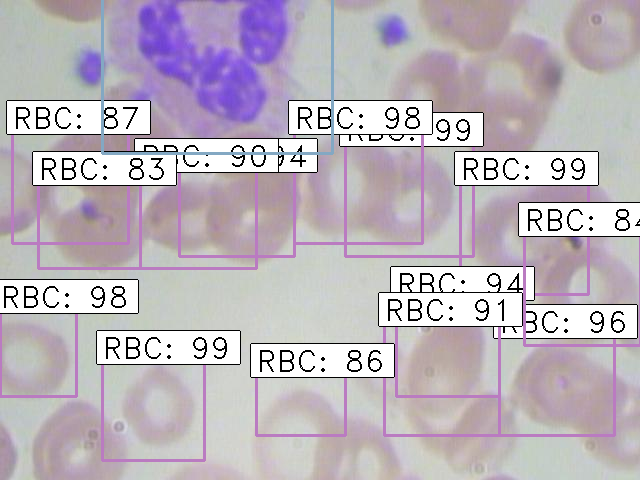
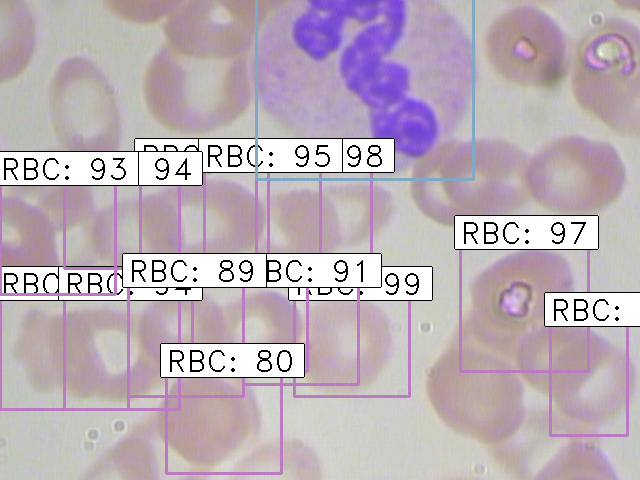
Conclusion
R-CNN algorithms have truly been a game-changer for object detection tasks. There has suddenly been a spike in recent years in the amount of computer vision applications being created, and R-CNN is at the heart of most of them.
Keras_frcnn proved to be an excellent library for object detection, and in the next article of this series, we will focus on more advanced techniques like YOLO, SSD, etc.
If you have any query or suggestions regarding what we covered here, feel free to post them in the comments section below and I will be happy to connect with you!
FAQs
Q1. What is the use of faster R-CNN?
Faster R-CNN is a deep learning model that detects objects in images. It is used in self-driving cars, security systems, medical imaging, and robotics.
Faster R-CNN works by first identifying regions of interest (ROIs) in an image. The ROIs are then passed to a second network, which classifies the objects in each ROI and predicts their bounding boxes.
Q2. What is fast R-CNN vs faster R-CNN?
Faster R-CNN is an improved version of Fast R-CNN for object detection. It is faster because it uses a region proposal network (RPN) to generate ROIs directly from the feature maps of the CNN.
Computer Visiondeep learningfaster rcnnimplementationkerasobject detectionobject detection algorithmspython
Pulkit Sharma
01 Jul, 2024
My research interests lies in the field of Machine Learning and Deep Learning. Possess an enthusiasm for learning new skills and technologies.


Thanks for article. Most of object detection algorithms fail if size of object to be detected is very small and with varying size. For example detection of small cracks on metal surface. What is your view on this? Any advice and best possible approach?
Hi, I believe Faster RCNN works good enough for small objects as well. Currently, I am working on YOLO and SSD and will share my learnings on how they deal with small objects.
Hey Pulkit, I am a Freshman at UIUC studying CS and one of my projects is in the same domain. Would it be possible to connect with you and talk more about this?
Hi Vishnu, You can ask any query related to this project here. I will try my best to respond to them.
The dataset that you have provided, it doesn't correspond with your example. Can you provide the right source?
Hi Toni, The original dataset is available on GitHub, link for the same is provided in the article. I have made some changes in that dataset and have mentioned the changes as well. You just have to convert the dataset in csv format.
I am having issues reading the data which is in .rec format
Hi Saurabh, You can convert the coordinates to csv format and then read it in python.
Hi, Thanks for this tutorial ! Do you have installed the last package of tensorflow here ? Thanks Laurent cESARO
Hi, Yes, I have the latest version of Tensorflow. You can install the latest version too.
Very well documented all your learnings, thanks for sharing. Keep it going, all the best.
Thank You!
Hi, I'm wondering if it's possible to load existing weights from a pre-trained model such as Imagenet? Also how does the faster RCNN model compare to the Mask-RCNN model? Cheers Michael
Hi Michael, We can use weights from any of the model which is trained for object detection. Faster RCNN predicts the bounding box coordinates whereas, Mask RCNN is used for pixel-wise predictions. So, it totally depends on the type of problem that you want to solve. In my opinion, both of these algorithms are good and can be used depending on the type of problem in hand.
Hi Pulkit, Can you please also share the config file generated after training the model? Test_frcnn is looking for config file as well.
Hi Shilpa, You can download the config file from this link.
Thanks for the article. I am a beginner in ML / DS field. Can I use this code to detect the Region of Interest (ROI) from Glaucoma images?
Hi Sonal, Yes, you can use this for your own dataset as well. You just have to make a .txt file in the same format as I have used.
Thank you Pulkit. It is working finally. Thanks for all your help.
Hi , Thanks for the article. I am not able to train model on tensorflow-gpu. I get error "ValueError: Shape must be rank 1 but is rank 0 for 'bn_conv1_7/Reshape_4' (op: 'Reshape') with input shapes: [1,1,1,64], []." Keras version on server : 2.2.4 Tensorflow version on server: 1.11.0 The training works fine without any issues on cpu machine. Please help.
Hi Hareesh, I have used the following version of Keras and Tensorflow: Keras - 2.2.0 Tensorflow - 1.8.0 And the codes run smoothly without any error.
I met the same problem as yours. After I use Keras – 2.2.0 and Tensorflow – 1.8.0, the problem is fixed.
Bug in Keras 2.2.4, this works until Keras 2.2.2 it seems https://github.com/keras-team/keras/issues/10382
Hi Hareesh, Did you manage to get it to run on Keras 2.2.4 ? I am facing the same issue. I have Keras 2.2.4 and Tensorflow 1.13. I can downgrade Keras to 2.2.0, but I am unable to compile Tensorflow 1.8.0 from the source code. So backtracking is not possible for me. How did you solve the issue ?
How do we know when to stop training? For very small object detections any parameters to tune? Any anchor sizes, RPN to change? Thanks
Hi, You can make a validation set from the training data and if the validation accuracy stops to increase or if it starts to decrease, you can say that the model is overfitting and you can stop the training at that point. Regarding the hyperparameter tuning, you can always try different set of hyperparameters to check whether they improve the model performance. There is no clear-cut answer to what hyperparameters should be used. You always have to try a range of hyperparameters and select the one which gives highest performance. Same goes with anchor sizes and RPN.
Thanks !!
Hi , Can you tell us how did you arrive at the img_channel_mean, classifier_regr_std values and whats is the need of it? # image channel-wise mean to subtract self.img_channel_mean = [103.939, 116.779, 123.68] # scaling the stdev Similarly for self.classifier_regr_std = [8.0, 8.0, 4.0, 4.0]
Hi Hareesh, These are the pre-processing steps which make the training faster. These are used to normalize the data. The values are taken by the people who have created the keras_frcnn library. They must have done experiments using different values and found this set as the best. You can try to change these values as well.
>>>train_images: Images that we will be using to train the model. We have the classes and the actual bounding boxes for each class in this folder. test_images: Images in this folder will be used to make predictions using the trained model. This set is missing the classes and the bounding boxes for these classes. train.csv: Contains the name, class and bounding box coordinates for each image. There can be multiple rows for one image as a single image can have more than one object. >>> Even tough you have provided the code to convert xml to csv, I'm not sure if I have reliably run it and I have a valid data. Can you please provide the exact data set with the exact train/test ratio so I can get results results identical to yours?
Hi Asad, Once you have the complete csv file, you can divide it randomly in a ratio of say 70:30 (train:test) or 80:20 or any other ratio you want. Then you will have two different csv files, say train.csv and test.csv. Finally, for the images in train.csv, put them in train folder and images in test.csv file should be copied to test folder. Then you can run the model.
import os, sys, random import xml.etree.ElementTree as ET from glob import glob import pandas as pd from shutil import copyfile import pandas as pd annotations = glob('*.xml') df = pd.DataFrame(columns=['prev_filename', 'filename', 'cell_type','xmin', 'xmax', 'ymin', 'ymax']) cnt = 0 for file in annotations: prev_filename = file.split('/')[-1].split('.')[0] + '.jpg' filename = str(cnt) + '.jpg' row = [] parsedXML = ET.parse(file) for node in parsedXML.getroot().iter('object'): blood_cells = node.find('name').text xmin = int(node.find('bndbox/xmin').text) xmax = int(node.find('bndbox/xmax').text) ymin = int(node.find('bndbox/ymin').text) ymax = int(node.find('bndbox/ymax').text) row = [prev_filename, filename, blood_cells, xmin, xmax,ymin, ymax] df=df.append({'prev_filename':prev_filename,'filename':filename,'cell_type':blood_cells,'xmin':xmin, 'xmax':xmax, 'ymin':ymin, 'ymax':ymax},ignore_index=True) cnt += 1 #data = pd.DataFrame(df, columns=['prev_filename', 'filename', 'cell_type', #'xmin', 'xmax', 'ymin', 'ymax']) #data[['filename', 'cell_type', 'xmin', 'xmax', 'ymin', 'ymax']].to_csv('blood_cell_detection.csv', index=False) df.to_csv('blood_cell_detection.csv', index=False)
Hi Pulkit, The command ran : python test_frcnn.py -p test_images successfully , but did not detect any bounding boxes in the image. Can you please suggest what is wrong ? Thanks, Pankaj
Hi Pankaj, Make sure you have used the weights provided in the article. Or else you can train your model again and then make predictions for test_images.
Hi! Great article! About weights that you make available, you know what the loss, the accuracy, time of the treining and you hardware that you used ? Thank you !
Hi Otavio, The overall loss when I trained the model was around 2.3 The model was trained for more than 2 hours for 1000 epochs and I was using a GPU with 12 cores and 16 GB RAM
Hi! Great Article! How I load your weights for training more epochs? Thanks
Hi Otavio, I think you have to retrain the model from the beginning. I am not aware of how to use the model weights and then start training on top of them. I will search for it and will let you know if any solution is found.
When I am running the code: python3 train_frcnn.py -o simple -p annotate3.txt; following error is coming: Using TensorFlow backend. Traceback (most recent call last): File "train_frcnn.py", line 15, in from keras_frcnn import config, data_generators ModuleNotFoundError: No module named 'keras_frcnn' Also showing 'keras_frcnn' is not available when trying to install/import it explicitly.
Hi Tanuj, You are getting this error because it might be possible that you have not cloned the keras_frcnn GitHub repository. You have to clone this repository before running the script.
Hi sir, thank you for this article, pleas can i apply this code on facial component detection?
Hi, Yes! You can apply this algorithm for facial component detection. For that you first have to train your model on facial components. Weights used in this model will not help in detecting facial components as this model is trained on different dataset. So, first train your model on facial components and then you can use those weights to detect facial components in new set of images.
Hi Pulkit - thanks for this - great article. I wanted to understand if the training set can be extended. I wanted to train some of the classes from the "Luminoth" library - would that be possible - where can I add the extra class labels? Thanks.
Hi Jyoti, You can make changes in the csv file. You can add classes in them and then pass those labels while training the model.
Dear Mr.Pulkit Thanks for your tutorial. I'm working on develop my own data set. I already move the train_images and test_images folder, as well as the train.csv file, to the cloned repository. Then I use Labelimg to create a train.csv, and then I convert it in to .txt Something like this: /train_images/100.jpg,202,397,311,507,defect /train_images/100.jpg,547,390,690,504,defect However, there are a problem when I run command: Parsing annotation files Traceback (most recent call last): File "train_frcnn.py", line 79, in all_imgs, classes_count, class_mapping = get_data(options.train_path) File "C:\Users\USER\Documents\Objectdetection\keras-frcnn\keras_frcnn\simple_parser.py", line 37, in get_data (rows,cols) = img.shape[:2] AttributeError: 'NoneType' object has no attribute 'shape' Can you recommend some solutions, If it possible, may I email to send you some photos about this problems. Thanks.
Dear Mr. PULKIT Can you recommend solutions for this problem: Parsing annotation files Traceback (most recent call last): File "train_frcnn.py", line 79, in all_imgs, classes_count, class_mapping = get_data(options.train_path) File "C:\Users\USER\Documents\Objectdetection\keras-frcnn\keras_frcnn\simple_parser.py", line 37, in get_data (rows,cols) = img.shape[:2] AttributeError: 'NoneType' object has no attribute 'shape' Thank you
Hey pulkit, I ran this for epoch length=100 and epoch =5 still i am not getting any output at least some wrong output should be there. dont know the reason why?
Hi Aaditya, Make sure you are giving the correct bounding box coordinates for their corresponding images while training the model. If you give incorrect coordinates, you will not get results. So, I would suggest before passing the coordinates and images for training, first plot some images with their corresponding bounding boxes and check whether the data is in correct form.
Hi and thanks for the tutorial. I have a problem with bounding box detection in python. I use this tutorial on Stanford cars dataset. http://ai.stanford.edu/~jkrause/cars/car_dataset.html I provide train_annotate.txt and it runs successfully on a few epochs with loss value of 2. it's natural because of the small number of epochs. but when I run test_frcnn.py on the test_images folder it saves pictures with no bounding box. I expected at least a wrong bounding box appear on pictures. would you please help me? thank you. and my other question is, how can i evaluate the accuracy of the trained model on test set? here is the test log for 5 test picture: physical GPU (device: 0, name: GeForce GTX 1060, pci bus id: 0000:01:00.0, compute capability: 6.1) 000001.jpg Elapsed time = 6.0193772315979 [] 000146.jpg Elapsed time = 1.3050158023834229 [] 000150.jpg Elapsed time = 1.2876217365264893 [] 000160.jpg Elapsed time = 0.6831655502319336 [] 000162.jpg Elapsed time = 0.76279616355896 []
Hi Sajjad, Make sure that the training and testing images have similar shape, also you have done similar pre-processing on these images. If the distribution of train and test images is different, you will not get fair results. Also, try to run the model for more number of epochs so that it can learn the patterns and can become better. Regarding your other question, you can evaluate the performance of model on test images only if you have the true labels for the test images, i.e. the class of the objects and their actual bounding boxes. If you do not have these values, you will not be able to evaluate the model on test images.
Hi Pulkit, I have two questions to ask 1. During training, we are only training on one image at a time if I understood the code correctly right. So if I have to say train on 2500 training images then to complete one epoch in one go, then I have to set `epoch_length=2500`. 2. Could you please explain the outputs losses `rpn_cls` and `rpn_reg`? I know they are related to RPN output predictions. What I got from the code that we are generating ground truth for RPN using numpy operations and comparing RPN network output and training. But why is it actually required? 3. What exactly is metric bounding box accuracy? Could you explain in more detail. 4. Also for me all the 4 losses are not going down simultaneously, all of them are like really fluctuating. I am using VGG-16, Any suggestions on that
Hi Shivangi, 1. 1 epoch is when we have gone through all the images once. So, epoch_length has nothing to do with the training images. 2. The overall loss is calculated based on these losses. Here, one loss is for classification and other for regression. rpn_cls will tell us how accurately we have classified the correct class for the identified object and rpn_reg will tell how accurate our bounding boxes are. 3. It is similar to rmse, not exactly same but conveys the similar message. It tells us how accurate our predicted bounding boxes are. 4. The losses can fluctuate. Ideally they all should be synced but practically when we implement things, there can be fluctuations. Hope this helps!!
Hey, Pulkit, thanks for your article. Can you guide me on how to annotate the images with bounding box?? I am confused with this part?? plzz help me.. Thanks
Hi, You have to manually annotate the images if you are using a new dataset. Or else, you can look for open source datasets which have their corresponding bounding boxes.
Thanks.I want to know how to set GPU config.
Hi, Refer to this link.
Hello ! First of all, thanks you for this amazing tuto. I am having just a little problem : Using the weights you provided ( my PC is way too slow for getting good ones myself) as well as the option file, when i use test_frcnn.py the labels on WBC and RBC are inverted. The cells themselfs are very-well recognised, it is just that every single WBC is labelled as RBC and every single RBC is labelled as WBC ... Any idea of what may have caused than ?
Hi Martin, Can you please share the screenshot of some of the results that you are getting? That would help me to clarify your doubt in a better way.
Please can you teach me how to use use VOC pascal dataset? i have downloaded the dataset but its not in path/x1,y1,x2,y2,class_name format.
Hi saadiq, You have to convert the format of the data to use this library. You can do some coding or search online how to convert the VOC pascal dataset. Or else share the format of your data and I will look for solution.
train_frcnn.py -o simple -p annotate.txt File "", line 1 train_frcnn.py -o simple -p annotate.txt ^ SyntaxError: invalid syntax Im running it through IPython console, I dont understand why it isnt working
Hi Karl, You have to use the following code:
python train_frcnn.py -o simple -p annotate.txtGo to the directory where the train_frcnn.py file is and run the above line of code.Hello, I am landing up to this error, i have my train_images folder and train.csv file inside keras-frcnn folder and i am trying to use %run from Jupyter, could you please help on this. Parsing annotation files --------------------------------------------------------------------------- AttributeError Traceback (most recent call last) ~\Image_Processing\Object_Detection\keras-frcnn\train_frcnn.py in () 77 C.base_net_weights = nn.get_weight_path() 78 ---> 79 all_imgs, classes_count, class_mapping = get_data(options.train_path) 80 81 if 'bg' not in classes_count: ~\Image_Processing\Object_Detection\keras-frcnn\keras_frcnn\simple_parser.py in get_data(input_path) 35 36 img = cv2.imread(filename) ---> 37 (rows,cols) = img.shape[:2] 38 all_imgs[filename]['filepath'] = filename 39 all_imgs[filename]['width'] = cols AttributeError: 'NoneType' object has no attribute 'shape'
Hi Sayak, Open the train_frcnn.py and check the filename that you are giving. Currently it is not able to go to the images folder. Try to edit the filename, i.e. the path of the images.
When I got this error it ended up being an issue with the file path being incorrect relative to where you were running the script from. Go into your txt file that has all the file paths and x/y values and make sure the relative path is correct.
Do you have the config.pickle of your model trained? It is needed for testing.
Hi Leonardo, You can download the config.pickle file from this link.
Can we use the same algorithm for detecting text in images? Do you have any resources on end-to-end text recognition from images?
Hi Ravi, I have not yet worked on text recognition project. If I find any relevant resource, I will share it with you.
Hi pulkit, First of all thanks for you blog post on object detection, i trained 40 images (my own dataset) on 100 epochs , but when i passed test images it doesn't recognize any of given images means it didn't recognize bounding boxes around images at least wrong prediction is expected but no bounding boxes are detected, i have resized test images in same manner as i did for train images. I have no clue what is happening, so can you please check what is the problem?
Hi Abhijit, It might be possible that the training dataset is small that's why the model is not able to understand the signals. Also, make sure you are providing the correct bounding boxes while training. Try to plot few images with their corresponding bounding boxes to make sure that the notations are correct.
Hi Pulkit basically i am working on a protect which is based on detection of worker working in industry and the camera will detect that person who is not wearing jacket or helmet etc and ve are doing it on vedio based i have presented the idea to include yolo pattern in detection faculty said me to use any other pattern do not use yolo so please tell me which pattern will be better and best.
the approach used here is it yolo v1,v2 ?
Hi Omkar, I have implemented Faster R-CNN in this article.
hi pulkit, great one ! can a localization of object can be done if there is no cell name field in dataset ? i need to generate bounding boxes for object present in an image....
Hi, How can I calculate the mAP, IoU and other performances of the algorithm? Thank you
thanks for the great content. I had this doubt: I want the prediction only for one class i.e. I want only one bounding box in my output image. Also I want to the coordinates of the bounding box i.e., I want the model to output the top right, top left, bottom left and bottom right coordinates. I will be more than delighted if u will help me.
hey there, tutorial was amazing but can you help me to generate each layer wise output and feature maps at the end of each layer (same way we see in simple CNN- layer wise results and feature map). any other way to see output of each faster rcnn layer?
Hello, First of all you have amazing articles on this domain. Just wanted to know if you have already updated articles on SSD, YOLO and Retinanet or any other updates on Obj Detection ?
Hi pulkit , I am getting below error AttributeError: 'NoneType' object has no attribute 'shape' and my input file format is exactly the same can u plz help me with this issue.
Can we train different object with the same code
Hi Sidharth, Yes! you can train this model for different objects as well. You just have to change the annotation file.
How can we check the accuracy of the model at last ?
Hello I am getting in simple parser.py in line 37 has attribute error please help me to solve this
As you have described the format of file used for training like filepath , xmin xmax y min y max and so on can you please tell the format of the output files being created and does and does it includes acuuracy or confidence my doubt is suppose one test image contains more than 1 class to be predicted than what can be the expected format for output file. Will it contain prediction xmin , xmax y min ymax of all classes found in the test image or just any single most dominating class's xmin ,xmax ymin ymax and if this is true how to access these values along with confidence like score for each prediction .?
Hi Pulkit, I'm very interesting with your article. I want to create a food detection object with my own dataset. Would you please to share again the link about how to create your own dataset? I cannot find your previous shared. Many Thanks
kindly guide me the where is train.xml files....?? i cant find them i have train.idx file train.rec file but cant find train.xml file kindly help me
Hi Rabiya, The xml files are in the BCCD - Annotations folder of this repository.
Thanks for your sharing. However, when I test images, there is no bounding-box appearing. Number of epochs I trained is 20. How can I print out on terminal screen class name, probability, width and height of bounding box of each image I train ?
Hey! Pulkit, Which model are you using in this project?either it is VGG16 or resnet. Like I am planning to use thermal dataset for human detection do you think faster rcnn will work?
Hi Pulkit, I trained the model on different objects but not getting any results. Can you please help me on this, Elapsed time = 8.996999979019165 [] 000000001.jpg Elapsed time = 5.723998308181763 [] 000000002.jpg Elapsed time = 5.910001039505005 []
Hi,Pulkit I am using google colab for implementing and running the code.i have mounted the github repo to my drive and cloned it to colab. My annotations.txt file is also correct But while running !python3 '/content/drive/My Drive/keras-frcnn-master/train_frcnn.py' -o simple -p '/content/annotate.txt' its showing error Using TensorFlow backend. Parsing annotation files Traceback (most recent call last): File "/content/drive/My Drive/keras-frcnn-master/train_frcnn.py", line 79, in all_imgs, classes_count, class_mapping = get_data(options.train_path) File "/content/drive/My Drive/keras-frcnn-master/keras_frcnn/simple_parser.py", line 37, in get_data (rows,cols) = img.shape[:2] AttributeError: 'NoneType' object has no attribute 'shape' Can you please help me with this?
Hi Pulkit, Thank you very much for your tutorial series on deep learning. It is really very helpful for a beginner like me. Slowly I am trying to grasp the concepts and meanwhile when I was executing training model on my system, I got following error : ValueError: Shape must be rank 1 but is rank 0 for 'bn_conv1/Reshape_4' (op: 'Reshape') with input shapes: [1,1,1,64], [] Can you please help me in understanding this error and guide me what can I do to fix the same ? Thanks in advance.
Have you fine-tuned the whole resnet50 model or set the intial layers to not trainable? And what learning rate have you used? What anchor box sizes and ratios you have used? Based on what information have you chose them? Have you used validation data or not to decide best model? If not, how did you chose your best model?(keras faster rcnn does not use validation data, right?)
Hey pulkit, I trained my own model using the codes for thermal images.I am getting the output but false predictions are also coming.How to resolve it? can you please help me with it
Hi Rishabh, You can try to increase the number of epochs and let the model learn more features. This might help to improve the model performance.
Hello thanks for the article. I have 2 urgent questions please. what the number of "overlapping bounding boxes" represent? would it be better to get it higher or lower. second question is there a specific total loss at which it is good to stop training ? Thanks again for the amazing article
kindly guide me in the demo code i cant show any image in the last its giving this error Image data cannot be converted to float what show i do?? kindly reply on my 4email [email protected]
hey pulkit, I wanted to ask about what is getting saved in config.pickle file and where are the parameters such a learning rate in the code?
Hi Pulkit, thanks for the article! As for measure_map.py in the github project you linked, do you have any insight in how to set the score thresholds for the predictions?
Hi Pulkit, Thanks for the article. I set it up and ran it over a dataset of my own. It trained well and test went fantastic. So, my question is .. what configuration should i change to reduce the detection threshold. Challenge is, I have let's say 90 objects in the image but the test is detecting about 70 very accurately with confidence of 99 and 100.(and it's correct too) but rest of the elements it's not even detecting.(which my guess is, getting cut off somehow due to accuracy threshold/cutoff). The whole exercise has be a great learning, so looking forward to complete it well. Thanks in advance.
Could you public your's model trained, images_train and images_test. Thks in advance.
Hello P Sharma, Please what is the best total loss target for faster rcnn training? In your experiment you obtained more than 2 as the total loss. Please what is the minimum threshold?
Hi, i'm trying to run test_frcnn.py with the config.pickle that you provided, but my results are empty, the model not detect any bounding box. Can you help me?, i have already check that i'm giving the correct config file, i really dont know what is the problem
Hi Pulkit, My machine configuration is intel core i5-7200U, RAM: 4 GB. Is it possible to train this model as well as test this model using my machine? If possible then how much time will it take? Any idea!? Thanks in advance
Hey Pulkit, When i am running the code of measure_map.py -o simple -p measure.txt. measure.txt is my annotation file for testing images but it is showing error Traceback (most recent call last): File "measure_map.py", line 271, in t, p = get_map(all_dets, img_data['bboxes'], (fx, fy)) File "measure_map.py", line 66, in get_map if not gt_box['bbox_matched'] and not gt_box['difficult']: KeyError: 'difficult' Can you please help me resolve it?
Hey pulkit, I am getting eerror when i am running measure_map.py Traceback (most recent call last): File "measure_map.py", line 271, in t, p = get_map(all_dets, img_data['bboxes'], (fx, fy)) File "measure_map.py", line 66, in get_map if not gt_box['bbox_matched'] and not gt_box['difficult']: KeyError: 'difficult' can you please help me with it
Hi just some friendly feedback - I notice that it seems a majority of your readers, including me, cannot proceed since the tutorial lacks precise instructions on how you converted the .xml to the correct .csv format. Unfortunately the code in the comment section doesn't work properly. It generates an inconsistent dataframe. I'd kindly suggest updating your post with the exact and precise instructions you used for this conversion process, otherwise a majority of your readers will simply abandon this page like I have before even reaching the tutorial part.
Hi Pulkit ! Thanks for your sharing ! I copy your code and run. But I have a problem that when the "training" starts , it tells me the ETA is 28 HOURS ! .It too long ,when the epoch is 2000 , the training time is a VERY HUGE number.(I use the Tesla T4 GPU).I dont know how long is your training time? Is my setting is wrong ? Or I need to use more faster GPU ? Please tell me what should I do to short the training time. Or could you share the training result to me? Thank you so much!🙏
Hi, You can try to reduce the number of epochs to reduce the training time or you can try a faster version of GPU to train your model. Also, if you want to use the pre-trained weights of the models that I have trained, you can download them (link for these weights have been provided in the article). I got those weights after training the model for 500 epochs.
Hi Pulkit! Thanks for your amazing post! Can I use this implementation of frcnn, for grayscale images? If so, how should I modify the code? Thank you so much!
Extremely helpful article. The way in which it was structured made the comprehension very easy. Well, I am looking to analyze helically shaped nano-sized propellers(cork-screw shaped structures) from an image obtained from a microscope. So my main aim is to do the image processing of the images obtained from the microscope. Will you please guide about the way I should proceed for implementing this.
I have trained FRCNN for my dataset and config file has been created but when I test the model it is not giving bounding boxes on images can you please identify the reason? Given that I have used 10 epochs each of 100 iterations
Hey, Pulkit. This was a great tutorial. I am trying to apply this code to a Gray-scale data set, what part of the code must I change to move forward with the training.
Hi Pulkit, Can we train the above model for tumor detection using bounding boxes? But in a tumor image, we have one or two patches of tumor which is to be detected. The color of tumor varies in each image. How can we do that?
Hi, You can use this for detecting tumor. For that you will require the labeled images first. Once you have the labeled images, i.e. you know the bounding boxes for all the tumor, you can train the model. Once the model is trained, you can use that trained model and make predictions for new images.
Thank s for the wonderful article! I tried it and it worked well Now could you please guide me how to run this on AMD GPUs (is it possible to run the same code or some modifications should be needed)? Thanks in Advance!
Hi, Glad you found it helpful. These codes are written to run on both GPU and CPU. I myself trained the model on GPU. So, you can go ahead and train the model on GPU. You won't have to change anything in the codes.
Would this object detection algorithm work if the images has objects with a resolution of about 6x6 or 10x10 pixels?
Hi, Generally, Faster R-CNN works well enough while dealing with even small objects. But I can not confirm whether it will work well or not as I have not tried it myself for detecting small objects. So, I would suggest that you try it on images having smaller objects and share your insights here which will be helpful for the community.
Hi Pulkit , when I run the model in epoch 36/100 I receive the following exception error: "Exception: a must be non-empty". i've run this model on eight pictures (in TIF). the model ran for up to 35/1000 and then started throwing this exception. while, the other day i ran the same model with only 4 pictures (in PNG) and no exceptions where thrown. How is this possible, and would anyone have an idea what the reason would be. Thank you in advance for your help.
Hi Elie, The error that you are getting might be due to memory issues. These are some heavy codes and will require high RAM and GPU power.
Hi pulkit, I am training the model with objects of size 12*12 pixels. I am getting output will lesser number of bounding boxes than expected. what changes should I make in the config file?
Pulkit, Thank you for the amazing script. I will tuning and applying the algorithm towards my microscopy images. However I have some quesitons: Would you happen to know why running the CMD command lines for train and test frnn.py ( I checked everything is right) does not provide any output and predicted images? It only outputs "running on Tensorflow Backends" so I assume it is working but It does not output my results. Thank you
Hey Pulkit First of all thank you for this wonderful article. I am training my model on google colab GPU. The issue of I am getting is its been 6 hours since model is training and it is still stuck on first epoch. Is it due to size of images it is taking that time. image size 1920*1080? Or there are some else reasons ? Am i approaching it correctly?
And also can we change the batch size if yes then how
Hi sir, I cant find the training set, test set, train,csv folders here. Can u give the source to find those folders. Thank you
Hi Abisha, The dataset is provided here.
Hi, i try to continue training with this command: python train_frcnn.py -o simple -p annotate.txt model_frcnn.hd5 with last weights of my last train but it's starting from begin like 1/2000 epochs
Hi, i try to continue training with this command: python train_frcnn.py -o simple -p annotate.txt model_frcnn.h5 which last weights of my last train but its starts train from begin, it writes 1/2000 epoch.. Is any solution to continue training? Thank you
Hi, first of all thank you for the content, my question is is there a way to continue training from where ever stopped? i tried python train_frcnn.py -o simple -p annotate.txt model_frcnn.hdf5 which is the last weights from last train run but it starts first epoch again..
Hi, how do we fine tune this model?
Hi there, I'm facing an error. would you please help me with that? keras_frcnn\train_frcnn.py in 9 import re 10 ---> 11 from keras import backend as K 12 from tensorflow.keras.optimizers import Adam, SGD, RMSprop 13 from keras.layers import Input ~\anaconda3\lib\site-packages\keras\__init__.py in 2 3 from . import activations ----> 4 from . import applications 5 from . import backend 6 from . import datasets ~\anaconda3\lib\site-packages\keras\applications\__init__.py in ----> 1 from .vgg16 import VGG16 2 from .vgg19 import VGG19 3 from .resnet50 import ResNet50 4 from .inception_v3 import InceptionV3 5 from .xception import Xception ~\anaconda3\lib\site-packages\keras\applications\vgg16.py in 12 import warnings 13 ---> 14 from ..models import Model 15 from ..layers import Flatten 16 from ..layers import Dense ~\anaconda3\lib\site-packages\keras\models.py in 12 from . import backend as K 13 from . import optimizers ---> 14 from . import layers as layer_module 15 from .utils.io_utils import ask_to_proceed_with_overwrite 16 from .engine.training import Model ~\anaconda3\lib\site-packages\keras\layers\__init__.py in 2 3 from ..utils.generic_utils import deserialize_keras_object ----> 4 from ..engine import Layer 5 from ..engine import Input 6 from ..engine import InputLayer ~\anaconda3\lib\site-packages\keras\engine\__init__.py in 6 from .topology import Layer 7 from .topology import get_source_inputs ----> 8 from .training import Model ~\anaconda3\lib\site-packages\keras\engine\training.py in 22 from .. import metrics as metrics_module 23 from ..utils.generic_utils import Progbar ---> 24 from .. import callbacks as cbks 25 from ..legacy import interfaces 26 ~\anaconda3\lib\site-packages\keras\callbacks.py in 23 if K.backend() == 'tensorflow': 24 import tensorflow as tf ---> 25 from tensorflow.contrib.tensorboard.plugins import projector 26 27 ModuleNotFoundError: No module named 'tensorflow.contrib'
hi my friend ; please, what version of TensorFlow, Keras, Cuda, cudnn , and python do you use? regards
Pulkit, I am getting the following error: (computervision) C:\Users\sjavadi\Desktop\rcnn-sorna\frcnn\keras-frcnn\train_images>python train_frcnn.py -o simple -p annotate.txt Using TensorFlow backend. C:\Users\sjavadi\computervision\lib\site-packages\tensorflow\python\framework\dtypes.py:519: FutureWarning: Passing (type, 1) or '1type' as a synonym of type is deprecated; in a future version of numpy, it will be understood as (type, (1,)) / '(1,)type'. _np_qint8 = np.dtype([("qint8", np.int8, 1)]) C:\Users\sjavadi\computervision\lib\site-packages\tensorflow\python\framework\dtypes.py:520: FutureWarning: Passing (type, 1) or '1type' as a synonym of type is deprecated; in a future version of numpy, it will be understood as (type, (1,)) / '(1,)type'. _np_quint8 = np.dtype([("quint8", np.uint8, 1)]) C:\Users\sjavadi\computervision\lib\site-packages\tensorflow\python\framework\dtypes.py:521: FutureWarning: Passing (type, 1) or '1type' as a synonym of type is deprecated; in a future version of numpy, it will be understood as (type, (1,)) / '(1,)type'. _np_qint16 = np.dtype([("qint16", np.int16, 1)]) C:\Users\sjavadi\computervision\lib\site-packages\tensorflow\python\framework\dtypes.py:522: FutureWarning: Passing (type, 1) or '1type' as a synonym of type is deprecated; in a future version of numpy, it will be understood as (type, (1,)) / '(1,)type'. _np_quint16 = np.dtype([("quint16", np.uint16, 1)]) C:\Users\sjavadi\computervision\lib\site-packages\tensorflow\python\framework\dtypes.py:523: FutureWarning: Passing (type, 1) or '1type' as a synonym of type is deprecated; in a future version of numpy, it will be understood as (type, (1,)) / '(1,)type'. _np_qint32 = np.dtype([("qint32", np.int32, 1)]) C:\Users\sjavadi\computervision\lib\site-packages\tensorflow\python\framework\dtypes.py:528: FutureWarning: Passing (type, 1) or '1type' as a synonym of type is deprecated; in a future version of numpy, it will be understood as (type, (1,)) / '(1,)type'. np_resource = np.dtype([("resource", np.ubyte, 1)]) Traceback (most recent call last): File "train_frcnn.py", line 84, in train_imgs, classes_count, class_mapping = get_data(options.train_path, 'trainval') TypeError: get_data() takes 1 positional argument but 2 were given any help is greatly appreciated
Greetings Pulkit, Thank you for the great course on object detection and for generously sharing your knowledge with us. I am facing this error after the completion of the first epoch. would you please help me solve it? the error is shown below: Exception: name 'mean_overlapping_boxes' is not defined Exception: index 5 is out of bounds for axis 0 with size 5 Exception: index 5 is out of bounds for axis 0 with size 5 Exception: index 5 is out of bounds for axis 0 with size 5 Exception: index 5 is out of bounds for axis 0 with size 5 The average number of overlapping bounding boxes from RPN = 14.8 for 5 previous iterations
Greetings Pulkit, Thank you for the great course on object detection and for generously sharing your knowledge with us. I am facing this error after the completion of the first epoch. would you please help me solve it? the error is shown below: xceptionE: name 'mean_overlapping_boxes' is not defined Exception: index 5 is out of bounds for axis 0 with size 5 Exception: index 5 is out of bounds for axis 0 with size 5 Exception: index 5 is out of bounds for axis 0 with size 5 Exception: index 5 is out of bounds for axis 0 with size 5 The average number of overlapping bounding boxes from RPN = 14.8 for 5 previous iterations
Greetings Pulkit, Thank you for the great course on object detection and for generously sharing your knowledge with us. I am facing this error after the completion of the first epoch. would you please help me solve it? the error is shown below: exceptionE: name 'mean_overlapping_boxes' is not defined Exception: index 5 is out of bounds for axis 0 with size 5 (epoch length = 5)
can you help in text detection and recognition for scenic images
Hello sir. I need to detect building roof with fast rcnn using this application. I already have my own dataset(train,validation,test) and annotations.json file. can you please help me? I'm tired of dealing with CNN for 1 year now.
Hi Sir, I was working on a similar project. Can you please share code how did you split the train images and test images? And how did you convert .csv file to text file with required format. Thank You.
Hello Pulkit! I am trying to train this model on a fire dataset but i am getting some errors with the libs. Seems that new versions appeared for keras and tensorflow. So, i will appreciate a lot if you can help me to solve this errors... Thank you! :D
Hello Pulkit! I have this error when tryinh to test pn a custom dataset. Can ypu please hep me with this :D. Thanks a lot! Traceback (most recent call last): File "/content/drive/MyDrive/keras-frcnn/train_frcnn.py", line 134, in classifier = nn.classifier(shared_layers, roi_input, C.num_rois, nb_classes=len(classes_count), trainable=True) File "/content/drive/MyDrive/keras-frcnn/keras_frcnn/vgg.py", line 109, in classifier out_roi_pool = RoiPoolingConv(pooling_regions, num_rois)([base_layers, input_rois]) File "/content/drive/MyDrive/keras-frcnn/keras_frcnn/RoiPoolingConv.py", line 30, in __init__ assert self.dim_ordering in {'tf', 'th'}, 'dim_ordering must be in {tf, th}' AssertionError: dim_ordering must be in {tf, th}
Hi Pulkit! i have this error when i am trying to train this model on a dataset.Do you think that can help me to fix it? thanks a lot! Constantin assert self.dim_ordering in {'tf', 'th'}, 'dim_ordering must be in {tf, th}' AssertionError: dim_ordering must be in {tf, th}
I am having issues with my bounding boxes for the train dataset, the object bounding box is off from the object of interest . I need help as I cannot proceed to training my model if this is not addressed.