Overview
- TensorFlow.js (deeplearn.js) enables us to build machine learning and deep learning models right in our browser without needing any complex installation steps
- There are two components to TensorFlow.js – Core API and Layers API.
- Learn how to build an awesome model that lets you classify images from your webcam using Tensorflow.js
Introduction
What’s your favourite tool to code machine learning models? This eternal question prompts all sorts of different answers from data scientists. Some prefer RStudio, others have a special affinity towards Jupyter Notebooks. I’m definitely in the latter category.
So, when I first came across TensorFlow.js (previously deeplearn.js), my mind was blown. Building a machine learning model in my browser? And using JavaScript? Sounded too good to be true!
More than 4.3 billion people use a web browser – around 55% of the world’s population. – Wikipedia (March 2019)
Not only has Google’s TensorFlow.js democratized machine learning for the masses by bringing it to the browser, But it is also the perfect gateway to machine learning for developers who work regularly with JavaScript.

Our web browsers are one of the most easily accessible platforms. And that’s why it makes sense to be able to build applications that are able to not only train machine learning models but are also able to “learn” or “transfer learn” in the browser itself.
In this article, we’ll first understand the importance of using TensorFlow.js and it’s different components. We’ll then deep dive straight into building our own machine learning model in the browser using TensorFlow.js. Then we will build an application that will detect your body pose using your computer’s webcam!
If you’re new to TensorFlow, you can learn more about it here:
- TensorFlow 101: Understanding Tensors and Graphs to get you Started with Deep Learning
- Introduction to Implementing Neural Networks using TensorFlow
Table of Contents
- Why should you use TensorFlow.js?
- Image classification in your Browser using a Webcam
- Features of TensorFlow.js
- Understanding Machine Learning in the Browser
- Core API: Working with Tensors
- Layers API: Building Models like Keras
- Utilizing Google’s Pre-Trained Models: PoseNet
1. Why should you use TensorFlow.js?
I’ll answer this question using a unique approach. I won’t delve into the theoretical aspect of TensorFlow.js and list down pointers on why it’s such an incredible tool.
Instead, I will simply show you what you will miss out on if you do not use TensorFlow.js. So, let’s build an application to classify images using your webcam in under 5 minutes. That’s right – we will jump right into the code!
And here’s the best part – you do not need to install anything to do this! Just a text editor and a web browser is enough. The below video shows the application we’ll be building:
 How cool is that? I literally built that in a matter of minutes in my browser. So let’s look at the steps and code to help you build your own image classification model in your web browser.
Building an Image Classification Model in your Browser using a Webcam
- Open a text editor of your choice and create a file index.html. Save the following code in this file:
- Next, create another file index.js and write the following code in it:
- Save both the files and open your index.html file in a browser like Google Chrome or Mozilla Firefox. That’s it! You have now created an app that can classify images in real-time using your webcam in the browser itself! Here is how it looks like on my computer:
Key points to note in this example:
- In the above example, we used a pre-trained image classification model called MobileNet
- We used ml5.js, a library built on top of TensorFlow.js, to load the MobileNet model into our browser and perform inference on the video feed
- We also leveraged the P5.js library to process the video feed and display labels on the video itself
I love the fact that we didn’t need to install anything in our machine. This example should work on any modern system irrespective of whether it is Linux, Windows or MacOS – this is the power of building models on the web using JavaScript.
Now, let’s see the awesome features TensorFlow.js provides and how you can utilize them for deploying machine learning models in your browser.
Features of TensorFlow.js
TensorFlow.js is a library for developing and training ML models in JavaScript, and deploying in the browser or on Node.js.
TensorFlow.js offers a plethora of features to leverage and play around with.
It is an extension of TensorFlow in JavaScript, the programming language behind the logic of almost every website, browser or application that we use on the internet. JavaScript is as versatile as Python so using it to develop machine learning models gives us a lot of advantages:
- It is easier to deploy ML models if they are written in the language of the web.
- Since JavaScript is supported by all major browsers, you can use it ubiquitously without worrying about the type of platform or other compatibility issues. The same will be true for your users.
- TensorFlow.js is a client-side library that means it trains or runs ML models in the user’s browser itself. This mitigates any concerns related to the privacy of data.
- Running real-time inferencing on your client gives makes your application more interactive as they can immediately respond to user inputs (like the webcam app we built earlier).

Deploying with TensorFlow.js is a lot easier than the conventional approach
TensorFlow.js provides the below major functionalities in its current form:
- Machine learning in the browser: You can create and train ML models in the browser using TensorFlow.js
- Google’s pre-trained models: TensorFlow.js comes with a suite of pre-trained models by Google for tasks ranging from object detection, image segmentation, speech recognition, text toxicity classification, etc.
- Transfer learning: You can perform transfer learning by re-training parts of already trained models, like MobileNet in TensorFlow.js
- Deploy your python model: Models trained in Keras or TensorFlow can be easily imported into the browser/ deployed using TensorFlow.js
In this article, we will focus on the first two features. We’ll discuss transfer learning and deploying our model in Python in the second part of this series (coming soon!).
Machine Learning in the Browser
TensorFlow.js provides two ways to train models (quite similar to what TensorFlow does):
- The first approach is to define your model using low-level tensor operations using the Core API
- The second method is to define a model using the Layers API, similar to Keras
Let’s understand both the approaches through the lens of a few examples. After all, the best way to learn a concept is by putting it into practice!
First, set up your HTML file:
Create a new index.html file in your computer and write the following code in it:
We have created a basic HTML page and loaded Tensorflow.js (line 7) from a cloud URL.
A note about installing TensorFlow.js (deeplearn.js)
Since TensorFlow.js is made for the browser, the easiest method to install and use TensorFlow.js is to not install it at all. You can simply load it from a URL in your HTML.
What if you want to work locally? Well, you can actually use TensorFlow.js inside Jupyter Notebook like you normally do in case of Python or R. There’s a solution in this for everyone!
This local approach is slightly longer and takes time so we won’t be using it in this article. If you do want to learn how to do it, you can start by installing ijavascript kernel for Jupyter. Here is a screenshot of how it looks in my Jupyter notebook:

Now, the recommended approach to use TensorFlow.js is to load it directly by using the official URL of the library. You just have to add the following line to your HTML file:
<script src="https://cdn.jsdelivr.net/npm/@tensorflow/[email protected]/dist/tf.min.js"></script>
And done! It really is that straightforward.
Core API: Working with Tensors
The Core API is very similar to the TensorFlow Core where we can define models using low-level tensor operations and linear algebra.
This is very useful if we want to build custom models or want to build neural networks from scratch. Let’s take up an example of working with tensors in the browser.
Start by adding the below code between the <script></script> tags in your index.html file:
const a = tf.tensor([1, 2, 3, 4]);
const b = tf.tensor([10, 20, 30, 40]);
const y = a.add(b); // equivalent to tf.add(a, b)
const z = a.mul(b);
y.print();
z.print();
The <script> tags basically denote JavaScript. Anything we write between these tags would be executed as JavaScript code. Here is how your index.html should look now:
In the above code, we are performing basic addition and multiplication operations on two tensors a and b and printing the result in the browser. Now, go to your terminal, open your project folder, and start a Python server by using the below command:
python3 -m http.server
Then go to your browser and open the following address:
http://localhost:8000/
Once you see a page saying “Tensorflow.js Core API”, open the console using the keys Ctrl+Shift+I. This should work on both Chrome and Firefox. We get the output of the above operations in the console:

If you want to read more about Core API in depth, then I recommend going through the official CoreAPI documentation.
Layers API: Building models like Keras
The Layers API is very similar to Keras in Python. Just like Keras, you can create a model using both sequential and functional approaches.
Let’s take a closer look at the sequential approach through an example. We will train a regression model on these data points:

Here, X and Y have a linear relationship – each Y is corresponding to X + i (where i is 0, 1, 2, 3…n+1). Let’s train a basic regression model on this dataset. You can write the following code between the <script></script> tags in your index.html file:
The keen-eyed among you must have noticed how the above syntax is very similar to the Keras syntax for building a sequential model in Python. We’ll get the prediction when we go back to our browser console.

Our simple regression model predicts 7.556, which is very close to the expected value of 8. This was a basic example but we can clearly see how easy and useful it is to build machine learning models straight in our browser itself.
TensorFlow.js is capable of building both machine learning and deep learning models in the browser. It also automatically takes advantage of the power of GPU(s), if available in your system during model training.
Here are a few examples of deep learning models trained using TensorFlow.js on some standard datasets:

You can explore these examples in the tfjs-examples repository.
Utilizing Google’s Pretrained models: PoseNet
TensorFlow.js provides tons of pretrained models from Google for many useful tasks like object detection, voice recognition, image segmentation etc. The advantage of pre-trained models is that we can use them without any major dependencies or installation and right out of the box.
Google is widely expected to add even more models in the coming months. You can take a look at the available pre-trained models here:
https://www.tensorflow.org/js/models

Tensorflow.js comes with a lot of pre-trained models from Google
We will work with PoseNet in this article. PoseNet is a vision model that can be used to estimate the pose of a person in an image or video by estimating where key body joints are located.
How does PoseNet work?
This is a fascinating concept. Pose estimation refers to computer vision techniques that detect human figures in images and videos. This helps us determine, for example, where someone’s elbow shows up in an image.
Just to be clear – pose estimation is not about recognizing who is in an image. The algorithm is simply estimating where key body joints are located.
The key points detected are indexed by “Part” and “ID”, with a confidence score between 0.0 and 1.0 (1.0 being the highest.

Keypoints detected in PoseNet
Here is an example of the kind of output PoseNet gives:

Incredible, right?! We will be using the ml5.js library in order to work with PoseNet. ml5.js is a library built on top of TensorFlow.js along with p5.js, another library that makes it easier to access the webcam in the browser.
ml5.js aims to make machine learning approachable for a broad audience of artists, creative coders, and students. The library provides access to machine learning algorithms and models in the browser with a simple syntax, building on top of TensorFlow.js.
For example, you can create an image classification model with MobileNet using ml5.js in under 5 lines of code like this:

It’s this simplicity of Ml5.js that makes it so good for quick prototyping in the browser and that is why we are also using it for our project.
Let’s get back to PoseNet. Create a new file index.html and add the below code:
This will create a basic HTML web page and load the necessary files:
- ml5.js and p5.js are loaded through their official URL
- posenet.js is the file where we will write code for working with PoseNet
Now, we will write JavaScript code for working with PoseNet. Create a new file posenet.js in the same folder as index.html. Here are the steps needed to make this work:
- Load the PoseNet model and capture video from your webcam
- Detect key points in body joints
- Display the detected body joints
- Draw the estimated skeleton of the body
Let’s start with step 1.
Step 1: Load the PoseNet model and capture video from your webcam
We will load PoseNet using ml5.js. At the same time, p5.js enables us to capture video from webcam using just a few lines of code:
The most important things to note in the above code block are:
- createCapture(VIDEO): It is a p5.js function that is used to create a video element by capturing video through the webcam
- ml5.poseNet(video, modelRead): We use ml5.js to load the PoseNet mode. By passing in the video, we are telling the model to work on video input
- poseNet.on(): This function is executed whenever a new pose is detected
- modelReady(): When PoseNet is finished loading, we call this function to display the model’s status
Step 2: Detect key points in body joints
The next step is to detect the poses. You might have noticed in the previous step that we are saving every detected pose in the poses variable by calling poseNet.on(). This function runs in the background continuously. Whenever a new pose is found, it gives the location of body joints in the following format:

- ‘score’ refers to the confidence of the model
- ‘part’ denotes the body joint/key point that is detected
- ‘position’ contains the x and y position of the detected part
We do not have to write code for this part since it is automatically generated.
Step 3: Display the detected body joints
We know the detected body joints and their x and y location. Now, we just need to draw them over the video to display the detected body joints. We’ve seen that PoseNet gives us a list of body joints detected with a confidence score for each joint and its x and y locations.
We will use a threshold value of 20% (keypoint.score > 0.2) confidence score in order to draw a key point. Here is the code to do this:
Step 4: Draw the estimated skeleton of the body
Along with the key points or body joints, PoseNet also detects the estimated skeleton of the body. We can use the poses variable to draw the skeleton:
Here, we looped over the detected skeleton and created lines joining the key points. The code is fairly straightforward again.
Now, the last step is to call the drawSkeleton() and drawKeypoints() functions repeatedly along with the video feed that we are capturing from the webcam. We can do that using the draw() function of p5.js which is called directly after setup() and executes repeatedly:
Next, go to your terminal window, into your project folder, and start a Python server:
python3 -m http.server
Then go to your browser and open the following address:
http://localhost:8000/

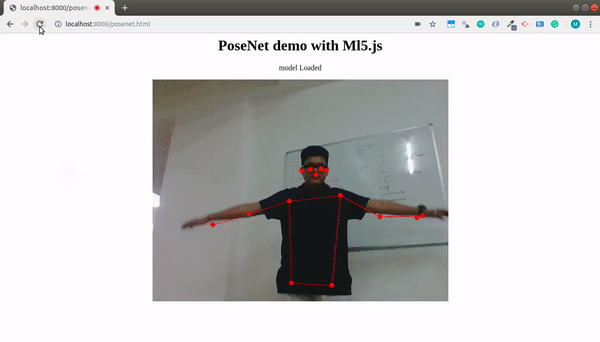
Voila! Your PoseNet should be nicely detecting your body pose (if you have followed all the steps correctly). Here is how my model looks:
End Notes
You can see why I love TensorFlow.js. It is incredibly effective and doesn’t even require you to worry about complex installation steps while building your models.
TensorFlow.js shows a lot of promise for making machine learning more accessible by bringing it to the browser. And at the same time, it has advantages like data privacy, interactivity etc. This combination makes it a very powerful tool to keep in a data scientist’s toolbox, especially if you want to deploy your machine learning applications.
In the next article, we will explore how to apply transfer learning in the browser and deploy your machine learning or deep learning models using TensorFlow.js.
The project that we did with PoseNet can be taken even further to build a pose recognition application by just training another classifier over it. I encourage you to go ahead and try that! Post in the comments below if you have built something interesting 🙂
All the code for this article is available on Github.
deeplearn.jsGoogle TensorflowJavaScriptmachine learning deploymentmachine learning in browserMobileNetobject recognitionPose DetectionPoseNetTensorFlow.js
[email protected] Sanad
27 Aug, 2021
A computer science graduate, I have previously worked as a Research Assistant at the University of Southern California(USC-ICT) where I employed NLP and ML to make better virtual STEM mentors. My research interests include using AI and its allied fields of NLP and Computer Vision for tackling real-world problems.


Couldnt find the code for index.js , in this page nor in github. Could u please post that code as well, so that i can try
Hey Shinu, Please try this link - https://gist.github.com/mohdsanadzakirizvi/ce95bcb560eeae899ff6852fda8757a6
Amazing post, thanks for sharing.
Hey Anna, Glad you found this article helpful!
Nice article but when I try this it gives me a DOM exception and posenet model never loads.
Hey Sagar, I didn't face that error, could you please write steps to re-create the error?
I saw this exact tutorial first on youtube channel "coding train". :)
This is a great piece! Well done. I wonder if there's a way to run PoseNet on videos or pics from my PC instead of the webcam input. How would that be? Thanks, A.
Very clear instruction. Thanks Let's see if i can put this on an ESP32 cam :-)
unable to start the camera on browser it is asking for permission even after i allow the browser it does not pick it up. Need some help here
Can you use an image classification model to work on face recognition with a created dataset using tensorflow.js? Thank you.
The post is soo much amazing and helpful. I have a question, that is, if I want deploy a trained keras model as an API to web application designed in html and javascript. Then I used this method i-e 'Tensorflow.js" or the method of REST API etc in which web application is written in FLASK etc? I am confused in both methods. Can you please clear?